Ten amazing Medium Mods including a polypropylene air diversion, PVC camper guides, memory foam chair swap, toolbox camper steps, backup camera relocation, and more. Don’t miss the marine countertop salvage!

Welcome to the September 2017 Super Cup Monthly Mod Contest. Please review the following ten Medium Mods and vote for your favorite. We will announce the winner next week. If you’d like to enter mods into TCM’s Monthly Mod Contest, click here.
1. Mike Tassinari, Peabody, Massachusetts
Kitchen Storage Containers On Wall
2002 Ford F350
2016 Lance 1172
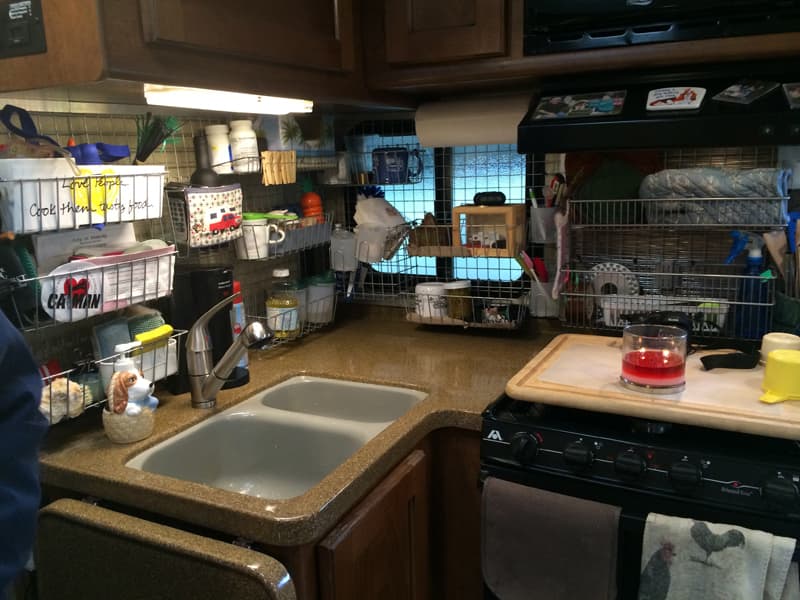
We did this modification so that I don’t have to put things away. It also keeps the counter space empty and provides more kitchen storage.
First, I measured the area for my storage containers. The wire rack backing comes as 24-inch by 30-inch pieces. I bought three of them for this modification. There are three physical sizes of the wire rack backing, so get the one that fits your set-up best.
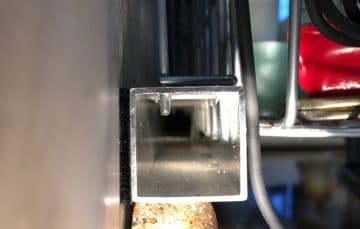
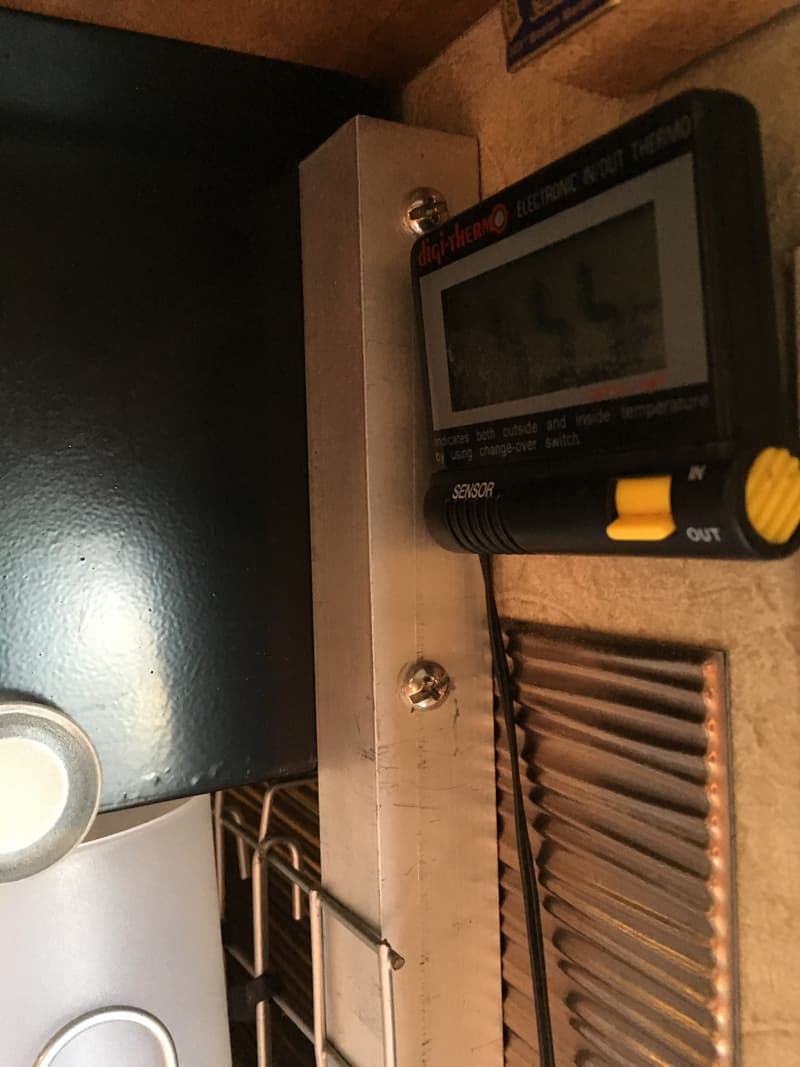
You can’t anchor anything to the walls because there is nothing to hold to, so I got 3/4-inch by 3/4-inch aluminum tubing. I put velcro on the bottom tubing and from the top I screwed down from the cabinets.
 |
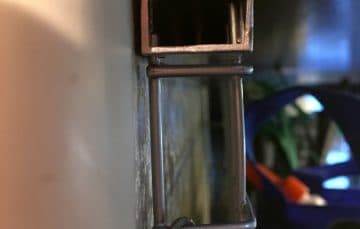 |
Above: Wire spoke attachments on the bottom (left) and top (right)
I had to drill a hole with the drill press for each one of the wire spokes on the rack and put it in the tubing. I pre-assembled this part in my shop with a side cutters. I had to get a couple and overlap them.
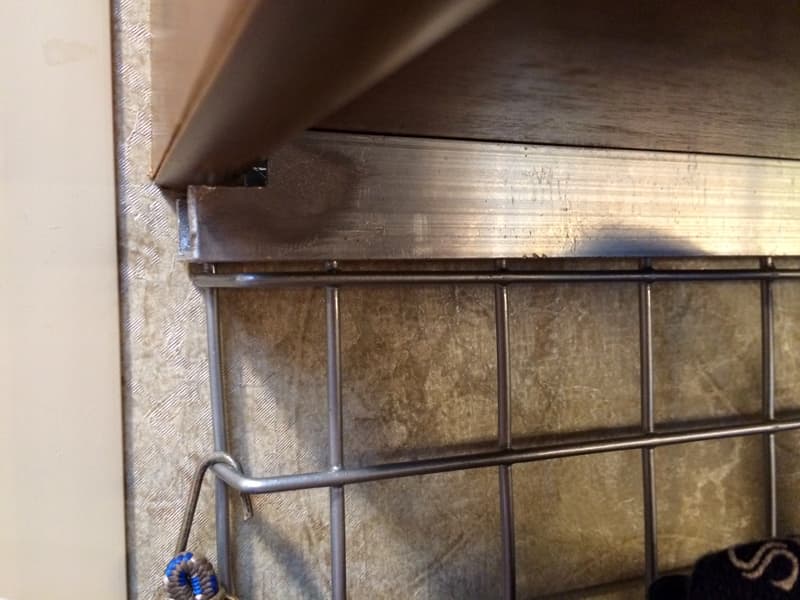
First, a 30-inch by 24-inch piece was cut to size, and then I cut to size a 12-inch by 24-inch piece to finish up the sink side.
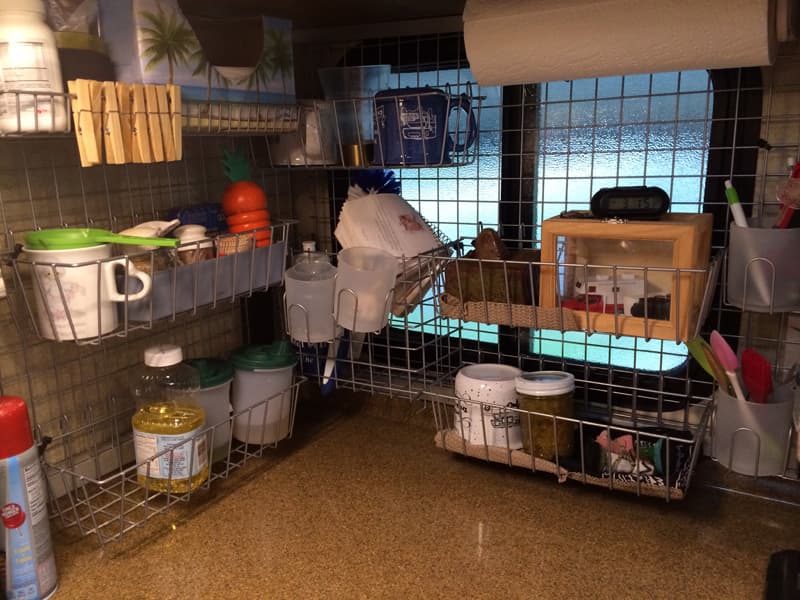
On the window/stove side we never use the kitchen window, so we bought a plastic film to put over the window for privacy. On the window/stove side I used a 24-inch by 30-inch cut to stop that end at the stove’s exhaust fan. On top of the stove, the aluminum bars had to be vertical. They are screwed into the sides of the range hood.
All of the components in this modification came from The Container Store. The baskets and hooks come with it. You can choose from deep and shallow baskets, long and short.
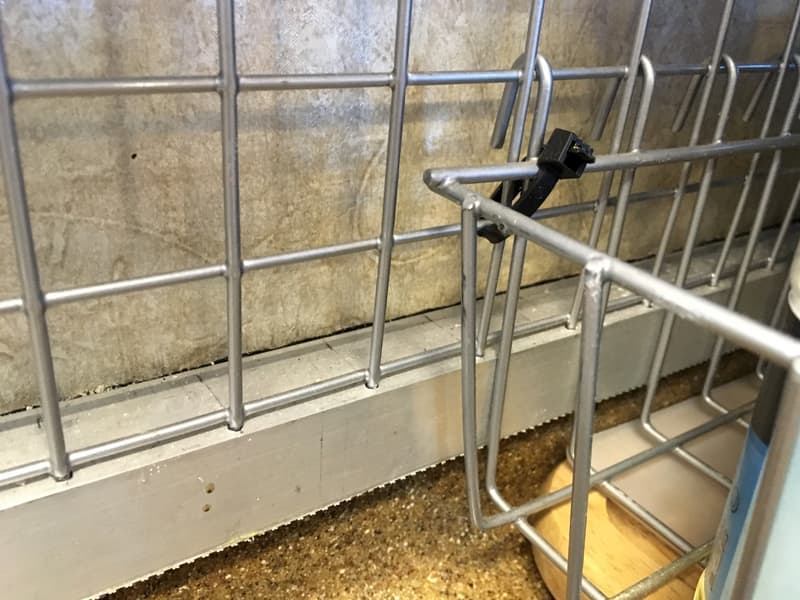
I have zip-tied them to the grid work so they don’t pop off while we drive. They did once in the past, and what a mess that was. Because of the grid wire racks, you can arrange the baskets as you want them arranged.
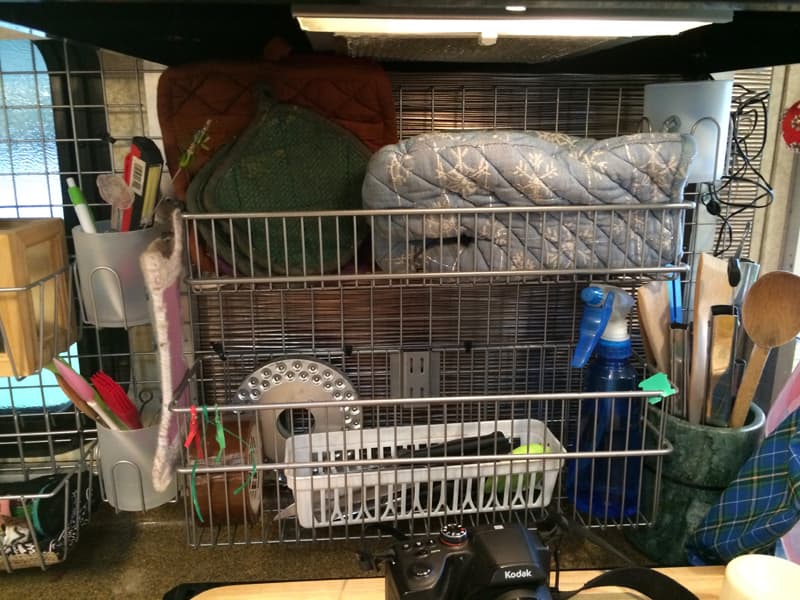
I keep everything in the containers all the time. Nothing ever pops out because I purchased the deep containers. Even the shallow one I have has never had anything come out.
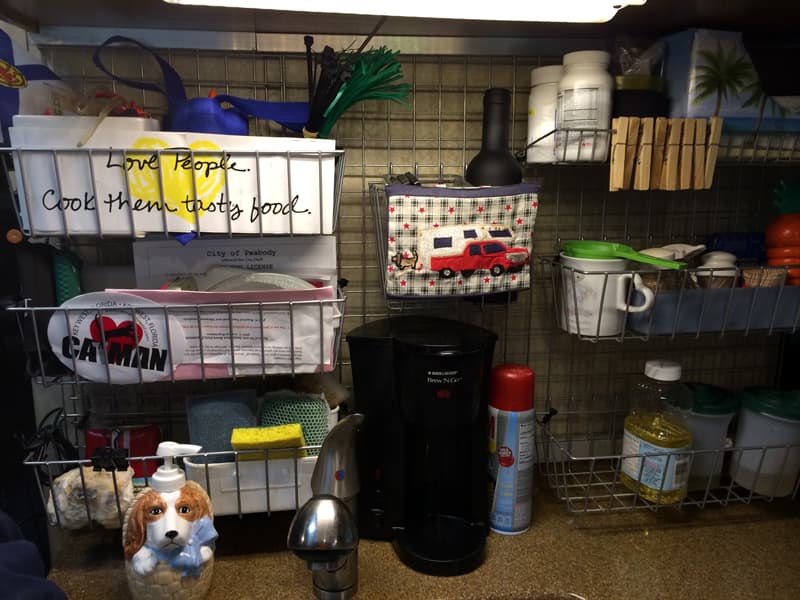
Here’s a tip. I first had them on the counter, but I raised them one inch so that I can clean under the storage bins. That has worked well.
It took me a full day complete this modification and cost me $175. In my opinion, the skill level of this modification is medium to hard. The hardest part is lining up the holes.
2. Rick and Cathy Johnson, Rockport, Texas
Booth To Chairs Dinette Transformation
2001 Ford F350
2007 Lance 915 Lite
We took our first truck camping trip last August and September. We traveled from south Texas to the inside passage of Alaska, which was 8,500 miles in eight and a half weeks. The dinette got increasingly uncomfortable by the day. When we got back, we decided to take action.
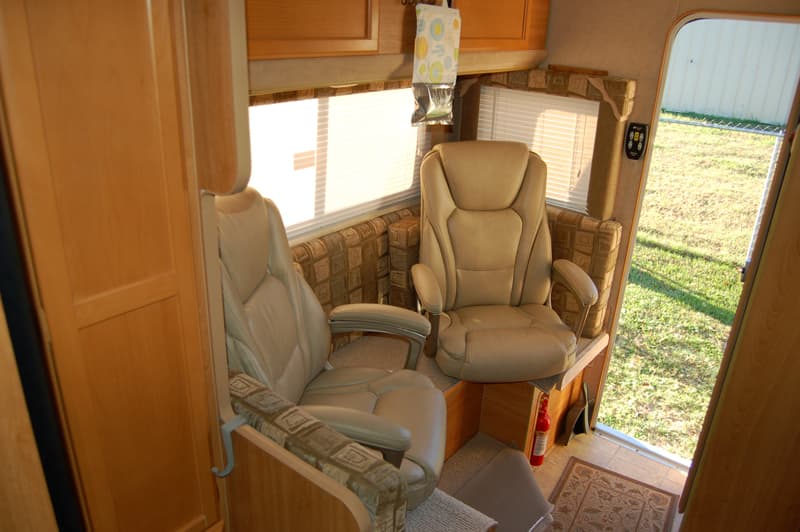
I removed the seat cushions, table, table support bracket, and all the aluminum guides for expanding the seat to make a bed. That way the remaining base was somewhat smooth and level. Then we purchased two Serta memory foam office chairs from Walmart and I assembled them without their bases.
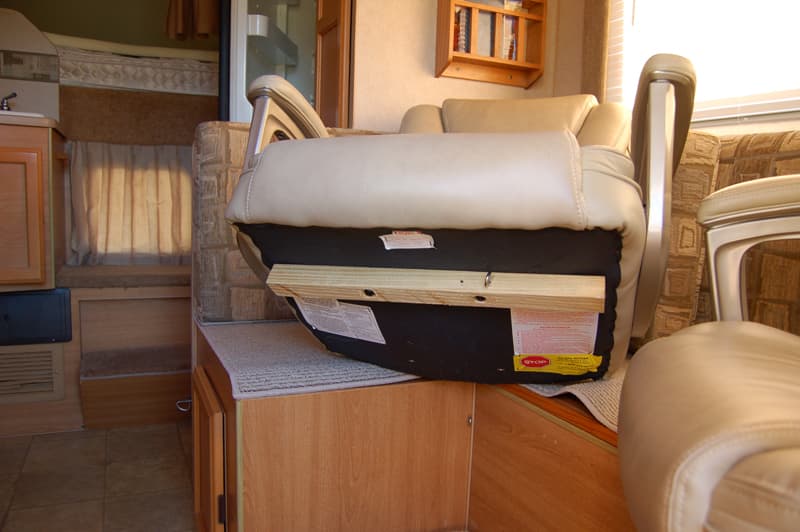
I cut a two-inch by two-inch board the width of the chairs and put a slight angle on the board so that it sits flat. Using the screws included with the chair, I attached the board to the bottom of the chair where the base would have attached. The chairs sit on the dinette base without any attachment so they can swivel slightly.
We tied the chairs down for travel with a bungee across the back and a small turnbuckle on the front. There have been no problems with this installation.
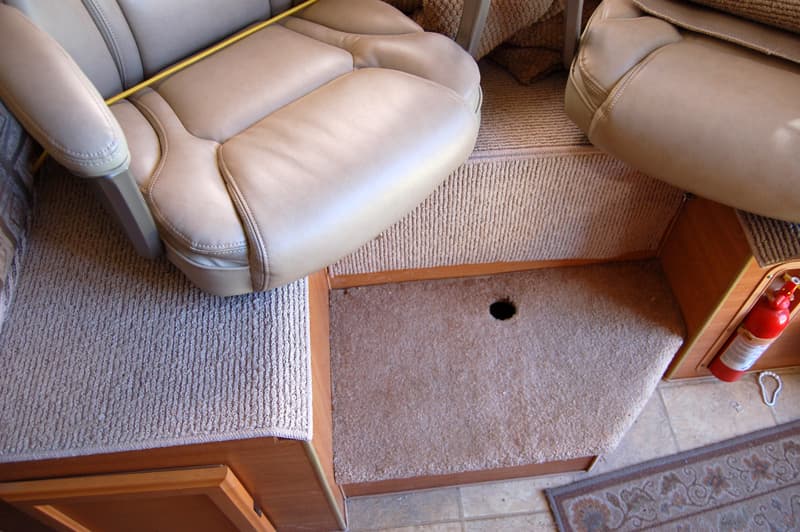
Above: They use bungee cords to keep them in place during travel
On our second truck camping trip we spent four weeks in the Texas Hill Country and Big Bend and drove 800 miles. The chairs were much more comfortable than the dinette but my wife decided that the foot well would be more comfortable if it was a bit higher.
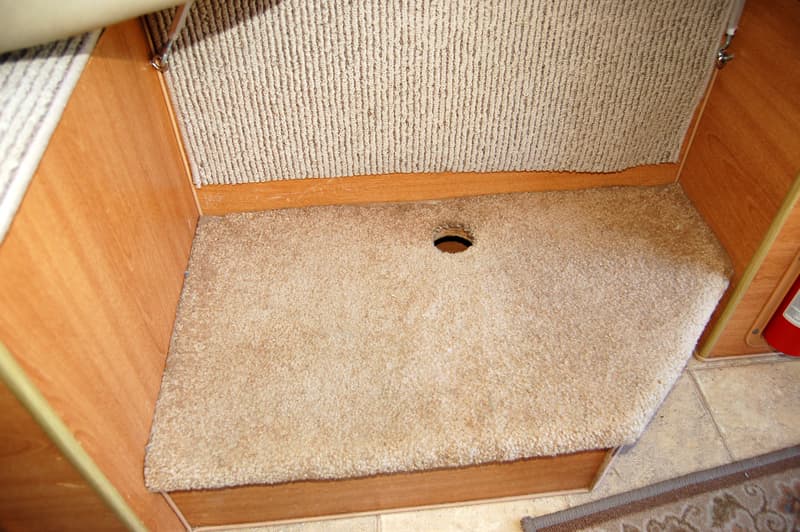
Above: Unmodified foot rest closeup
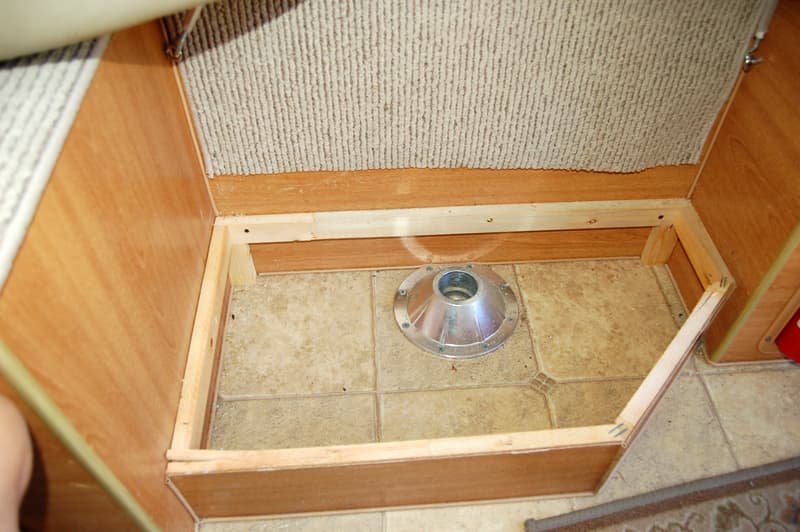
Above: This is what was under the foot rest
I removed the top of the foot rest and discovered what I suspected – a nice storage compartment. With storage being in short supply in a Lance 915, I decided this mod was worth pursuing.
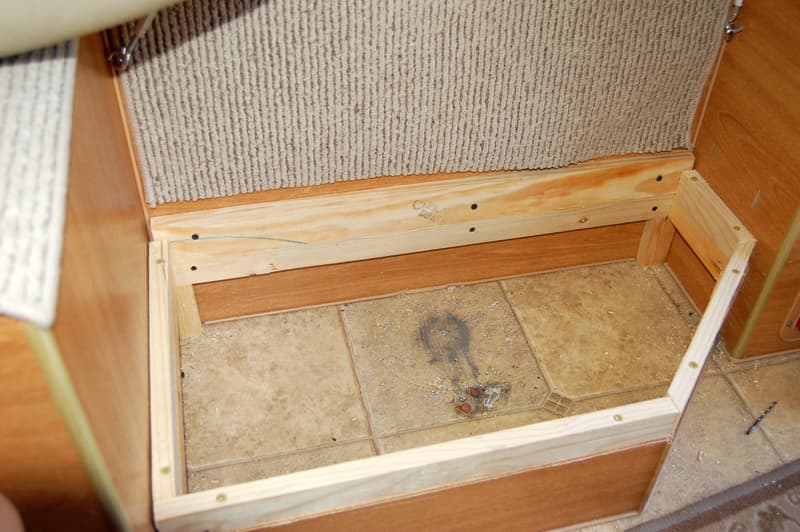
Above: Dinette foot rest on new extension
I extended the height of the box by screwing a one-inch by two-inch board to the top of the existing frame with 3-inch screws. I ripped a one-inch by four-inch board for the rear part of the frame to make it a half-inch taller.
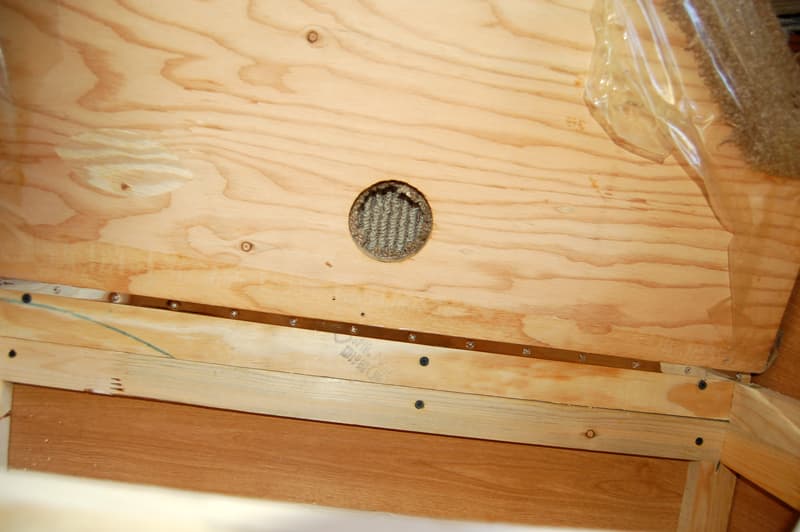
Above: Piano hinge on the rest top
I screwed a piano hinge to the foot rest top. Voilà, I now have a wine and beer cellar and my wife has her feet up where she wants them. Until truck camping trip number three to Nova Scotia, I won’t be sure that the height is perfect.
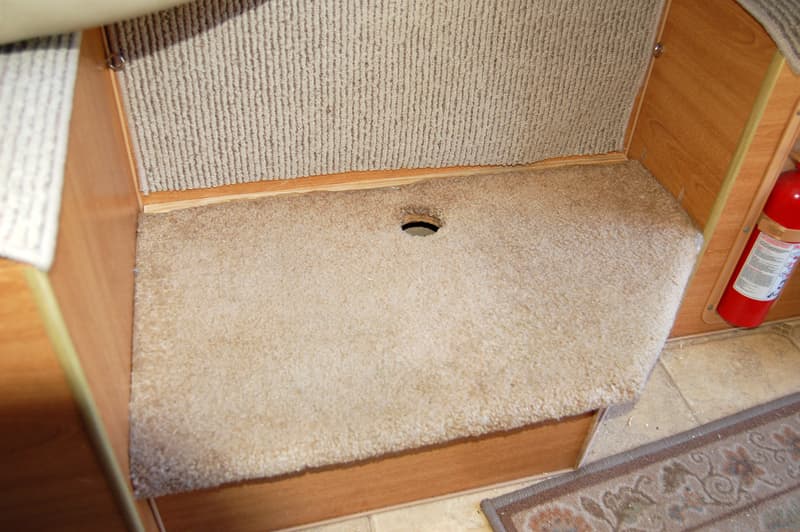
Above: The new foot rest is higher
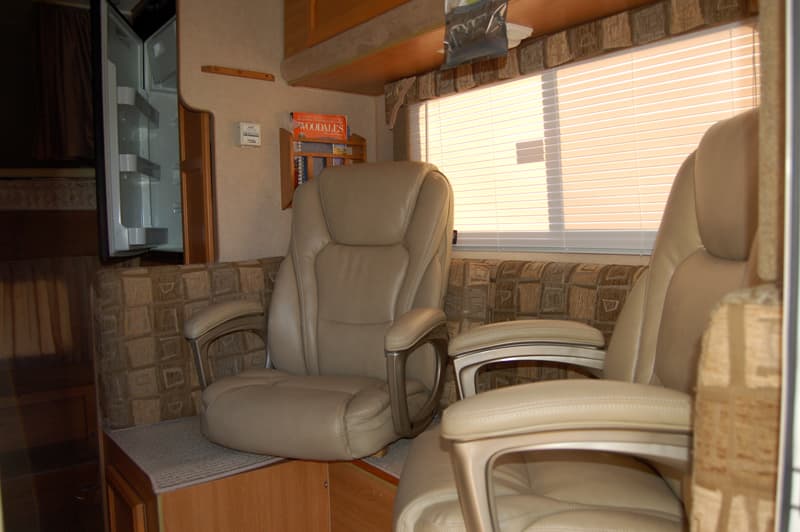
The chairs are much more comfortable than the dinette. Raising the foot rest improved the comfort and the extra storage is an added bonus. Eating on a lap tray is no problem and a laptop in the lap works out just fine for me. My wife puts a cushion under her iPad to raise it a little.
It took me 3.5-hours to complete this modification and cost me $280. In my opinion, the skill level of this modification is medium.
3. John Ambrosius, Crestview, Florida
Countertop Extension
2015 Ram 3500
2006 Lance 915
In our Lance 915, there was not enough counter space. We needed a place to prepare food, place washed dishes, etc. So, the old saying, “One man’s junk is another man’s treasure” came into play.
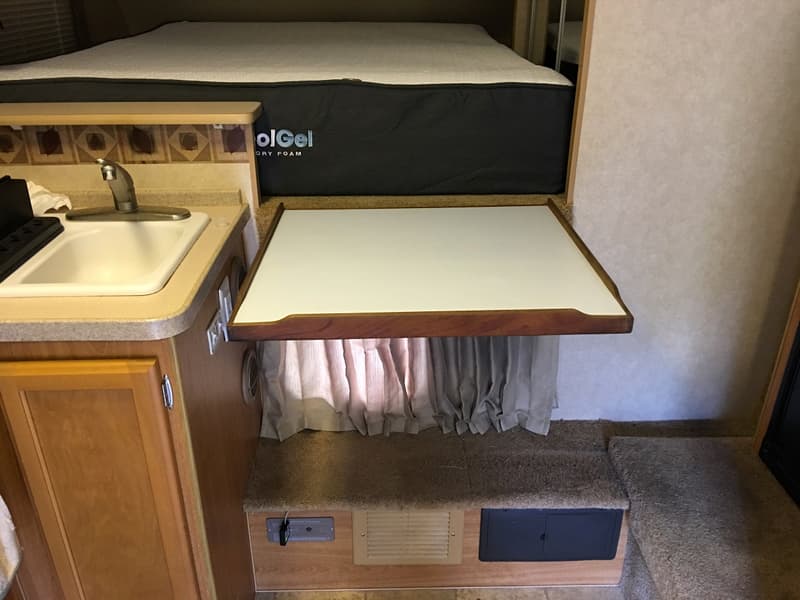
I ran across an old boat that was going to be scraped. Like any old pack rat, I took off all the cleats and a bunch of stainless screws. That’s when I saw the pot of gold – the table! As soon as I saw it, I immediately knew what to do with it. I took the table apart as this particular use could only use half of the table.
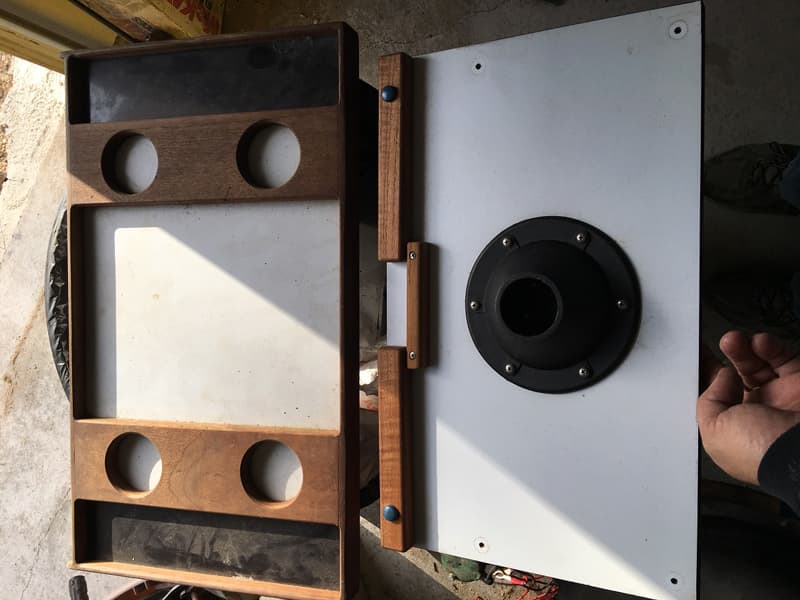
Above: The table and parts that he found on the old boat
I then ordered two folding brackets off eBay. After leveling the camper, I screwed the brackets to the camper. I made the new counter height the same as the one adjacent and allowed enough room to clear the outlet (and anything plugged into it, like a blender).
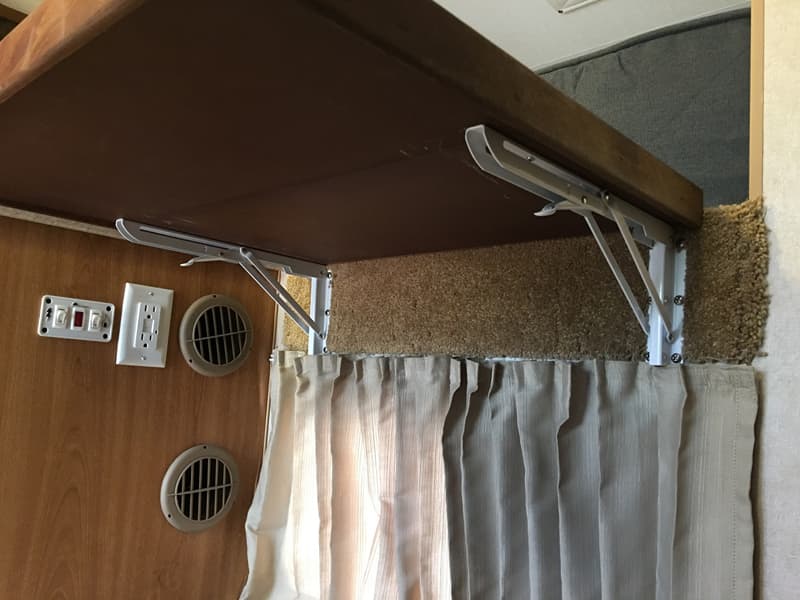
Above: The countertop brackets that were ordered off eBay
Note: I did have to lower the factory curtain one-inch. I then put in one screw on each bracket to the table. After lowering the table, I had to adjust one screw to make the table be plum in its down position (my OCD kicked in). Then I screwed in all the remaining screws into the table top. The table was an absolutely perfect fit!
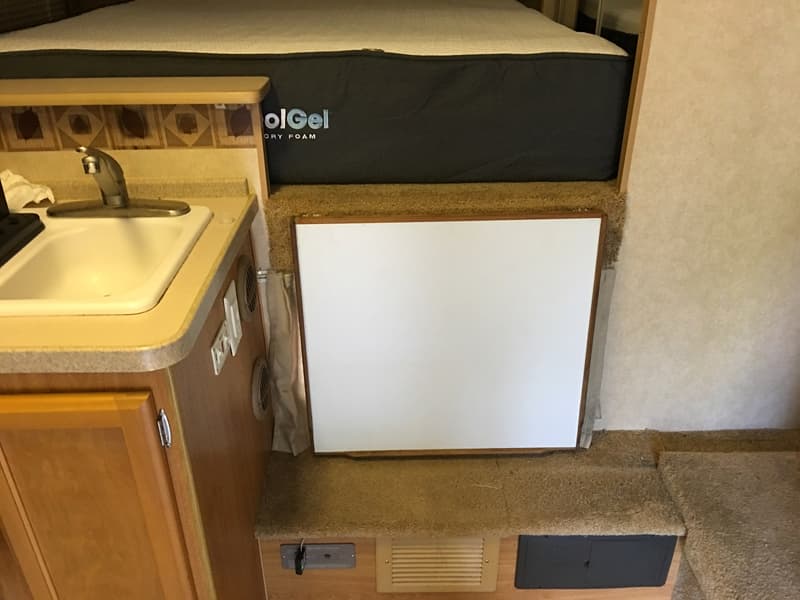
Above: In the down position it covers the window
We have doubled our counter space and, in the down position, it covers the window and blocks light for sleeping and/or privacy. Being the table is teak trimmed and mica, it can get wet without regard.
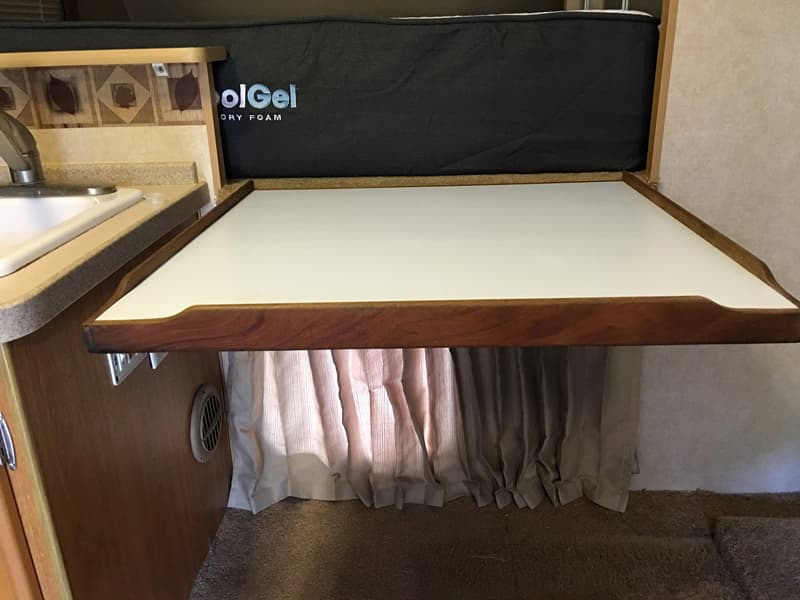
This mod has been a great improvement. It’s being used all the time. The brackets are amazingly solid and easy to lift up and down. Click here for an eBay link to the brackets.
It took me about one hour to complete this mod and cost me $15. In my opinion, the skill level of this modification is easy to medium as levels and hardware are involved.
4. Roch Nadon, Whitehorse, Yukon, Canada
Camper Guide Using PVC
2007 Toyota Tundra
2007 Okanagan 89WS
I have owned a camper three years now and it has been a blast so far! The main challenge has been to loading the camper in our truck bed. I have to do it many times per year since I use my truck for other tasks as a handy man.
I don’t have much space in the truck bed. There’s only one-inch between the wheels and the camper sides. Sometimes it goes well on the first try and sometimes it takes forever! So, this year I decided to install a guide. I made something simple to use, simple to build, and simple to install.
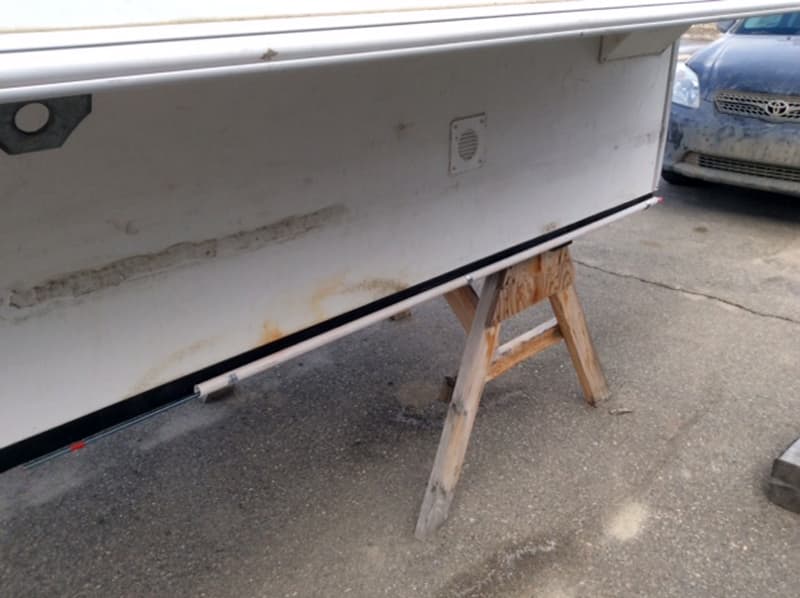
One part of the guide is made of half-inch PVC pipe. There are two sections 5-feet long. Each section is screwed on both sides of the camper at the floor level in the wood frame.
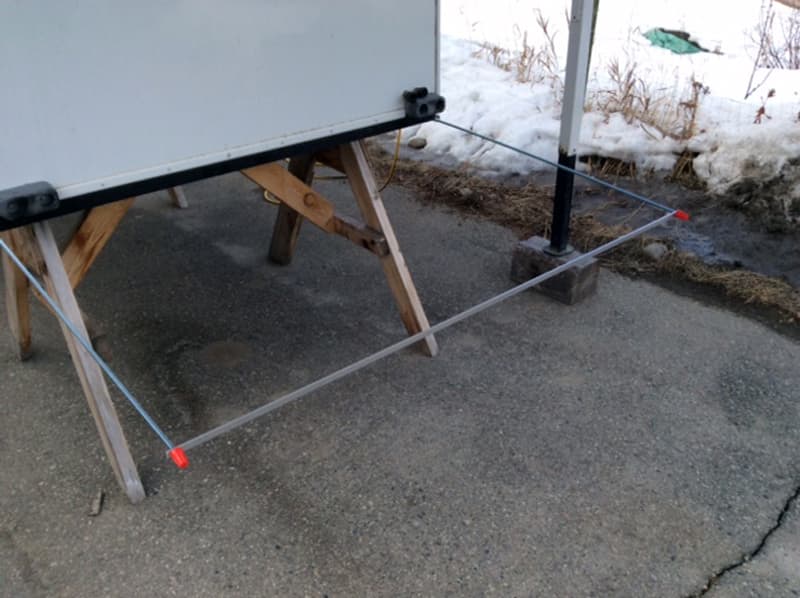
The guide itself is made of two rods that are 6-feet long by 5/16-inch in diameter, and a 4-foot long half-inch flat aluminum bar. These three parts are assembled together to make a square U-shape. I had to cut the flat bar to make two holes for the rods.
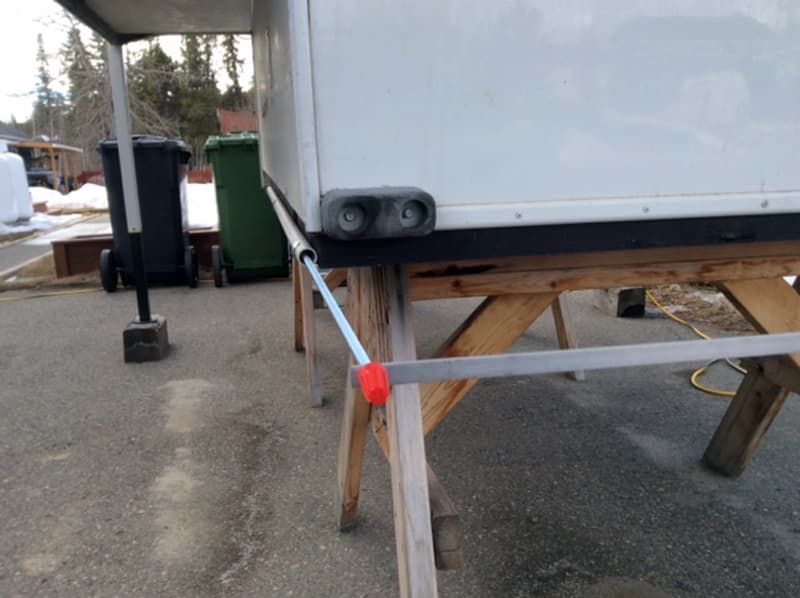
The guide (rod) is inserted in the PVC pipe. This way, the guide can slide in the pipe freely. So, when I pull the guide about 5-feet out of the PVC pipe, the guide goes between the wheels. More importantly, when the camper goes in the truck’s bed, the guide slides back into the PVC pipe. It’s working great and I’m a happy camper!
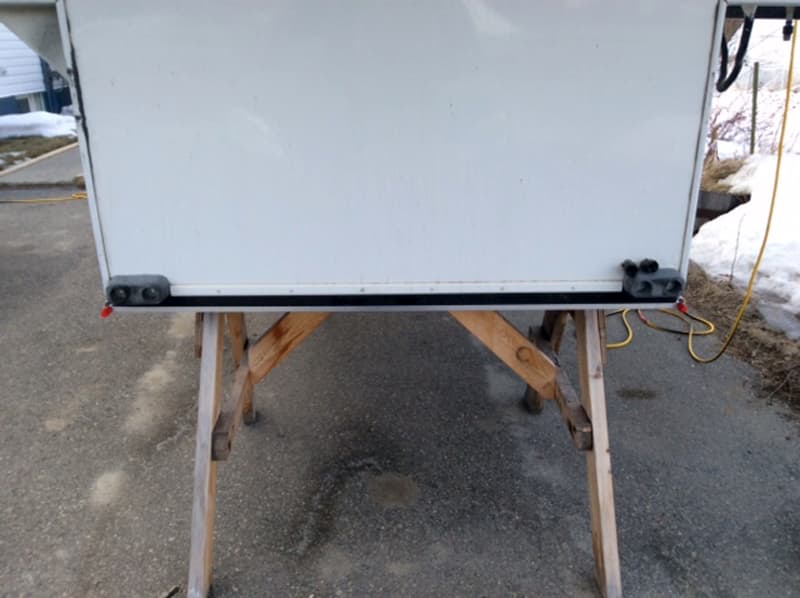
It took me one hour to complete this modification and will cost you around $20 Canadian if you build with new material. I used leftovers from previous projects when I made it. In my opinion, the skill level of this modification is medium.
5. Ron Richardson, Costa Mesa, California
Stairs Into Camper Work On and Off Truck
2014 Ram 3500
2012 Wolf Creek 850
My camper was purchased used and did not come with stairs. At one time it had Torklift stairs, so I still had the anchor brackets. I wanted stairs for when the camper was on the truck and when it was off the truck. The stairs also had to fold away. That was a tall order and I went through two iterations to get it right.
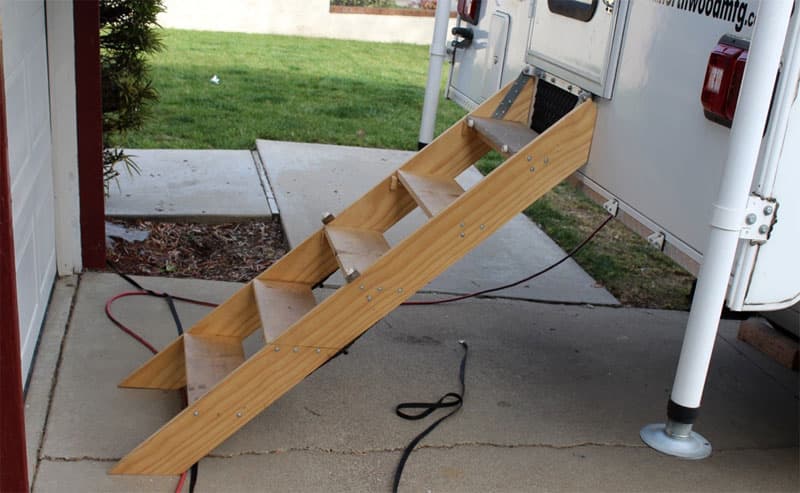
The stairs are made out of 1-inch by 6-inch Douglas fir for the stingers (sides) and 1-inch by 8-inch pine for the treads. There are a lot of calculations in order to figure out the proper rise and run. I eliminated the run calculation by making the strings come down at a 45-degree angle.
The rise calculation is the distance from the ground to the floor of the camper. In my case, the rise is 47-inches. Divide that by the number of stair treads you want. Stair rise should be around 8-inches.
Six treads gives me a rise of 7 7/8-inches for each step. The sixth step is the camper’s floor, so therefore the stairs will have five treads.
Now for the hard part. I want to use the same stairs for when it’s on or off the truck.
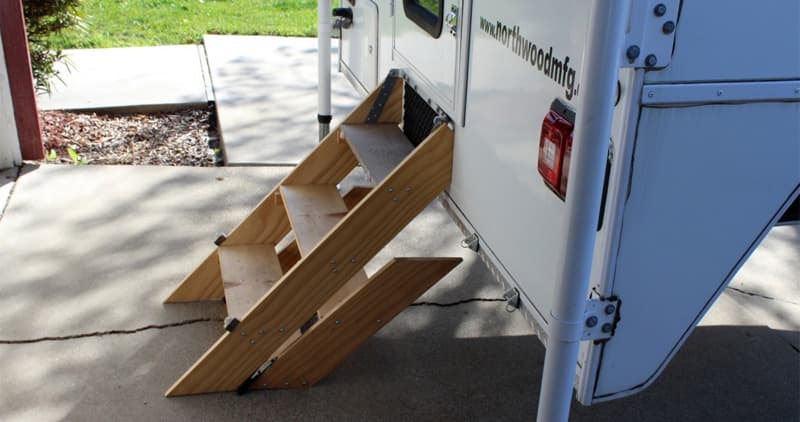
A hinge will be used to fold the stairs under. The stair height for when it is on the camper is set at 47-inches. The ideal height for the stairs when it is off is 22-inches, but with that height the stairs would not fold under without hitting the camper. So the height was set at 31.5-inches. The height should be at the stair’s tread.
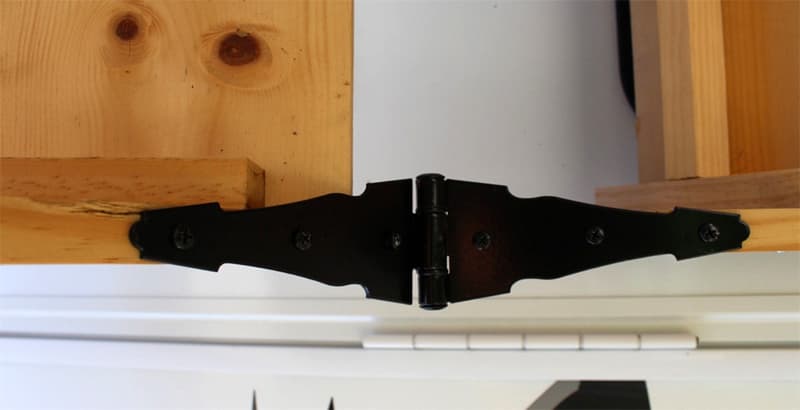
My first iteration was to not use hinges. I used stairs that slid together for the different heights. Then I got a new truck that had a different height. I used that opportunity to make a new design. The first set of hinges were 1-inch wide and too weak. Those hinges did not last one trip. The second set of hinges are much bigger and have lasted.
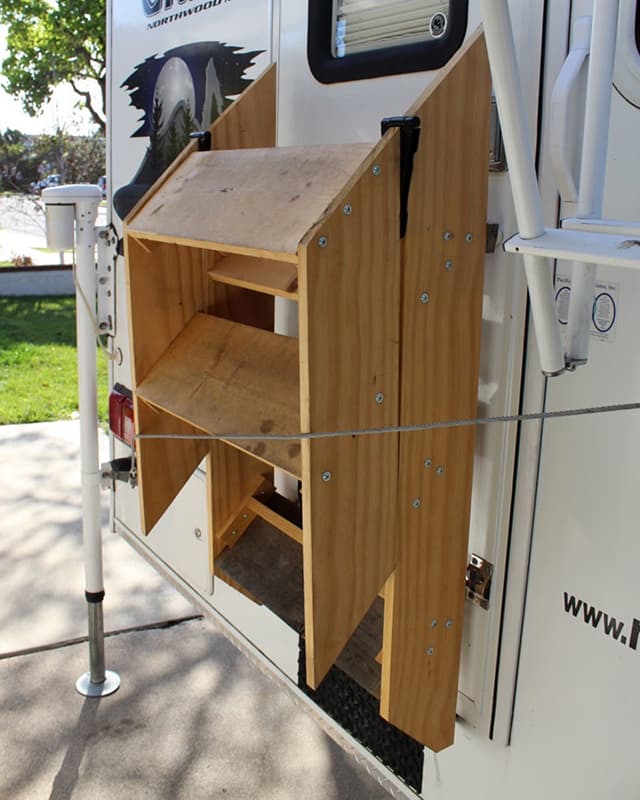
So far the stairs have worked great. They are stable and easy to setup. My first iteration with the one-inch hinges failed when my brother-in-law tried them. Since I went with the new hinges, they work flawlessly.
It took four hours to complete and cost $40. In my opinion, the skill level of this modification is medium.
6. Jeff McDonald, Mill Valley, California
Repeater for DVD Player
2005 Ford F-350
2008 Bigfoot 10.4
In our camper the radio/CD/DVD player is above the dinette. We have a mid-bath so to operate the unit we would have to get out of the cabover where our TV is to change the volume, etc. To remedy this I installed a repeater so I could use the remote from the cabover.
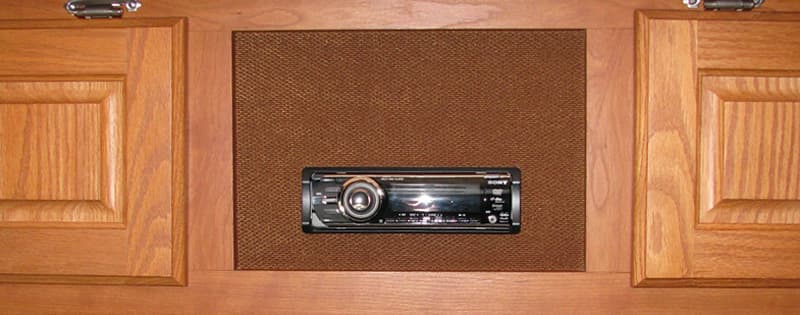
Above: The radio cd/dvd unit
I bought a PAC IR-X repeater and installed it in a cabinet across from the radio putting the sending part in the cabinet above a hinge.
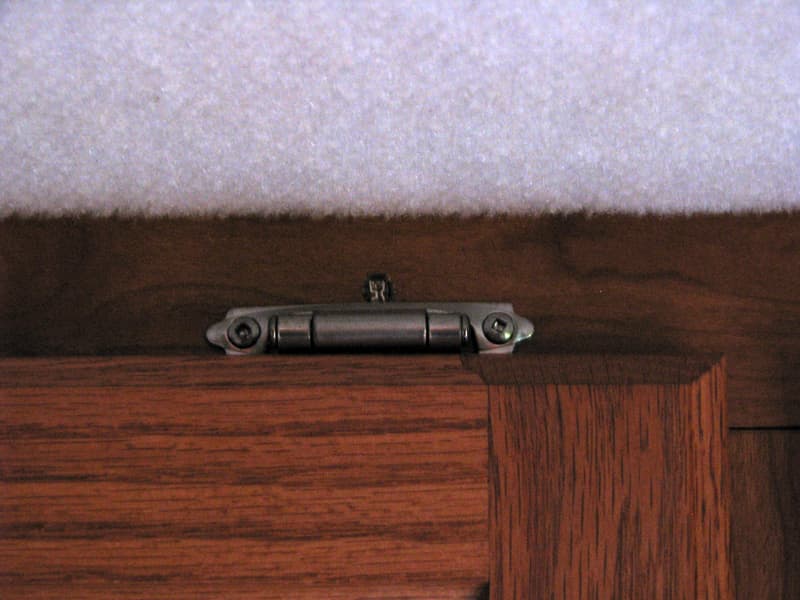
Above: The location of the sender, top center of hinge
I then routed the wire for the receiver part above the rear door in line with the overhead bunk.
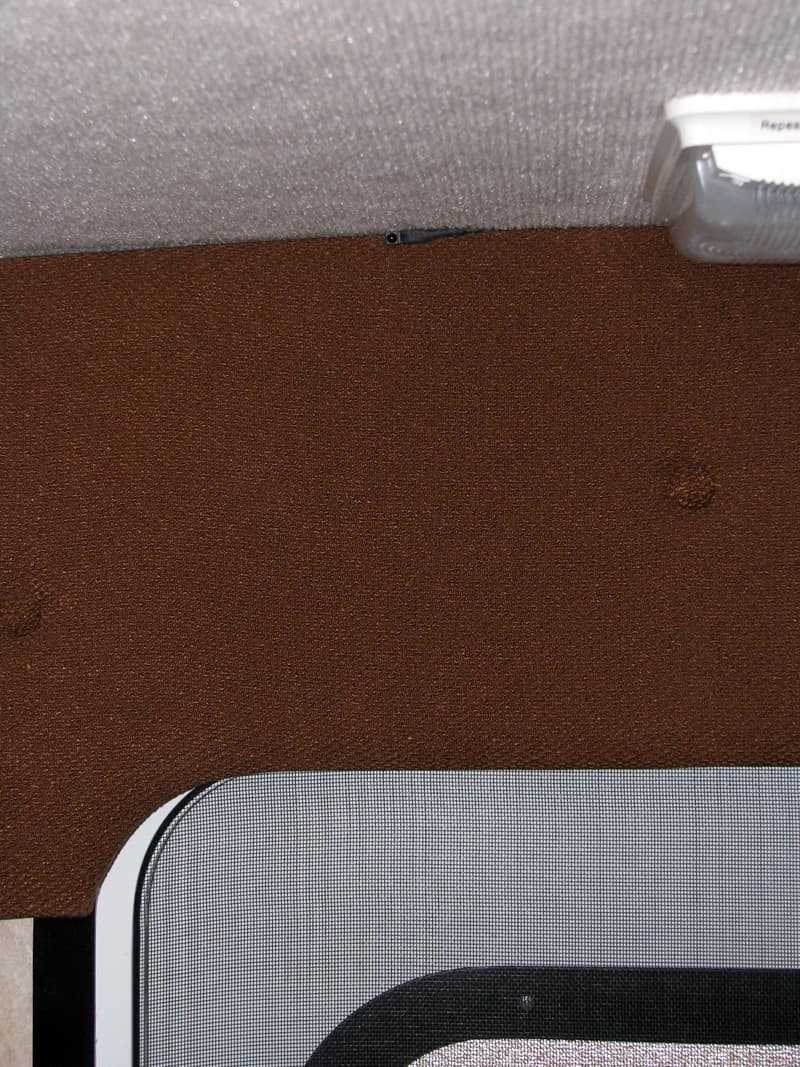
Above: The receiver above the door between the ceiling and the valance. Also shown is a part of the light used for power.
For power to the unit, I fished a wire to an existing light above the door and connected it with a fuse. Then I put a label on the light to remind me that there is a fuse in that lamp for the repeater.
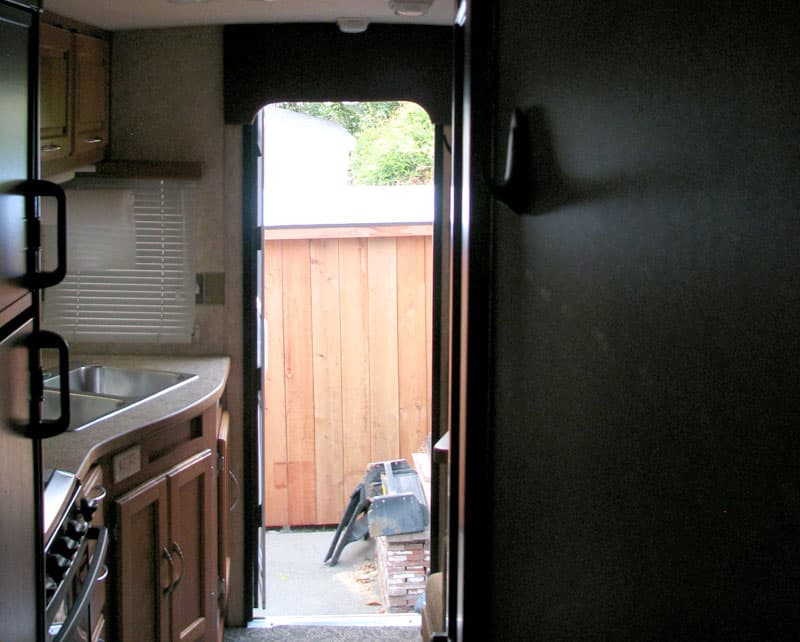
Above: Repeater view from overcab
The repeater install has worked great and would do it again. It took me three hours to complete this modification and cost me $22. In my opinion, the skill level of this modification is medium.
7. Sean Lynn, Surrey, British Columbia
Backup Camera Relocation
2011 Ram 3500
2014 Lance 950S
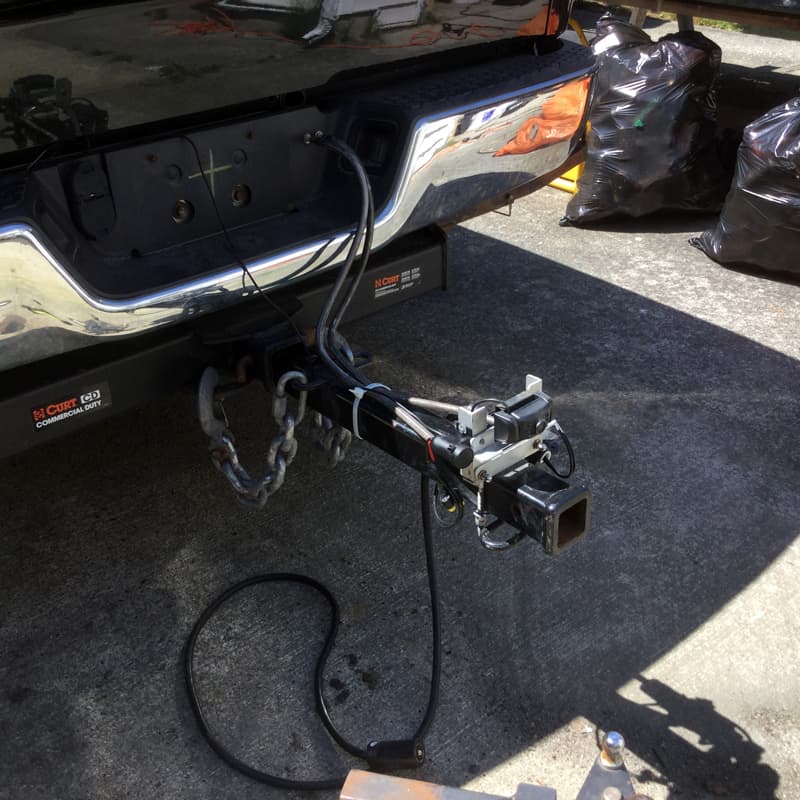
The aftermarket backup camera installed on the license plate of our truck worked fine when we had an 8.5 foot camper on the truck. When we upgraded to our Lance 950S, the camera’s view was blocked by the longer camper overhang.
The new camper required air bags to be installed which required a small compressor to be plugged into a 12-volt power supply inside the camper. That required extending the slide sufficiently to gain access inside the camper. That was painfully time consuming to just add a bit of air.
I also extended the air connections for the airbags from the back bumper to the same custom aluminum bracket on the hitch extension by using a couple of 36 inch SS hose extensions purchased on clearance from Camping World. Ut is way easier to inflate or adjust the air bag PSI with these being mounted out near the back of the camper.
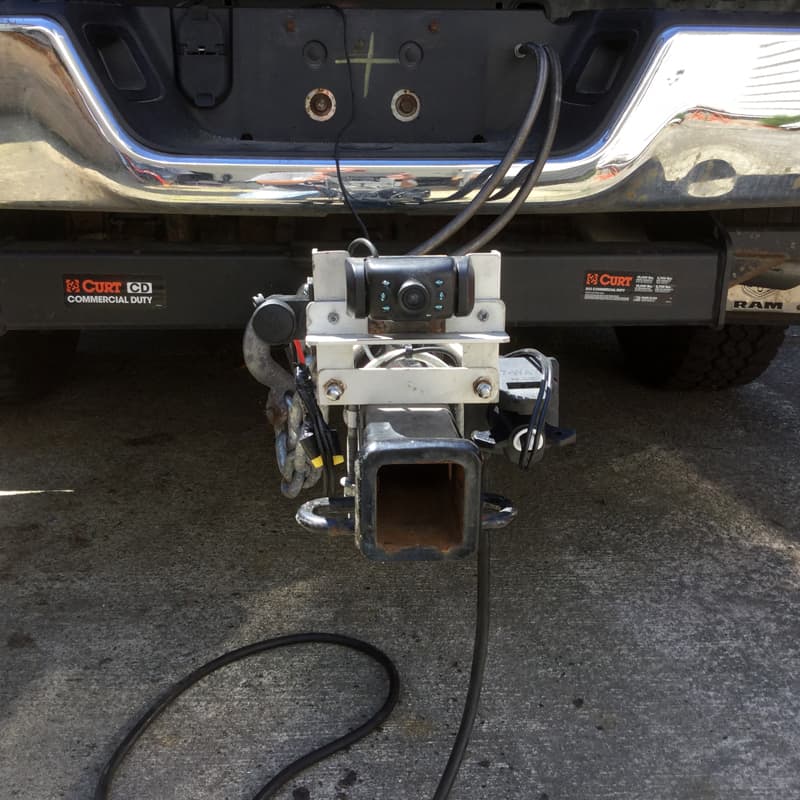
I relocated the aftermarket backup camera from my license plate’s bracket to a custom aluminum bracket. I fabricated it to mount on the hitch extension underneath the camper.
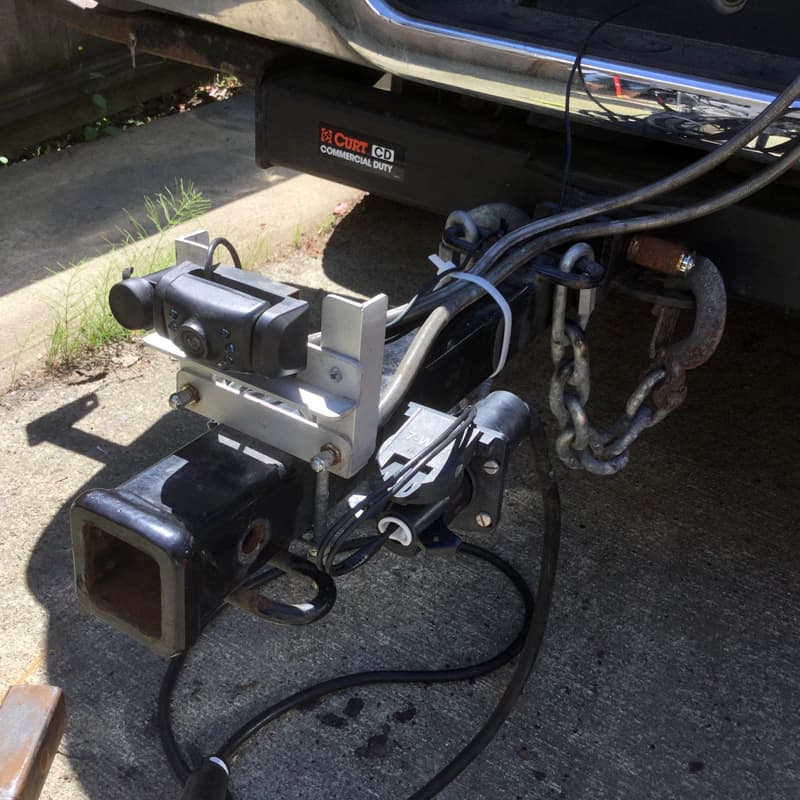
I also added a 12-volt power supply to the aluminum bracket that is wired to a seven-pin connector. That plugs into the trailer’s wiring for powering up a small portable compressor used to inflate the air bags. The camera can be taken off and relocated back to the license plate when the camper is off the truck.
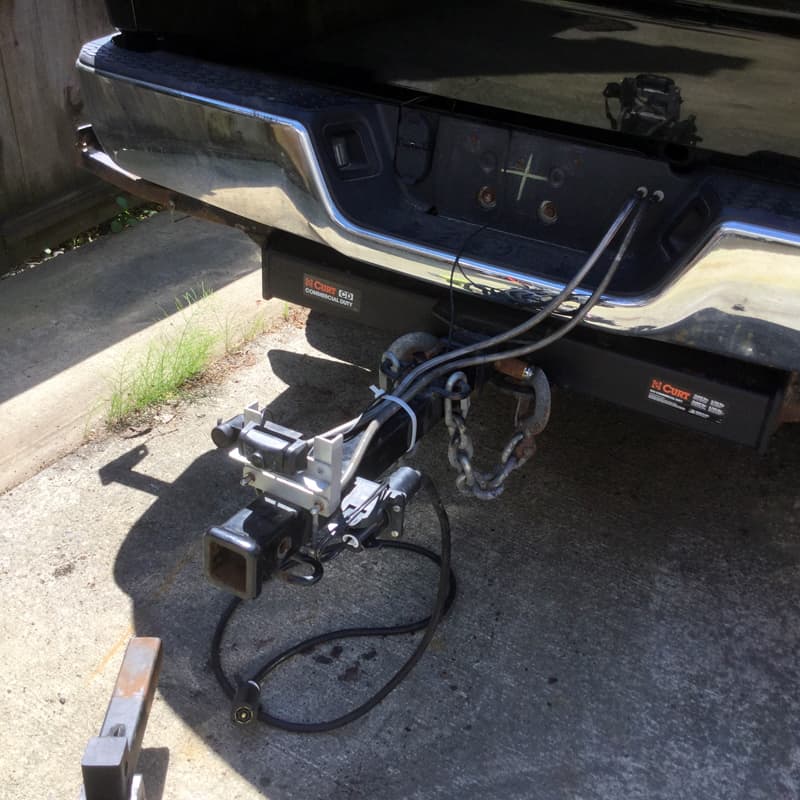
Both the relocated camera and the 12-volt power supply work great. It simplifies the process of adding air to the air bags and allows the camera to be used again.
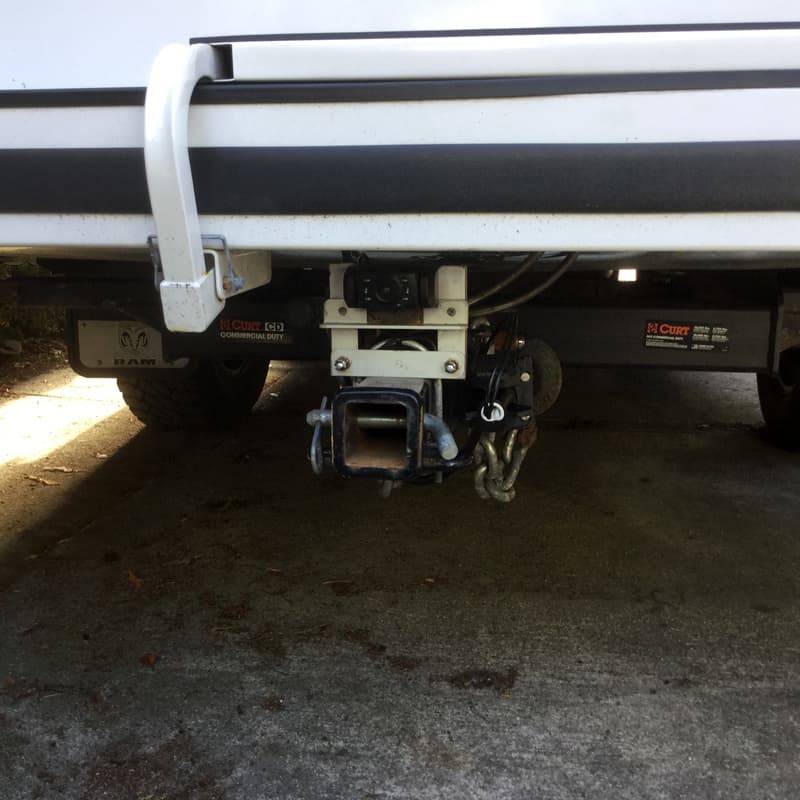
It took me six hours to complete this modification and cost me $75. In my opinion, the skill level of this modification is medium.
8. Dewey Lackey, Brentwood, Tennessee
Full Access to 1172 Water Heater
2003 Silverado 3500
2014 Lance 1172
I made this modification because the local RV service place wanted $350 to replace the electric element in the water heater. They said that they would have to pull the heater because they could not access it from the inside.
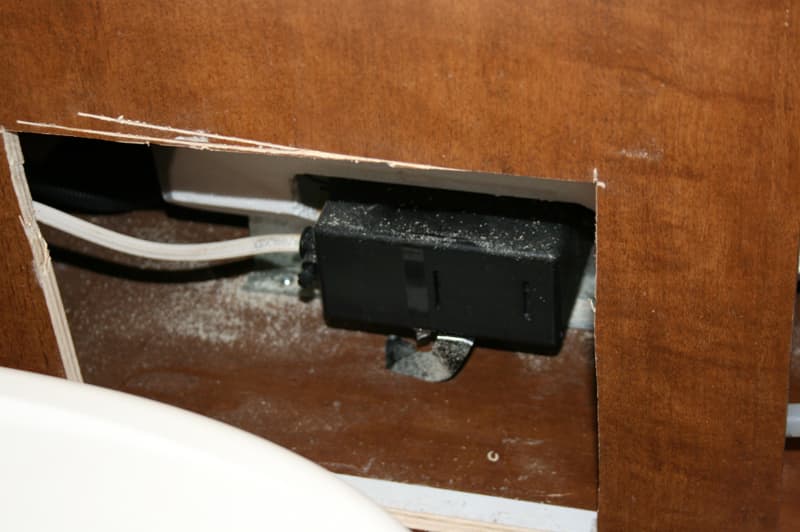
After I got to the heater from the inside, it turned out that that the problem was a 6-inch piece of electrical wire that had burned. I replaced it with wire from my shop and saved $350.
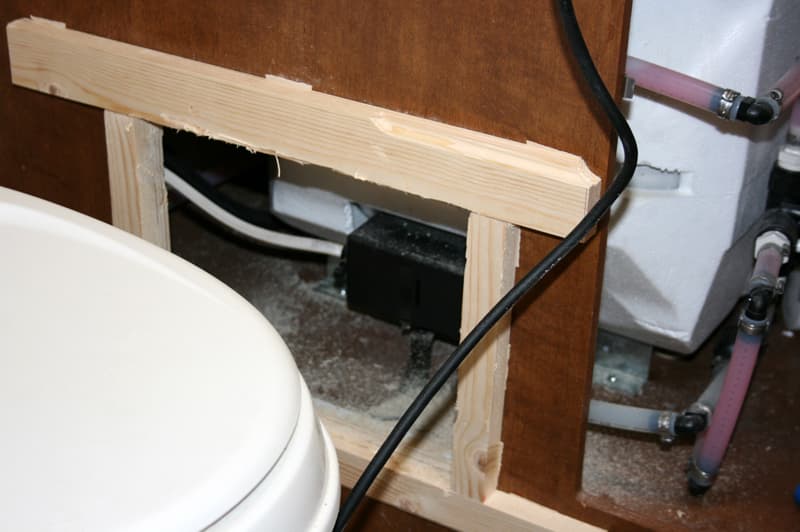
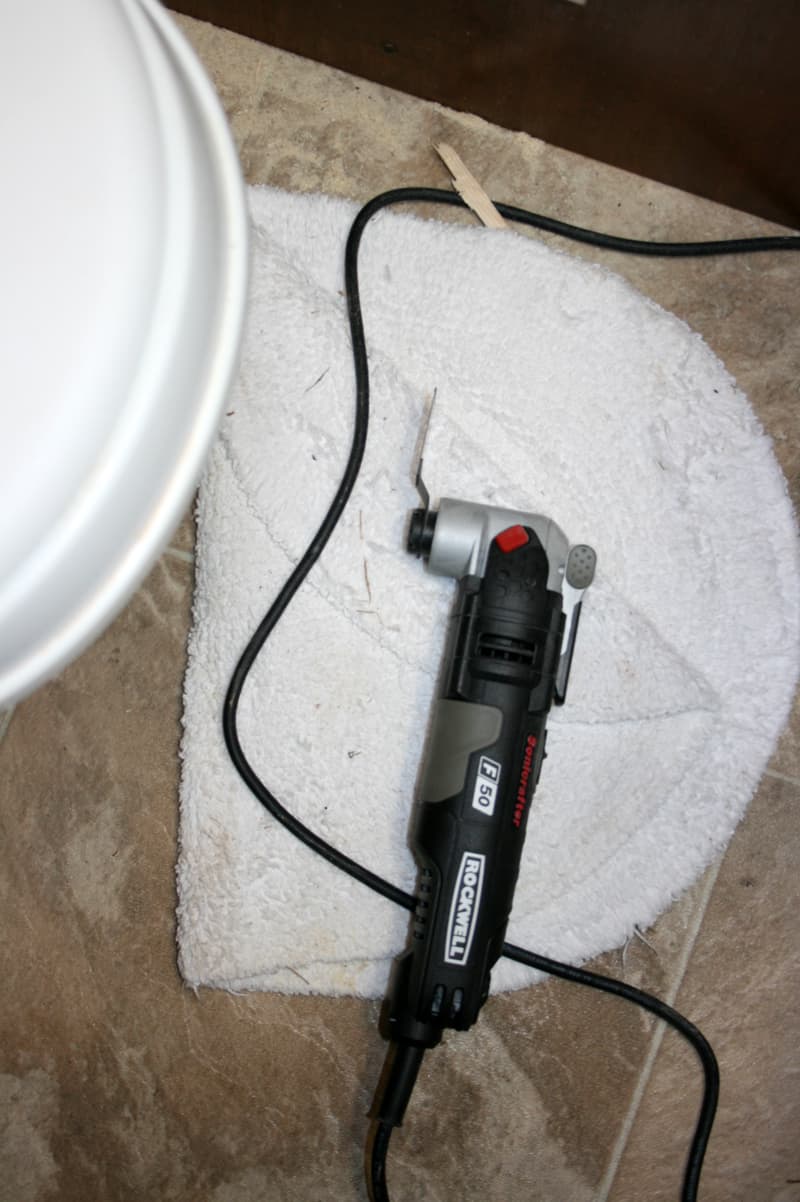
Gaining inside access to the water heater was the priority. I marked off a 12-inch by 12-inch square, made brackets from 1-inch material, and attached it to the cabinet with two-sided tape. The brackets served as a border for the flush cut saw to rest on.
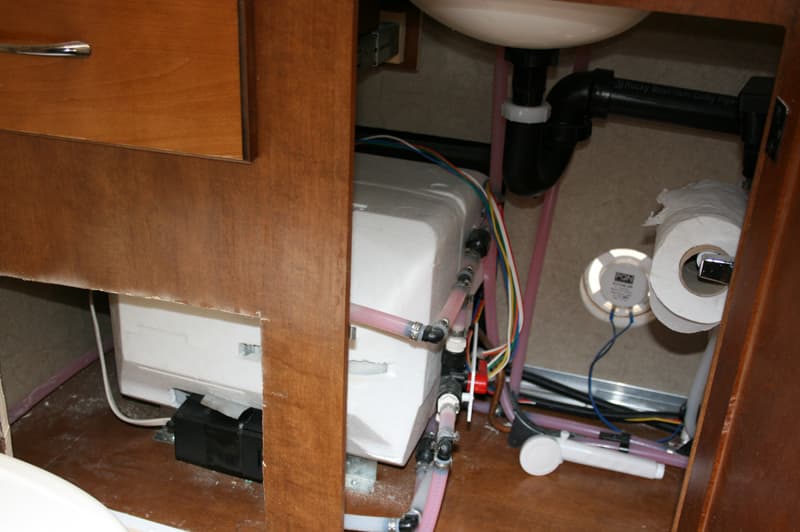
After repairing the burnt wire, I cut a 13-inch square of luan plywood that I had on hand, stained it to match, and installed the panel with brass screws.
This modifications allows full access to the hot water heater from the inside of the camper. Should future repairs to the hot water be required in the future, this modification will make it easy to access the unit.
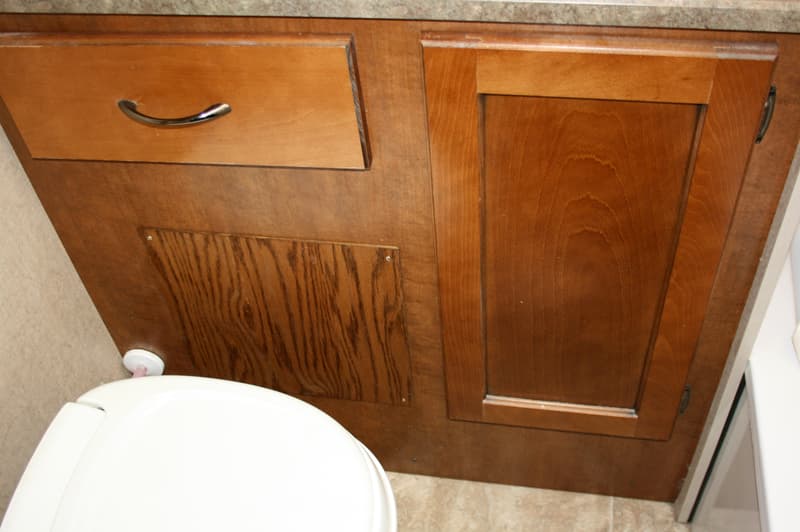
This modification also allows access to all the water lines and connections should a leak occur. I already had a leak at the exit point from the hot water heater. Truck camper manufacturers would do well to equip campers with better access to areas like this. They could do so with either a sliding panel or a removable panel.
It took me three hours to complete this modification and cost me less than a dollar. In my opinion, the skill level of this modification is medium.
9. Arlyn Verlo, West Branch, Iowa
Stairs Into Camper Using Carrier And Tool Box
2011 Chevy 2500HD
2011 Northstar 8.5 Adventurer
I never liked the fold-up stairs that came with our truck camper. I wanted stairs that would not stick out when we needed to get into the camper on the road.
I looked at several hitch-mounted cargo carriers and found one at our local hardware store. I also found a tool box that would give the right height to step up into the camper.

I purchased the cargo carrier and added cedar deck material to support the toolbox that made the step. We also use a small step to reach the carrier while we’re at a campground. The carrier is less work than the fold-up stairs were.

The tool box is used to store water, drain hoses, tool bags, and other supplies that may be needed on a trip. The whole unit can be removed when you have to get to the spare tire or remove the truck camper.

It took me ten hours to complete this modification and cost me about $300. In my opinion, the skill level of this modification is medium.
10. Tom Fitch, Fort Collins, Colorado
Air Diversion Under Cabover
2002 Toyota Tacoma
2016 Outfitter Caribou Lite 6.5
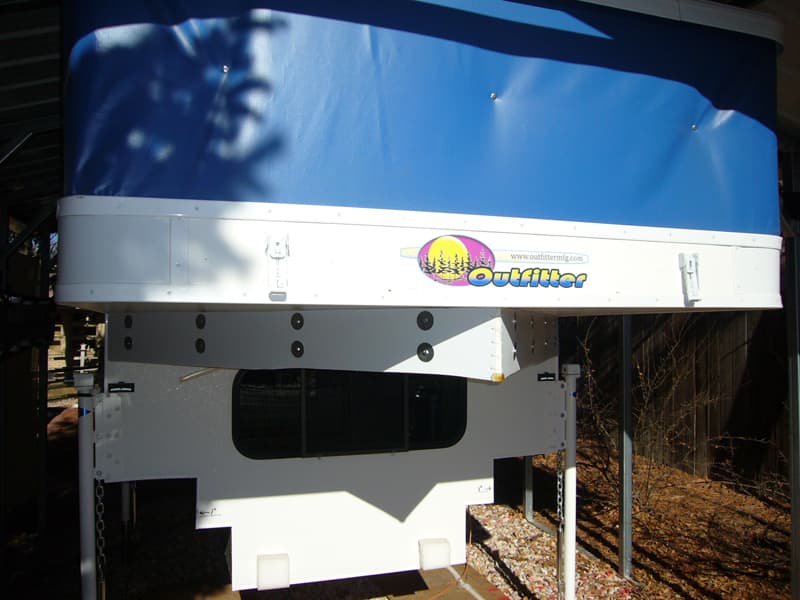
This mod is all about smoothing the airflow around our camper and perhaps gaining a bit of fuel economy. I had about a 7-inch space between the truck and the cabover section. As I drove, wind hit the flat wall. I figured I could improve the situation.
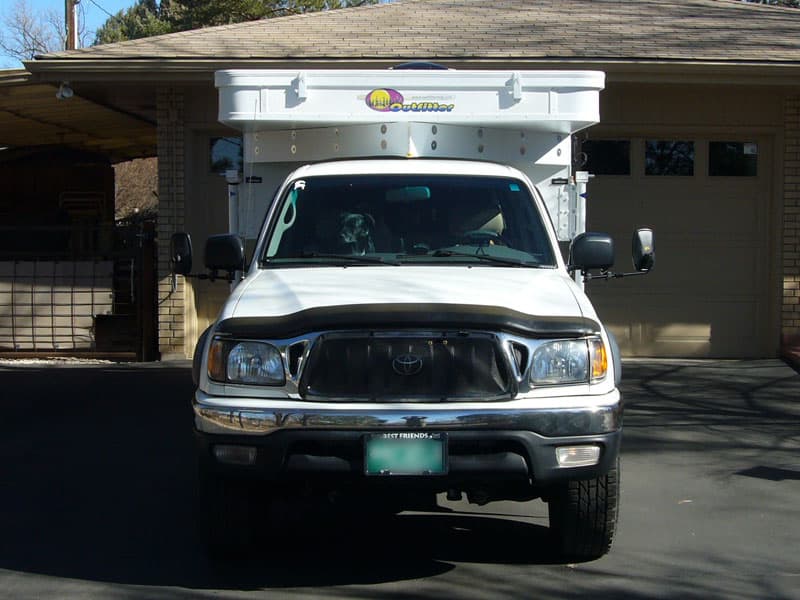
My inspiration was a Truck Camper Magazine article that you published last fall on Stephen O’Neal. Stephen mounted his camper on a flatbed truck and did a number of very impressive improvements. My take-away was a metal air diversion that he fabricated. Clearly I don’t have the skills or tools that he does, so I had to improvise.
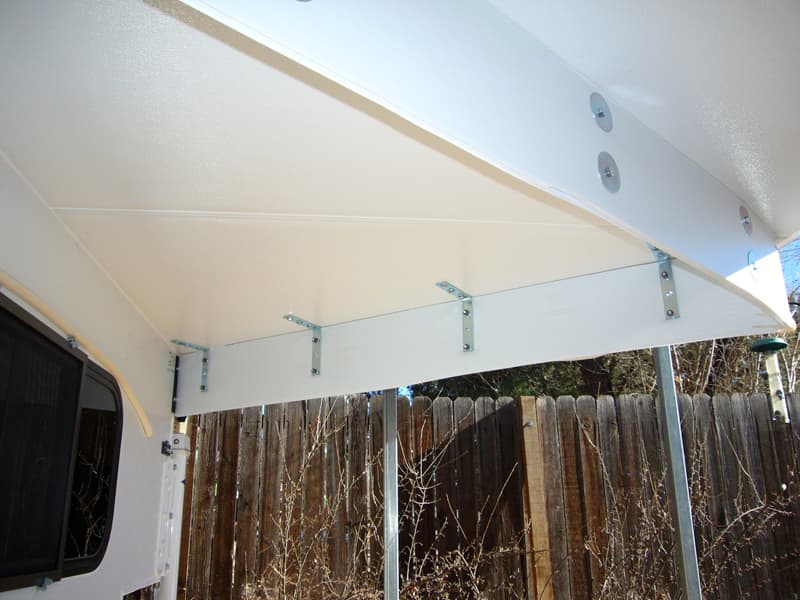
I bought a sheet of 10-mil fluted polypropylene, which you can buy (or order in) from a business that deals in plastic fabrication or distribution. It isn’t cheap at about $70 for a 4-foot by 8-foot sheet, but I use the stuff for all kinds of things around the house.
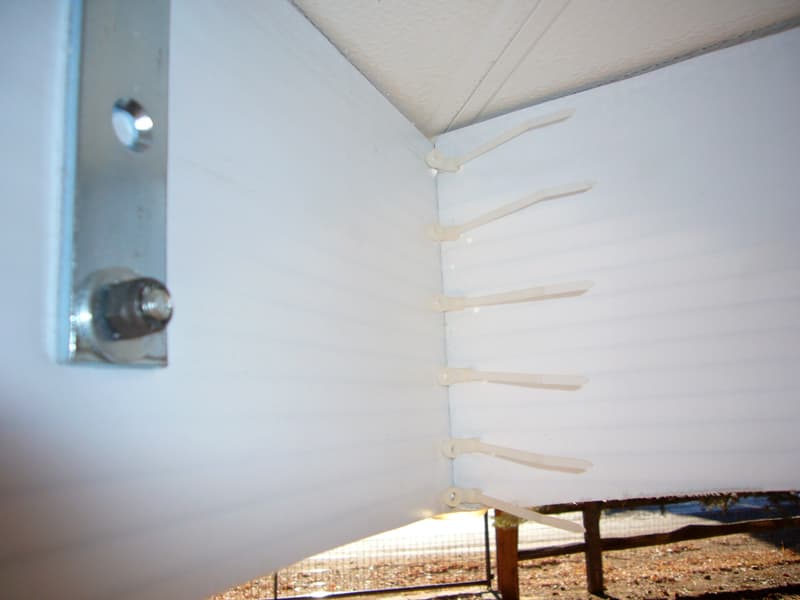
The material is very strong for the weight and comes in a bunch of different colors, so you don’t have painting to deal with. I also bought some 5-inch shelf brackets, screws, bolts, washers, zip ties, and nylock nuts. You can cut the polypropylene with a utility knife. On my camper, the underside of the cabover gave good purchase for the screws that hold it up.
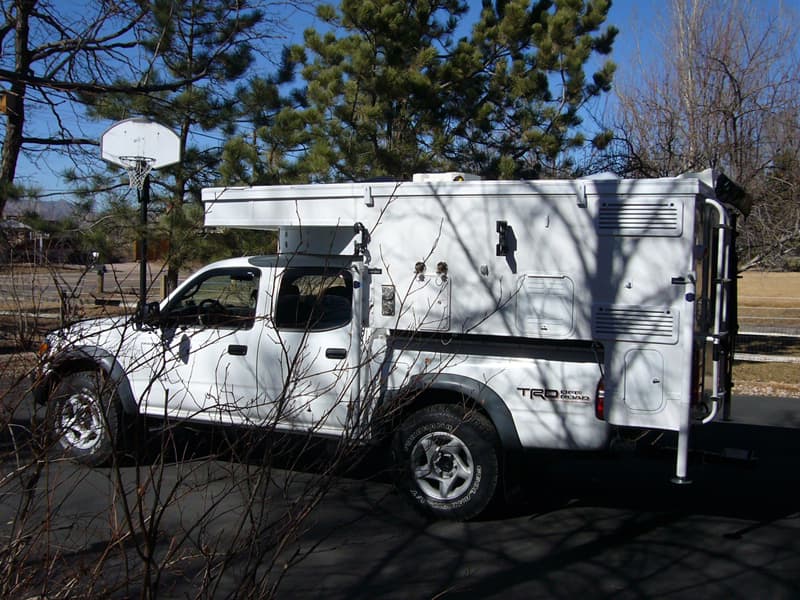
I took my first trip of the season last month and drove about 750 miles in all. I do believe this modification cut down on wind buffeting somewhat.
The first third of the trip I had a sweet tailwind, the second third of the trip was a calm day, and the last third I had a headwind. I feel like I had an average of all of the typical driving conditions, with the exception of severe side wind.
My total miles per gallon for the trip was 17.3. That’s about one mile per gallon better than usual. Of course conditions are never the same, but I do suspect mileage is a bit better with this mod. I also think the truck looks better without that 7-inch gap, so there’s that!
It took about two hours to complete this modification and cost less than $100. I also had most of the polypropylene left over. In my opinion, the skill level of this modification is somewhere between easy and medium.
Disclaimer: The modifications above are submitted by Truck Camper Magazine readers. It is your responsibility to make sure that any do-it-yourself modification project you undertake is safe, effective, and legal for your situation.
Enter Your Mods Now!
If you’d like to enter mods into TCM’s Monthly Mod Contest, click here. You can enter as many mods as you want, at any time. Good luck mod makers!
