Fellow truck camper and 12-volt sharp shooter, John Wells, returns with a step-by-step article on installing a 12-volt outlet. Get your multi-meters ready.

We’re not taking to the high seas for this swashbuckling electrical adventure, but we will be putting what we learned in “12-Volt Circuits 101” to practical use. It’s time to get out of the 12-volt classroom, and enhance the 12-volt system in your truck camper.
For this example, I’ve chosen to add a 12-volt outlet for powering an Endless Breeze fan. Endless Breeze fans are essentially freestanding Fantastic Vents, nearly identical to what’s installed in most truck camper ceilings. An Endless Breeze fan is a very efficient solution for directing fresh air to a truck camper dinette or cabover during hot weather.
Endless Breeze fans use a cigarette-lighter type plug, so our choice for this task will be the corresponding outlet. The cigarette-lighter outlet is the most common and versatile of all 12-volt outlets, and is similar to the 12-volt outlets found in automobiles. Once completed, we can not only plug in the Endless Breeze fan, but a wide variety of 12-volt items that use the same cigarette-lighter type plug. Let’s get started.
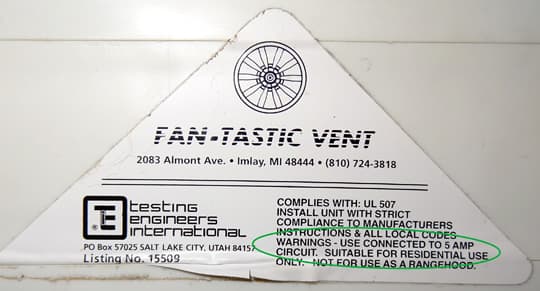
Above: The amperage recommendation is clearly printed on the label of our Endless Breeze fan.
The first step is to choose an appropriate power source for the new 12-volt outlet. Checking the label of the Endless Breeze fan (see above) reveals that the expected current draw is 5 amps, or less.
For the installation, we will need to locate an existing 12-volt circuit with wiring near the intended installation site. The circuit needs to handle 5 amps without overloading. Any circuit that works when we are unplugged from shore power (and not running a generator or inverter) is operating at 12-volts. These 12-volt circuits are fair game.
SAFETY NOTE: Amp draw on a 12-volt circuit is cumulative. For example, if you have a 5-amp light and a 5-amp fan on the same 12-volt circuit, the peak amp draw on that circuit is potentially 10-amps. This is unlikely as most 5-amp appliances and devices do not operate at 5-amps, but it’s very important to be aware of your total amp draw on a given circuit. In short, be careful not to exceed 5-amps on a 5-amp circuit or you could overload the circuit and blow the fuse.
On our truck camper, the 12-volt circuits near the kitchen window include an LED light over the kitchen sink, a range hood fan, and a range hood light. We can determine that these circuits are 12-volt (as opposed to 110 volt) as they operate when the camper is disconnected from 110 volt shore power.
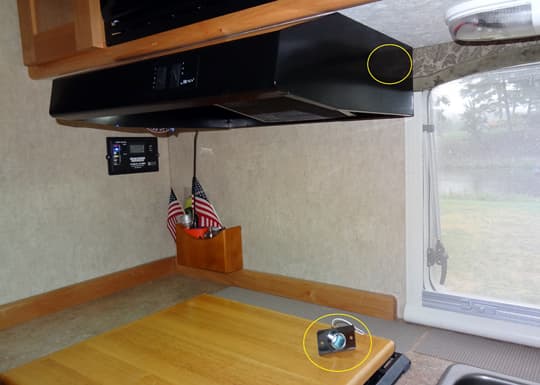
Above: Notice the proximity of the LED light and the range hood to our desired location for the new outlet
The LED light circuit over the sink could provide the necessary 12-volt power, but it would be difficult to conceal the wires needed for the new 12-volt outlet.
On the other hand, the range hood circuit also offers the necessary 12-volt power, offers an easy solution for concealing the required wiring, and provides space for mounting the new 12-volt outlet. Equally important, the location of the range hood is up and out of the way to protect the new outlet from dirt, debris, loose objects, and water in the kitchen area. Everything considered, the range hood is an obvious choice for installing the new outlet.
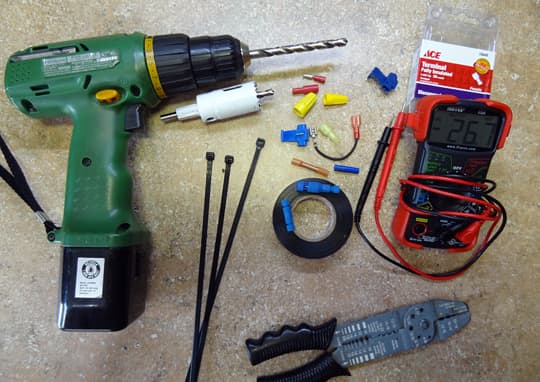
Above: Here are some assembled tools for today’s project. Various connector options are included.
Here are the materials needed to begin the project; a hole saw and drill, a crimping and stripping tool, various lug and spade connectors, circuit taps, color-coded 16-gauge wire, a multi-meter, and basic screwdrivers.
Above: Note the circled entry on the distribution panel identifying the range hood and its amperage.
The next step is to examine the camper 12-volt distribution panel to find the fuse rating for the circuit that we have chosen to tap. According to the panel information, the range hood on our camper is on its own circuit and is protected with a 5 amp fuse. That means the circuit can provide the 5 amps needed by the Endless Breeze fan, making it perfect for our application.
Now it’s time to do a little bit of exploratory surgery. The range hood is held to the underside of the kitchen cabinet with four screws. Unfortunately, there’s not enough slack provided in the hood circuit wires to allow the hood to sit on the counter top while we work. To solve this problem, available materials are assembled to support the hood while we complete our wiring.
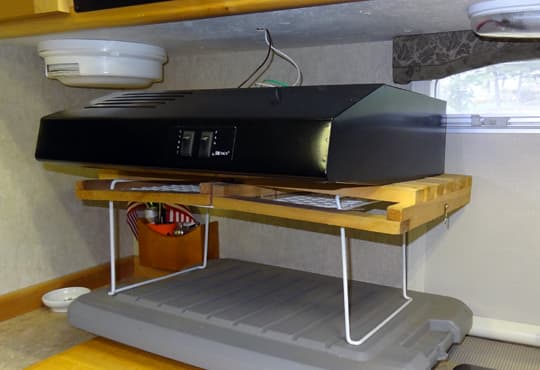
Above: Here is our range hood detached from the kitchen cabinet and supported on our temporary “crib”. Note the wires that provide power to the hood.
Once the hood is lowered, it’s very easy to see the two wires that provide power to both the light and the fan within the hood. It’s also no surprise to find that the wiring colors used by the RV manufacturer do not conform to the typical “red for positive, black for negative” so commonly used for wire coding in other electrical endeavors.
Accurate polarity is extremely important for 12-volt wiring for most appliances, including lighting. Many LED light fixtures will not work at all if polarity is reversed. The same is true for DC motor-driven appliances, which run backwards with reversed polarity. Some electronics can be ruined if connected with polarity reversed, even briefly. For this reason, I always rely on a digital multi-meter to determine the polarity and voltage of any unknown wiring in the camper.
SAFETY NOTE: There seems to be very little conformity to any kind of color coding within the RV industry, even between different circuits in the same RV. Do not presume the polarity of a given wire based on the color of that wire. Please, always use a digital (or analog, if you’re old school), multi-meter to determine the polarity and voltage of any unknown wiring.
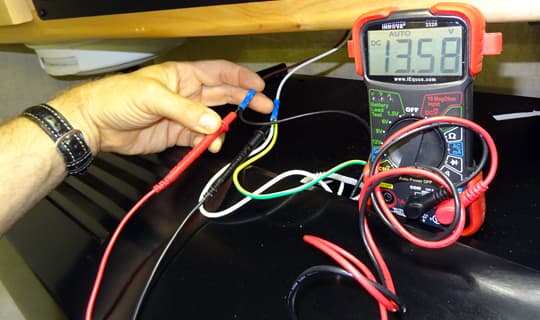
Above: A digital multi-meter connected to the power supply for the range hood. Note that, though we talk about “12-volt” circuits, actual voltages measured are usually 12.5-14.5 volts depending on the charge state of our on-board battery(s). Also, notice the color confusion present in our chosen example. Multi-meter leads are red-positive, black-negative (always!) But, the wires coming out of the cabinet and connected to the range hood total 5 different colors.
In this case, the brown camper wiring is positive and the white is negative, until the wires reach the range hood. At that point, black becomes positive and white, as well as yellow/green, becomes negative. Why the wiring was done in this fashion is anyone’s guess, but it reaffirms the need to use a multi-meter when determining polarity every step of the way.
Now that the circuit and wires have been identified for our new 12-volt outlet, the next step is to tap into the circuit. The industry standard for tapping into a circuit is the 3M Scotchloc tap.
A careful investigation of the concealed wiring in your truck camper would likely reveal some of these handy little connectors in use by the manufacturer.
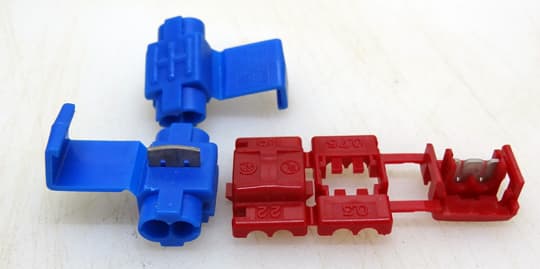
Above: 3M Scotchloc taps for two different wire gauges
Using a 3M Scotchloc tap, the connection is made with a guillotine-like slotted metal blade which slices into the existing wire and the new wire being added. The blade cuts through the insulation on two sides of each wire and bites into the stranded conductor within, often severing some of those strands.
While making an excellent electrical connection, this is at least theoretically undesirable if the current-carrying capacity of the wire is reduced by some severed strands. Also, should future removal of the 3M Scotchloc tap be required, the insulation on the wire has been damaged in a way that is not easily repairable and, again, some of the conductor strands may have been harmed.
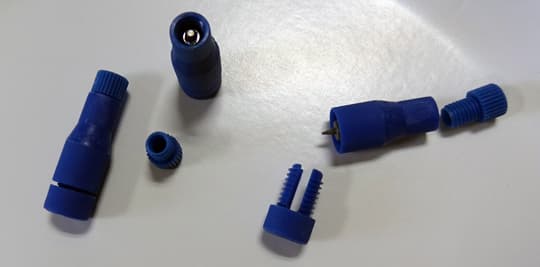
Above: Posi-Taps, showing wire-piercing end with saddle nut, as well as compression end (with nut) that connects new circuit. Posi-Tap and Posi-Lock connectors are available from a variety of sources, including Amazon, NAPA, Grainger, and others. See posi-lock.com for information on the full line of these brilliant new connectors.
For these reasons, I much prefer the new Posi-Tap no-crimp connectors. Or, as I like to call them the, “Electron Pirates” – ARRR! Posi-Taps are easy to use. They make a very positive connection, make only a tiny pinhole in the insulation, and are easily removable with no damage to conductors should we ever wish to remove the circuit. I’ll use Posi-Taps to steal the necessary electrons for our new fan outlet.
With the range hood supported on its temporary crib, and our 12-volt wires identified for polarity with a multi-meter, we will first drill the hole in the range hood to mount the new 12-volt outlet.
The best tool for this purpose is a hole saw operated by an electric drill. Since I desire a close fit, the next smaller size hole saw will be used and then a Dremel tool carefully employed to enlarge the hole three-quarters of a smidgen (that’s a “bit” of Pirate humor folks).
Out of the rainbow offered, I chose to match the colors of the wire where I’ll actually be applying the Posi-Taps, so lengths of white and black wire of the proper 14 gauge were cut long enough for some slack to allow future modification of the circuit if needed.
Next, the correct terminals were crimped on the wire ends to make the necessary connection with our new outlet. In this case, an insulated “eye” terminal is needed for the positive (hot) center post on the outlet, and a non-insulated spade terminal for the outer negative (ground) terminal. These choices were determined by the available connections on the outlet.
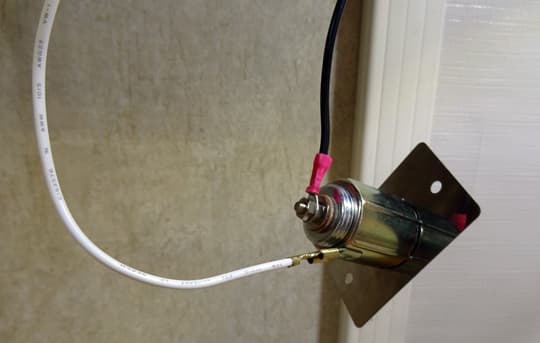
Here’s our pre-wired 12-volt outlet with a crimped eye terminal on the positive (hot) center post and a spade terminal on the negative (ground) shell. The black wire will be connected to positive and white to negativeOnce connections were made, the outlet, with the wires attached, was examined by eye in its new location. This was to make sure that the “hot” (center) connection did not come into contact with the metal range hood.
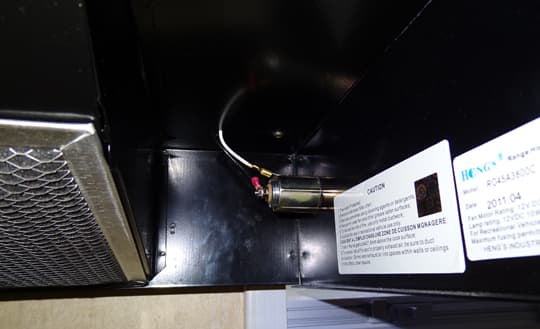
Above: Preliminary installation in the range hood shows plenty of room around the hot (center) terminal of the new outlet. It should be worry-free, as we planned.
Now, we have to route the wires from inside the hood to the connection point above the hood.
If necessary, a new hole could be drilled to route the wires. However, in this case, an existing hole in the hood was just what the Doctor ordered!
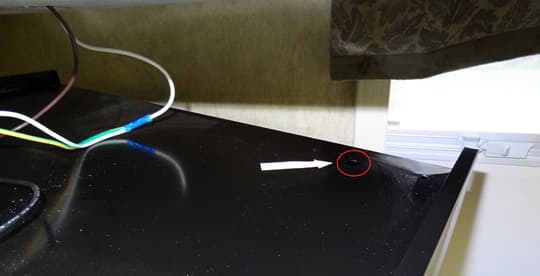
Above: White arrow denotes hole that will admit wires to the connection point above the hood.
Now that we’re satisfied that our connections to the outlet are safe and correct, we’ll employ the Posi-Taps to provide power to the new outlet.
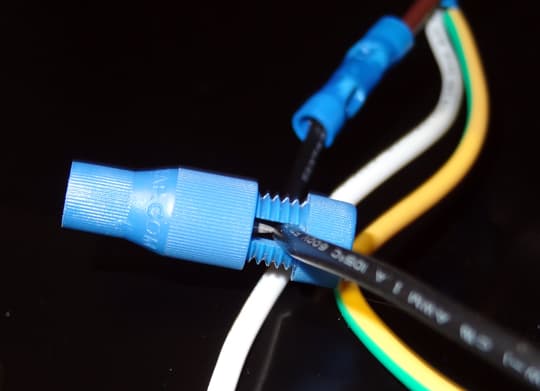
Above: The saddle nut and piercing needle of the Posi-Tap are ready to harvest those much-needed electrons for our new circuit. Just a few twists of the wrist…
To accomplish this, the saddle nut straddles the donor wire. Then the piercing end of the Posi-Tap is screwed tightly into the donor wire making the connection. Repeat this step for the second donor wire. Check the connectors with your multi-meter to verify a good connection.
Next attach the female end of the Posi-Tap to the new circuit by first passing the wire through the compression nut. Then, strip about 1/4″ of insulation and spread the conductor strands in “paintbrush-fashion.”
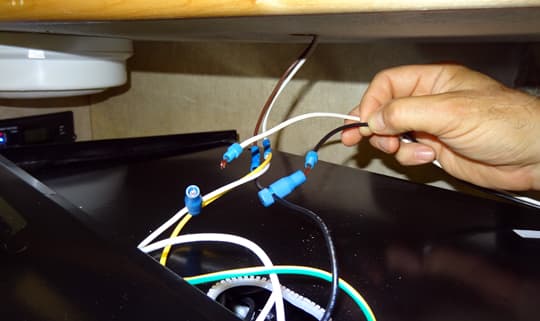
Above: Note wires pre-threaded through compression nuts, stripped, and bare ends flared “paintbrush-style”.
The brush of connector strands are then inserted over the blunt end of the connector and the nut screwed finger-tight. Once both connections are made, the outlet is powered. Again, verify function of the new 12-volt outlet either with your multi-meter or by plugging in your 12-volt device.
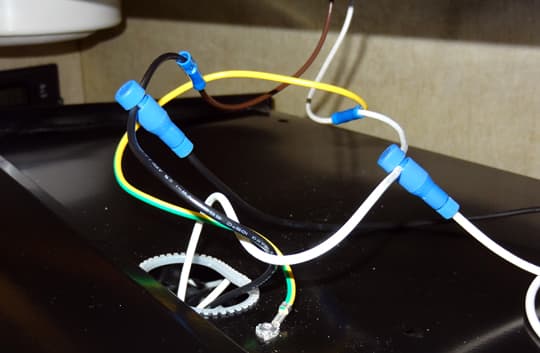
Above: All connections are made and tightened securely. Now we’re nearing the end!
If everything is functioning correctly, it’s a simple matter to reinstall the range hood in its original position. Make certain that no wires are pinched or pierced during this process.
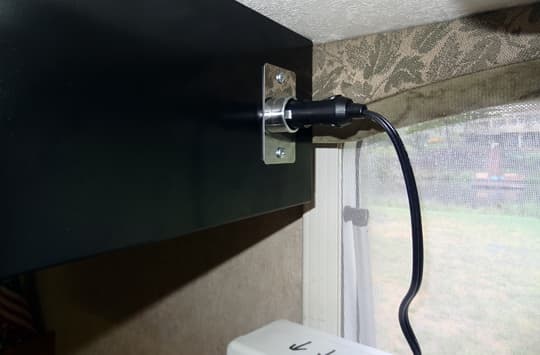
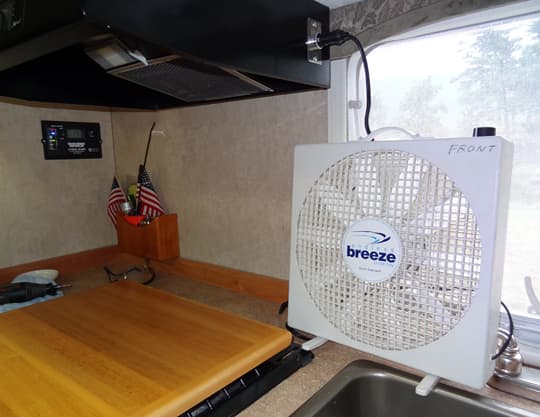
Above: Our newly-installed cigarette-type 12-volt outlet, and the Endless Breeze portable 12-volt fan, ready to direct cool fresh air right into the dinette across the way.
Voilà! Our new 12-volt outlet is ready to serve us in whatever capacity we choose.
Let’s briefly recap this project. We chose the proper type outlet and an existing electrical circuit that could be safely tapped to provide necessary power. Then, we assembled the tools and connectors necessary to make all connections safely. We verified voltage and polarity of the donor wires. Finally, we physically installed the new outlet and made all connections, and verified them before final reassembly.
For our next 12-volt project we’ll use the principles and information from “12-Volt Circuits 101” to tackle a different electrical upgrade. In this new endeavor, we’ll add a completely new circuit with high current draw using a very special outlet. This time, we’ll provide power directly from the electrical distribution panel. I’ll call this new episode, “Grand-Theft Electrons.” Stay tuned!
SAFETY NOTE: I want to share an important word about campers with older power converters. It’s very important to check if the converter in your truck camper produces clean DC power, or unfiltered DC power.
In years past, many RV manufacturers installed converters that produced unfiltered DC power. Unfiltered DC power is safe for incandescent lights and motor driven appliances (like Fantastic Vent fans). It can cause damage to 12-volt electronics like televisions, radios, computers, and some LED light fixtures.
For camper converters that produced unfiltered DC, camper manufacturers looped the DC through the camper battery to produce “filtered” DC. This is what powered the televisions and radio in a camper with an unfiltered DC converter. Other converters had something called a battery emulator. That essentially did the same thing for campers that did not have a battery installed.
Details about your power converter may be included in the information packet of brochures that came with your truck camper. Otherwise, you’ll need to locate and identify the converter unit yourself by reading its label. If the converter was manufactured in the mid-2000’s or earlier, chances are it’s generating unfiltered DC. Even if you have a newer converter, it’s important to check.
If your converter produces unfiltered DC, we recommend upgrading to a modern clean DC converter before adding new 12-volt outlets. A modern clean DC converter will also offer better efficiency, improved battery life, and safer power.
Don’t miss Jim Tomblin’s article about camper batteries and AJ Rosenbrock’s article about camper electrical systems.
Thank you to John Wells for documenting his 12-Volt outlet install and for writing this article. Thanks to Tom Emerick for proofreading and offering 12-Volt advice. Randy at Best Converters has given his expertise in clarifying the above safety note.
