Ten clever Mini-Mods compete including a sharp knife idea, water intrusion solution, craft beer opener, exploding cabinet countermeasure, anti-dirt system, mud-proof bike storage, something on the level, and more.

Welcome to the March 2017 Super Mod Cup Contest. Please review the following ten mini-mods and vote for your favorite. We will announce the winner next week. For more information about the Monthly Mod Contest, including how to enter, click here.
Click here to vote for your favorite 3 mods from this month’s contest.
1. Tom Strock, Waunakee, Wisconsin
Mounting Brackets In Dinette For Bicycles
2003 Chevy 2500HD
2000 Bigfoot 9.6
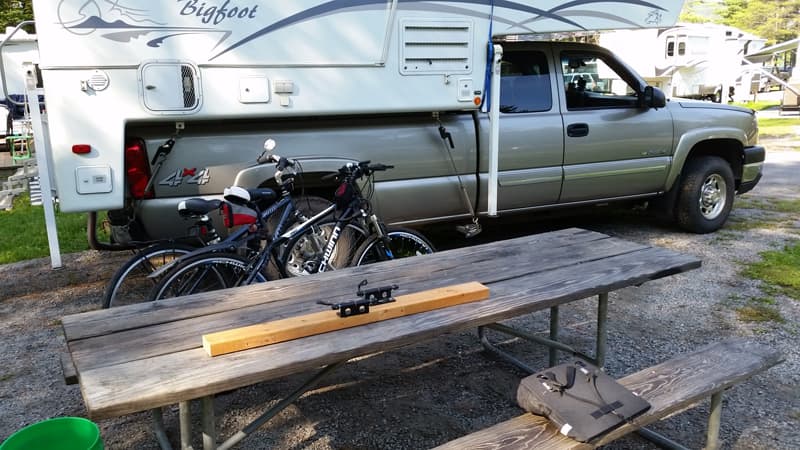
We love to take our toys with us when we travel. Our kayaks, strapped upside down to the roof racks, are out of the way and can handle any type of weather. However, our bikes posed a different set of challenges.
We used to carry the bikes hanging from a rack mounted to the back ladder. They would need to be removed to get access to the kayaks on the roof. They were also subject to dust and rain which makes a muddy mess.
We tried a rear hitch mounted bike rack. That hindered back door access while still having to deal with wet muddy bikes. Then I had an aha moment, “What about putting the bikes inside the camper?”
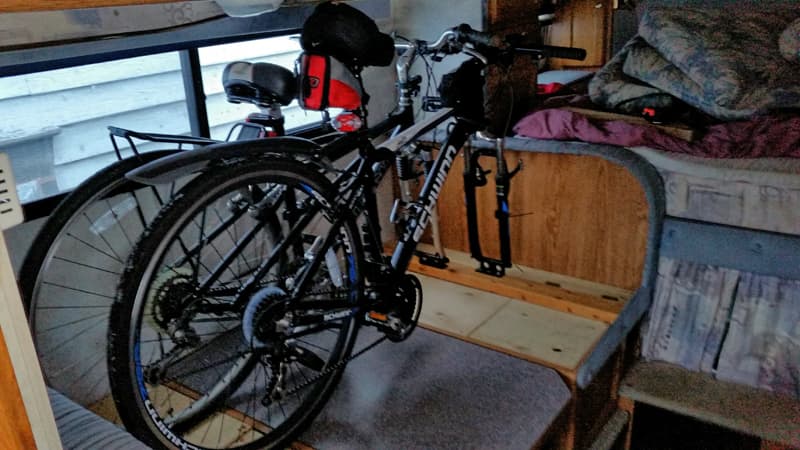
Our Bigfoot camper has a face-to-face dinette that easily makes into a bed. This area should be large enough to carry two bikes. But, how could we hold them in place securely enough for travel?
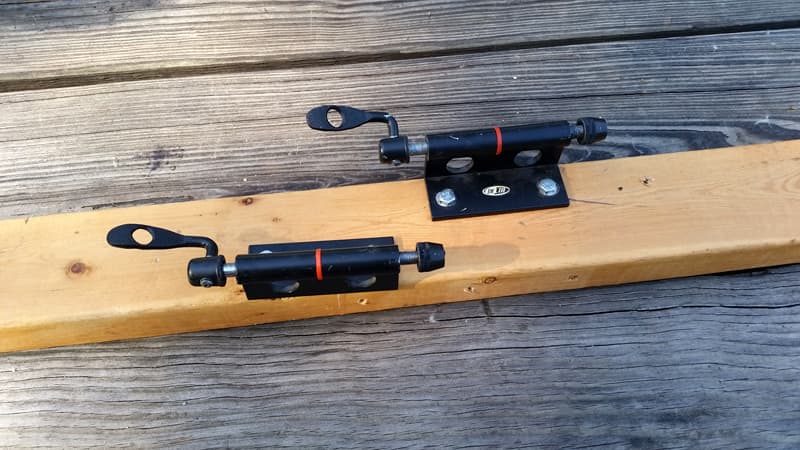
Then I remembered that several years ago I had bought a couple quick release clamps that bolt on the wall. You store your bikes by clamping the front forks into them.
I cut a piece of 2×4 long enough to snugly fit between the wall and the lip of the bench seat that holds the cushion in place. Removing the bike’s front wheel (with the same type of quick release) allows the handle bars to be turned 90 degrees. This provides clearance up to the steps and through the door with the back wheel rolling up the steps and into the camper.
Then I clamped the mounting bracket into the front fork and lifted the bike onto the bed. After making sure that the handlebars were clear of the window blinds, I lag bolted the bracket into the 2×4. I repeated the same process for the second bike. The 2×4 simply sits on top of the dinette seat and is not fastened in any way.
The mounting brackets hold the bikes in place very securely. The front wheels store vertically between the back wheels which can be swung over close to the wall providing additional room for storage or to sit on the edge of seat. There is enough room for the back cushions to remain in place while the seat cushions either fit under the table or on the bed.
While the bikes are usually the first thing unloaded upon reaching our destination, they can be left in place for an overnight Walmart stay giving us access to everything in the camper except the table.
Once the bikes are unloaded, the 2×4 is lifted out and stored under the camper or picnic table. No tools, no straps, no mud, and no more wet bike seats.
It took me It took about 15 minutes to make one cut on the 2×4 and to drive the four 1/4-inch by 1-inch lag bolts. The mod cost me nothing because I had everything on hand. You should be able to buy everything for less than $30. In my opinion, the skill level of this modification is easy.
2. Nancy Carvalho, South Hadley, Massachusetts
Window Insulation To Keep Sun and Cold Out
2006 Ram 3500
2013 Alaskan Camper
In our Alaskan Camper, sunshine was coming through the mini-blinds and keeping me awake. When the sun came up, it came through the camper windows and mini-blinds, and we were awake.
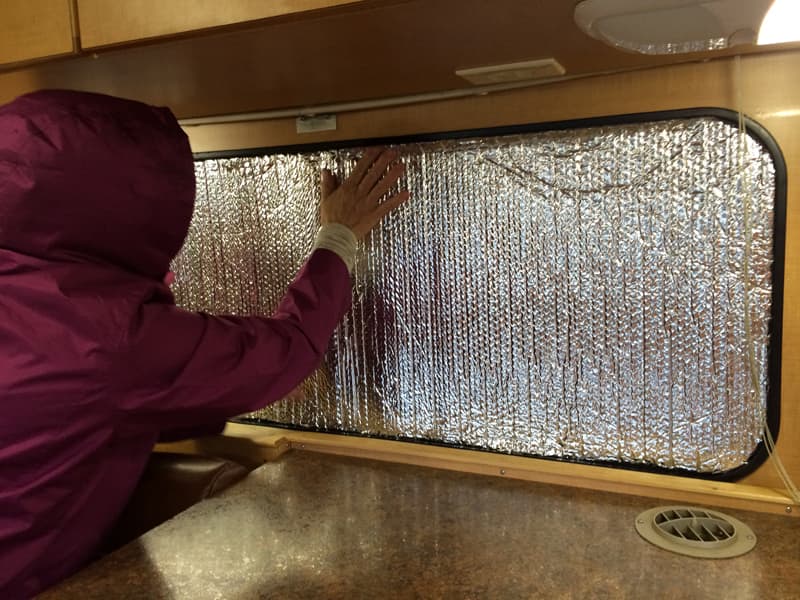
In our search for something to keep the light out, I wanted something that would fit easily, and be put up and taken down easily. I like mini-blinds for privacy, and didn’t want curtains because they block the view.
I used foil insulation from Home Depot and cut it with scissors to the same shape as the window, slightly oversized. Now, all I have to do is to put the foil insulation pieces in the windows. The mini-blinds hold them in place.
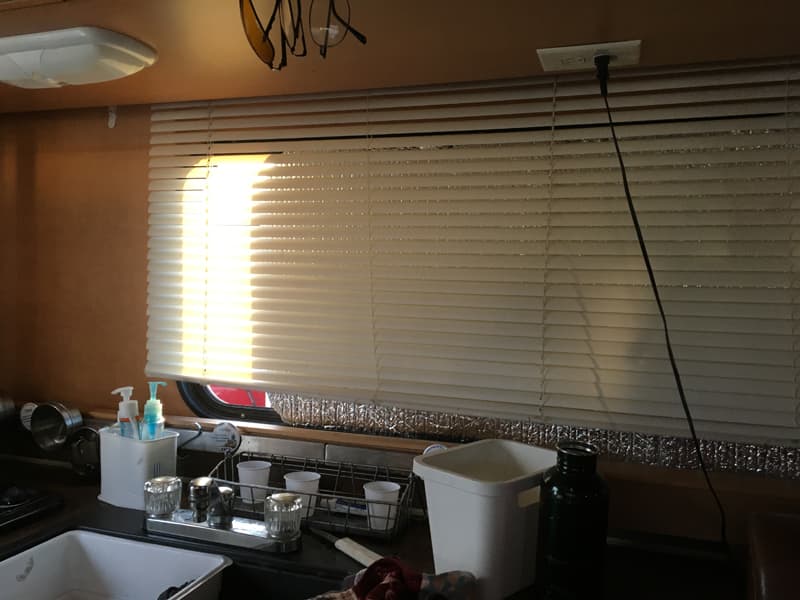
If there’s a breeze and you want to leave the window open, just drop the mini-blinds down and roll a part of the insulation. Then, you can open the window and get breeze.

We did this for the two main windows, and the door. The windows in the cabover had snap insulation that came from Alaskan, so we didn’t need it there.
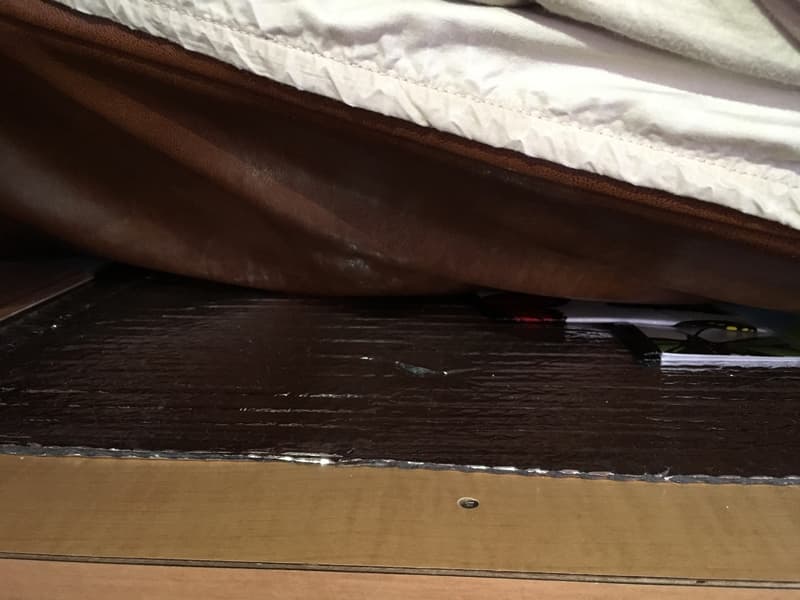
Above: Insulation under the camper’s mattress
We also put that same insulation under the bed. We just cut the insulation to the size of the bed. It keeps the chill off the mattress.
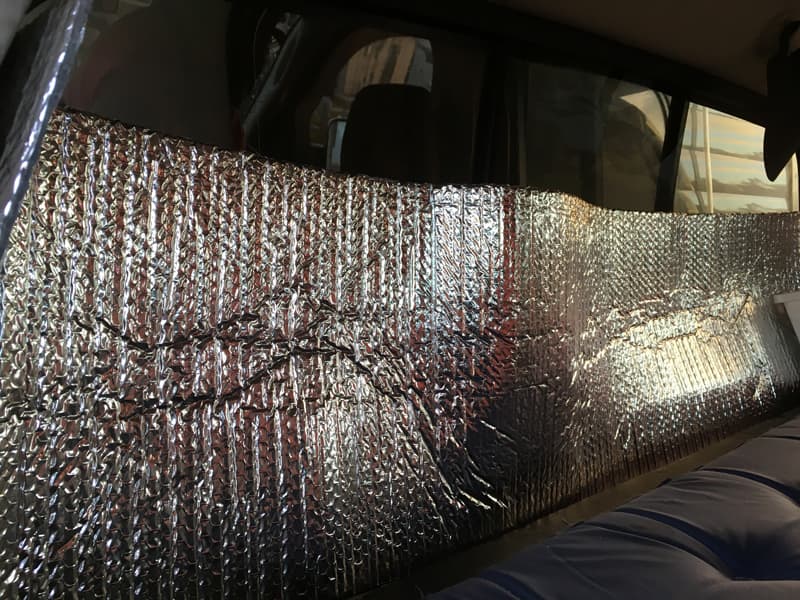
Above: Insulation on the back truck window to keep the cold and road noise down
I also put it in the truck on the back window to keep the cold from coming in, and to lower the highway noise.
This mod has been really great! It keeps out the cold and light.
It took me twenty minutes to complete this modification. The cost was simply the cost of insulation at Home Depot. In my opinion, the skill level of this modification is easy.
3. Richard Mount, Washago, Ontario
Wall Mounted Beer Opener On Outside Of Camper
2013 Ford F150
2013 Four Wheel Campers Grandby
I enjoy craft beer. Often craft beers do not have screw top bottles, and I can never remember where I left the bottle opener.
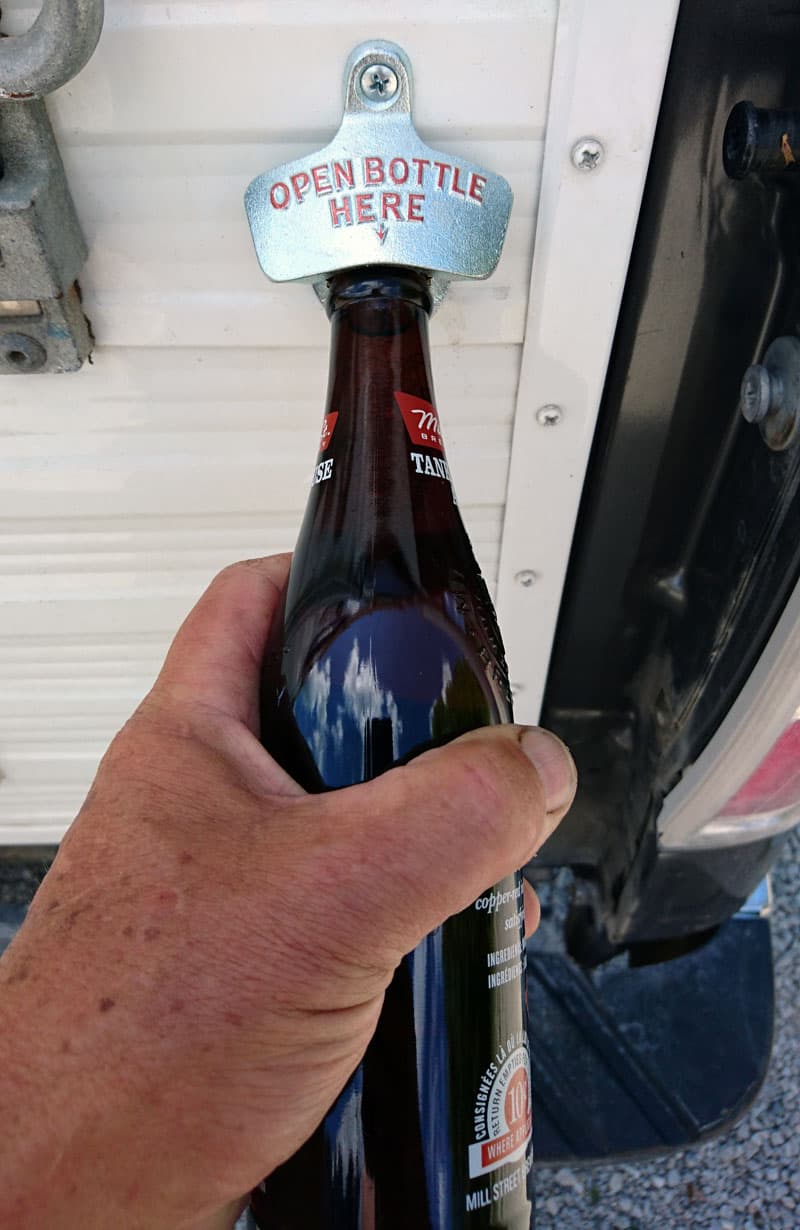
We stopped at a small brewery in Maine and they had a basket of these old style wall openers by the checkout.
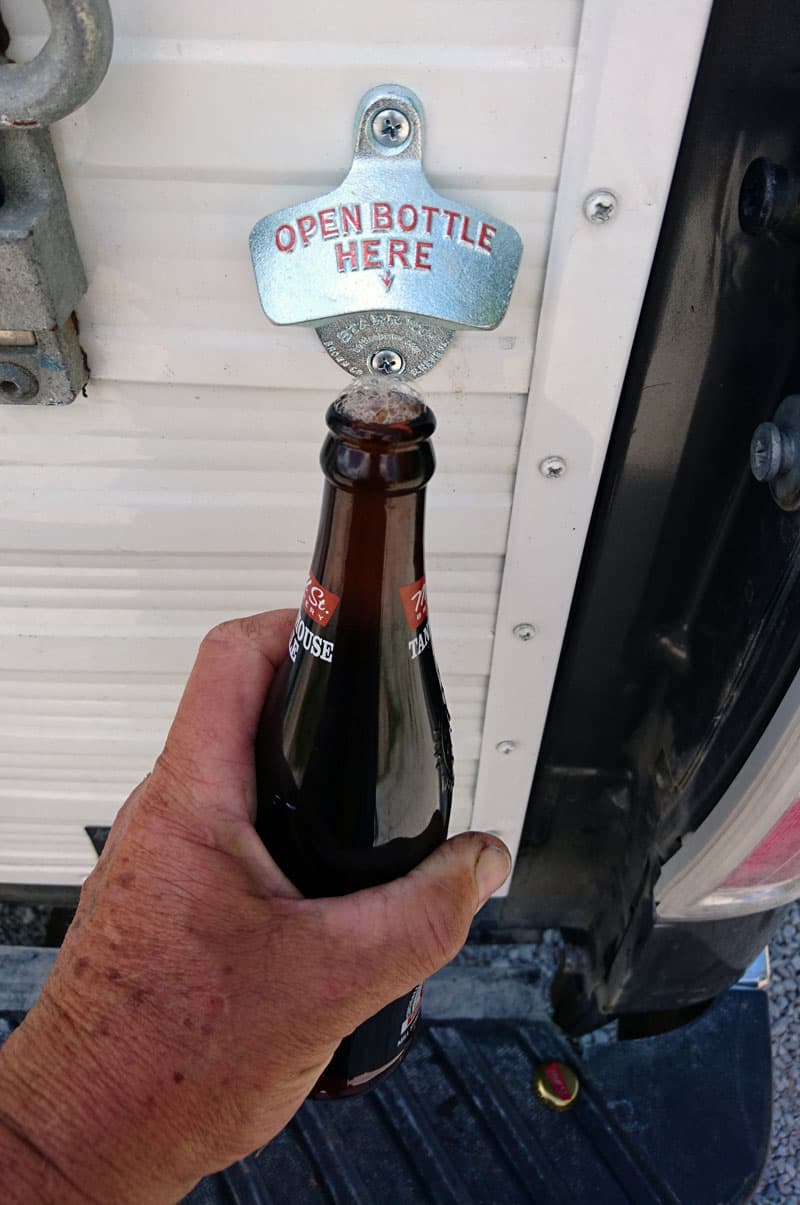
So, I bought one and screwed the opener on to the back wall of the camper.
It works perfect! If I can find the camper, I know exactly where the bottle opener is located.
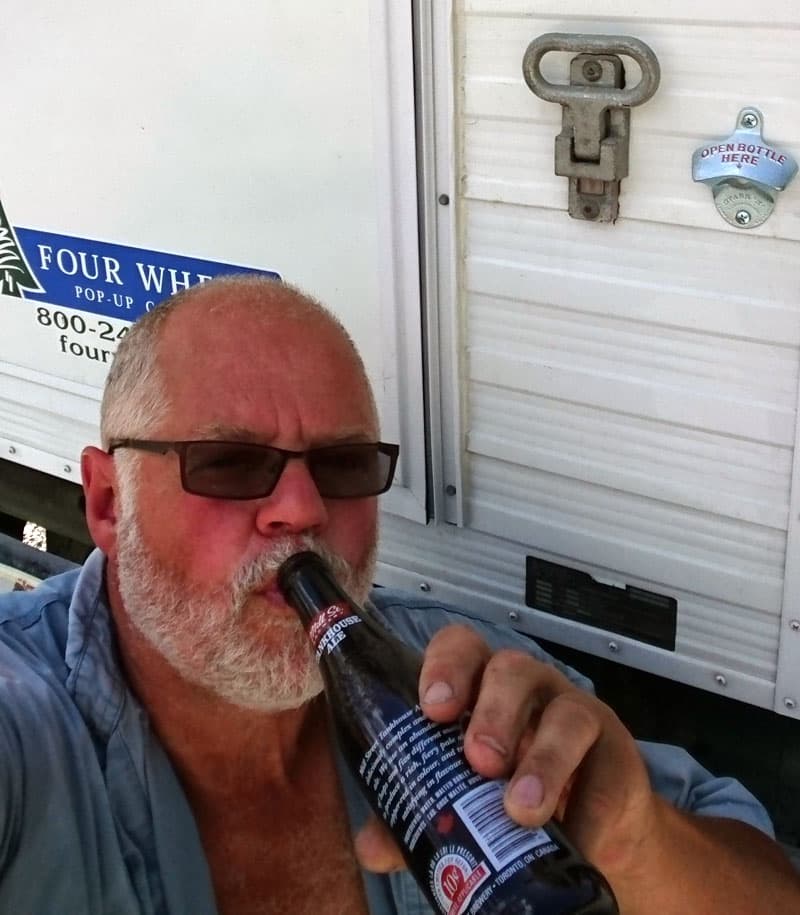
It took me two minutes to complete this modification and cost me under $10. In my opinion, the skill level of this modification is easy.
4. Kate and Roland Goetz, British Columbia
Medicine Cabinet Metal Rods and Storage Trays
2008 Ford F350
2016 Northern Lite 8-11 Queen SE
On our first few trips out, all the stuff in the bathroom medicine cabinet fell out and landed in the sink and elsewhere as we drove. This got to be old really fast because I’m a neat freak and didn’t want to have to keep fishing the dental floss from behind the toilet.
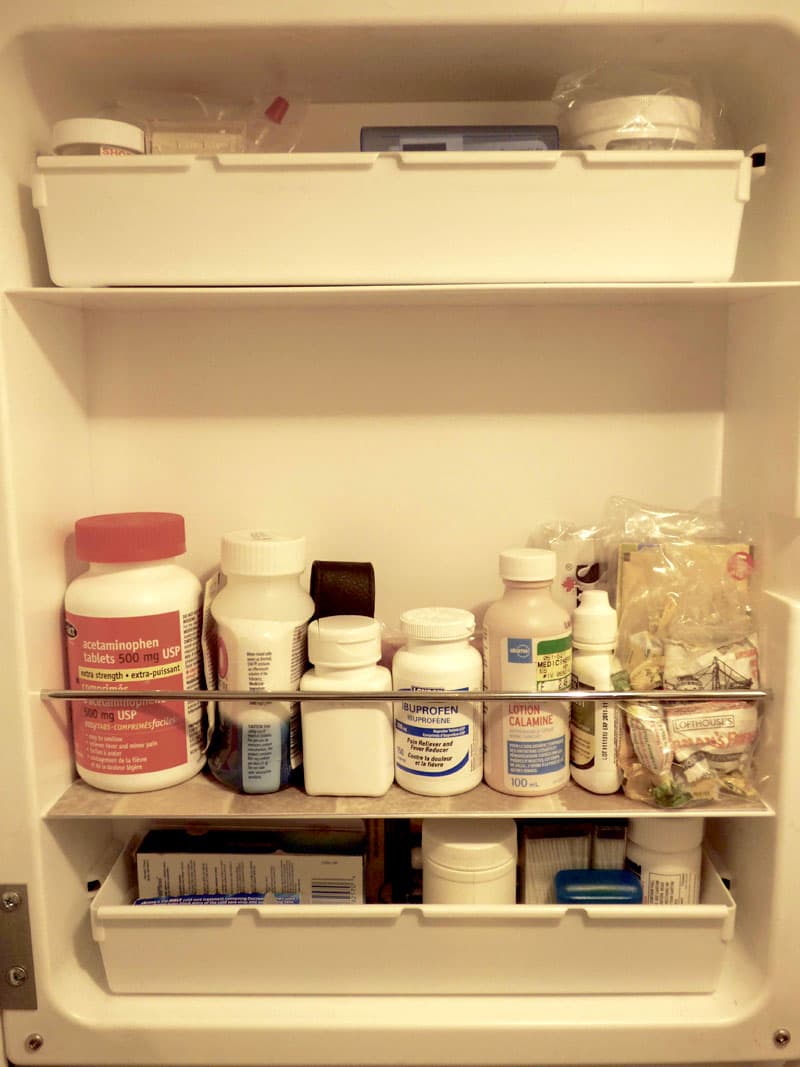
Roland used a short length of metal rod to secure some of the taller things inside the medicine cabinet. He drilled a hole into the cabinet wall on each side of the middle shelf and slid the rod into the holes.
For the smaller things that would still fall out from behind the rod, Roland used some Rubbermaid cutlery/utility trays.
To keep the trays secure, we put 1-inch adhesive magnetic tape on both the bottom and back of the trays, on the walls of the cabinet, and on the shelves themselves.
The magnetic tape keeps the trays from falling out, but still allows them to be taken out when we need to access the stuff in them.
It’s been a great solution for us. In five months on the road, the things inside the medicine cabinet have stayed put – even over the bumpiest roads.
It took me less than an hour to complete this modification and cost me $20. In my opinion, the skill level of this modification is easy.
5. Ray and Brenda Fair, Hopkinton, Massachusetts
Boot Brush Mounted To Bumper Steps
2013 Silverado 2500 HD
2015 Eagle Cap 850
A day walking on a beach or walking up a mountain trail is great until you return to the truck camper with all the sand, dirt, leaves, and/or grass on the bottom of your foot wear. Just sitting around the campsite is great until you start to go into the camper and hear a voice say, “Take off your sneakers”.
But we will only be a minute going in for a brew or cookie!
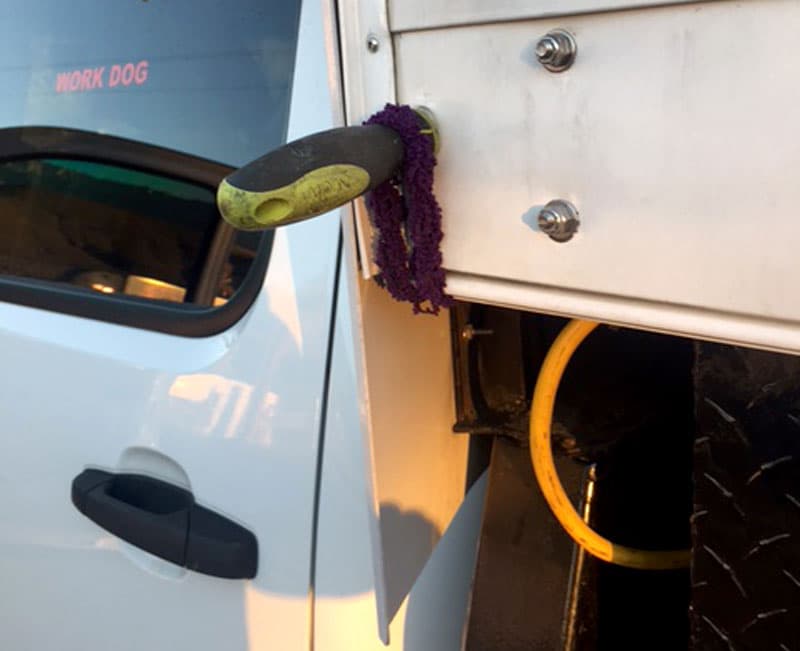
To address this problem I purchased a boot brush at Bass Pro for $20. With a cup of coffee in hand I had to figure out where to install the brush.
Possible location 1: Under the back porch. That would be hard to use and one would have to stand on the ground in order to clean the other foot
Possible location 2: On a hinge under the step that could be lower for cleaning and raised when the steps are raised and made ready for travel. This would interfere with the door to the basement that is behind the removable steps.
At this point my coffee was getting cold, and I had to make an executive decision. I would mount the brush on the side of the steps. But which side? The right side was the best option.
I drilled two holes into the stair frame and used #10 stainless screws to attach the brush to the frame.
The sequence to clean the foot wear is (1) clean the left foot first and then (2) step onto the first stair step and then (3) clean the right foot. Should someone have a balancing problem when standing on the left foot while cleaning the right foot, the assist entry handle is just above the brush.
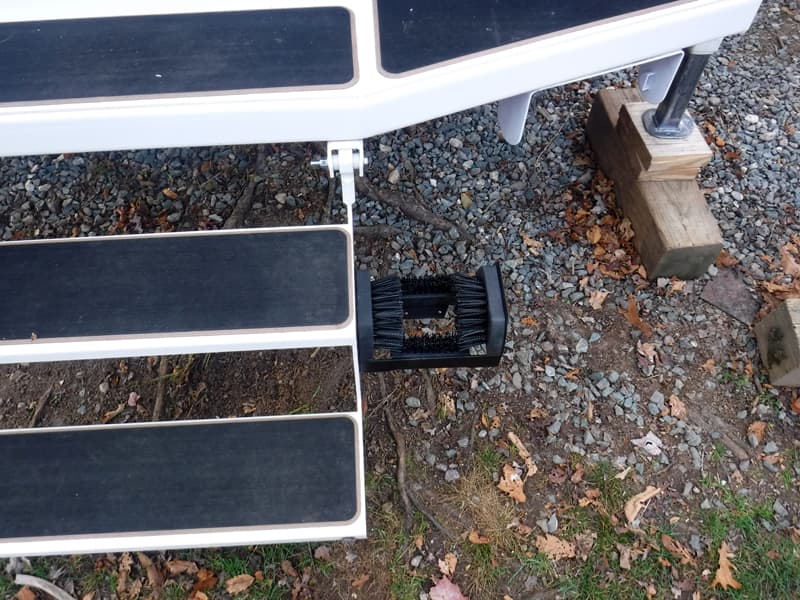
The first picture shows the stairs in the down position with the brush mounted on the right side.
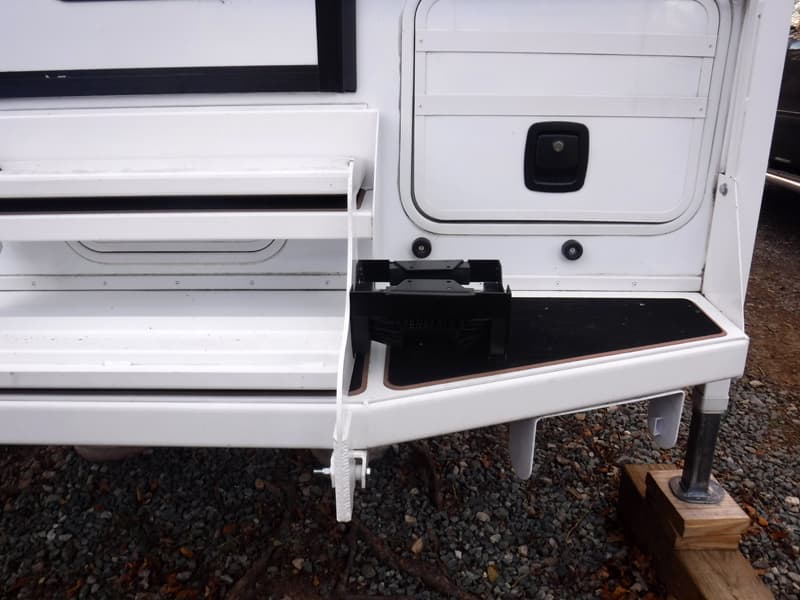
The second picture shows the stairs raised into the stored position for travel.
It took me 20 minutes hours to complete this modification and cost me $20, plus a cup of coffee. In my opinion, the skill level of this modification is easy.
6. Pam Conner, Parker, Colorado
Knife Block Behind Stove
2015 Ford F350
2015 Arctic Fox 1150
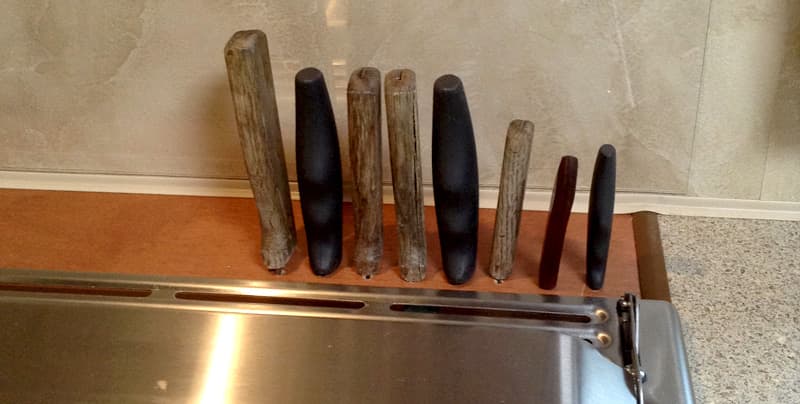
Before our truck camper I owned a fifth wheel. Behind the stove and oven on our fifth wheel were knife slots. I liked having that space to keep sharp knives from moving around and dulling while driving. It also a kept young hands away from them.
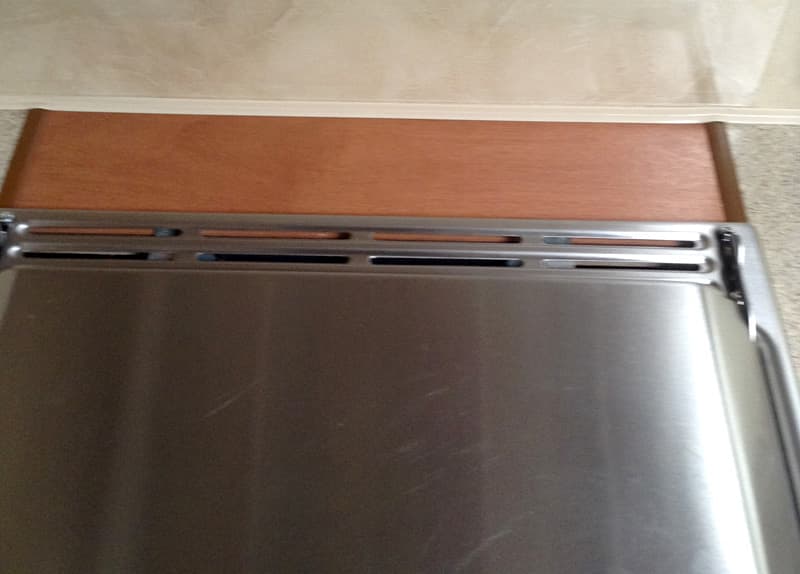
For this mod, I started by removing the drawers next to the oven to check behind it for wiring, pipes, etc. Once I verified it was clear of obstacles, I checked to see how much space I needed in between the knives, and the length of slot each knife required.
Once I had those measurements, I marked the slot spacing on the board and drilled pilot holes on each end of the slot. From there I proceeded to cut a slot between each pilot hole.
Then I inserted each knife into a slot. I discovered that the longest knives needed to be toward the center of the space and the shortest knives could go on the edge.
Having had this set up in a previous camper, I knew this mod will work out great for me. I haven’t had a chance to take the camper out since completing this mini-mod, but will be headed out very soon.
It took me one hour to complete this modification. It was free because I already had the few tools needed for this mod. In my opinion, the skill level of this modification is easy.
7. Russell Berquam, Clever, Missouri
Gorilla Tape Weep Hole Solution
2014 Ford F350
2015 Arctic Fox 1140
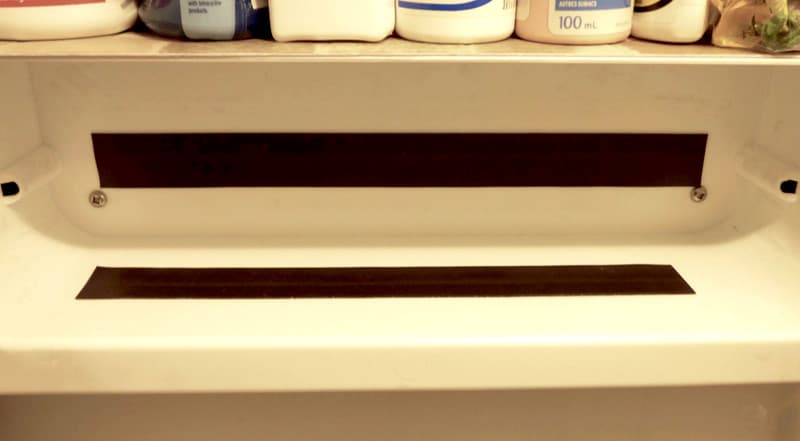
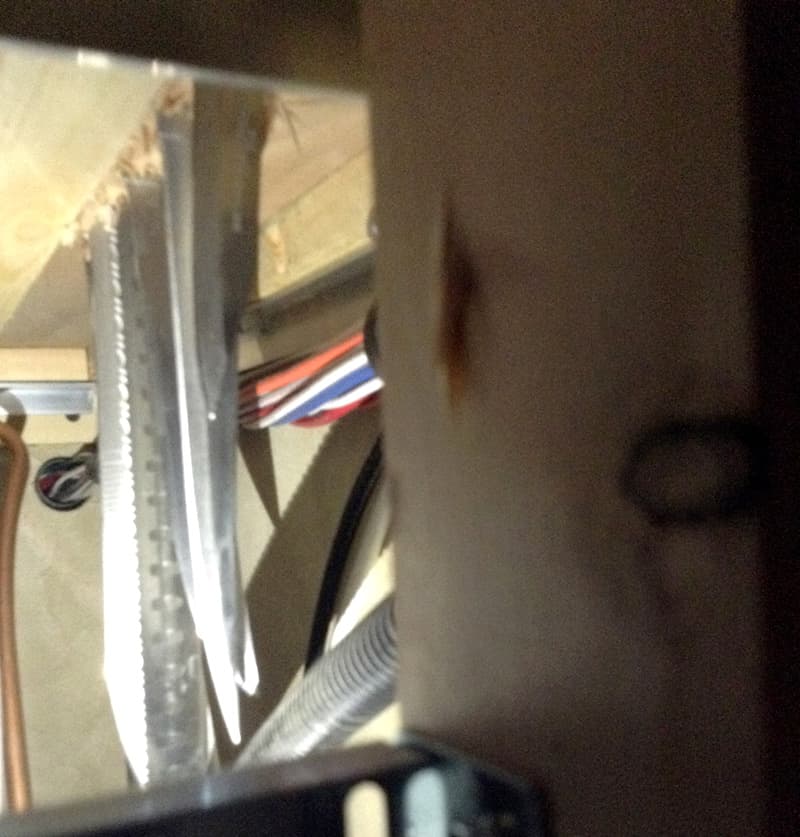
Our new camper has a front window behind the cab of the truck. The window is a standard Hehr window with weep holes at the bottom of the frame.
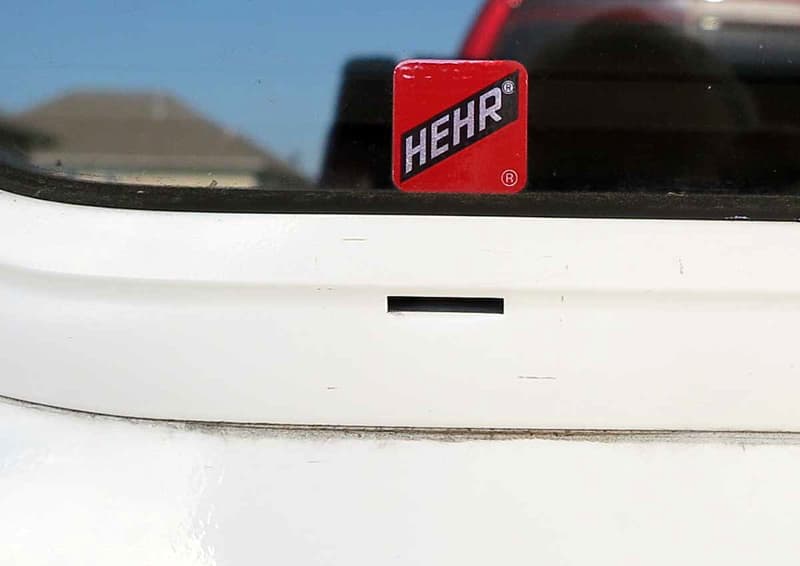
When we drive down the highway in a heavy rain, the weep holes let the rain water into the camper. The RV stores have a plastic cover that will keep out some of the water, but a simple piece of tape over the holes will (a) let condensation water drip out and (b) keep the driving rain out.
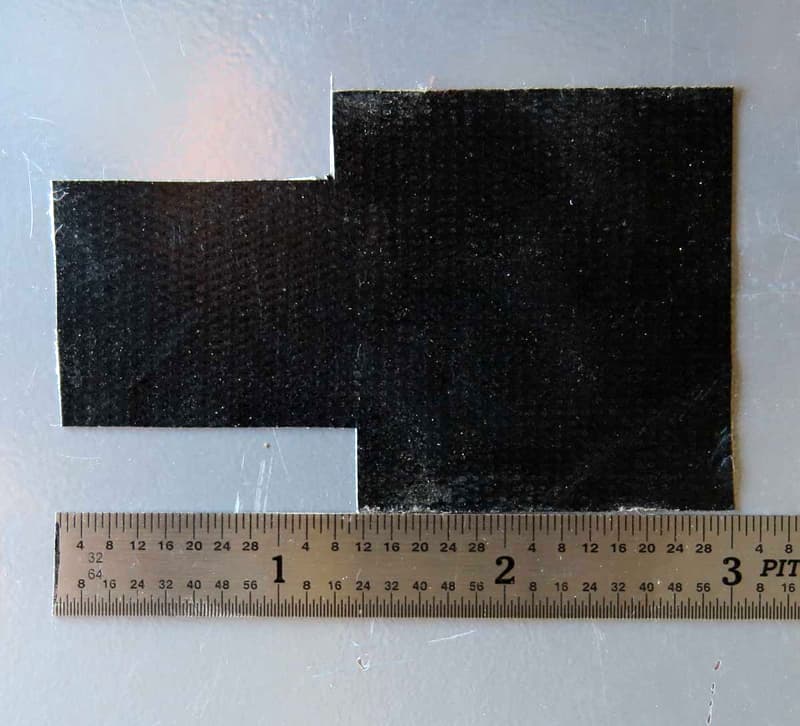
I used Gorilla tape, but duct tape should also work. I cut a piece of tape three inches long and cut notches out of tape 1¼-inch long by ⅜-inch wide as shown in the picture.
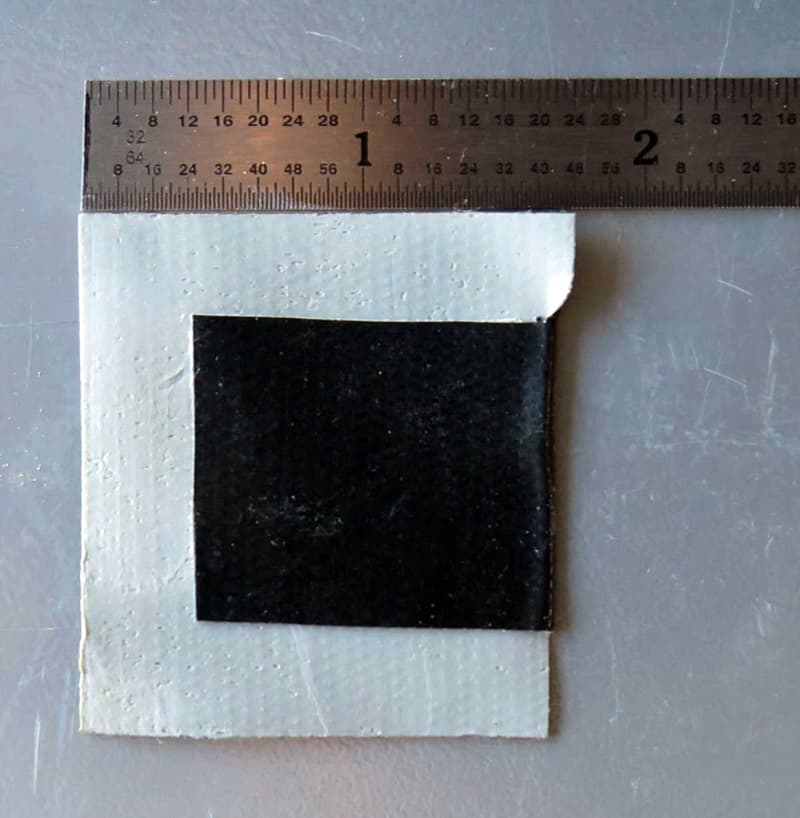
I folded the small end where it will keep the tape from sticking to the frame of the window. When I applied the tape to the window frame I kept the center away from the frame to form a channel for the water to drip out.
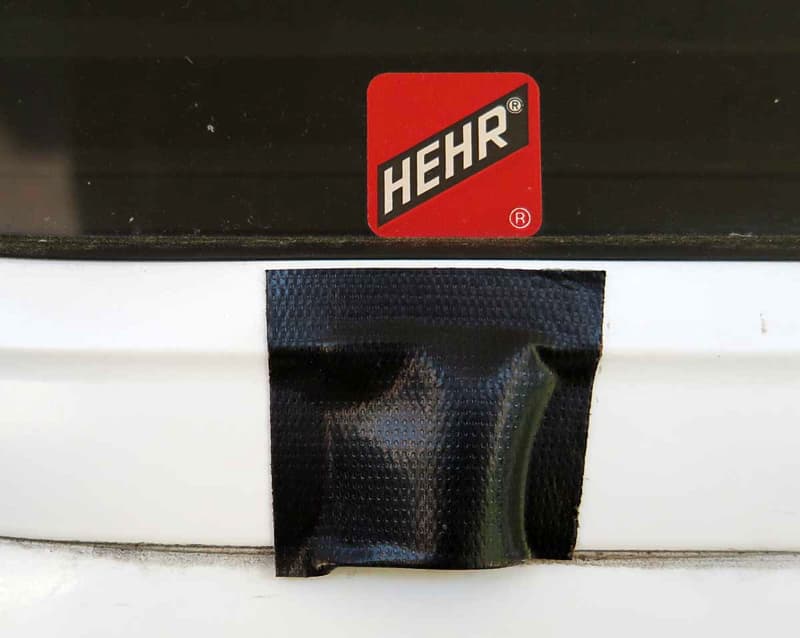
Make sure that the sticky part is applied above the weep hole so the hole is not sealed. The tape channel is long enough to keep the driving rain out of the camper.
After the mod, there are no rain leaks. It works great!
It took me half an hour to complete this modification and cost me a few cents. In my opinion, the skill level of this modification is easy.
8. Steven Sternberg, New London, Wisconsin
Backsplash Made From Floor Tiles
2013 Chevy 2500 HD
2012 Palomino Maverick 8801
I made a back splash for the stove. I stuck on floor tiles for the back splash. The back splash can be changed to different colors if you wish.
It took me five minutes to complete this modification and it cost me $15. In my opinion, the skill level of this modification is easy.
9. Stephen O’Neal, Miami, Florida
Reminder To Remove Pop-Up Pin
2013 Chevy 3500 HD
2011 Alaskan 11-foot cabover
Alaskan Campers fabricated a bolt hole through the camper pop-up roof so that a pin can be inserted to prevent the roof from raising itself in high crosswinds and/or at highway speeds.
My problem was that I would forget to remove the pin (in my case a screwdriver held in place with one of my granddaughters hair wraps) before trying to raise the top.
The solution was to place a piece of masking tape over the entry door lock key hole every time the camper top pin/screwdriver was installed.
It took me minutes to complete this modification and the cost was free. In my opinion, the skill level of this modification is easy.
10. John Tseka, Hartland, Connecticut
Bubble Levels In Cab Of Truck
2004 Chevy Silverado 3500
2012 Lance 850
I wanted to simplify leveling the rig. I started by purchasing a set of those small bubble levels. Then I parked my rig with the camper loaded up for a trip on a flat level surface. I checked the level at the kitchen counter surface in the camper.
Then I installed a stick on each of the bubble levels and placed one on the center of the dash and the other on the foremost part of passenger’s side door. The driver must be able to see both levels easily.
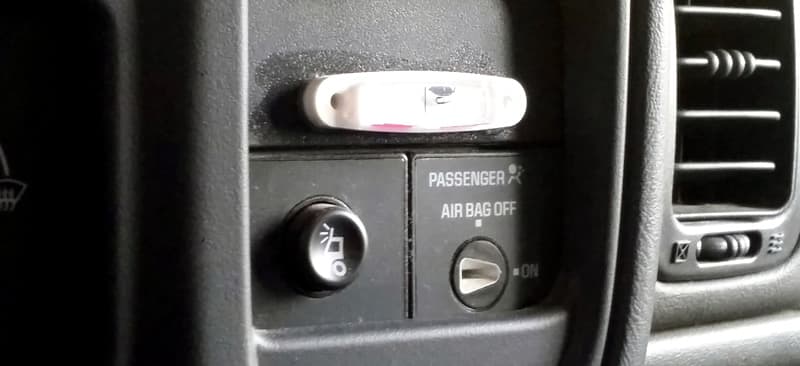
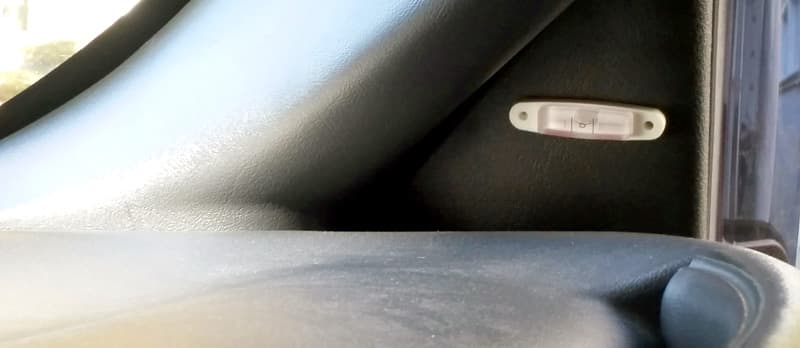
This mod has been excellent. I have about eight 16-inch pieces of rough 2x6s for leveling blocks. I just glance at the cab levels and place a few blocks on the ground. I drive up on the blocks and it’s done.
It took me ten minutes to complete this modification and it cost me $8. In my opinion, the skill level of this modification is easy.
Click here to vote for your favorite 3 mods from this month’s contest.
Disclaimer: The modifications above are submitted by Truck Camper Magazine readers. It is your responsibility to make sure that any do-it-yourself modification project you undertake is safe, effective, and legal for your situation.
Enter Your Mods Now!
If you’d like to enter a modification that you’ve done on your truck camper, click here. You can enter as many mods as you want, at any time. Good luck mod makers!


