Welcome to the PowerMod truck camper mod contest, sponsored by Goal Zero. One mod will be published in every Email Alert in June. At the end of the month, a reader vote will determine a winner. Click for information about the 2024 PowerMod Contest, including how to enter.
Kevin Mooney, Nimpo Lake, British Columbia
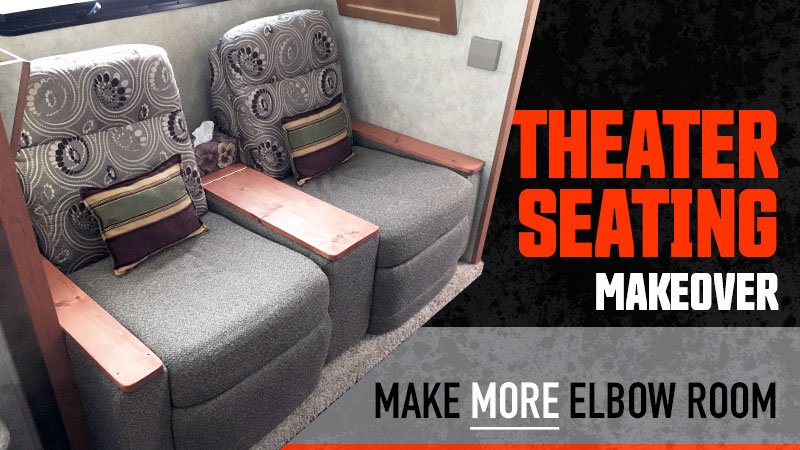
Theater Seating Makeover
2022 Ford F-550
2016 Eagle Cap 1200
One of the reasons we purchased the camper we did was because of the reclining seats. At the end of a long day to relax, it’s so much nicer to have a place where we can put our feet up. Yes, I’m getting older.
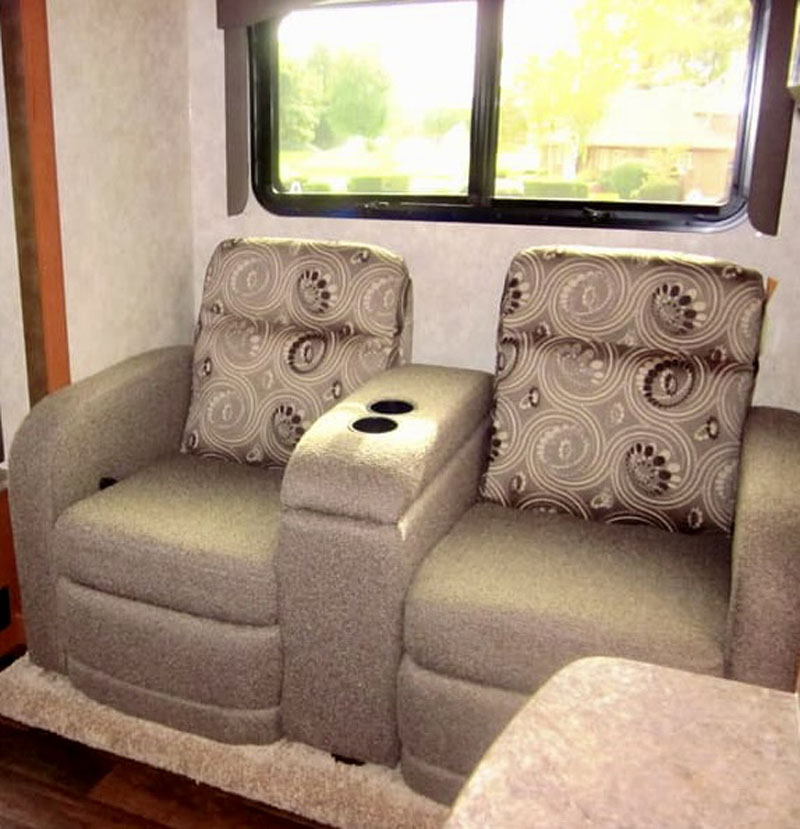
As comfortable as these seats are, the arm rests left a lot to be desired. They were way too high for me and my wife. She’s almost a foot shorter. We either had to have our arms sitting on top of the arm rests, or pinned in beside us. It felt like we could hardly move when our arms were wedged in between them. We use a reclining love seat at home all the time. It is very roomy and comfortable. It was time to make some improvements.
I knew this couch would be an absolute bear to try and wrestle out the door, so I decided to take it apart inside the camper and move it in pieces as needed. That was way easier; been there, done that.
First, you have to get your hands up the inside of the backrest and feel around for two spring clips; one on either side. Pull those out a bit while trying to lift up at the same time. Try not to tear a fingernail off in the process. Those springer things are small and stiff. A little help with wiggling doesn’t hurt!
Once the backs are removed, it is time to practice all those cool yoga exercise moves you’ve been practicing all winter. Pull up on the reclining mechanism and get down on the floor. There were five lag screws on each mechanism; two on one side and thee on the other. For four of them you can just back out an eighth to a quarter of an inch as you will notice that they sit in a grove or track on the metal frame. The fifth one is really hard to see, and is the only one that has to be completely removed. Once it’s removed, the whole mechanism can be slid about an inch forward and lifted right out. Bonus.
So now you have this wooden frame assembly that is a whole lot lighter and easier to move. I had to remove the dining table in order to get the right angle on the dangle in order to wiggle the frame out the door. It was way easier than trying to get the whole couch out in one piece. Off to the shop we go.
Before actually commencing with the slicing and dicing part, we had taken measurements for how much we wanted to trim off, plus the extra 3/4 inch for the arms being added back on afterward. For us, the magic number was four inches. It’s never really comfortable cutting apart a piece of furniture that I’m sure is pretty pricey to replace, but I’m handy with a saw and Lori likes to sew, so what could go wrong?
In hindsight, I should have taken more pictures but got caught up in the moment. We started with the center section, removed all the staples, and then peeled down the fabric below the four-inch mark. After making a nice clear mark to follow, it was time to cut. I used a circular saw and a hand saw. It was 3/4″ plywood I was cutting, so no real issues.
Once that piece was removed, we just folded the fabric back over inside the box, re-stapled it all around and we were good to go. You may notice in one of the pictures that there was already a piece of wood in the center. I did that precisely and inserted it inside the center as a quick fix, but all this did was make things lopsided.
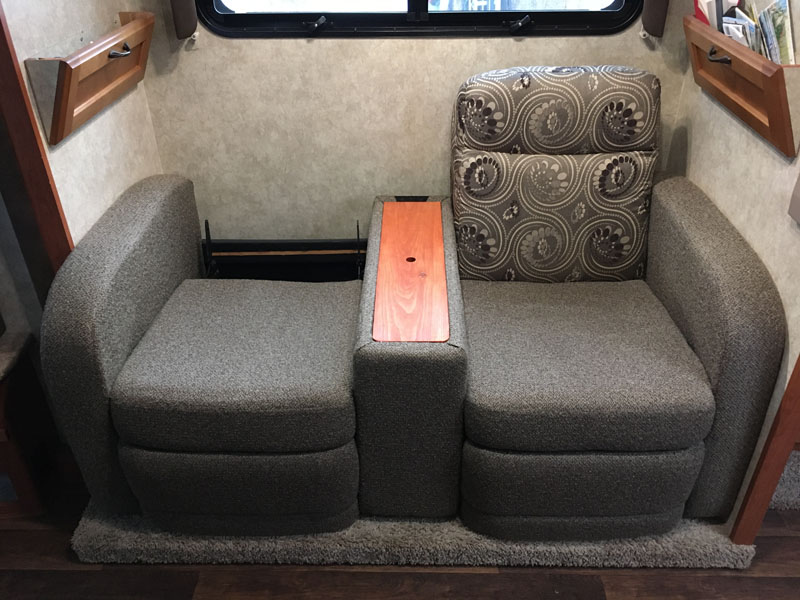
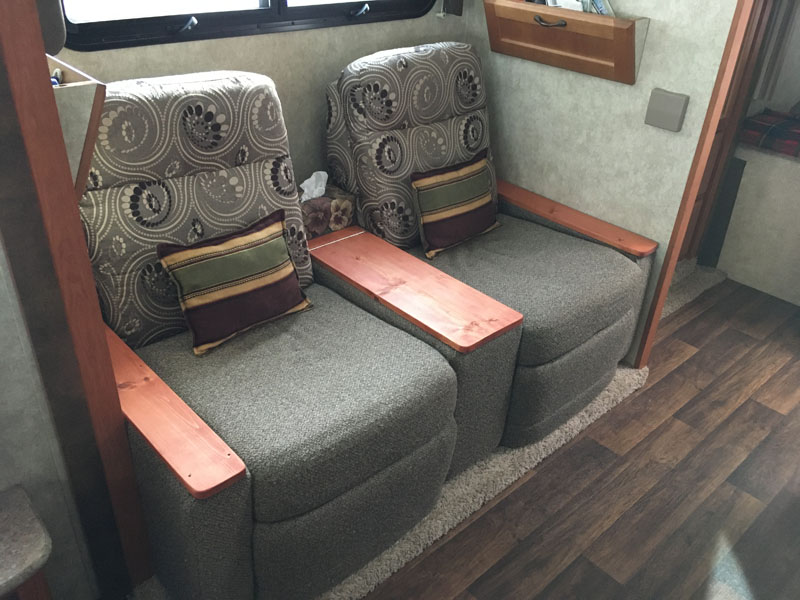
With the arms, Lori chose to cut right down the top middle of the fabric. There were some staples at the back, but basically a repeat of the center section. The arms are no longer rounded as per from the factory, but I dare say they look better. With a small simple foam cushion on top or a pillow, you now have a padded armrest if you choose. And now that four inches are off, it’s a lot easier to get back in the camper door.
The couch feels huge now. Our arms are not hemmed into our sides, so it’s way more comfortable. Although we lost four inches of storage space in the center section, it’s not an issue. I have a modified wine box in there and it makes a great wine cellar. Lori and I both prefer the new look over the old one, so it’s a complete win-win. And seeing as I had the whole thing apart, I didn’t have any excuse for not lubricating everything so it worked smoother. That’s priceless.
I had to cut four support pieces for the arms, 1×2’s x 29” the arms are mostly hollow, then the wood pieces were for the arms. I used 3’4″ pine because that’s what I had on hand, plus an eight-inch piece of piano hinge.
It took me eight hours to complete this modification and cost me nada, but that all depends on what you want it to look like.
Disclaimer: The modifications above are submitted by Truck Camper Magazine readers. It is your responsibility to make sure that any do-it-yourself modification project you undertake is safe, effective, and legal for your situation.
Enter Your Mods Now!
If you’d like to enter a modification you’ve done on your truck camper, click here. You can enter as many mods as you want, at any time. Good luck mod makers!


