Welcome to the PowerMod truck camper mod contest, sponsored by Goal Zero. One mod will be published in every Email Alert in August. At the end of the month, a reader vote will determine a winner. Click for information about the 2024 PowerMod Contest, including how to enter.

Albert Killackey, El Monte, California
Multi-Function Swing-Out Ladder Mod
2019 Ram 3500
2012 Lance 825
Going off-road is fun, but having a five-ton rig stuck in the sand is not. I needed heavy-duty traction boards; aka, recovery boards/mats. I bought Escaper Buddy Traction Mats from Home Depot online (hereinafter, “boards”). The boards cost $129. That’s more than others cost, but they are rated to hold more weight. Now I am ready for sand, mud or snow.
Next came the problem of mounting these 4 foot long, 15-inch wide boards on the camper without the appearance of having roped a load onto a pack mule for the backcountry. In my opinion, a mod must not sacrifice quick and easy use of a camper or camper function.
I began with the idea of hanging the boards on a chain link gate frame mounted on the ladder (hereinafter, “gate”). By coincidence, the ladder and the boards are each approximately 14 inches wide. I was also lucky the boards would not cover the tail light below or the docking light above them. During travel mode, the gate is locked shut. If the ladder is needed, the gate opens instantly.
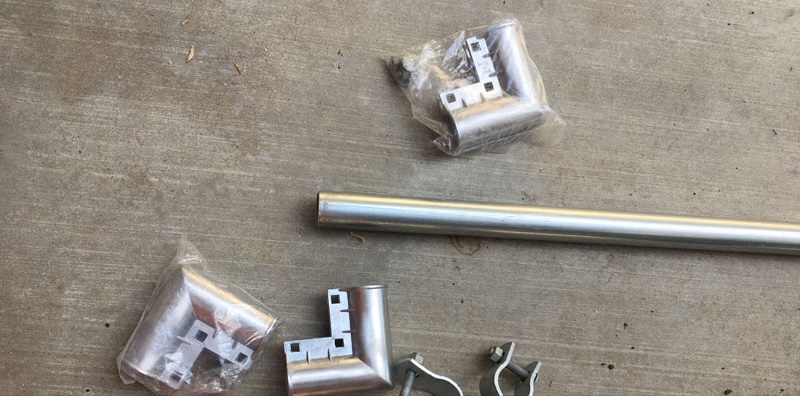
I gathered parts by going to Mission Fence in Rosemead, California; a custom chain link fence and gate builder. The owner handed me two 1 5/8 inch post hinges to attach to the ladder side rail ($9) and two 1 3/8 inch gate hinges ($4.50) to mount on the gate. I added four 1 3/8 inch gate corner pieces ($26) and 10 feet of 1 3/8 inch tubing ($23) to fabricate the gate’s frame. I also bought a Velcro strap ($10) to pull the gate snug to the ladder during travel.
The total cost so far was $75.
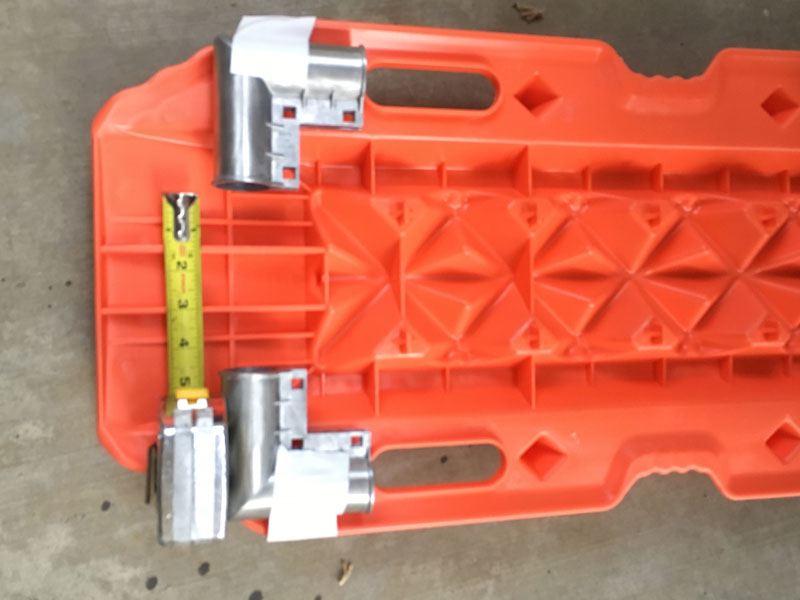
My plan was to hang the boards on eye bolts bolted to the vertical pipes of the gate. That required the width of the gate to align with the slotted handles on the boards.
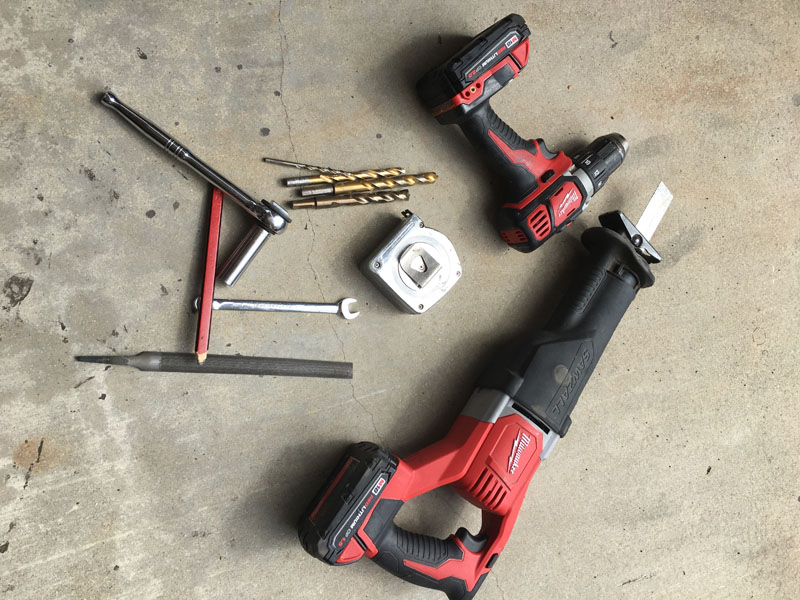
I used a sawzall to cut the tubing, a rubber mallet to tap the post hinges to the ladder side rail, and some sockets and a wrench to tighten all the nuts and bolts.
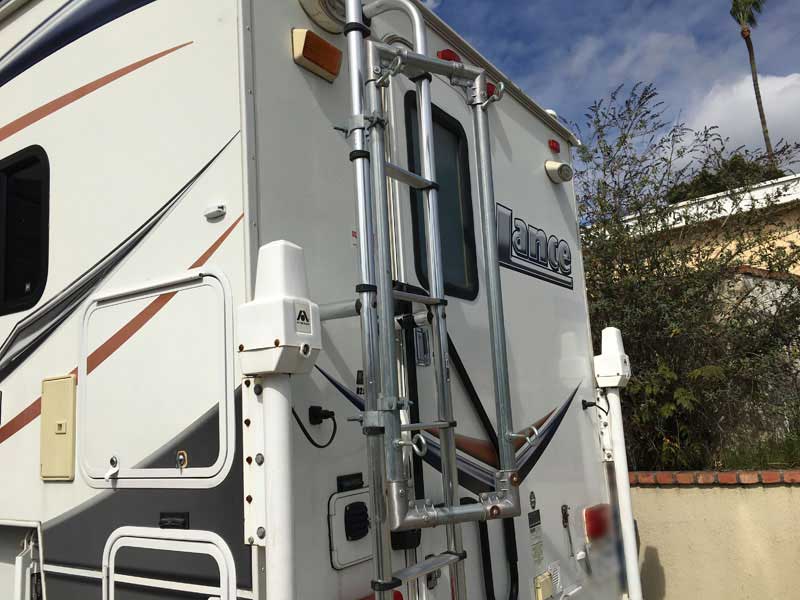
To keep the gate safely in place, the top post hinge must point downward while the bottom post hinge points upward. That keeps the gate from rising up and off the ladder.
Although gate corner pieces tighten very firmly to the tubing, I decided to add safety and strength to those connections using 1/4-inch bolts with lock nuts drilled through each side of all four corners.
Those 8 bolts, 8 locknuts, and 16 washers cost $12. The four eye bolts cost $10. I bolted them on each side of the gate at the top and bottom. Once the boards were mounted on the eye bolts, I used Velcro straps through the eye bolts to hold the boards in place. I later locked it all together with a cable and lock, which cost $20. Thus another $42 was added to the initial $75 for a total of $117.
Although I hang my boards on the gate, it can also be used to hang other lightweight items such as beach chairs or fishing poles. I would not hang anything heavy on the gate.
Since mounting the gate, I have driven over 15,000 miles without incident. If I had it all to do again I would have a custom gate made by Mission Fence. It would be a single pipe with all four corners bent by a machine. Then the pipe ends would be welded together. The result would look more neat, clean, and professional.
During travel, the boards project 8 inches out from the ladder. This is almost identical to the furthest rear point of the Torklift Stow N’ Go steps mounted on my hitch. I work slowly and it took me approximately two hours to build the gate and attach it to the ladder. The skill level needed is minimal. The final result allows me to simply unlock the lock to open the gate which moves the boards completely out of the way of the ladder.
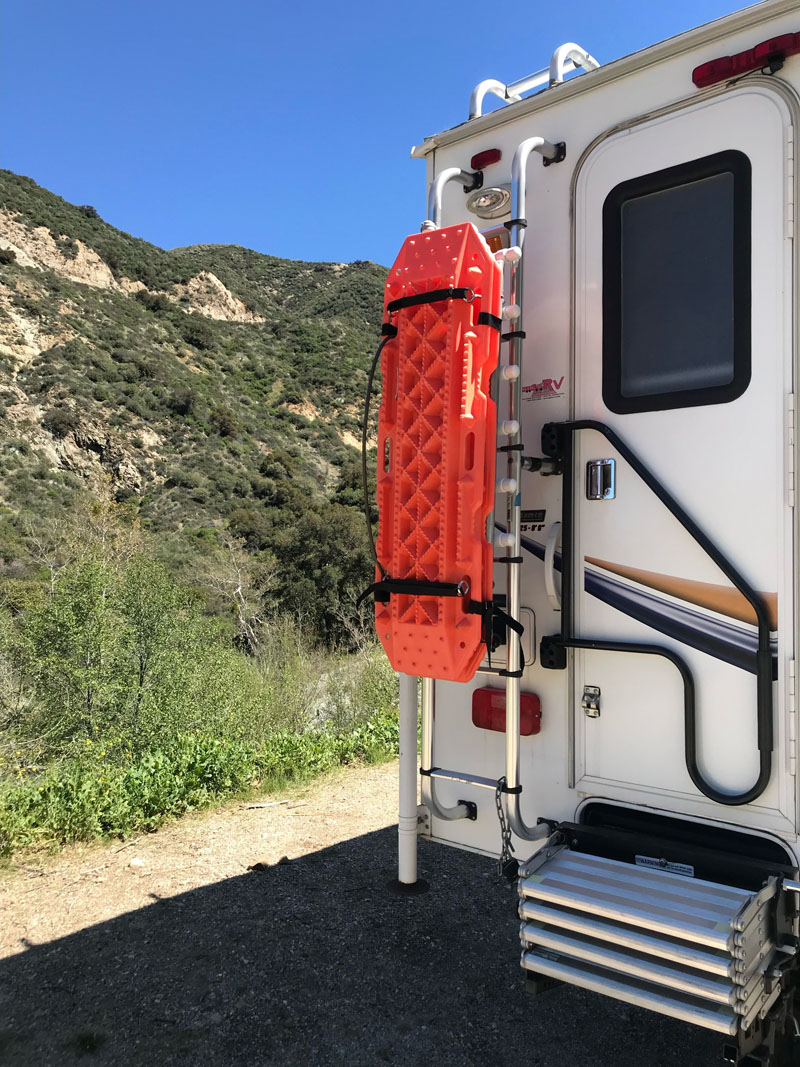
Once completed, I noticed the gate mod is a door to useful space 4 feet long by 14 inches wide by 10 inches deep.
But wait, there’s more! It’s also a hand-operated four-cycle washing machine.
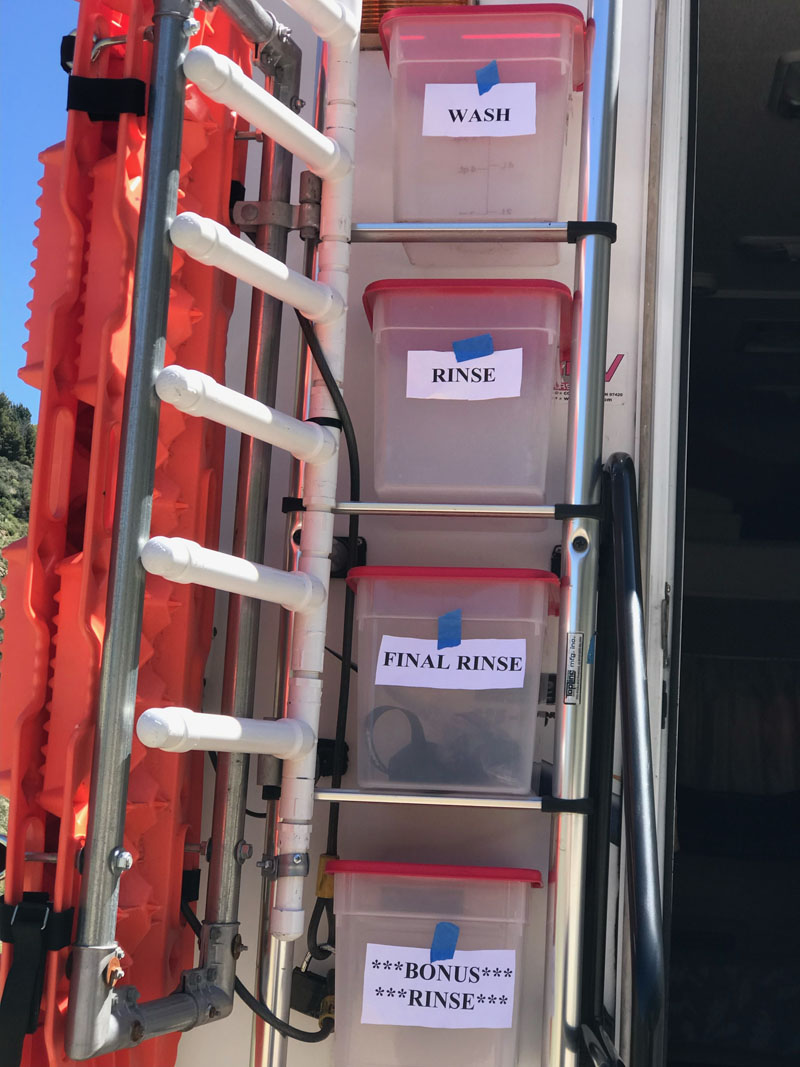
Actually, it’s four, two-gallon (eight gallons total) food storage boxes which I have also used for washing (hereinafter, “boxes”).
The idea of hanging stuff on the ladder rungs came one night after I took off my shoes inside the camper. Those shoes needed to go outside; quickly. I was concerned bugs and spiders might crawl inside of them; yikes! I left them on the ladder’s top rung.
The next morning they were a little wet from the dew. I later bought water resistant shoe bags on Amazon which zip tightly closed. Each bag holds one pair of shoes. The two bags cost $25 delivered.
When setting a shoe bag on the ladder rung, I thought of using the four ladder rungs behind the gate as shelves for the boxes. At my local Smart & Final store, I found these polypropylene waterproof storage boxes made by Cambro Food Storage Containers. I bought two 2-pack sets of the for less than $80 total. Each box measures 8 3/8 inches square by 9 1/8 inches high. The four boxes sit perfectly on the ladder rungs and between the side rails.
During travel with the gate locked shut, the boxes cannot shake out. The lids fit tightly. I will never store food in them in bear country for fear of having my ladder expertly removed during the night—scary! However, they are perfect for lightweight items such as coffee, travel mugs, a French Press, coffee grinder, wine glasses and paper goods like napkins and toilet paper, etc. No skill is needed to place boxes on ladder rungs.
But wait, there’s more! It’s a solar and wind-powered clothes dryer.
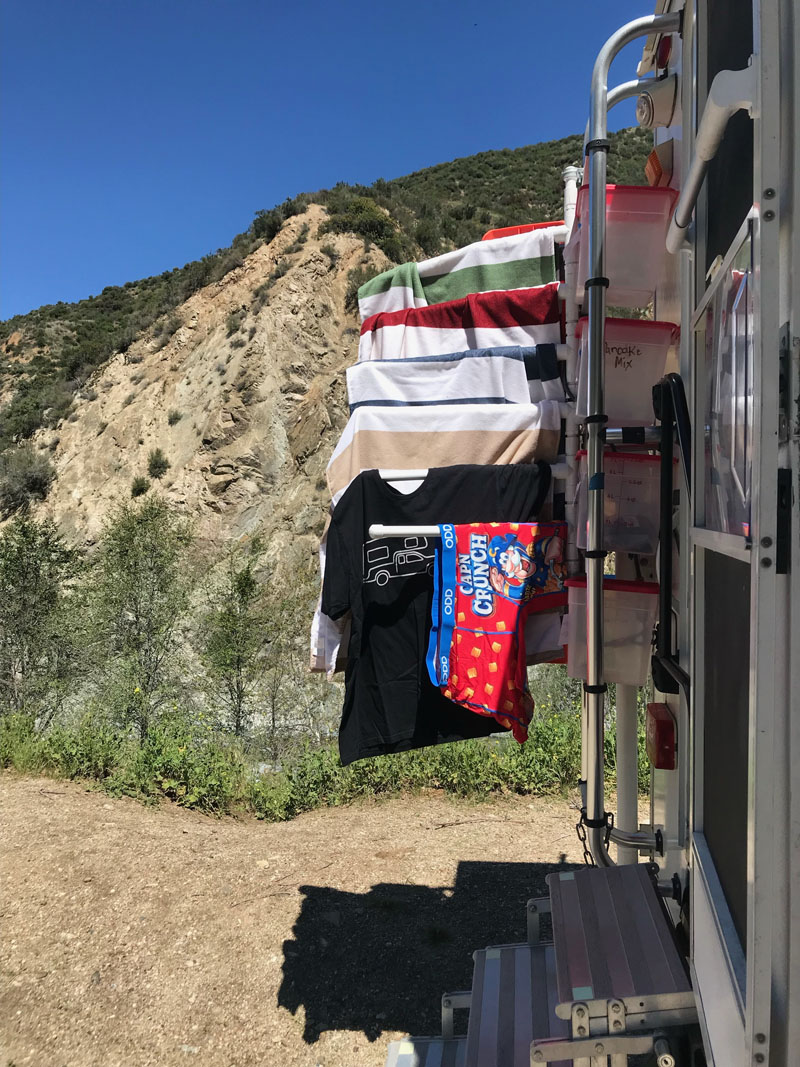
It has six swinging telescoping PVC arms for hanging out clothes on the camper ladder (hereinafter, “clothes dryer”). This idea came to me when pulling the gate snugly to the ladder to assure the boxes were secure. I saw 1.5 inches of vertical space between the gate and the boxes which anyone could see was a perfect amount of space for a clothes dryer, right?
Measure twice, cut once!
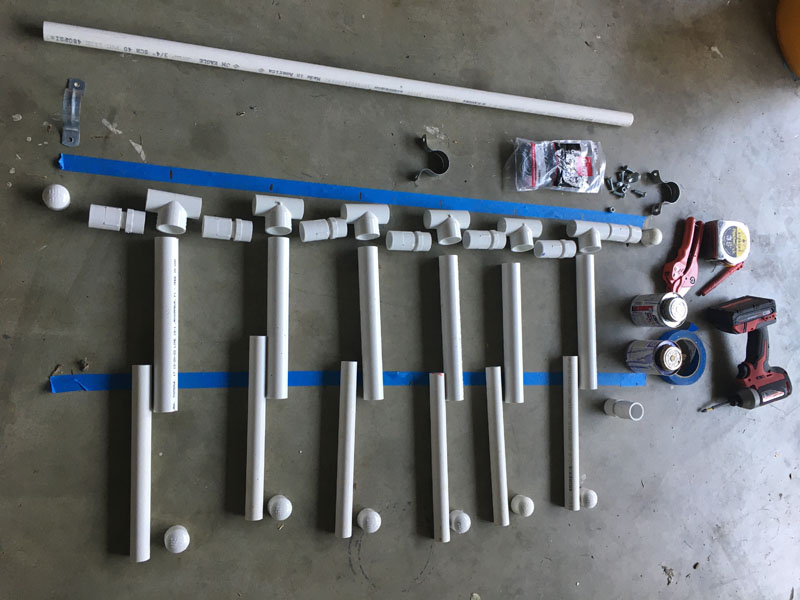
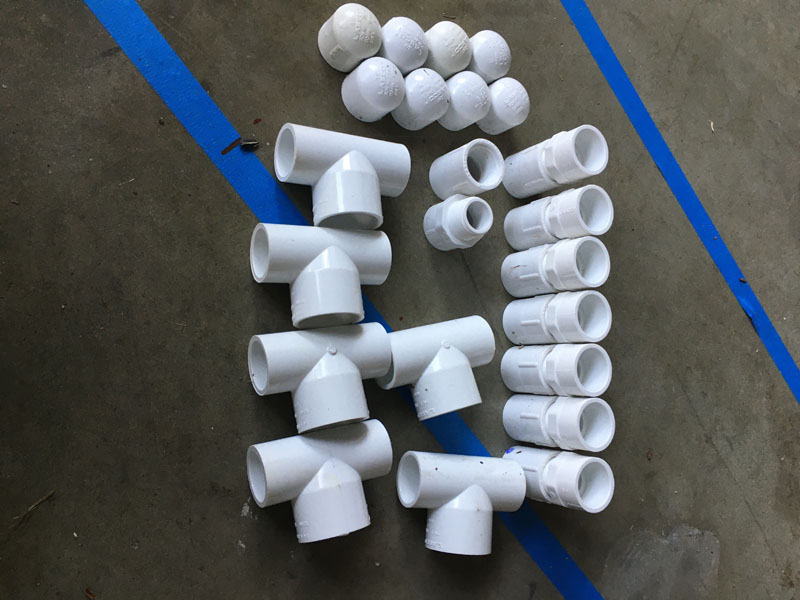
To make the vertical riser assembly I used six 3/4 inch by 3/4 inch by 1 inch x 3/4″ x 1 PVC Tees (Bull Head Tees); cost $11.
All other PVC fittings and pipes were bought at Home Depot. These Bull Head Tees provide a system made of a 3/4 inch PVC riser assembly with six 1-inch horizontal telescoping PVC arms.
To assure no bugs or spiders crawl into the otherwise open ends of the PVC pipes and from there into my underwear (Big Yikes!) I used eight 3/4 inch PVC caps; $7.
To create the individual swinging action of the horizontal telescoping PVC arms, I used six 3/4 inch PVC male-to-slip adaptors ($4) and six 3/4 inch PVC female-to-slip adaptors ($6). These fittings connect together by the threaded ends and the slip ends will be glued to 1 1/4 inch sections of 3/4 inch PVC pipe and then to the Bull Head tees thus creating the PVC riser assembly. The threaded adaptors will allow for the horizontal telescoping PVC arms connected to the tees to independently swing out as needed to either access the ladder or with only enough space between them for hanging clothes.
In the final assembly all PVC fittings and tubing, except the telescoping PVC pipes and the threaded ends of the adaptors, will be glued together using Christy’s Red Hot Blue Glue and Purple Primer; $13. Moreover, if any section of the system fails it can be separately replaced by unscrewing the threaded fittings above and below the problem and replacing it.
To create the telescoping PVC arms I used six 10-inch pieces of 1-inch schedule 20 PVC and six 11-inch pieces of 3/4-inch schedule 40 PVC. The 3/4 inch schedule 40 PVC (a thicker pipe) fits within 1 inch schedule 20 PVC (a thinner pipe) allowing for a telescoping movement to create a longer arm with a 19 inch max extension for hanging clothes. The cost of PVC pipes was $10 I also bought six 1-inch PVC caps ($7) and drilled holes into them large enough for the 3/4-inch PVC pipes to slide within them. But those holes must not be so large that bugs and spiders can hide therein and from there crawl into my underwear; holy moly!
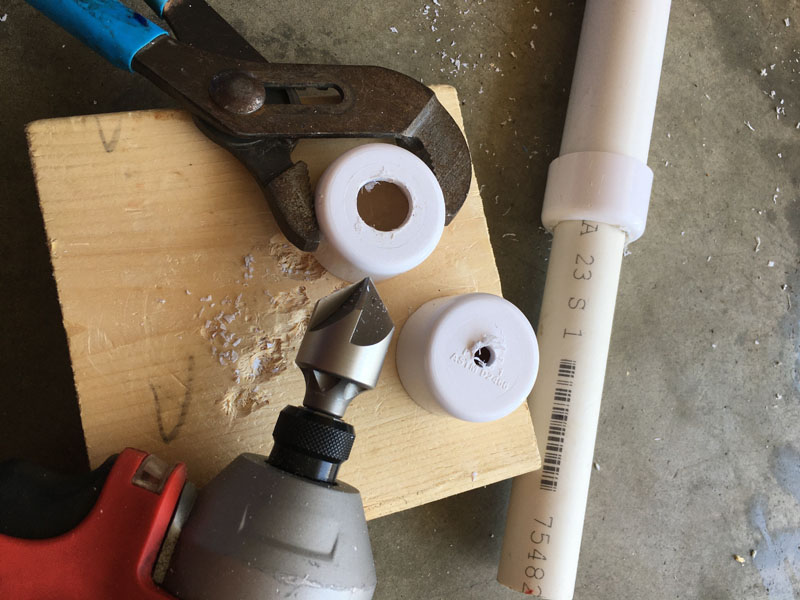
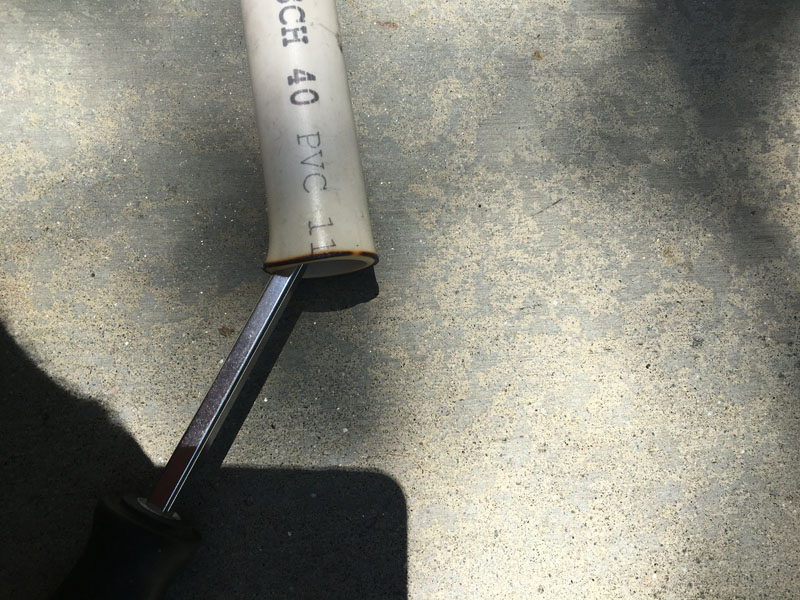
Next, I needed to prevent the 3/4 inch tube which is inserted into the 1 inch cap from sliding out while extending them or when traveling. PVC has a thermoplastic nature thus it can be heated (in a well-ventilated area as the smoke is toxic) and remolded to a new shape. After inserting the 3/4 inch tube through the hole I drilled into the 1-inch cap I heated the PVC just enough to insert a Phillips screwdriver inside the pipe and ream it out to form a slight bell shape. Then while it was still warm I checked to be sure the bell shape was not too big that it would not slide within the 1-inch PVC. I did ream several too big but was able to reheat and downsize the bell shape to fit inside the 1-inch PVC.
Finally, I could connect the vertical assembly of tees and slip adaptors using 12, 3/4 inch PVC pieces cut 1 1/4 inch long. To add the caps to the top and bottom of the vertical PVC assembly I added short PVC pieces as needed to reach an area on the ladder’s side rail as needed to secure it with metal straps.
It was ready to glue together.
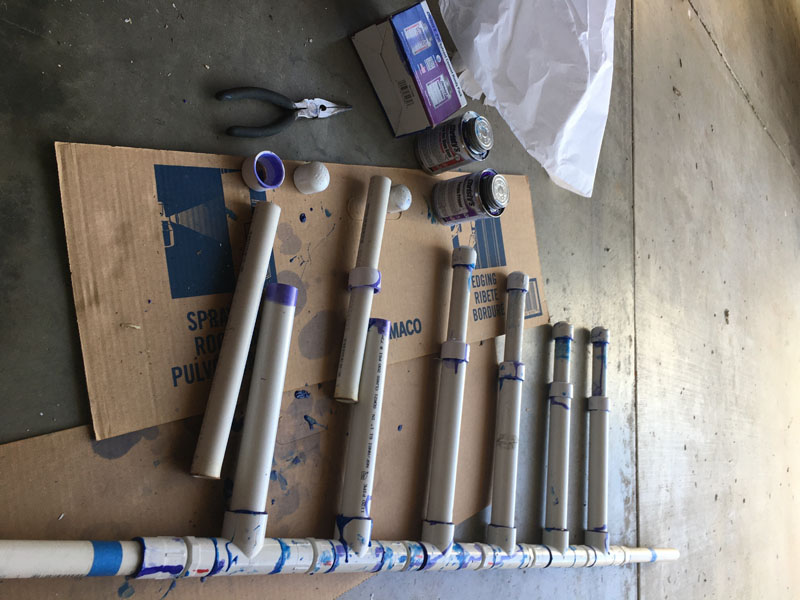
After gluing the PVC assembly together it needed to be spray painted ($7).
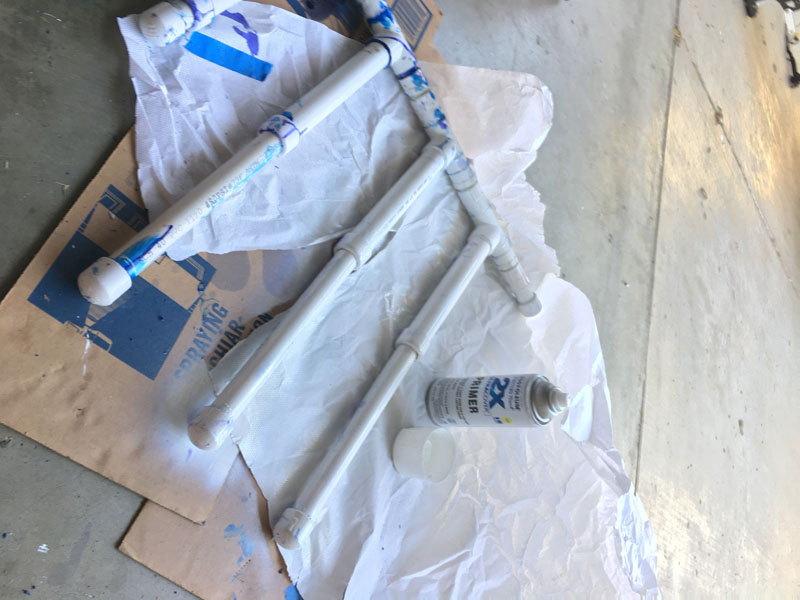
To connect the vertical assembly to the ladder’s left side rail I used four metal straps. For example, at the top and bottom of the vertical assembly, I used one fitting around the 1 5/8 inch ladder rail and one fitting around the 3/4 inch PVC pipe. I intended to use one set in the middle but later decided to use a heavy-duty slip tie. Also, the photo shows short bolts. I actually used one longer bolt connecting the two clamps in the middle between the ladder’s rail and the PVC.
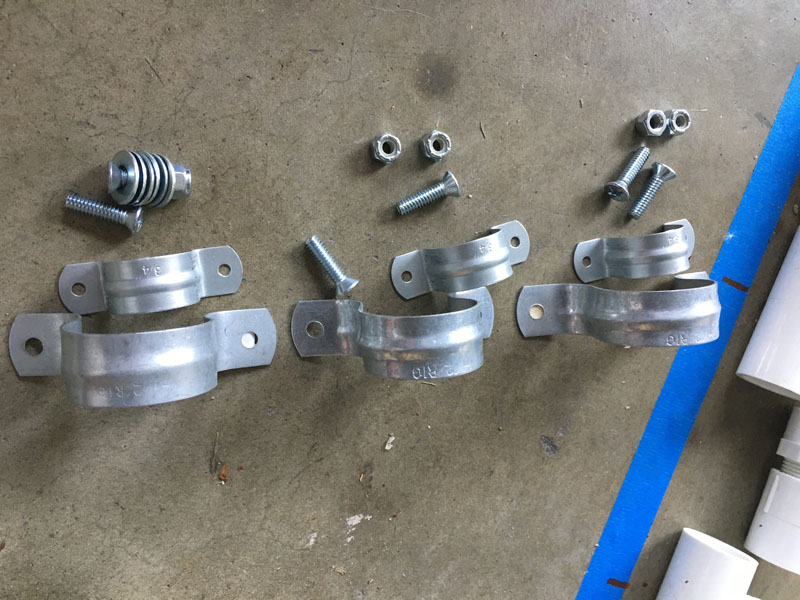
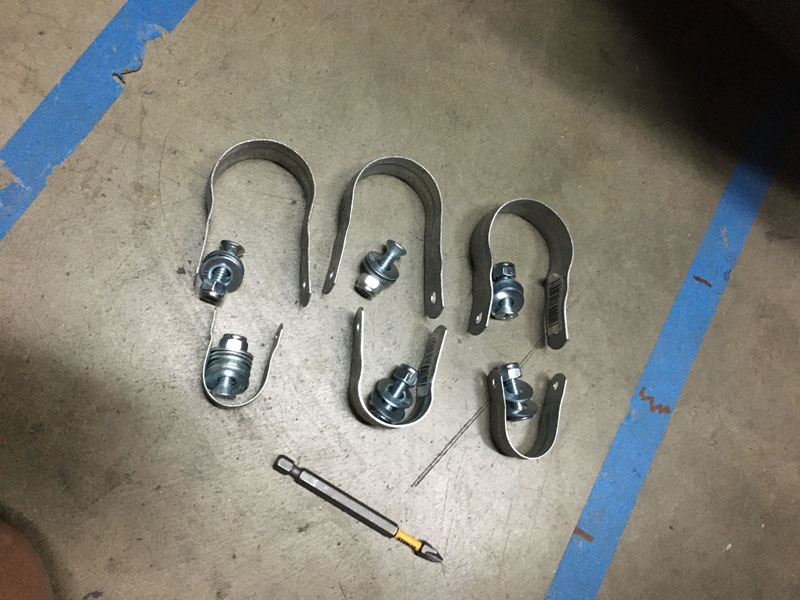
I bent the straps to fit around the ladder’s side rail and PVC assembly and then bolted together to snugly hold the PVC assembly to the ladder. The straps and bolts cost $15.
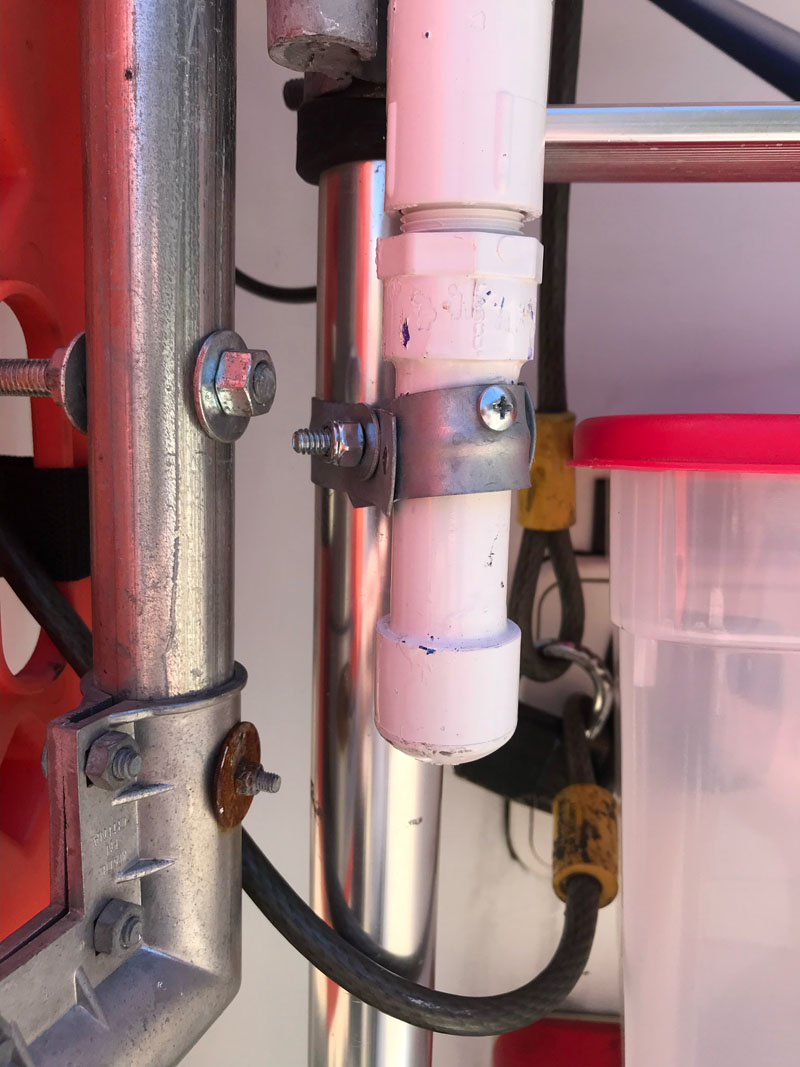
I drilled a single small screw connecting the metal straps to the PVC above and below the last threaded fitting on the vertical assembly. Those two screws keep the cap and the first threaded fitting at the top and bottom from turning thus securing against the threaded fittings between them from completely unscrewing and coming apart over time. In other words, it restricts the threaded fittings to only turning as far as the gate opens and then turning back closed.
The total cost of the clothes dryer is $80. The skill level needed is medium but only because it takes some thinking to adjust the threaded fittings so that they will all be tight when closed and turned open only slightly to not come apart. It is important to test the system twice before opening the glue can and…, well, you get the picture.
The tools used included a PVC cutter, drill, Channellock pliers, and a Philips screwdriver. I have lots of experience working with PVC but it still took me a few hours laying it all out on my garage floor to create the clothes dryer and then another hour to paint it and hang it on the ladder. Five hours of work in total, but fun therapy.
But wait, there’s more! It’s the cradle of civilization! Imagine a morning out in the barbarous wilds with enough space to grind and brew your coffee on a swinging cradle hanging on the camper ladder; that’s civilized! (hereinafter, “cradle.”)
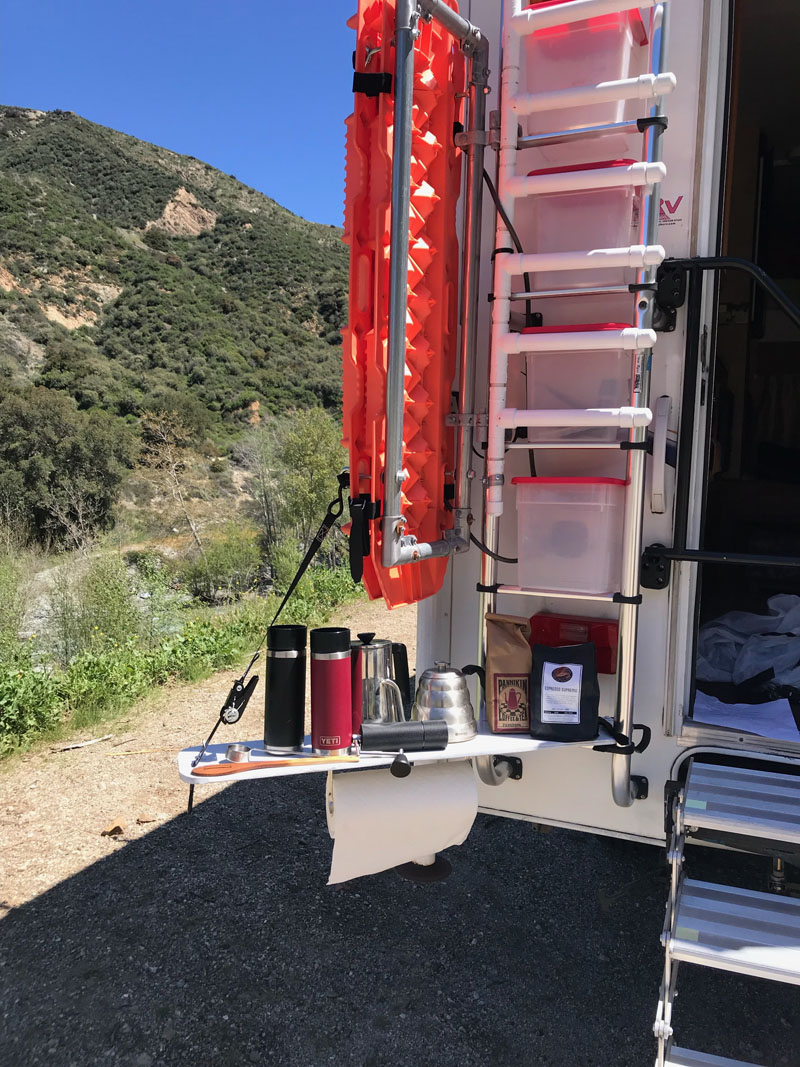
As the day advances the cradle becomes the cradle of advanced civilization!
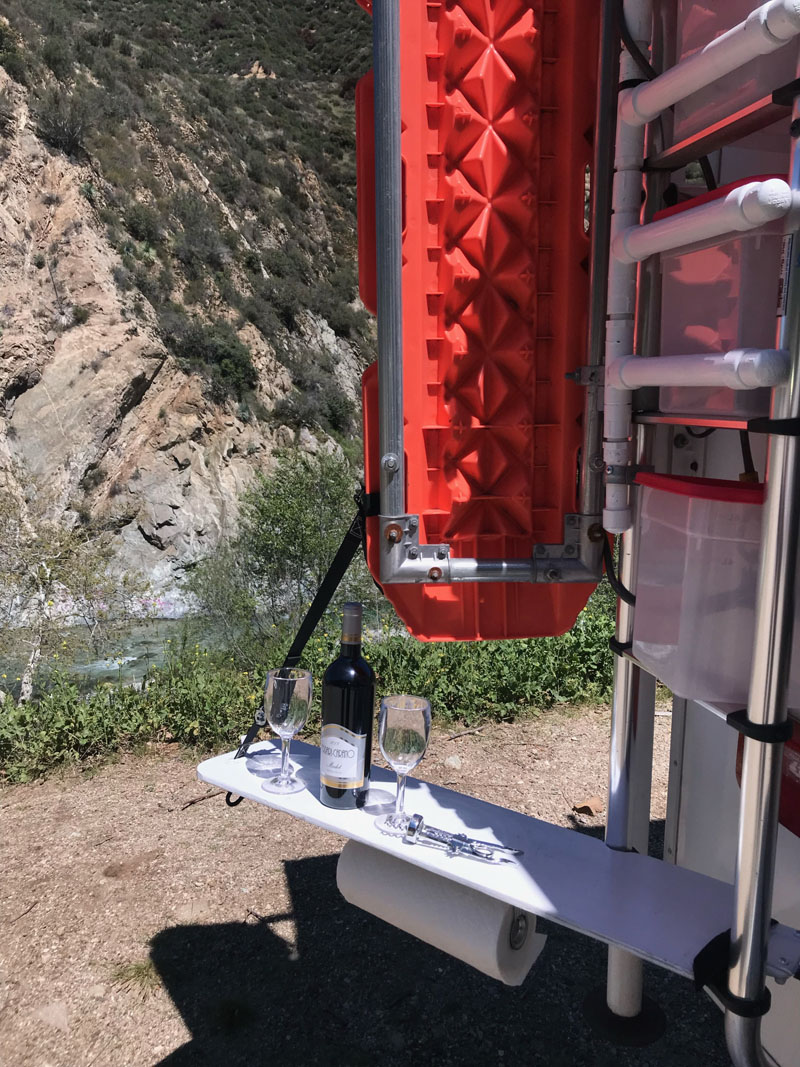
The cradle is half-inch plywood cut to fit within the area of the gate’s pipes; 9 by 36 inches. It is notched to create the angle seen above when resting on the ladder’s rung. It was left over from another mod and thus cost me nothing, but is worth maybe $5.
In use, it swings from a small ratcheting tie-down strap hooked to one of the eye-bolts on the opened gate. The strap runs through a slotted hole at the end of the cradle and onto the ratchet which then levels the cradle as needed.
To assure the slotted hole of the cradle does not crack from weight, I made a small 1/4-inch thick metal plate and bolted it to the cradle thus reinforcing the hole. The metal was scrap and cost me nothing. The strap running through that slotted hole has the second hook of the ratcheting tie-down and works to suspend the cradle. That hook is also in handy to hang a bucket for litter.
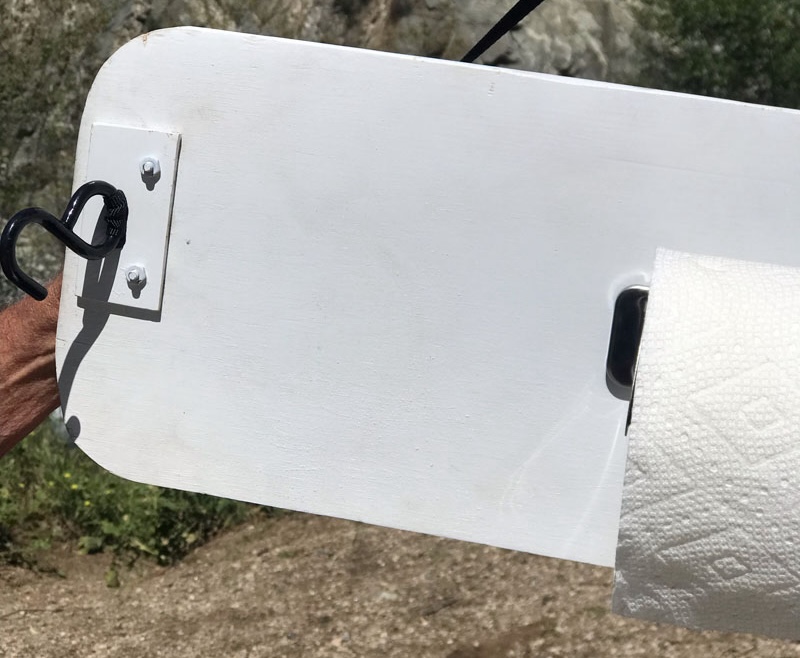
The ratcheting strap cost $3 at Home Depot.
I added a paper towel holder under the Cradle which cost $13 on Amazon.
The cradle’s other end rests on the ladder’s bottom rung and is secured by a Velcro strap. No legs are needed to support the cradle thus no bugs and spiders can crawl up to the cradle; booyah!
During travel mode, the end of the cradle has two large hooks ($7, Amazon) bolted on it which allow it to swing into place on the gate’s top tubing and then hang within the area of the gate’s frame. A short Velcro strap secures the bottom of the cradle during travel.
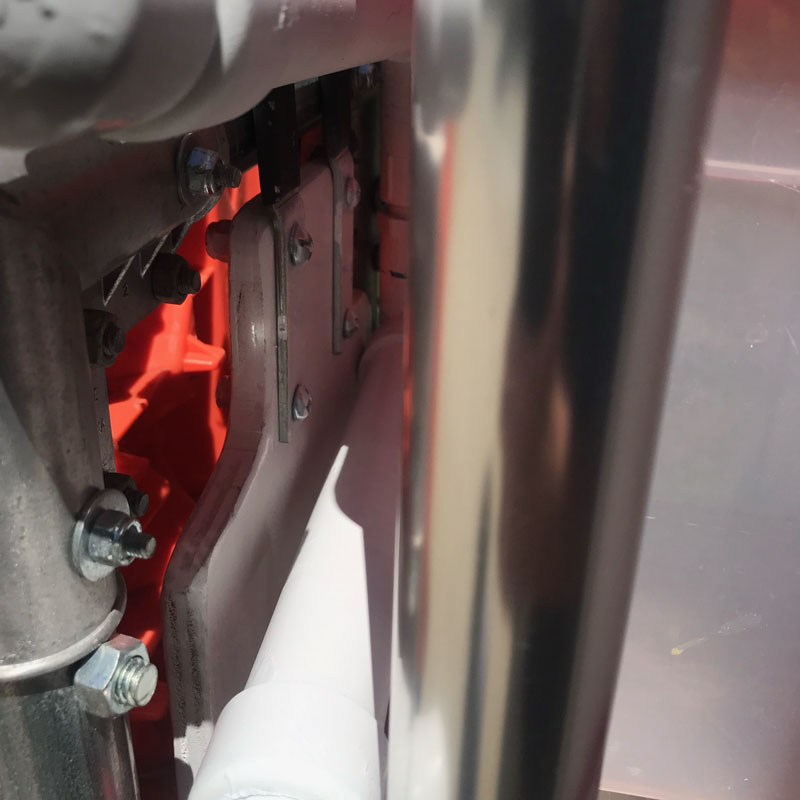
It hangs there securely being snugly sandwiched when the gate is pulled shut by one Velcro strap and then safely locked with a key lock and chain ($5). I had to hammer and bend those two hooks to fit around the gate’s 1 3/8-inch tubing. I then cut off the excess metal of the hooks. This next photo is from above when the gate is closed and shows the cradle within the gate’s pipes.
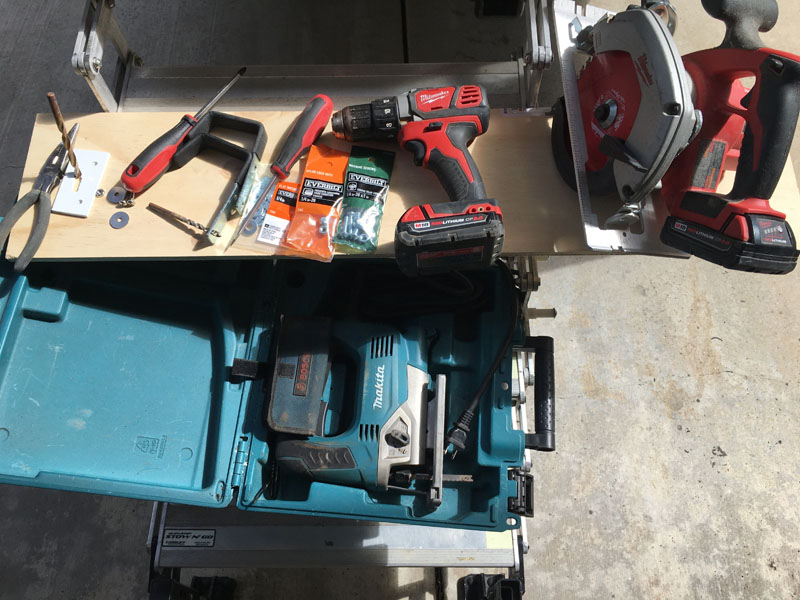
I sanded and spray-painted the cradle with leftover paint from the clothes dryer project. I used a circular saw, jigsaw, sander, drill, pliers, and screwdrivers. The total cost of the cradle is $15. Making and painting the cradle took me less than four hours and the skill level needed is easy.
The total cost of the gate, clothes dryer, boxes, and cradle was $300. Within seconds of unlocking the gate, it all swings out of the way to allow immediate use of the ladder as that valuable factory feature was intended for. Thus, with this gate mod, you can have your cake and eat a few big slices of it, too.
Disclaimer: The modifications above are submitted by Truck Camper Magazine readers. It is your responsibility to make sure that any do-it-yourself modification project you undertake is safe, effective, and legal for your situation.
Enter Your Mods Now!
If you’d like to enter a modification you’ve done on your truck camper, click here. You can enter as many mods as you want, at any time. Good luck mod makers!
