Welcome to the seventh entry in February’s Medium Mod Contest. One Medium Mod will be published in every Email Alert in February. At the end of the month, we’ll hold a reader vote to determine February’s winner. Click here for information about the 2021 Mod Contest, including how to enter.
Arn Chamberlain, Eagle, Wisconsin
Easy Emptying Valve for Water Heater
2000 Ford F-250
2004 Palomino Maverick
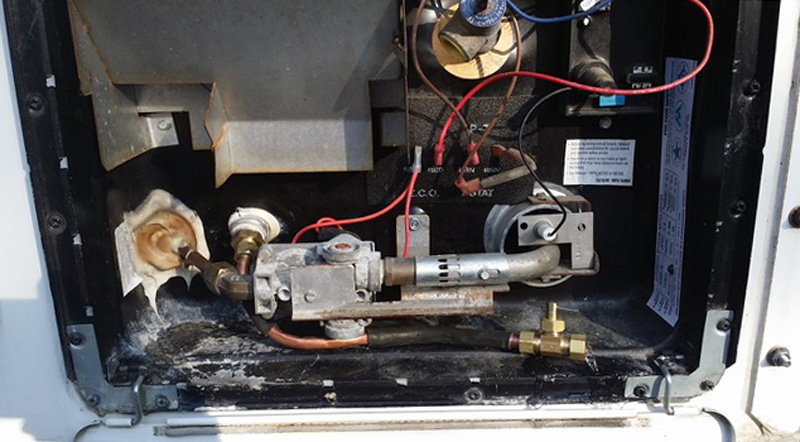
For whatever reason, Atwood put the drain plug for my hot water heater directly behind the gas tube (see photo #1 below). A socket cannot reach it.
To drain the water heater I had to use a short-handled, adjustable wrench to remove the plug. When the plug was removed, water shot out of the opening. I usually got wet as did most of the external parts of the water heater.
The plug was made of plastic and the points had worn making it even harder to remove. The plug would also leak unless I used a lot of Teflon tape when installing it. Draining the water heater was a messy, difficult, and time-consuming job.
I decided to replace the plug with a brass valve that could be opened and closed to drain the heater. I purchased a compression fitting that matched the threads of the plug and would accept a 3/8-inch copper tube, a short length of copper tubing, and a 3/8-inch brass valve with compression fittings (see photo #2 below).
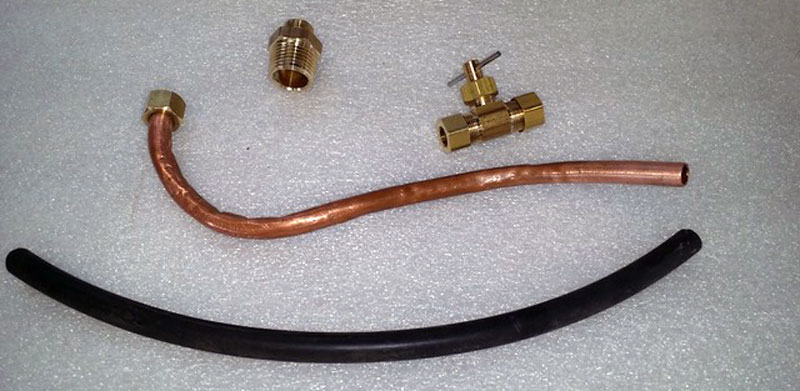
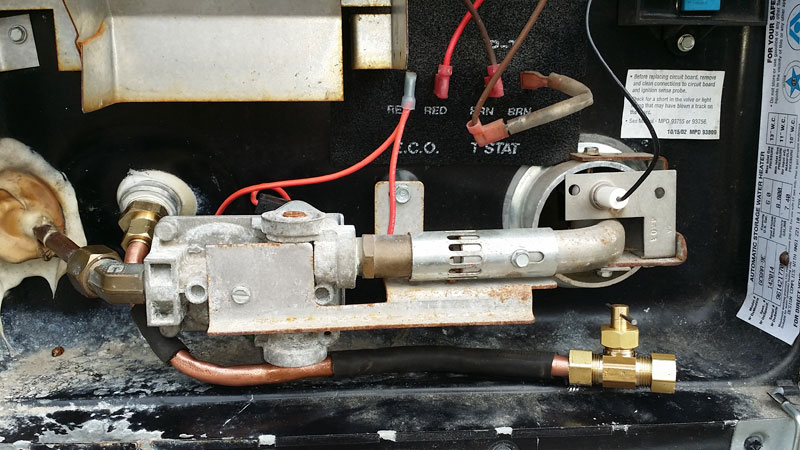
I bent the tubing so that it would exit the fitting and run to a space under the heater’s gas delivery tube where it was connected to the valve. To keep the copper tubing from rubbing on the external walls of the heater, I lined the tubing with a short segment of rubber tubing (see photo #3 below).
This mod has worked out great! When I need to drain the water heater, I simply open the valve and then open the safety valve.
The water no longer gushes out onto me or the heater. Instead, the water runs out through the valve and then runs down the side of the camper’s skirt. Both the heater and I stay dry!
It takes about ten minutes to empty the water heater’s tank. I may add a length of tubing to the output end of the valve to keep the water off the camper’s skirt. I did not have the tubing available when I originally devised the mod.
The mod took me 45-minutes because I’m not exactly skilled at bending tubing. In total, this modification and cost me $6.
In my opinion, the skill level of this modification is pretty easy. The hardest part was getting the correct curvature of the tubing.
Disclaimer: The modifications above are submitted by Truck Camper Magazine readers. It is your responsibility to make sure that any do-it-yourself modification project you undertake is safe, effective, and legal for your situation.
Enter Your Mods Now!
If you’d like to enter a modification you’ve done on your truck camper, click here. You can enter as many mods as you want, at any time. Good luck mod makers!


