Welcome to the PowerMod truck camper mod contest, sponsored by Goal Zero. One Mega Mod will be published in every Email Alert in April. At the end of the month, we’ll hold a reader vote to determine April’s winner. Click here for information about the 2024 Mod Contest, including how to enter.
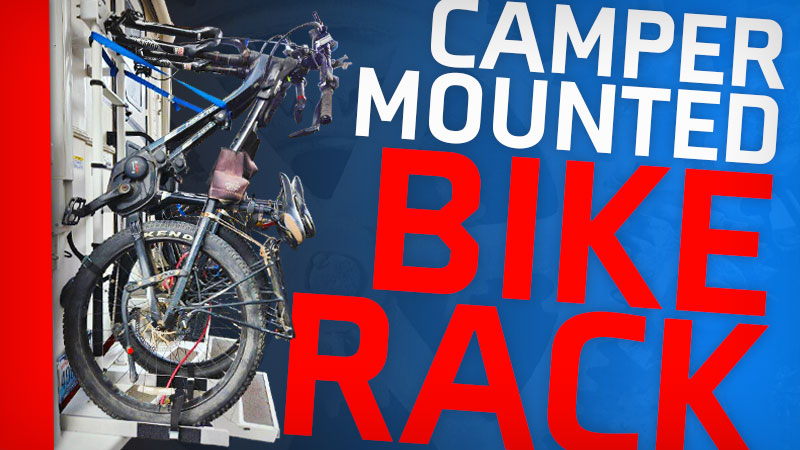
Steven Osburn, Poulsbo, Washington
Camper Mounted Bike Rack
2019 Ford F-350
2023 Northern Lite 10-2EX
When we’re out, we like the flexibility of being able to hike, bike, or kayak when we get to our destination. We carry our hiking boots, poles, and day packs in the back seat of our truck. We also carry our inflatable kayak on the roof of our camper, along with our life jackets, paddles, etc. Our bikes were another story.
When we had a Lance 1172, we used an elaborate system that included a Torklift SuperHitch, a 60-inch Torklift SuperTruss, a 9-inch extension to accommodate the rear slide-out and a beefy bike rack for our two 55-pound eBikes. All told it was a lot of weight bouncing around several feet behind the truck.
We now have a 2023 Northern Lite 10-2EX, so I was able to chop off the 60-inch SuperTruss to make a 40-inch version. However, because of the rear entry, I added a swing arm to rotate the bike rack to the side and allow us to use the camper steps. While the new setup was about a foot shorter, it still was a lot of weight bouncing around several feet behind the truck. We don’t always stick to pavement, so bouncing is often due to washboards and potholes.
Another concern with this setup is the impact of taking the camper on and off. Before loading the camper on the truck, I had to install and tighten the SuperTruss and extension, then load the camper, then put on the swing-arm, bike rack, bikes, and bike covers. None of this is hard, but it takes time. Taking the camper off was a similar process. The net result was a reluctance to take the camper off unless we planned to be in a campground for at least four days. Otherwise, why bother?
Oh, and what happens if you get distracted while talking to friends and get in a hurry while trying to take the camper off, and you jack the camper up and start to pull out from under the camper before taking your bikes off? I did that once. Not pretty. Luckily, nothing broke, but it could have been a lot worse.
Some have solved the bike problem by putting their bikes on the front of their truck, but that doesn’t work for all trucks and it did not work for our truck. Not only do the bikes interfere with the headlights, but they blocked the sensors and cameras that tie to the truck’s adaptive cruise control. There is nothing like being able to keep a defined distance from the vehicle ahead of you to make your drive more pleasant.
Alternatively, some put their bikes in the back seat of the truck, or inside the camper, but these were not choices I liked. I don’t want to unload bikes unless, and until, I want to use my bike, so having bikes in my way was a non-starter.
In my year-long search for alternatives, I saw people mounting their bikes to the camper. This is a great solution because the bikes do not need to come off to load the camper on or off the truck. But then there is the question of how.
Some put their bikes on the ladder itself, but the ladder is not designed for that sort of weight (110 pounds for two eBikes, plus mounting hardware). While the ladder might be rated for that weight, that weight rating is for a static load, not the dynamic loads of bouncing down a dirt road.
I saw other people mounting their bikes vertically, using the camper’s bumper plus the ladder, and that seemed like the best approach to me. But in all the versions I’d seen, when the bikes were loaded, the rear awning would not be able to fully extend and the rear awning is useful to keep the bikes out of the rain. So, I came up with a solution that turns the bike handlebars and allows the awning to fully extend.
The biggest takeaway I got from my research is that one size does not fit all. I’d seen all sorts of mods by many good modders, and even some with almost the same camper as me, providing solutions that would not work the same way for me.
For example, another person with a Northern Lite 10-2 had a configuration that put the rear tire of one bike on the right side of the ladder. In studying his photos, I realized that the placement of his basement cargo hatch was different than mine. While he had plenty of clearance for his bike tires, I would not be able to open or close the hatch with our bike in that position; also a non-starter. So even with the same camper and similar model years, the configuration of ladder versus hatch placement was not exactly the same–enough so that my bike would have worked on his camper, but not on mine.
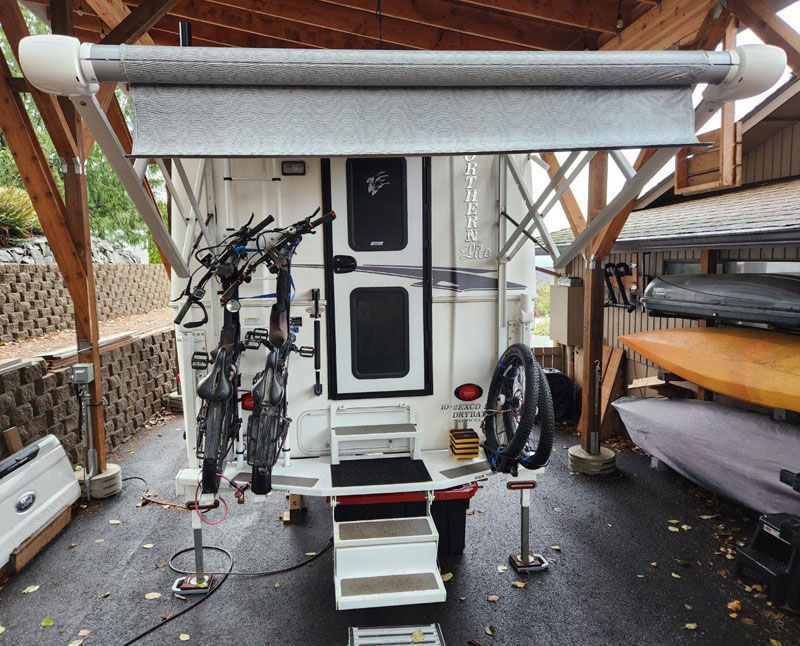
My solution had the following objectives:
1. Weight on the bumper versus ladder, with accommodation of how tire pressure might change the front fork connection relative to the weight on the ladder.
2. Does not require the removal of the bikes to take the camper on or off.
3. Does not require the removal of the bikes to access the basement hatch.
4. Able to fully extend the awning with the bikes in place.
5. Bonus: Be able to use the ladder if only one bike is removed.
To do this required some unusual geometry. Even though I’m an engineer, I have to admit that the bike rack involved a certain amount of “try and see” to get the system right.
I wanted the front fork mount to be able to slip up and down the ladder side tubes to accommodate varying tire pressure. Why is this important? Our tires run at 15 psi, and with the bikes hung vertically, that means that as we drive from sea level to crossing mountain passes, there will be some degree of vertical movement of the bikes just based on the rear tire pressure. That means that the front fork mount must be at least somewhat moveable up and down the ladder side tubes–so “floating” to minimize the stress on the ladder.
While many similar designs anchor the front fork mount to the ladder, mine was based on a loose friction fit using Ultra High Molecular Weight (UHMW) Nylon blocks clamped to the ladder tubes. Essentially, that means that the front fork mounts can move up and down the tube, so the weight remains on the bumper, not on the ladder.
To make the upper mount required, I used a hole saw through the UHWM nylon blocks and then mounted the blocks to an aluminum plate. To turn the handlebars required another UHWM nylon block. These were cut at a diagonal to create wedges so the fork mount could be angled to accommodate a turned handlebar geometry.
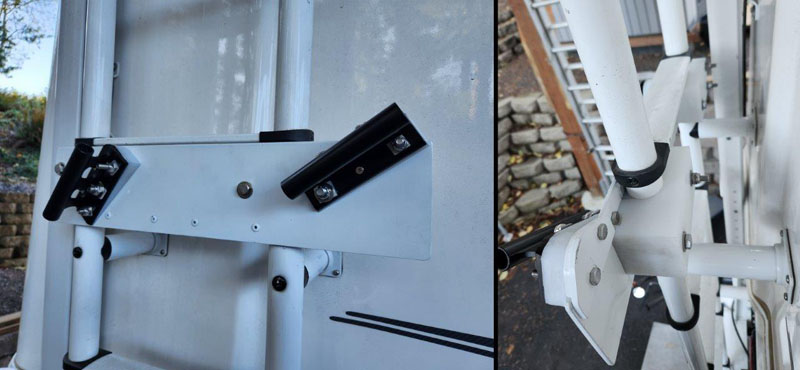
Above: Upper mount installed
If you think a lot of math was required to do this, you’re wrong. I just held the bike where I wanted it, turned the handlebar how I wanted it (to accommodate an extended awning), and measured the gap between one side of the fork mount and the other. That’s how I cut the wedge blocks.
For those who have not worked with UHWM nylon before, it’s a godsend for camper applications. It machines a lot like metal, but is lighter weight, and easier to machine with saws, routers, drills, etc. You don’t need a machine shop to work with it. Woodworking tools will work fine. However, if you don’t have sharp saws or tools, it can melt, so make sure you use sharp blades and/or low speeds when cutting.
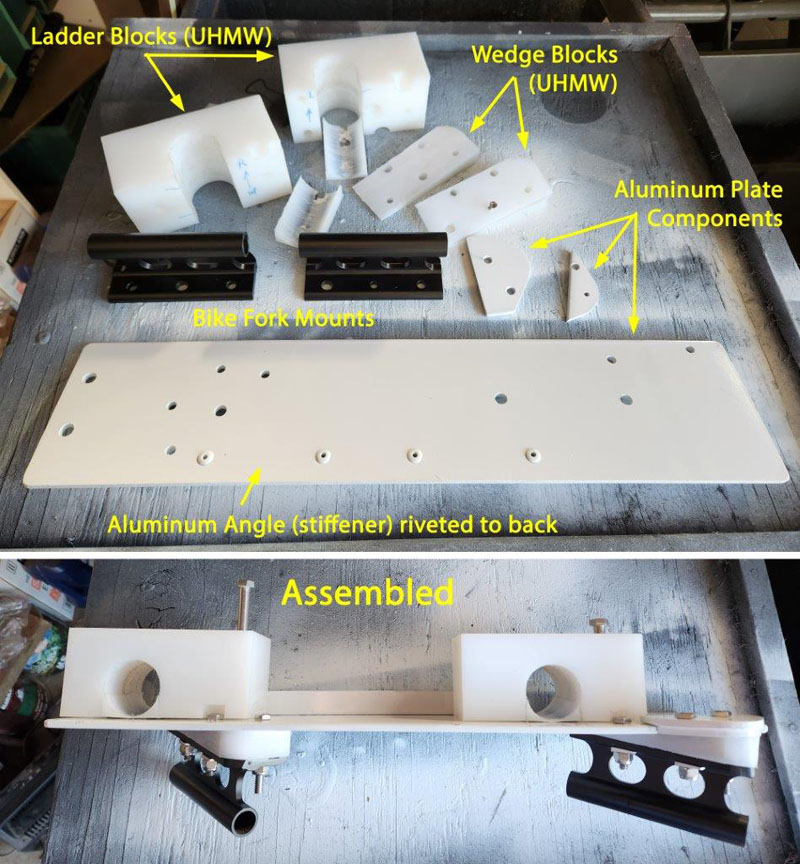
Above: Components for the upper mount
The top part included two UHMW blocks that can slip up and down the ladder, two UHWM wedge blocks to accommodate turning the handlebars, and an aluminum plate to tie everything together.
The bottom of the rack is based on the camper bumper, but the bumper is not deep enough for the tires. That required adding a 2x3x1/4-inch aluminum angle iron to support the tires. These were cut to length (enough to support the tire, with a little slop) and bolted to the bumper. I also had to move the bottom rung of the ladder down to accommodate a tire.
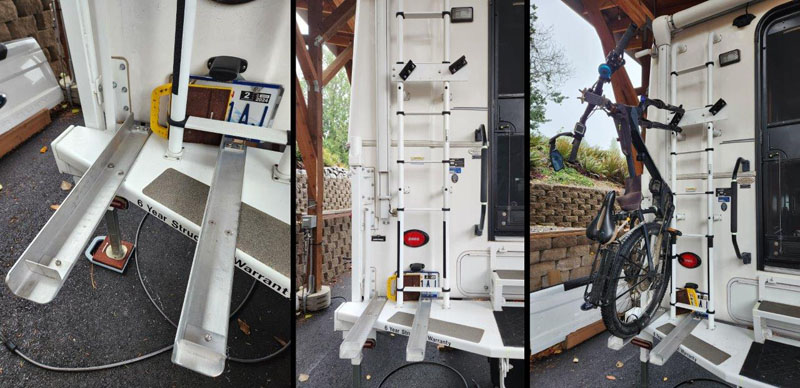
Above: Lower trays that take the weight of the bikes
The only thing left was to make sure the bikes didn’t move while driving or going over bad roads. Once the bike weight was stable on the bumper, and the bike fork was anchored to the ladder, all that remained were cinch straps to pull everything tight.
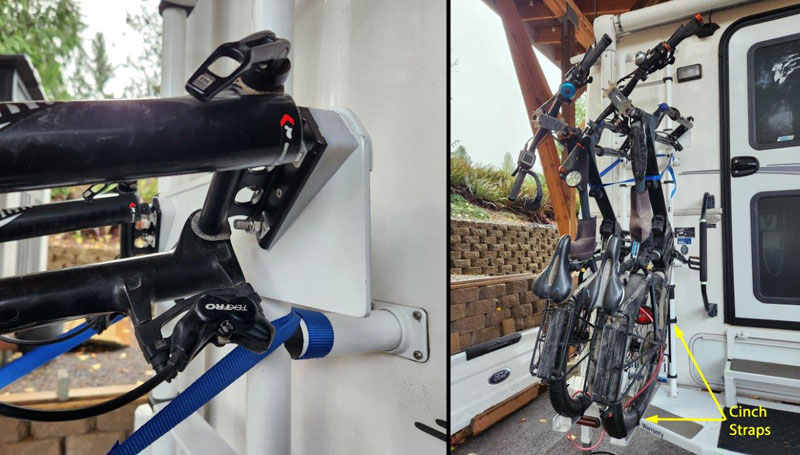
Above: A view of the wedge blocks and upper mount plus the cinch straps
I use two straps on each rear wheel, and one strap that spans both bikes. Everything is now tied together and tight.
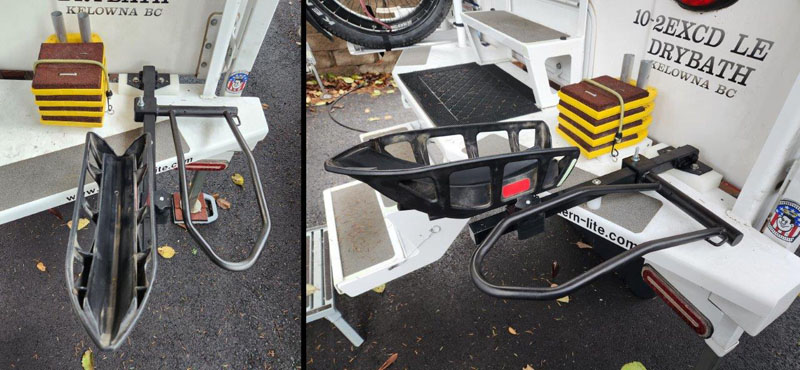
What do I do with the front bike tires now that they are off? Some people just put the tires in the camper or the truck, but as I mentioned earlier, I wanted the bikes to stay out of our truck and camper. I mounted them to the other side of the bumper. This mount (for the front tires) was made from a cheap bike rack, plus parts of an older bike rack I already had.
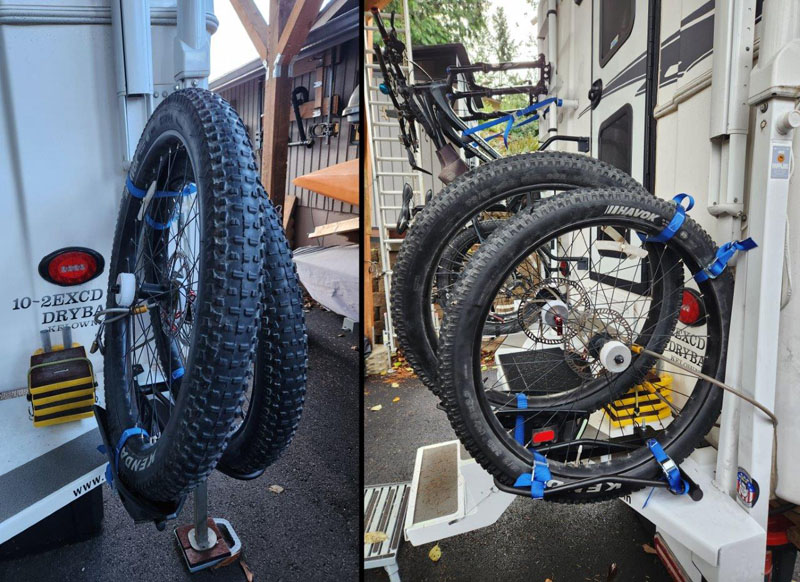
The bottom line is that the bike tires stay outside the camper and truck, and don’t require removal to take the camper off. For security, both the bikes and the front tires are locked to the camper bumper. For keeping the bikes out of the elements, I’ve also been able to use the ladder and a bungee net to keep a bike cover on the bikes. Those of us who have driven through Utah know how bad the dust is on bikes after driving on back roads, and then it rains.
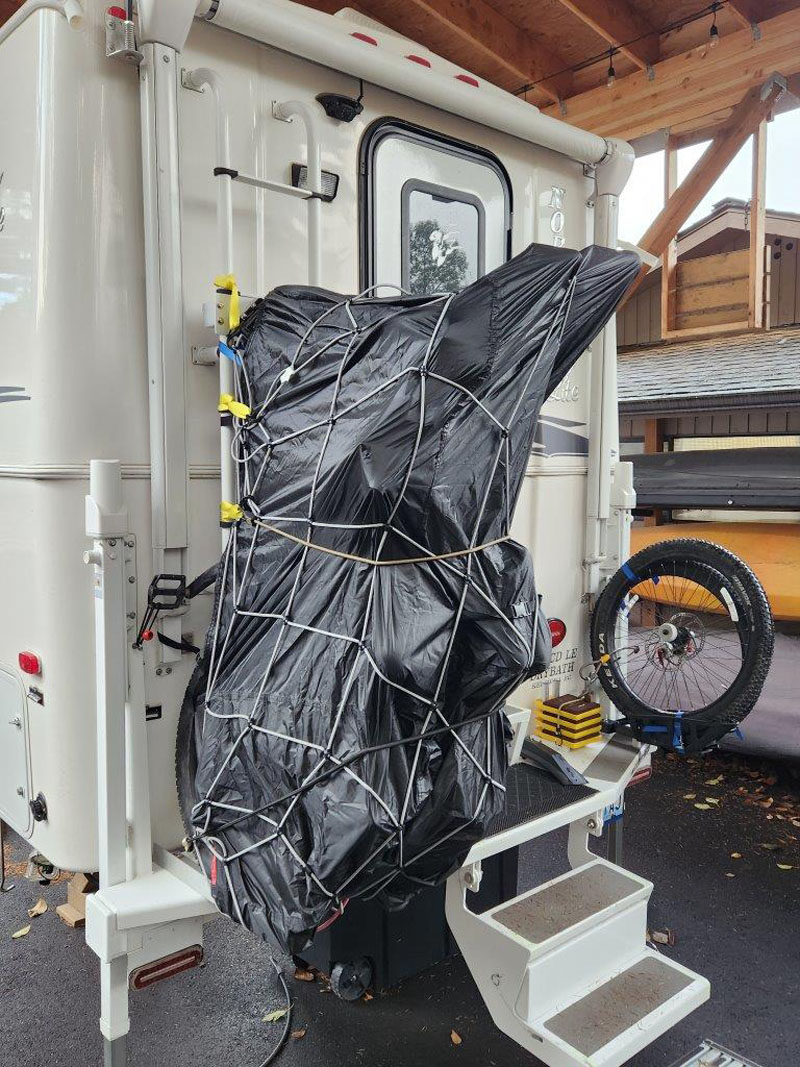
The mod has worked great! The system is more stable on bad dirt roads than the original setup with the long extension, plus I’ve moved the center of gravity forward. It’s also a lot easier and faster to take the camper on and off now that the bikes are attached to the camper and not the truck. It’s also one less thing to think about, and that much more time saved, making it more likely we will take the camper off even for shorter campground stays. That is a lot more important than it sounds because getting to trailheads, or even just parking in towns while exploring or shopping, is a lot easier without the camper on.
The original, long extension worked great, and I’d still say it is good if you don’t want to build a custom design, but that system is a lot better for trips that are on pavement than on washboard roads. This ladder-mount system is a lot better for all road conditions, and that was my goal, as well as shortening the time required to get the camper on and off the truck.
I probably spent a year thinking about this design, studying other people’s ideas, and either partially adopting their ideas or discarding them after seeing how my camper design would not support their ideas. Once I decided on my design, I probably spent two weeks putting it together, including time waiting for Amazon to deliver the parts. As I mentioned earlier, some of this is trial and error. While I actually had no errors, I had a lot of trial, measure, adapt, cut, and then install.
I guess I would have to say this is one of the harder mods I’ve done; not because making it was difficult, but because there are so many things to consider. Everyone has advice on how to do it and not all of their advice is applicable to your situation.
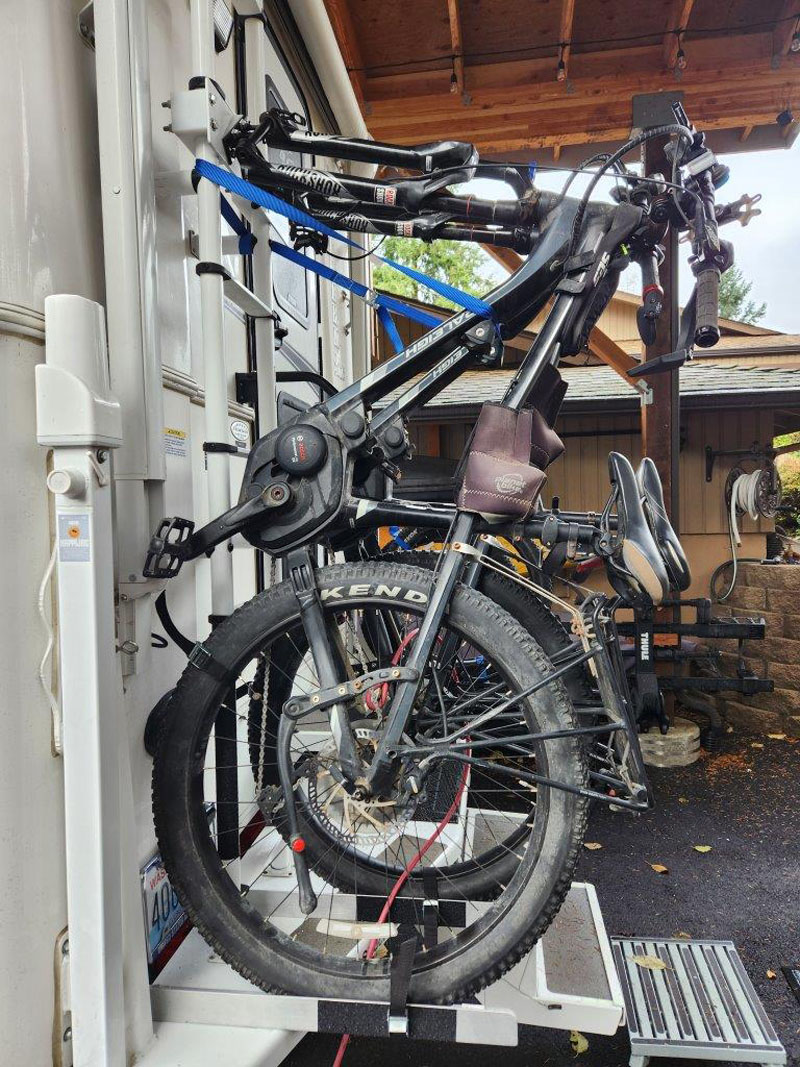
Above: The final system, side view
There are dozens of ideas out there, including mine, that work great for the other guy, but how it will work for you is based on variables that have to be discovered and adapted to. I’m a retired engineer with plenty of time. You have to study your camper and study your bikes to determine what can fit where and how, and adapt good ideas from multiple sources to create a solution that works for you.
However, the idea of putting the weight on the bumper, and allowing the front fork to slip up and down the ladder tube is fairly universal and might be applicable to several camper brands and models. I put the rear tire of the right bike on the left side of the right ladder tube, and the rear tire of the left bike on the left side of the left ladder tube. This avoided any conflict with my cargo doors and put adequate space between the two bikes. Some campers might allow you to choose differently as to where the tire goes. In my case, I had to change the placement of the first rung of the ladder. Regardless, if the right bike is removed, I found that I can still use the ladder to access the roof.
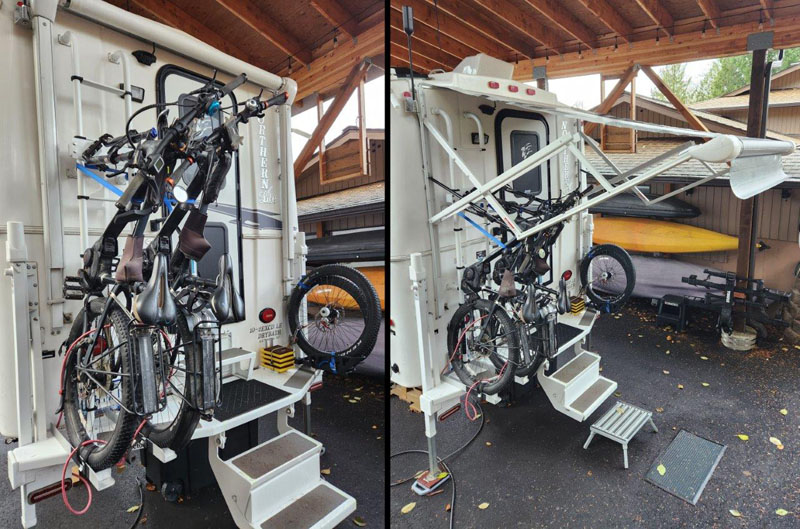
Above: The final system from another angle
In the end, my system is more stable than running an extension from the back of the truck. Aside from that, it has higher ground clearance, moves the center of gravity forward, and allows me to remove the camper and keep the bikes where they are; all of which are advantageous for the serious truck camper enthusiast.
Are there drawbacks? Sure. There is now more weight on the rear bumper and no camper manufacturer is going to endorse a use for their bumper that they have not tested–for liability reasons–so you’re on your own. However, if you check out the warranty on your bike rack or swing arm, you will probably find they are not guaranteed for RVs or extensions either. Either way, you are taking a risk. A note that most bike racks also disclaim any use when on the front of a truck, even without an extension.
The alternatives? If you don’t have adaptive cruise control, then a front rack might work better for you. In some states, it may not be legal because you block the headlights. I doubt you’ll get ticketed, but it’s still a risk. If you are okay with taking room inside your camper or your truck to store your bikes, that’s another solution.
For me, this has been really helpful, plus, I can still fully extend my awning, which both covers the bikes and our stairs going up into the camper.
I’ve used this bike rack on a few trips now, and can say for certain that the bikes move around a lot less than when on the long extension from the back of the truck. That is very important in bad road conditions. I’m very happy with the results.
Parts:
Bike Fork Mount Block 15x110mm – Amazon $16 (times 2)
UHMW Tapping Block (2.4×2.4×12 in) – Amazon $26 (I cut this in half, so I only needed one)
HDPE Machinable Plastic Blocks – eBay – $4 plus shipping (this was for the wedge blocks to turn the fork mounts to accommodate the awning)
Aluminum plate for the top carrier (5x16x.25 in) – had this on hand in my shop
6061 Aluminum Angle 2x3x24″ Long 1/4″ thick – eBay $11.50 (times 2, plus shipping)
Various Stainless Steel bolts, nuts washers, locknuts – Amazon, but since I only use a few from each length that I ordered, I’d have to summarize at about $25. This included 5/16” bolts to go through the upper UHMW blocks, as well as 5/16” bolts to connect the angle iron and the bumper.
White spray paint – Home Depot $10.
For the front bike tire mount:
Cheap bike rack – Amazon $75 – I only used one of the tire cradles and supporting arm. the rest of this goes into my spare parts bin.
Used (broken) bike rack – had this on hand and used the front tire cradle.
Another UHMW block to raise the assembly to where I wanted it.
For covering and securing the bikes:
Bike cover – Amazon $15 (times one – since one covers both bikes)
Soft Loop Tie Down Straps to secure the bungee net to the ladder – Amazon $9
Bungee net – Had it on hand, but probably not more than $15. The bungee strap had hooks on it when I bought it, but I moved the hooks to the Soft Loop Straps, which made managing the bungee net a lot easier.
Locks, cables, misc. – probably another $20
It took me 20 hours to complete this modification and cost me about $250 including the bike cover and front wheel carrier.
Disclaimer: The modifications above are submitted by Truck Camper Magazine readers. It is your responsibility to make sure that any do-it-yourself modification project you undertake is safe, effective, and legal for your situation.
Enter Your Mods Now!
If you’d like to enter a modification you’ve done on your truck camper, click here. You can enter as many mods as you want, at any time. Good luck mod makers!
