Suspended from planet Earth, Bruce Johnson and Joy Grzyboski’s singular creation tips steampunk on its ear with a welded steel frame, curved trolley top, automotive sunroofs, and an antique lock and skeleton key. Is this design from the past, the future… or somewhere else entirely?
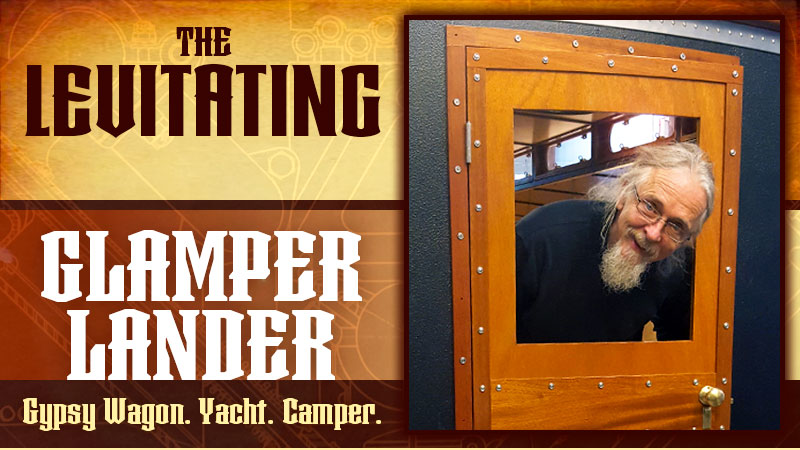
Last December we came across a short, and mind-boggling video about a wildly imaginative custom truck camper at Overland Expo East. Described by its owners as a cross between a gypsy wagon and a sailing yacht, the video left us astonished and full of questions. One thing was certain; we had to see this thing, and its creators, in person.
Six months later we were pulling into Bruce Johnson and Joy Grzyboski’s Massachusetts hideaway retreat. There, literally suspended under the shop building’s porch, was their one-of-a-kind creation. Bruce and Joy gave us full access to their camper and then sat down with us to go through every aspect of the design; sketch to rivet. What a treat!
This isn’t your typical garage-built camper, nor is it another attempt to build a better mousetrap and take over the truck camper market. The Glamper Lander was built with one audience and mission in mind; to be exactly what Bruce and Joy needed in a truck camper, and to achieve their personal aesthetic vision. Ladies and gentlemen, this is form, function, and art – for two. And it’s one heck of a cool truck camper!
In the intro, I asked, “Is this design from the past, the future… or somewhere else entirely?” Having seen the camper and met the artisans behind it, I’ll take, “Somewhere else entirely” for the win.
How did you get into truck camping?
Joy: I was a confirmed backpacker. Then, I met Bruce who wanted comfort. There went my tent and my backpack. Now I’m having a great time truck camping.
Bruce: In 1969, when I was in college, I worked at a truck camper manufacturer named Northlander in Ayer, Massachusetts. I was in framing placing 1×2 wood sticks into a jig. The interior was all wood grain cardboard. They were real garbage. At the time, I didn’t have a truck or the means to buy a camper, but that experience opened me up to how simple they were to construct.
In the late 1980s, I had a 1985 Toyota pickup. Along the way, I found a simple 7-foot camper that actually worked with the Toyota. It was unusual to find a camper that was light enough to work with the Toyota. It was like $600, and a jump up from sleeping on the ground. I had that camper for about a year.
After that, I bought a brand new 1995 Dodge 2500 diesel long bed and a two year old Shadow Cruiser truck camper. That was a big upgrade.
Four years later, I picked up an Avion C11. It was a mess. The skylight and window were broken and there were rodents, ants, and snake skins inside. The whole camper smelled like rotten and decomposing wood. I put a tarp over the camper, gutted the interior, and replaced the floor and wings. Then, I added all-new appliances.
When I removed the tarp, it had scraped the anodizing on the aluminum exterior. Envisioning a polished Airstream, I started with an air grinder and a fine grade Scotch-Brite. Then, I went back to a matte finish with a 600-grit abrasive pad and Fluid Film; a lanolin-based corrosion preventive. If I rubbed on the Fluid Film and cleaned it off, the exterior aluminum stayed clean for a year.
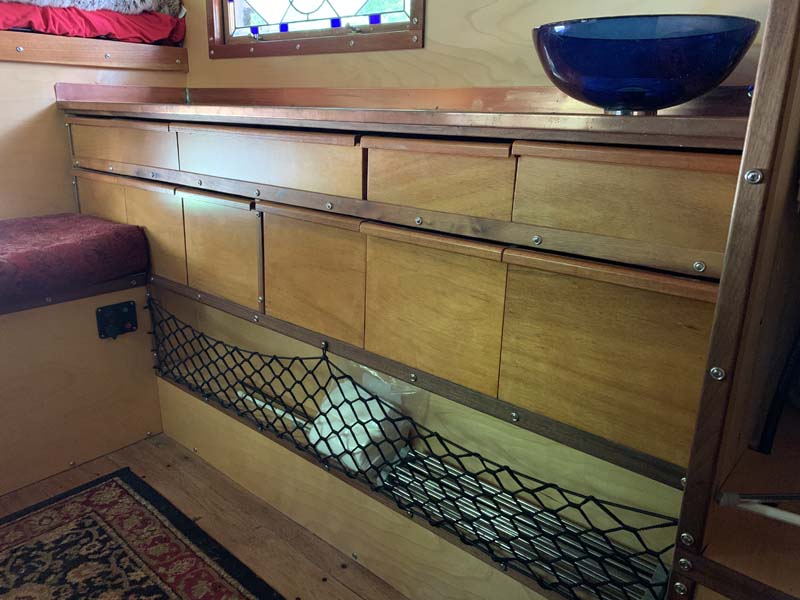
After all that, the Avion C11 didn’t give us what we wanted. It was dark inside and lacked functional storage. That’s when I started thinking about building my own camper. In my design, I would maximize the storage in a minimum space. And I would make it open and bright inside.
Joy: We didn’t need the separate bathroom in the Avion. It wasted a lot of interior space and made the camper dark. The Avion was also too top-heavy for our liking. We don’t spend more than two weeks at a time in our camper. If we were going to do more long-term traveling, we might want more.
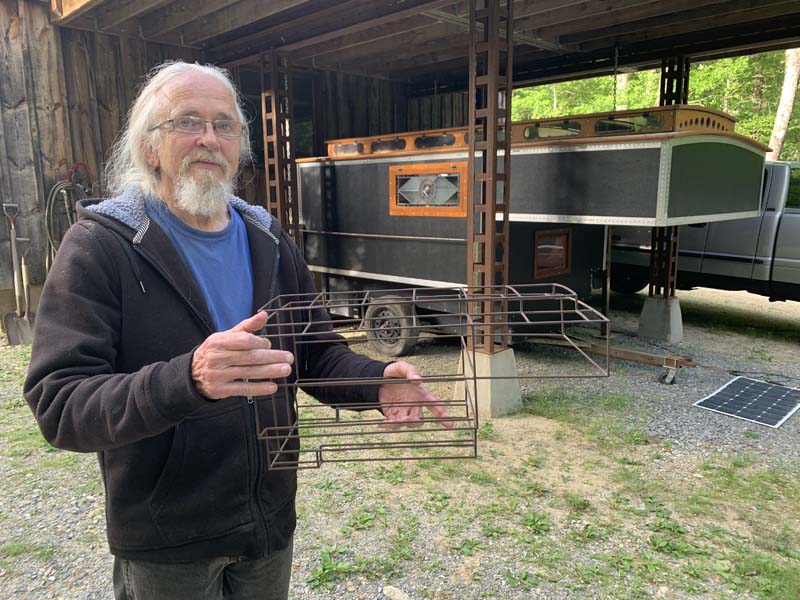
Above: Bruce holding the wire frame with the finished camper in the background
How did you go about designing the camper?
Bruce: There was a good year before pencil went to paper. When we were driving on long trips my mind would be visualizing; how this affects that, and then how that impact other steps down the line. I would constantly bounce ideas verbally to Joy and then she’d bounce back. It was interactive.
I started with a cardboard model. Then I made a wire model to visualize it better. From there I wanted to move to learn CAD. Joy got me Google SketchUp, but I couldn’t make the jump. I am much more tactile. I have to see it.
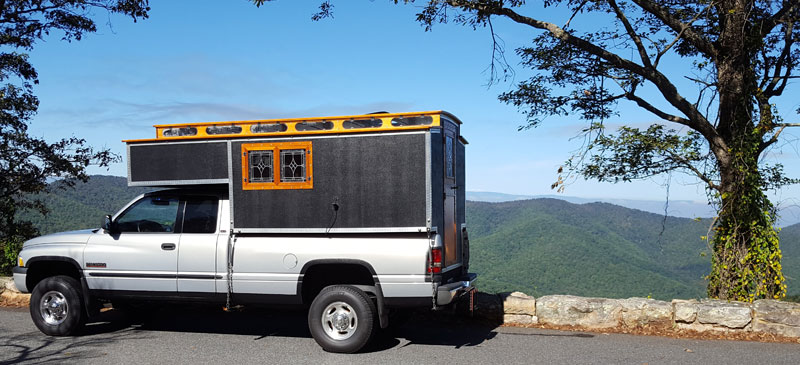
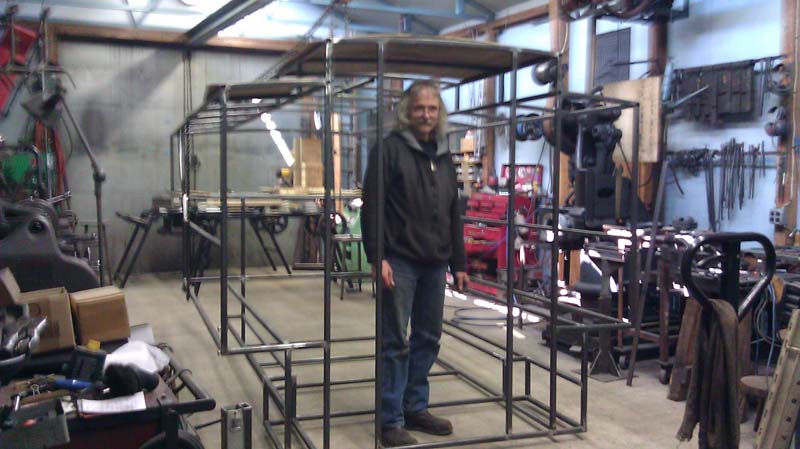
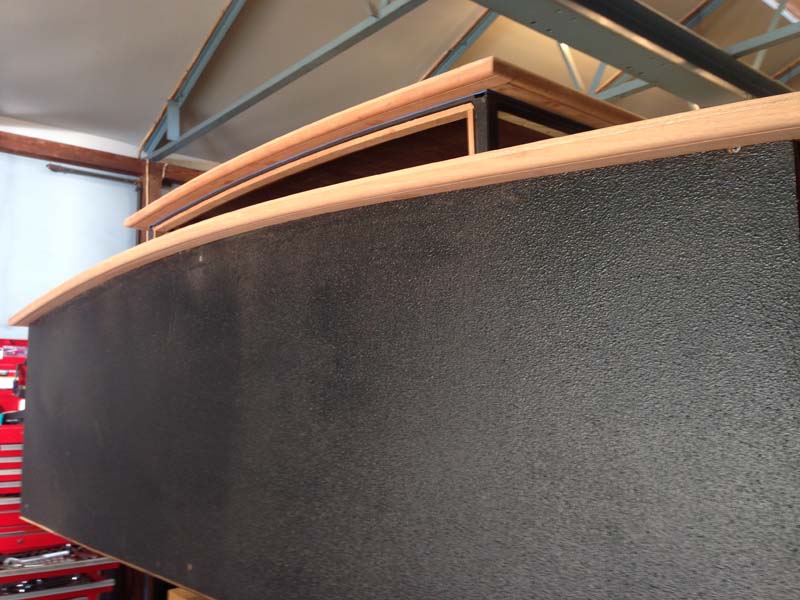
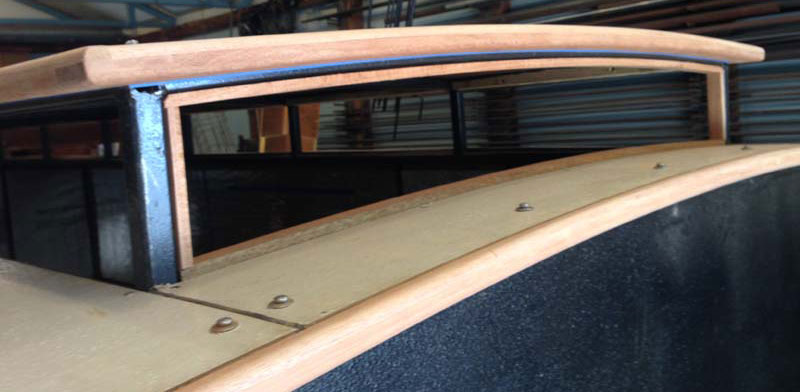
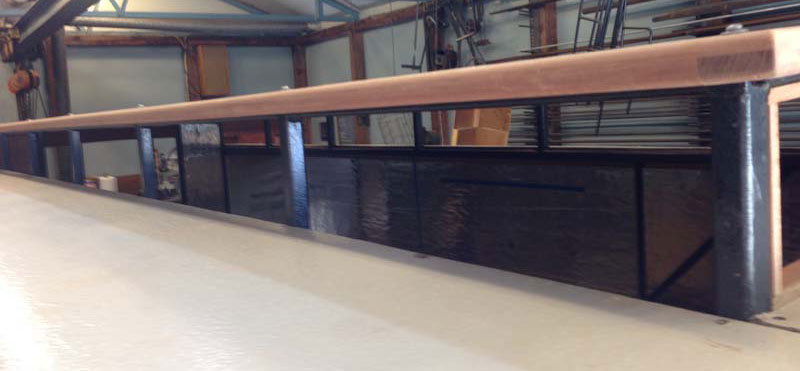
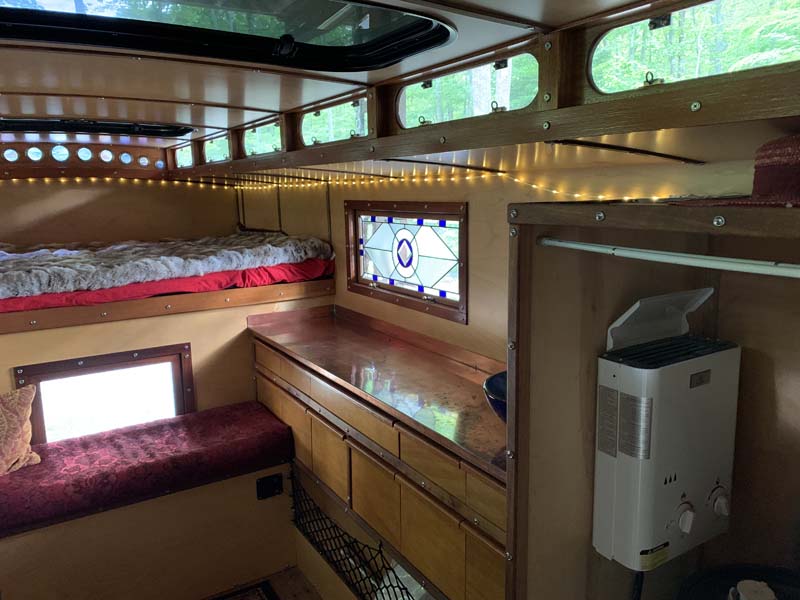
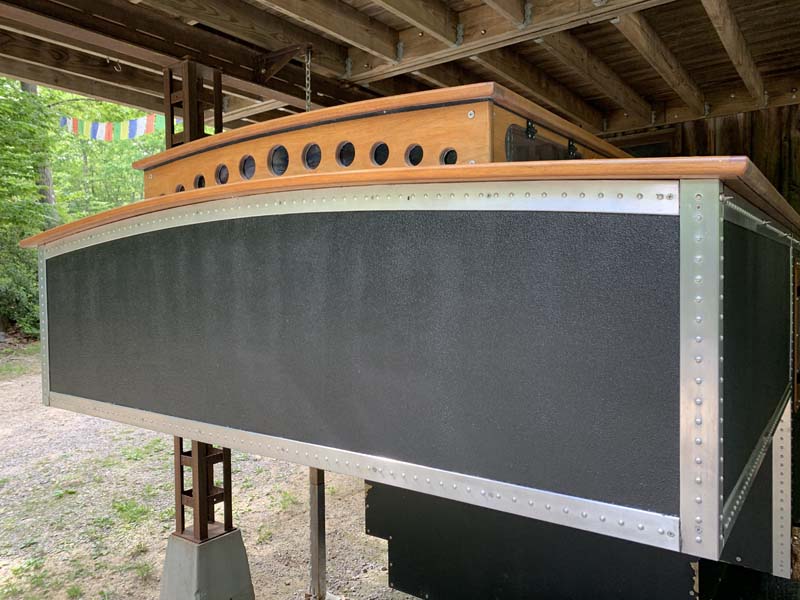
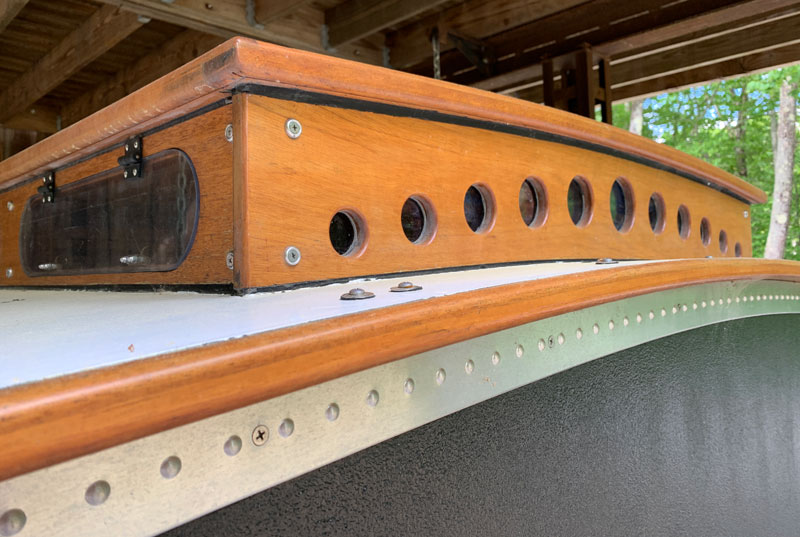
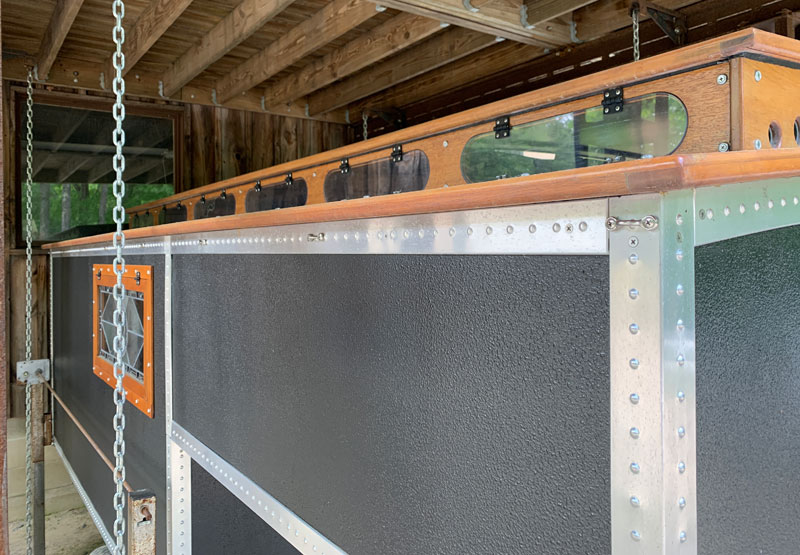
Through the design and modeling process, I was working out various concepts. The first concept was the raised trolley top. Classic train cars had that feature for added height to walk down the aisle. I liked that approach, and it also created a ladder truss that would benefit the structural integrity of the cabover.
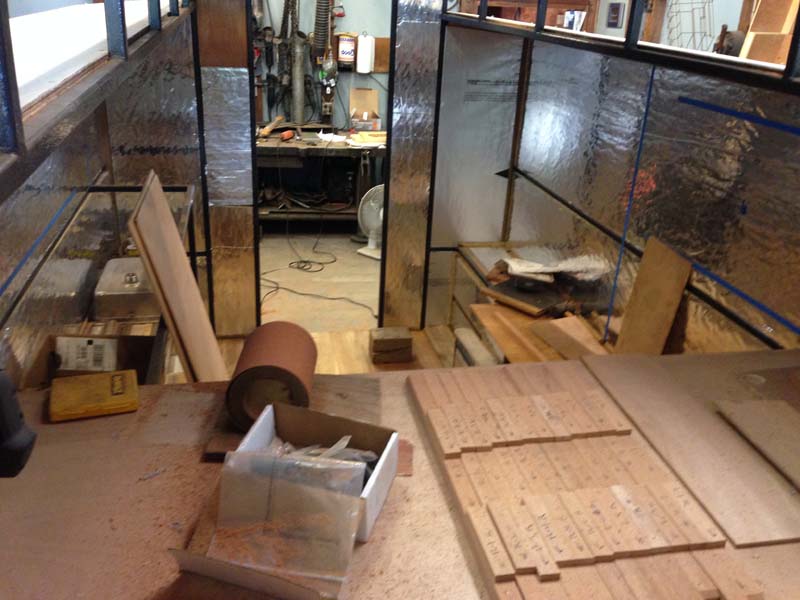
Like building a house, the welded frame was done in about two days and then it took forever to finish the camper. The total build time was four years. I only had so many opportunities to get the camper in my shop, and I had to convert my shop between iron and woodwork. I also kept discovering challenges not included in my sketches and models. Finally, woodworking isn’t my primary skill. I was pushing my limits.
What is your metal frame made from?
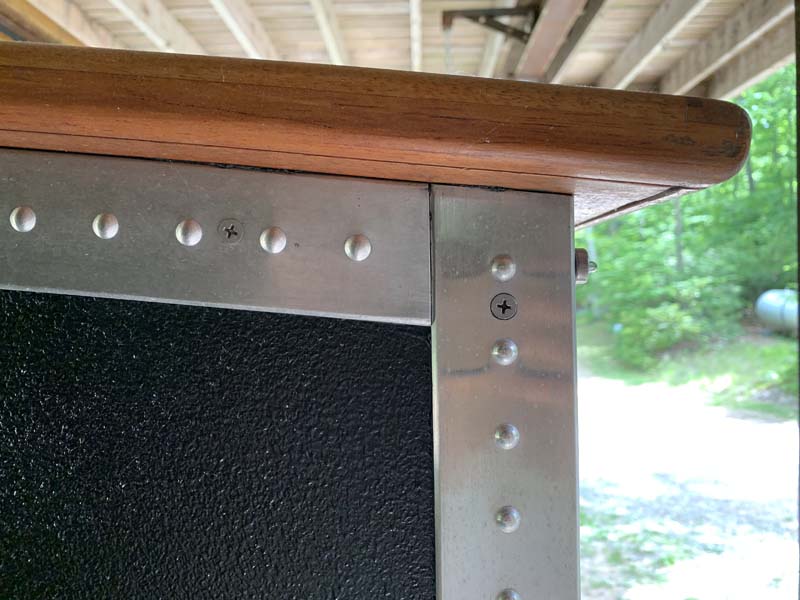
Bruce: The frame is steel and welded. I did some research and decided to use either aluminum or steel. With aluminum, you need to go with a larger tube size and thickness to get the same strength. There is a weight difference, but it’s not as great as you might imagine. I used 1-inch square steel tubing with a 1/8-inch thickness for enough body to cut a thread. In retrospect, I could have gone to a much lighter gauge. Once the frame was completed, I painted it for more corrosion protection.
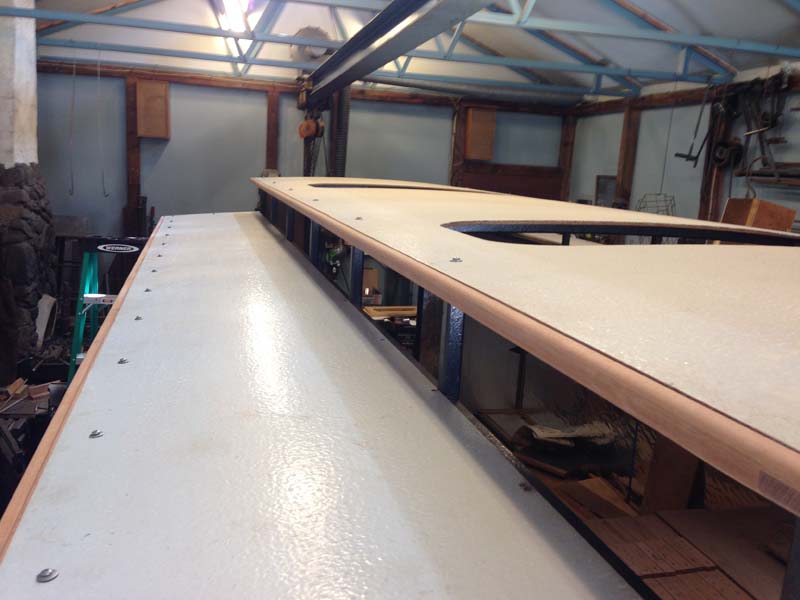
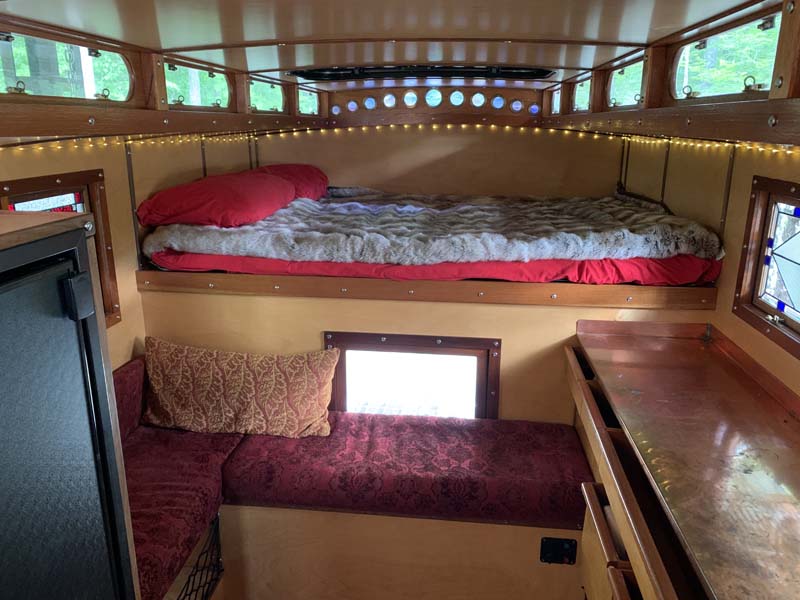
The exterior is 1/4-inch marine plywood screwed to the steel with rigid foil-faced foam in between. I used self-tapping screws. Under the bed is plywood and the interior walls are pre-finished 1/4-inch birch plywood.
The exterior aluminum extrusions are also screwed into the steel frame with butyl behind it. Again, instead of drilling and tapping, I used self-tapping screws so I didn’t have to worry about breaking taps.
Was there any concern about electrolysis between the steel and aluminum?
Bruce: I researched that with the Avion. With the grade of aluminum and steel, I used there will be a degree of electrolysis, but not enough to worry about in my lifetime.
Tell us about the coatings you used on the exterior of the camper.
Bruce: First, there’s a clear penetrating epoxy sealer. That saturates into the wood. Then I added a bed liner to the exterior sides and the roof is a marine deck paint.
I’ve actually had problems with both the bed liner and the marine deck paint. I believe the clear penetrating epoxy sealer may be the issue. The epoxy and paint manufacturers assured me that would not be an issue. It’s frustrating when you do the research and get the wrong answers from the experts. My advice is to always use the same manufacturer for the exterior coatings so there’s no blaming the other guy.
Tell us about the roof and how it was made.
Bruce: The roof is 3/8-inch plywood with deck paint. The roof has the same clear penetrating epoxy sealer and marine deck paint. I didn’t want the roof to have a raw edge so I added mahogany with a 3/8-inch step to the plywood. I left a 1/8-inch gap where it joins and filled that with caulking. The gap allows for expansion and contraction and is typical marine construction. With teak on a boat, you leave a 1/8-inch gap. The caulking gives it a degree of flexibility.
How did you go about finishing the interior?
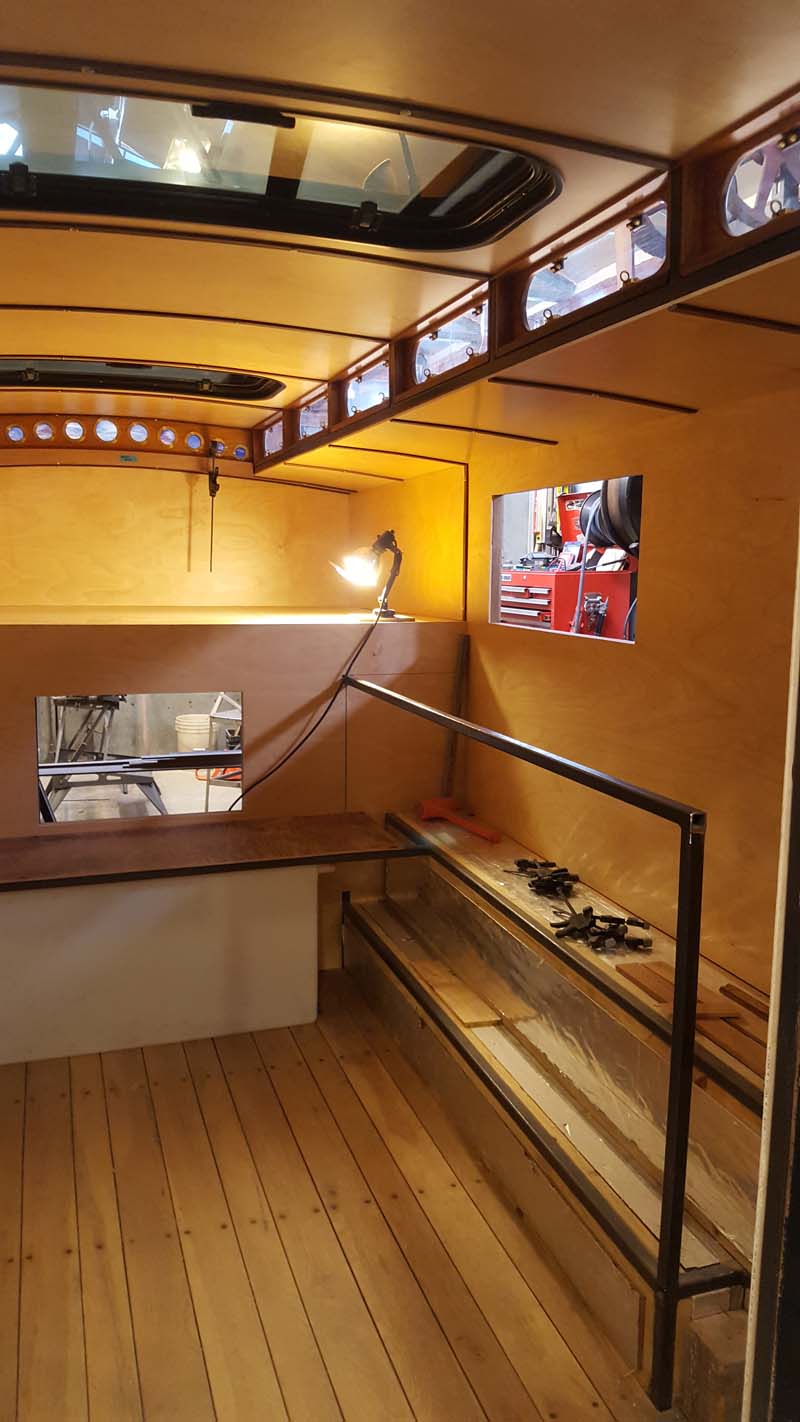
Bruce: The rigid foam insulation panels were pressed in for a friction fit with no adhesive. Then I cut the pre-finished birch plywood and put that in with self-tapping screws and finishing washers.
To screw down the room, I used McMaster-Carr finishing washers that are countersunk and allow flat head screws to sit flush. Together with the right-size O-rings and a little butyl, they sealed a potential leak area.
The camper is also a work of art. When did you think about the windows and other details that make it different from a normal camper?
Joy: Bruce has a very fine eye for form, fit, and function. For him, the aesthetics of it have to please without losing the form, fit, or function. Otherwise, it’s back to the drawing board. There is a beauty in the simplicity of the camper. Once it was built and weather tight, we lived with it and camped with it that way. That gave us many ideas about how to complete the interior.

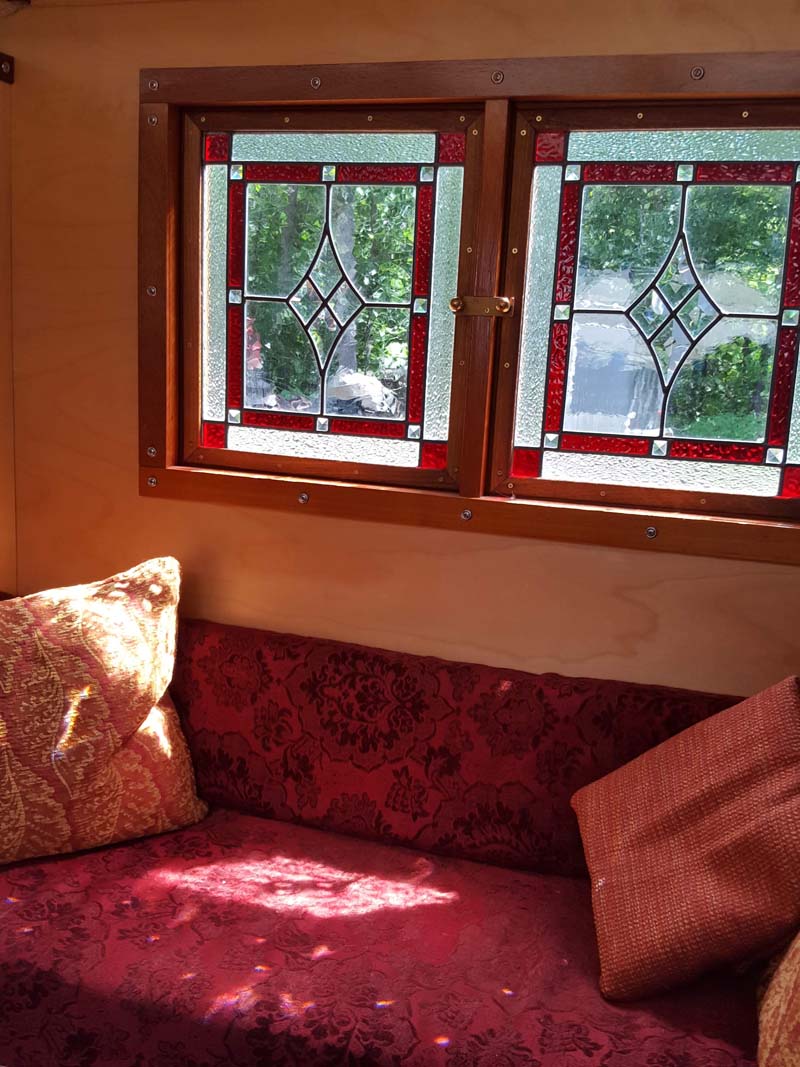
Where did the idea of stained-glass windows come from?
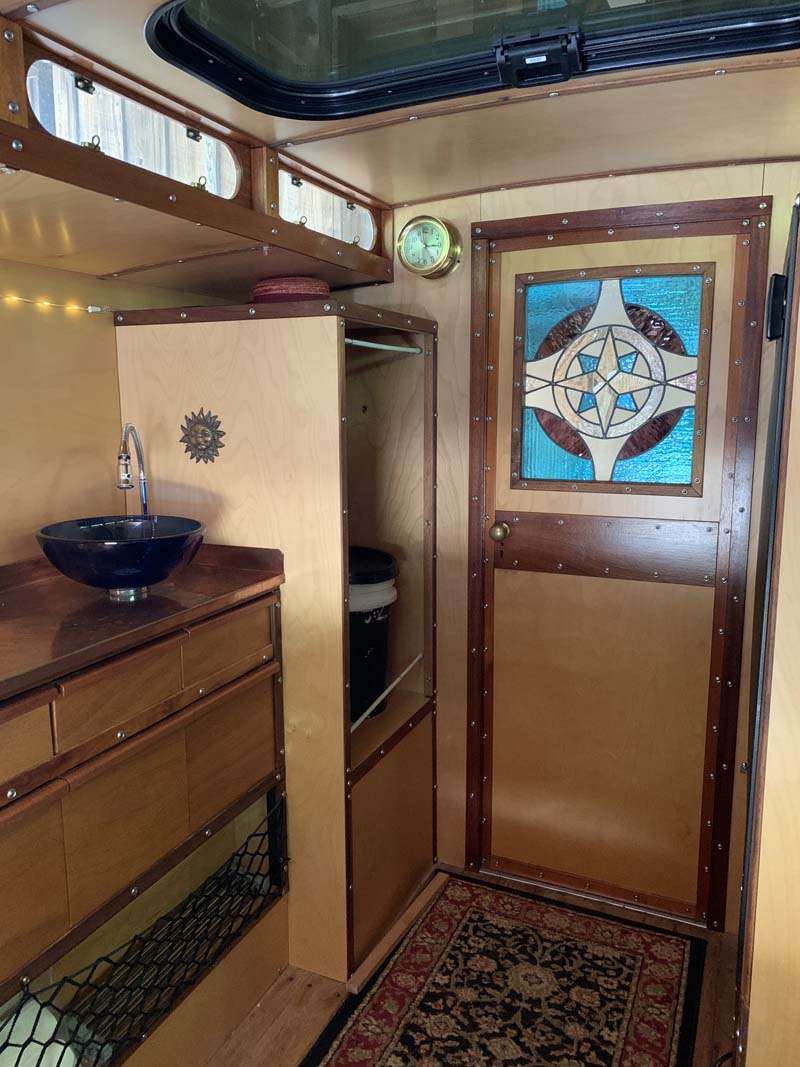
Joy: When Bruce proposed the camper, I suggested stained-glass windows. Bruce wasn’t initially keen on the idea. I had to teach him how to make stained glass before he could understand the functionality of it. I lived in Seattle, which is the capital of all things art glass. There were cars and station wagons with back windows made of stained glass. From that, I knew that it was possible to make a stained-glass window that would be strong enough.
Bruce: I didn’t know how stained glass was assembled and had structural concerns. We looked at buying standard camper windows. They have the shades and screens, and we priced them out. Eventually, we realized that the standard camper windows would have totally changed what this camper is.
Joy: It was through this experience that we realized how we approach projects from 180-degrees of difference. I’m very organic and spontaneous when I create. Bruce starts to sketch things out like a draftsman. We had to come to grips with how we approach things.
Bruce: I like to do destructive testing on things to learn. This approach was not feasible for window testing.
Joy: I showed him how the stained glass windows could have a zinc-came U-channel on the outside and a wood frame. I suggested the use of stabilizers inside for a deeper H-channel, and we could run a wire in there. That makes the construction many times more difficult, but it was doable.
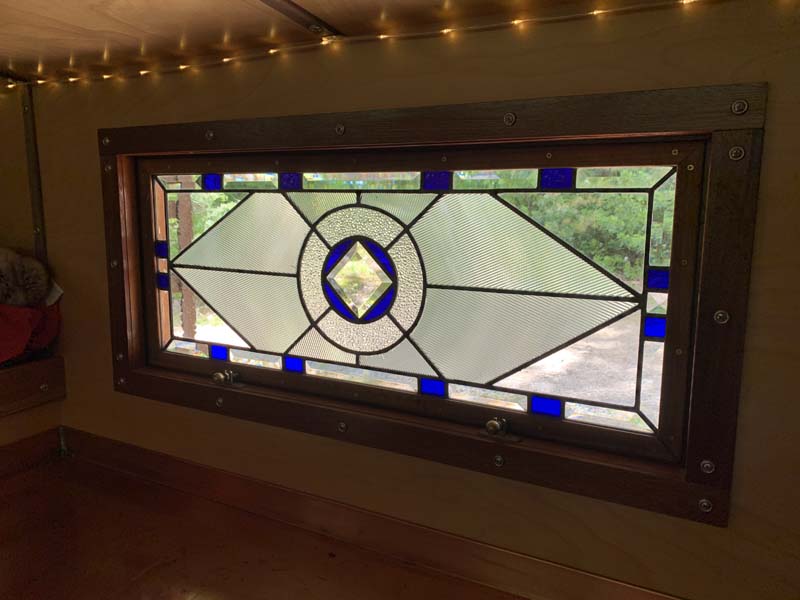
After we verbally arm-wrestled for a while, Bruce was satisfied that stained glass windows could be structurally sound. Then I designed the windows. I wanted ruby glass and he wanted cobalt. Instead of combining them into one design, I made them into separate windows; one of each on either side of the camper.
Where did the raised trolley top windows come from?
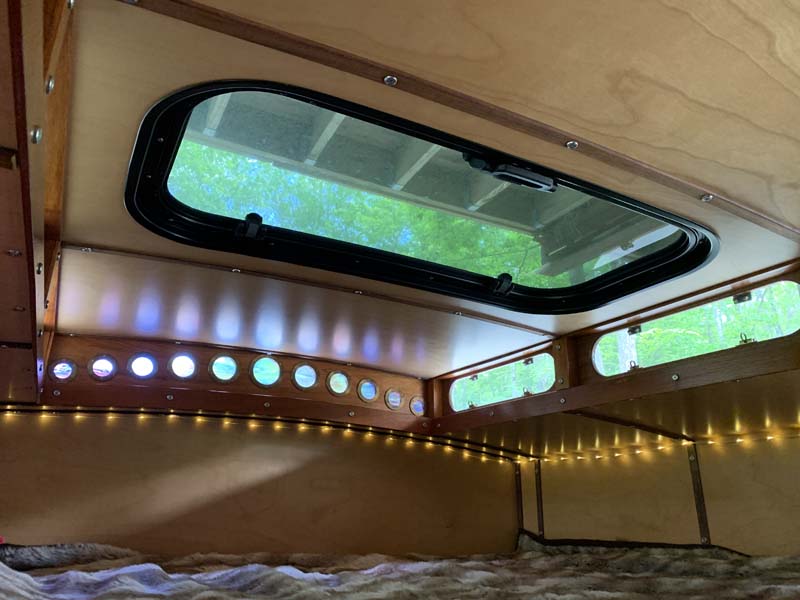
Bruce: On paper, I thought I’d buy nice marine portholes. The first thing I looked at was the price. They were hundreds of dollars a piece. That wasn’t going to work. They also were too big and had heavy frames. We wanted small lightweight windows.
I routed a little channel for each window, added a 1/8-inch silicone tube gasket, and created Lexan windows. I used cabinet latches with soldered loops to keep the windows closed. I spent lots of time online looking for solutions.
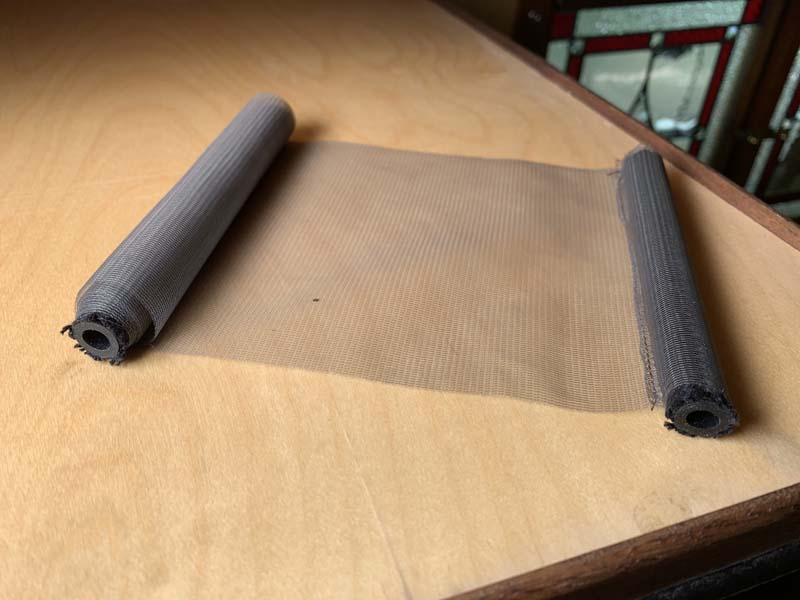
The bug screens are made from standard tent screening material that is sewn to a braided cloth-covered rubber tubing that’s normally used for gas lines in Volkswagens and BMW motorcycles. I cut sections of this tubing material that fit the window frames and then pushed in slightly shorter dowels to give it structural stability.
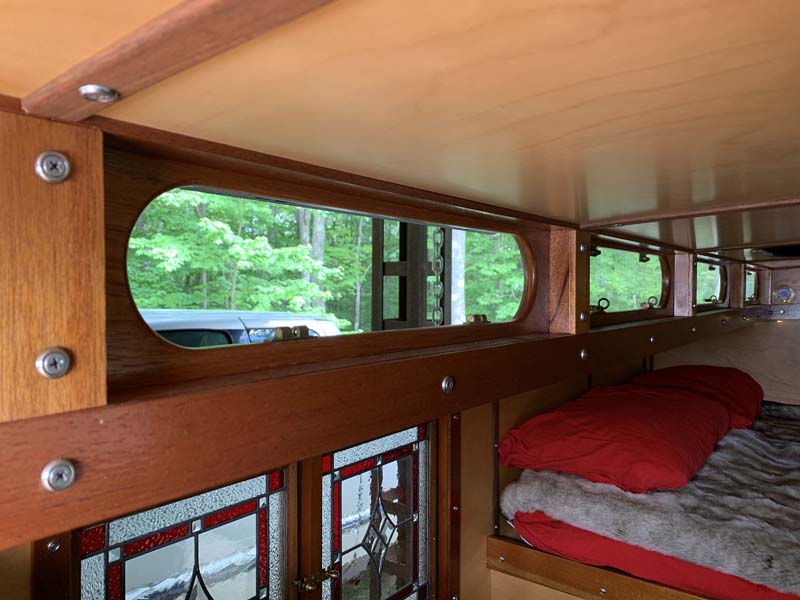
Above and below: Trolley windows without (above) and with (below) bug screens
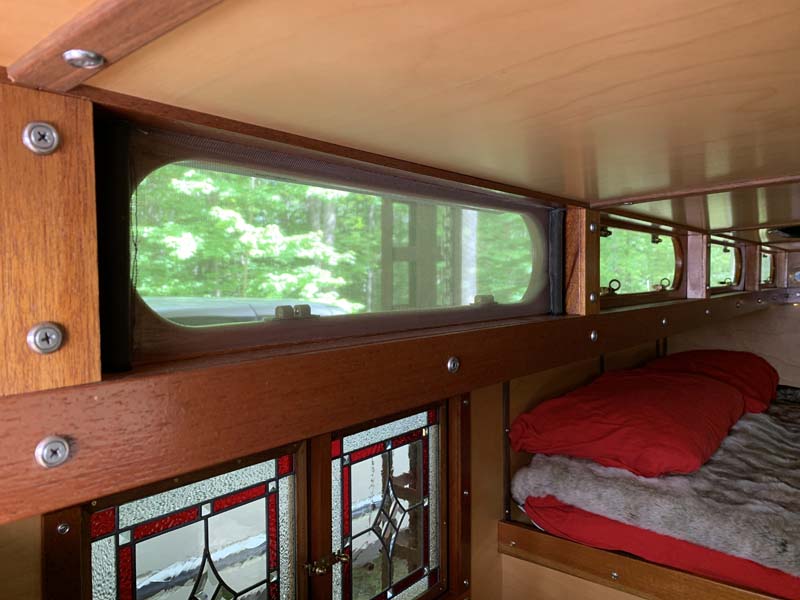
Once rolled out, the dowels press into the windows to create bug screens. When you’re done, you roll the dowels and screen material up and put them in a drawer.
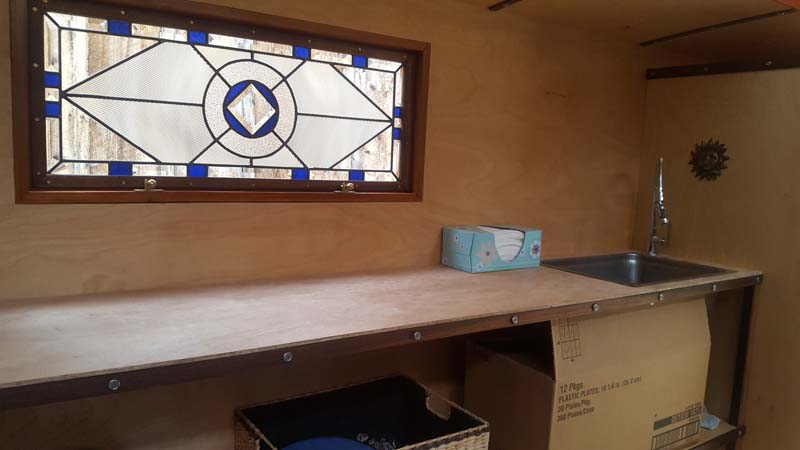
Above: Originally they had a recessed sink and then came up with an above-the-counter bowl sink solution
Ingenious solution. Why did you use copper for the countertop?
Joy: Aesthetics. We talked about butcher block and other materials.
Bruce: I had a sheet of copper left over from a project years ago. There’s a local sheet metal guy that does incredible work. I gave him the old wood countertop that we were using before we had a final and he nailed it. There’s no gap. It looks amazing.
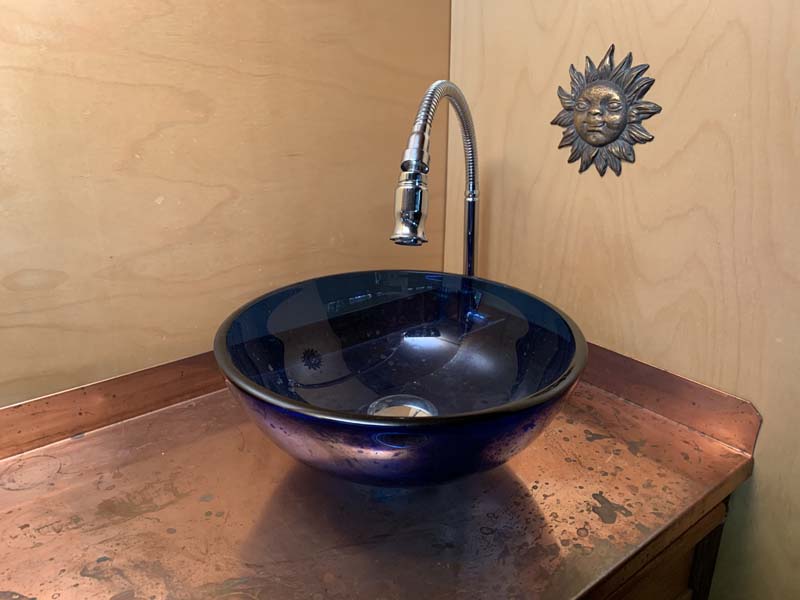
We were originally going to do a recessed sink. Then I came across an above-the-counter bowl sink and realized that would save space under the counter.
Another fun detail is the automotive sunroofs. Where did that come from?
Bruce: That’s where the idea for an arched roof came from. Beyond avoiding standing water from a flat roof, the automotive sunroofs have a built-in curve. I designed the camper roof with that same curve. I also added a drip edge to keep the water from running down the side of the camper. I like the look of it.
To install the sunroofs, I cut the necessary holes, put down butyl tape, and screwed the sunroofs down. Then I finished the sunroofs with trim on the inside. The flush sunroofs give the camper a nice smooth roof. You can also climb out the sunroofs to get on the roof or add kayaks or roof racks. We haven’t added screens for the sunroofs yet, but we will.
How did you create the round windows on the front of the camper?
Bruce: I have a box of various sizes of hole saws that were used to cut through the wood. They were also used as templates for cutting the circles out of the brass sheet and the glass. Butyl tape was sandwiched between the wood and the glass for a waterproof seal. The brass rings were then screwed on over the top to give the appearance of small portholes.
Joy: I cut lots of circles of different colors and textures of glass until we could narrow down what would make us both happy.
There’s a solar controller in the camper, but there are no panels on the roof.
Bruce: I have two 100-watt flexible panels. They are not attached so that I can move them around on our camping site. Sometimes I lean them against the truck or find a place on the ground. When we travel, they go in the truck.
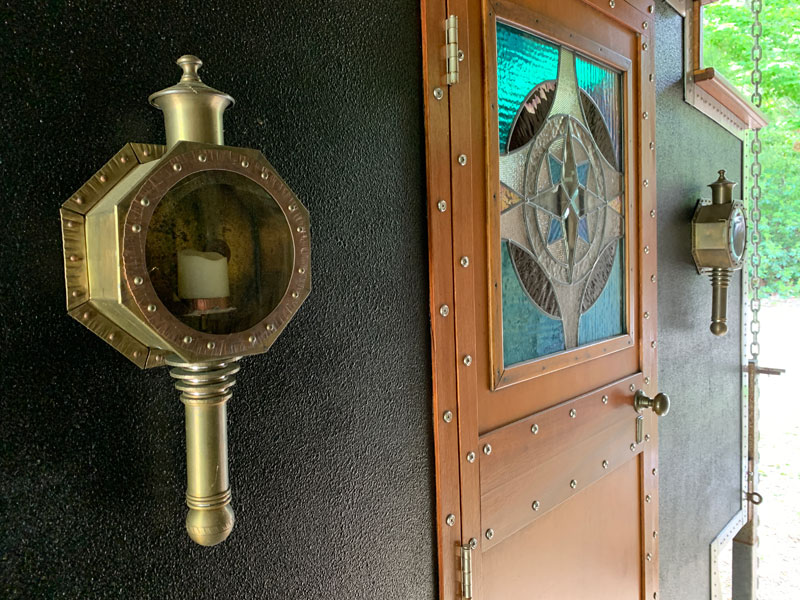
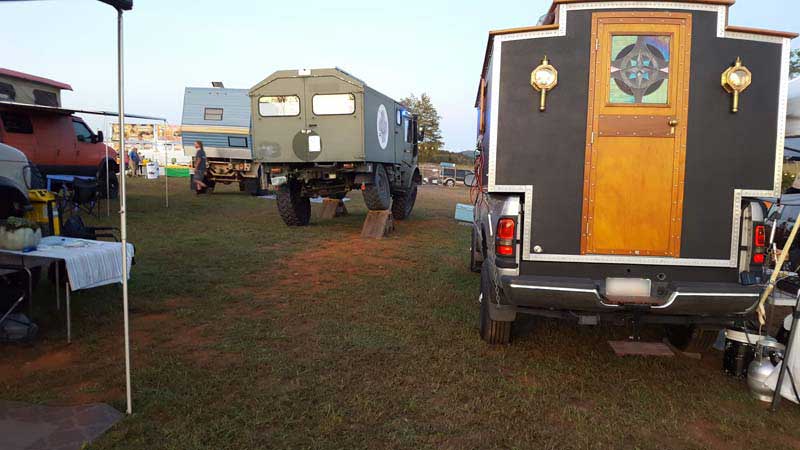
Tell us about the old lanterns that flank the rear door.
Bruce: I was all over the web looking for old carriage lamps and didn’t realize the problem with the door opening. With the larger lamps, the door would hit them. Since we couldn’t come up with anything small enough, we created our own.
The whole assembly is mixed brass and copper. The lantern stalk was the fuel container for old kerosene lamps and chimney parts. I alternated brass rivets on copper and vice versa to give it the carriage lamp look. The door is hinged and opens. Inside the light is an LED.
Continuing the vintage steampunk concept, the camper has false rivets. How did you achieve the false rivets?
Bruce: I did that with an old punch that was rounded. The bottom die is a hole. By setting a stop on my press it created a dome.
The rivets break up the visual bareness of that area and create a more compelling visual presentation.
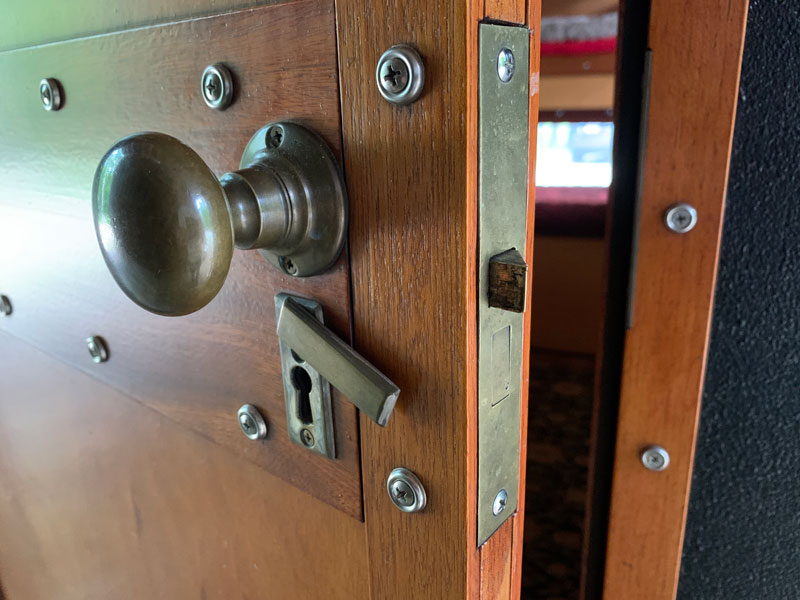
Tell us about the origin of the lock and keyhole.
Bruce: The door has a 3/4 steel tube framework. There’s 1/4-inch plywood wood on both sides and it’s trimmed out with mahogany.
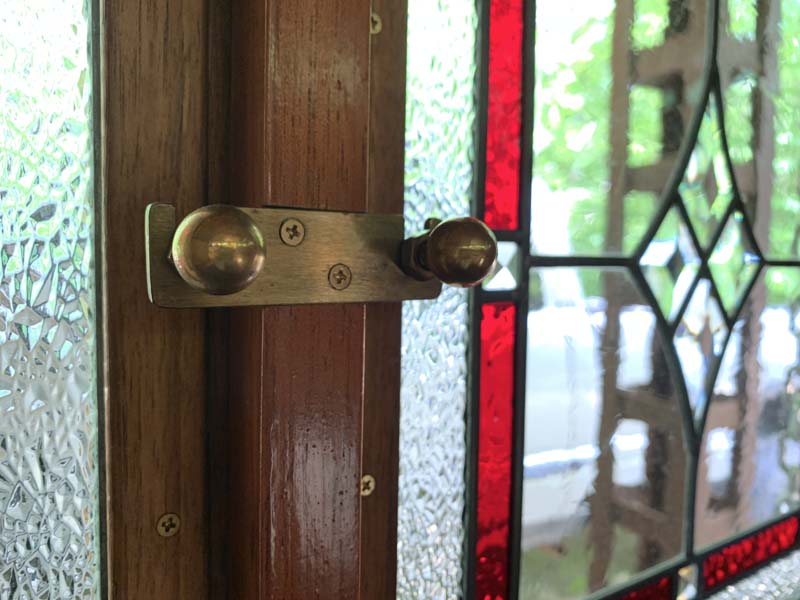
It’s a relatively thin door, and I didn’t want a standard camper latch. When our neighbor passed away, I got a brass doo-dad box. The key and latch were in that box. He collected stuff like that.
I bet he’d get a kick out of where that latch and key ended up. What type of refrigerator did you choose for the camper?
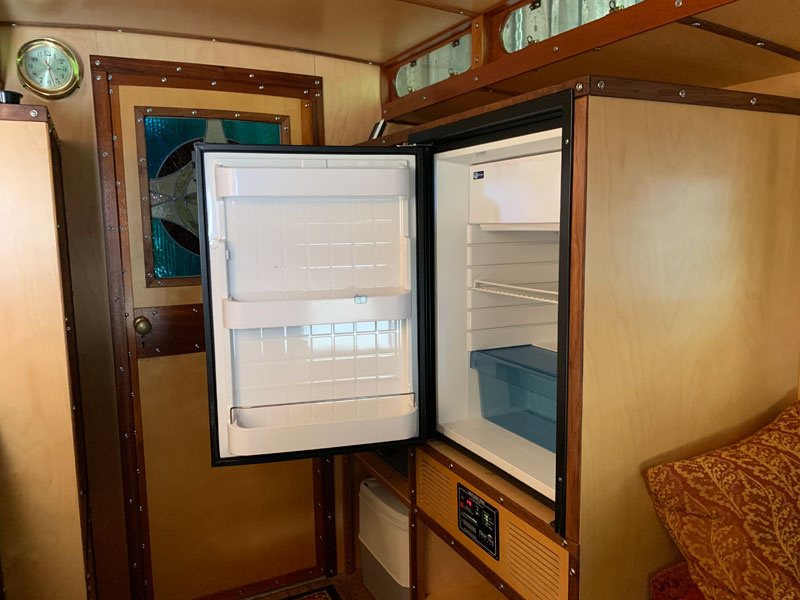
Bruce: It’s a marine-type 12-volt Dan Foss compressor refrigerator. I wanted a 12-volt refrigerator after my previous experience with propane refrigerators. Nothing is sadder than being at a festival and your freezer doesn’t make ice or your refrigerator doesn’t keep your beer cold.
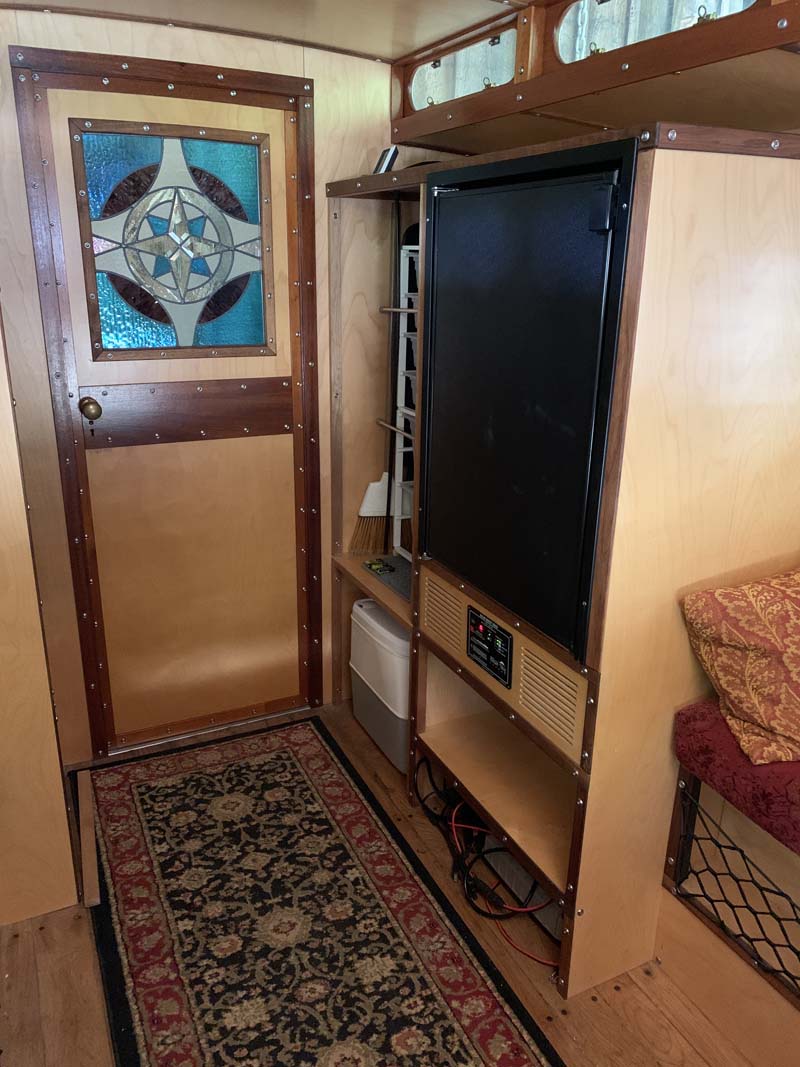
What is located under the refrigerator?
Bruce: I’ve got two 100-amp-hour AGMs under the refrigerator.
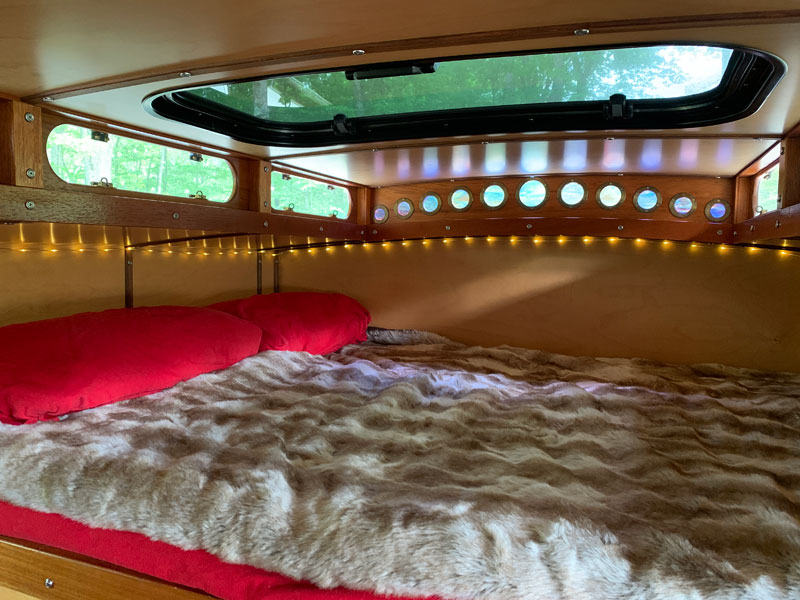
Other than the water pump and the refrigerator, there is no wiring in the camper. I wanted to keep it simple. We have a battery pack that works the LED strip lights. That made more sense than a fixture that’s wired in. With the LED strip lights, we don’t lose night vision.
So, you have an on-demand water heater, but no shower?
Joy: We use the water heater for our outside shower and washing dishes. We have the same on-demand water heater in our shop that we use, so we knew it would work well. It was only $99, and saves a lot of space.
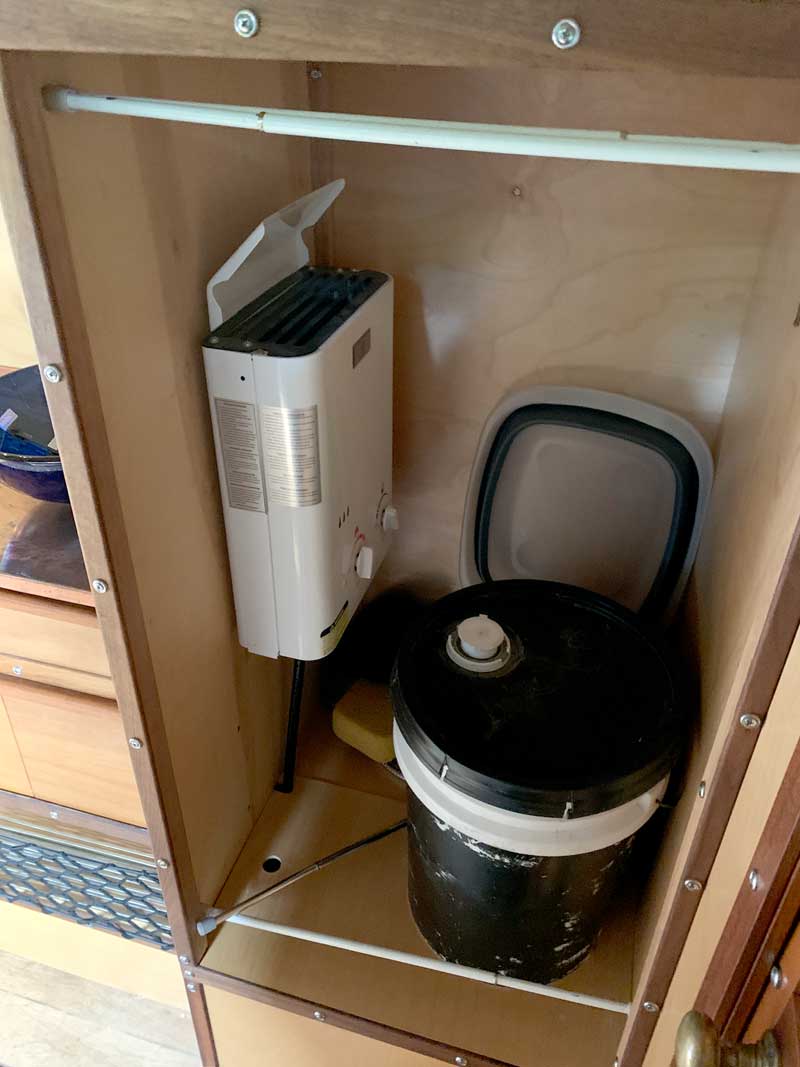
Bruce: The camper has a 40-gallon fresh tank. The pump is near the tank mounted on a 1/4-inch plywood section with quick connections. I can easily slide out the pump, disconnect it and drain it. I also put a marine deck hatch on top of the tank with a 6-inch opening. I fill the water through that. We can fill it with a bucket if we have to. And when the season is done, we can clean it out.
Joy: The Avion C11 only had a 15-gallon fresh tank and we’d run out, so we wanted a bigger water tank.
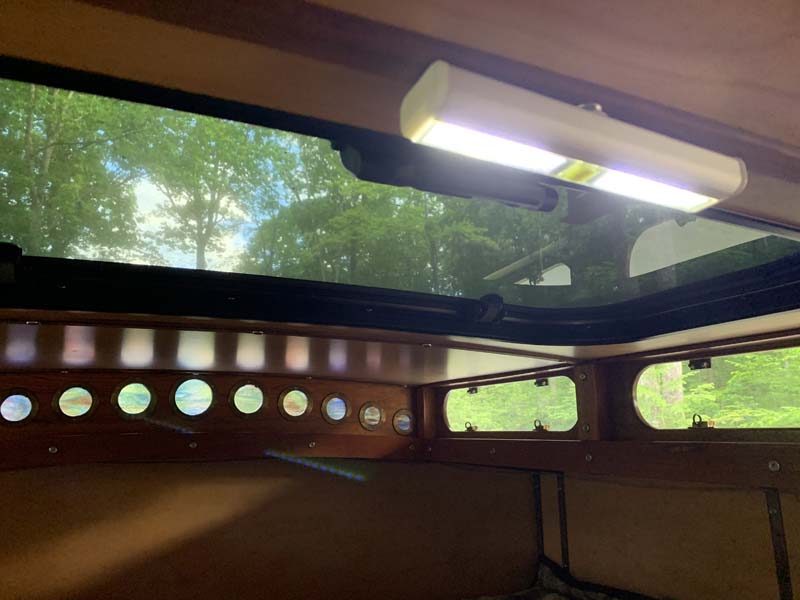
We also have work lights with magnets. They attach to the ceiling screws overhead (pictured above).
You have quite a setup under your deck. How do you load your camper?
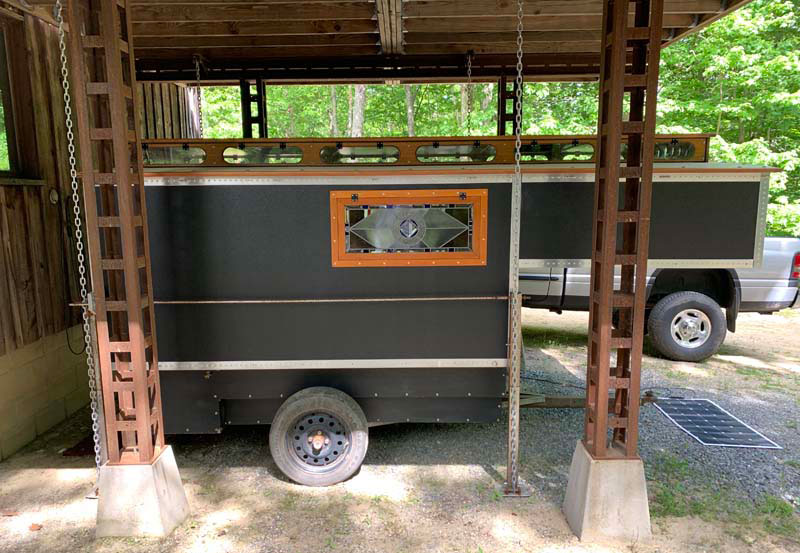
Bruce: The Avion had three manual jacks. I would go around individually hand-cranking each jack. For this build, I wanted four jacks. I initially looked at electric jacks and the complexity of the wiring and the expense. Then I looked at suspending it.
When our town puts sanders on trucks, they hoist up the sander, back the truck under, lower the sander down, and attach it. That approach looked easier and it avoided having the camper high up on jacks.
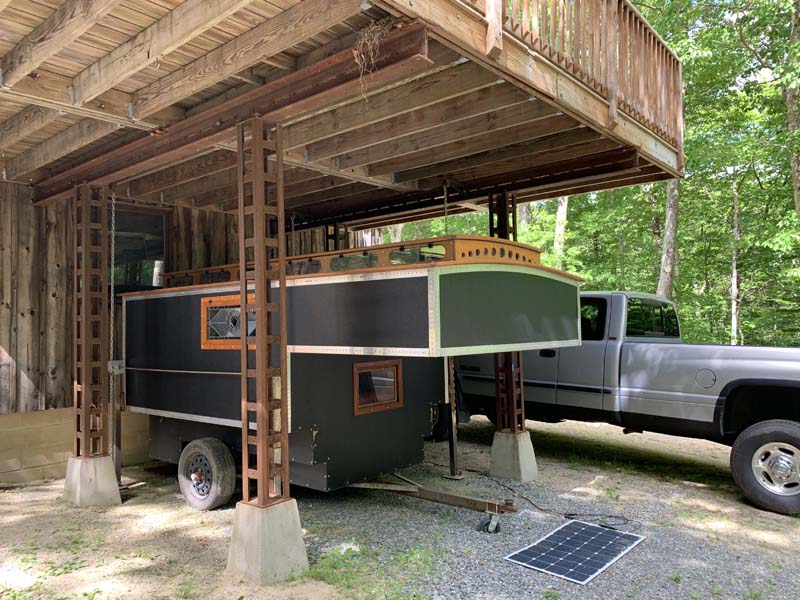
The camper hangs from steel beams under the porch. When unloaded, it literally doesn’t touch the ground. The camper mounts are 1/2-inch carriage bolts with threaded couplers that I welded into the frame. The camper hangs from chains. Having the camper suspended also makes lining up easier for loading.
Incredible. Once the camper is loaded, where do you go?
We often go out and tow our dune buggy trailer behind us. We use Boondockers Welcome to stay with people as we go. If we like a place, we’ll ride around for the day and come back.
Most of our trips are into northern Vermont, New Hampshire, and New York. We’ve talked about traveling cross-country with the buggy and attending festivals.
What kind of festivals do you enjoy?
Bruce: We mainly enjoy music and alternative consciousness festivals such as Sirius Rising at Brushwood Folklore Center in Sherman, New York. It is a week-long festival with nightly drumming and daytime workshops. There is also Starwood in Ohio and several Indie music festivals in New England.
Joy: I drove the Trans-Canadian Highway with a friend of mine and fell in love with so much in Canada. I want to take Bruce to Sleeping Giant Provincial Park in Ontario. I really enjoyed the wildlife and beauty there. It’s a place I recommend.
How do you get into the camper when it’s on the truck?
Bruce: I built steps that go into the receiver hitch. The lower step folds up and covers the bumper where you step, so it’s not slippery.
What’s left to finish?
Bruce: On the opposite side of the heater, I need to add a door for the closet and put a mirror on it. We need to finish the storage drawers. I need to pull out the rear seat of the truck. That’s been on the list. There’s still more to do!


