After 10 mod contests in 10 months, here are the 10 best. Which mod will be the 2018 Truck Camper Mod of the Year? Vote now!

Voting for the 2018 Truck Camper Mod of the Year starts today and ends at 11:59pm PST next Thursday, December 14th.
The winner will be announced the following day; Friday, December 15th. Who will be the 2018 World Champion Truck Camper Mod Maker? It’s time to vote.
Congratulations to Scott Richards for being Modder of the Year!
1. Jim and Joan Thompson, Edgerton, Wisconsin
Dinette Into A Desk With Office Chairs
2011 GMC 3500
2013 Lance 1191
We are fortunate to be able to work from the road for four or five weeks at a time using our laptops and cellular internet connection. We had room to work comfortably in our fifth wheel. However, when we bought a truck camper, we found the dinette seating unbearably uncomfortable for using a laptop, or for any kind of extended sitting.
Our 2013 Lance 1191 has a deep slide-out featuring a U-shape dinette. We needed to convert that area into a more comfortable place to sit and work. When we’re not working, we wanted a more comfortable place to sit and read (or in my case, knit).
We decided that whatever we did should be reversible in case we decide to sell the camper down the road. We knew we would want be able put it all back into a stock U-shape dinette without any extra holes in the walls. We also didn’t want to add a lot of weight to our rig, and we wanted to accomplish our changes without losing storage space.
We’ve accomplished our goals! Here’s what we did:
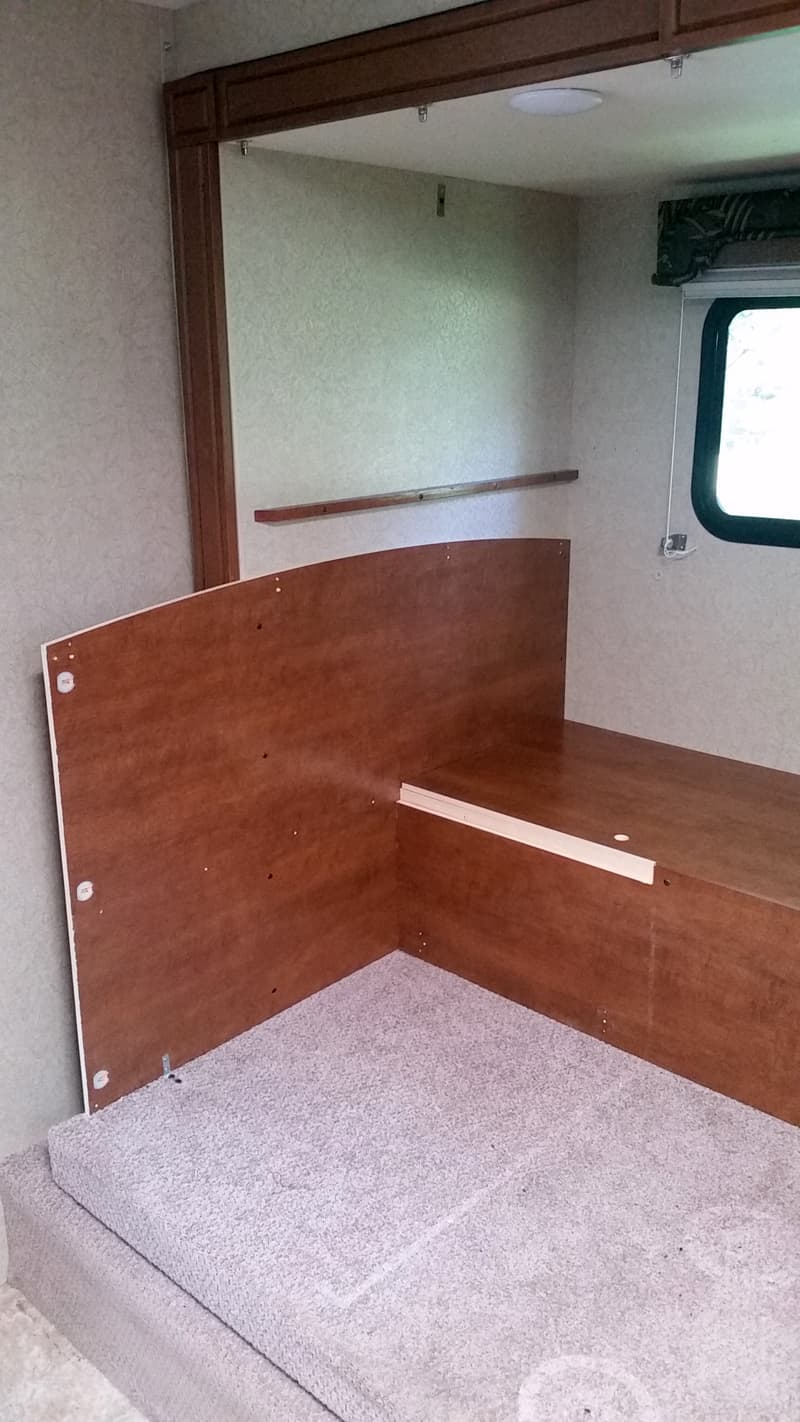
1. We removed most of the dinette except for the boards that form the back of the seats and the large storage area that’s accessible from the outside. Everything came out easily with a screwdriver. No glue joints had to be broken. We put hardware into plastic bags and labeled them, taking photos as we worked.
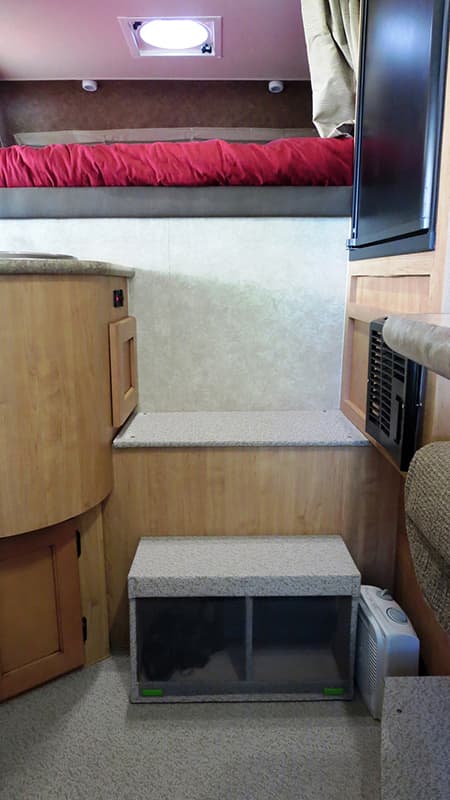
The photo above shows what we left in place. We also removed the bunk bed. The bunk bed was heavy, cuts down on headspace in the slide, and is something we do not need.
2. In the above photo, you can see the supports for the bunk bed on the wall. You can also see that we moved the window valance and shade up almost to the ceiling. When the shade is up, it no longer covers one-third of the glass. What a difference!
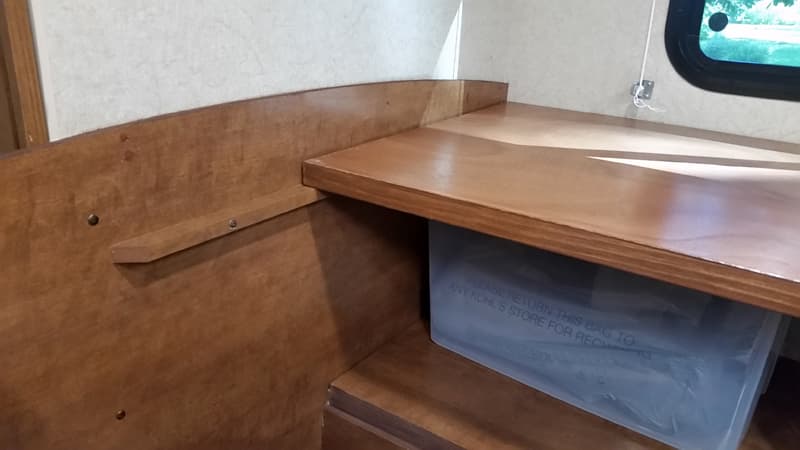
3. We moved the bunk bed supports down and mounted them on the dinette seat-back boards – as shown above. We bought an unfinished 24-inch by 80-inch hollow-core slab door from Home Depot, cut it to length, then stained and finished it.
The door sits on the bunk bed supports and slides forward for use as a desk. If it ever sags, it can be flipped over.
We found some 54-quart plastic storage boxes that are just the right height to sit on top of the outside storage compartment. We can fit three of these boxes length-wise in this area. They sit back against the wall and allow the knee-space we need when we are facing the window using the desk.
The boxes seem to give us a little more storage than what we lost by removing the drawers under the dinette. A stretch cord across the three boxes (not yet in place when the photo was taken) holds them in while traveling.
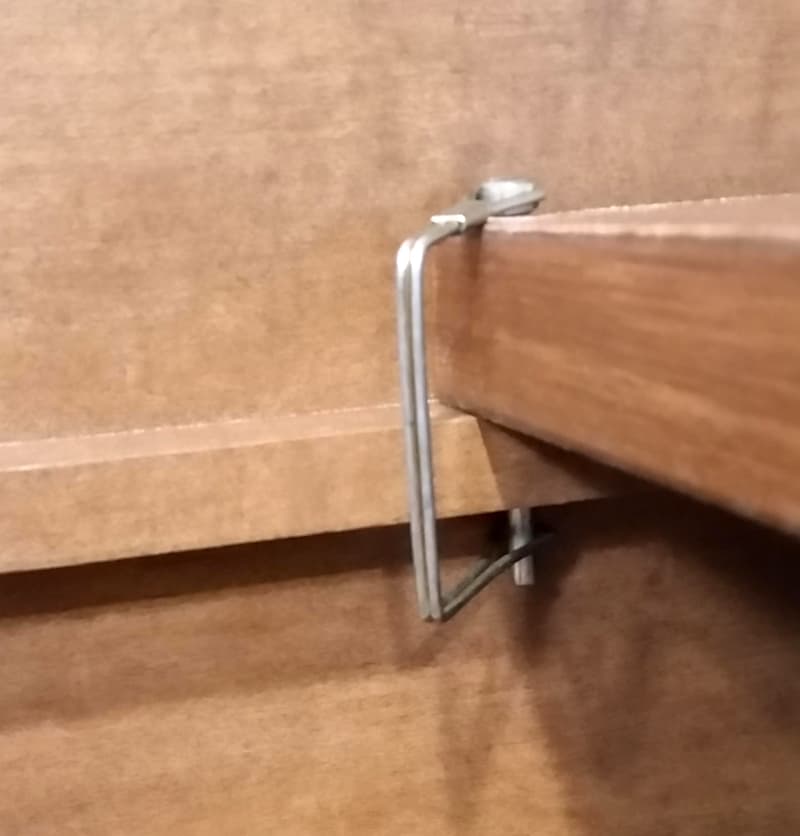
4. When we are on the road, the desk is held in place with a couple of clips that go through the supports, as shown above.
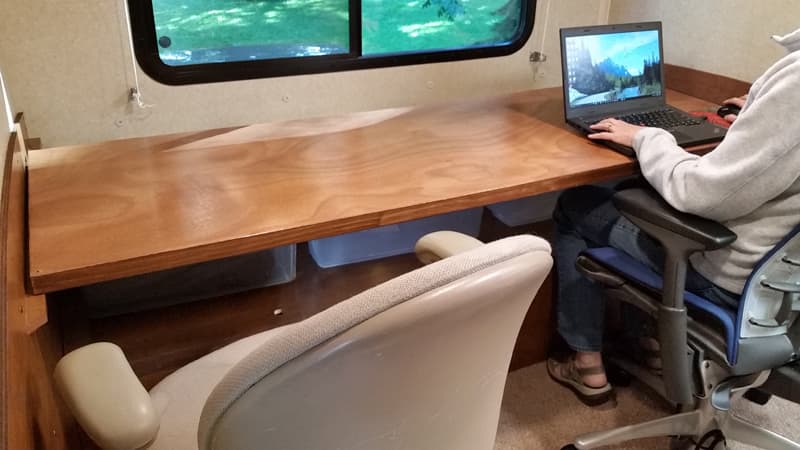
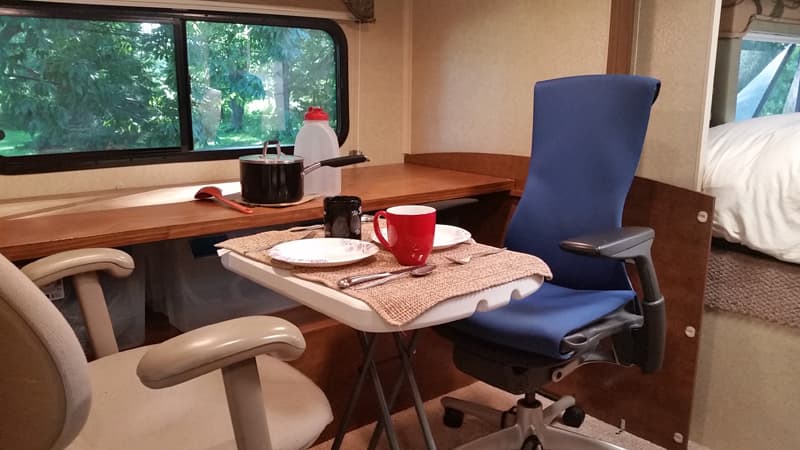
5. Next, we brought our comfortable office chairs into the camper. We are both tall people with long legs, so the placement of the chairs was all planned out beforehand to make sure we had leg room.
The spacing is just right to be able to sit facing the window to work, with the desk pulled forward about eight inches as shown in the photo above. We can also push the desk back against the wall and swivel the chairs to face the camper’s interior for relaxing or reading. With the desk against the wall and the back of the seat in the corner, I am able to recline as much as I would want to.
6. As you can see from the photo above, we have just enough room on the slide for the chairs. It would not have been possible to leave our outside storage intact without having the extra slide depth from the deep U-shape dinette slide.
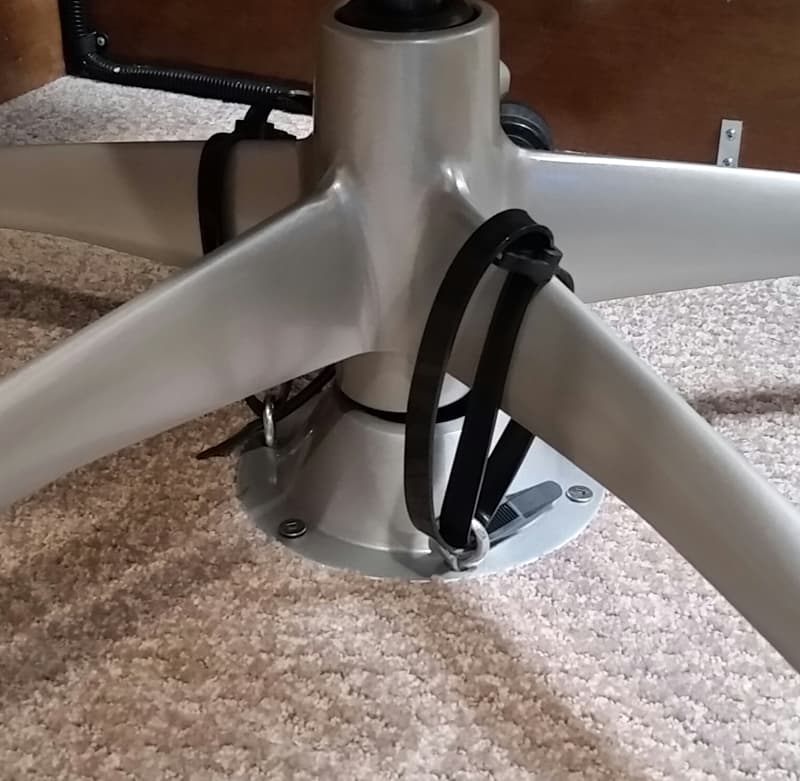
Next, we needed a way to keep the chairs from moving around and possibly falling off the slide floor while traveling or sitting in them. We took the two table supports from the center of the slide floor and mounted one under each chair using the original hardware.
Like most office chairs, our office chairs have a center shaft that extends down from the bottom. We positioned the table mounts directly beneath the center shafts.
To keep the chairs from jumping out of their holders, we replaced two of the screws on each table mount with I-bolts that go through the floor of the slide with a fender washer and locknut. The I-bolts allow the chairs to be solidly strapped down.
We do not move the chairs, and they’re in exactly the right position for either working or lounging. When we travel, the chairs are turned back-to-back with a stretch cord between them. The photo above also shows the wiring for the slide, in the background. We repositioned this wiring simply by moving the clips that held it in place.
If we want to eat facing each other, it is a little tight, but it works. We normally bring a folding table with us. Usually, we’re in a campground that has an outdoor table and we prefer that anyway, but this is a good option to have.
Before embarking on this mod, we spent a lot of time thinking about our priorities, and we had decided that comfort for working and relaxing was more important than being able to have an indoor table where we could sit facing each other.
7. We painted the exposed edges of the wood seat-back panels brown and filled in the screw-holes with wood filler.
Obviously, this mod would be nicer without the dinette seat’s back panels, and we realized that removing them would make getting in and out of the bed with the slide in very easy when stealth camping. But, because the storage box is built to fit between those two seat-back panels, removing them would have meant making spacers to put between the ends of the storage box and walls. We decided to start here and try it out.
We can remove these panels down the road, or we can put it back to a dinette very easily. All we would be out is some time and the $35 we spent on the door and stain. None of the new screw-holes we made will be visible when the camper is returned to its original U-shape dinette.
The door weighs about 15-pounds and the chairs average about 40-pounds each. With the removal of the bunk bed and dinette, we think the slide is no heavier now than originally configured.
We just completed a four week trip throughout Montana and Idaho. We found it best to take turns getting in and out of our chairs.
We also discovered that accessing the storage boxes requires that you be smarter than the box (and by the way, the box lids are an unnecessary complication). Those were our only learning curves. Overall, we were amazed at how well it worked, and how nice it was to have a comfortable place to sit for working, lounging, or eating.
It took me 100 hours of thinking and about five hours of doing to complete this modification. It cost me $29 for the door and $6 for some stain. We already had the polyurethane, office chairs, and fasteners. In my opinion, the skill level of this modification is easy.
2. Neil and Yoly Mullen, Dawsonville, Georgia
Step Riser to Cabover
2016 Ram 2500 HD
2016 Adventurer 80RB
Our primary modification was a step riser for accessing the cabover bed area. Yoly is not tall, so she has short legs. The initial 22.5-inch step up from the camper floor was difficult for me, let alone her. Coming down from the cabover bed area was actually harder than stepping up.
I could easily see Yoly, half asleep in the middle of the night, getting up for bathroom access in the dark, misjudging the long drop-off, and falling. This simply had to be addressed. It also makes me wonder if the manufacturers camp in their own units.
The step riser is constructed out of wood, glued and screwed together and covered with the same floor material as the OEM floor covering.
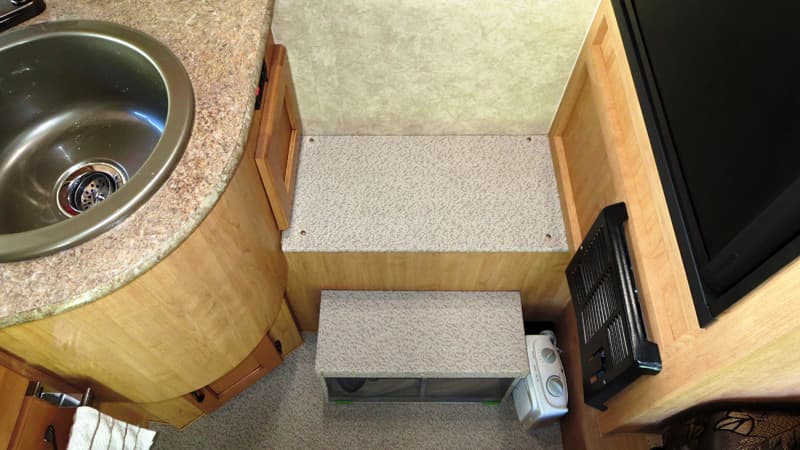
The step riser actually rests flat on the floor (full box section) so all our weight is carried by the floor itself. It is through-bolted with a 1/2-inch thick strip of birch laminate on the inside of the vertical wall section to locate and stabilize the assembly.
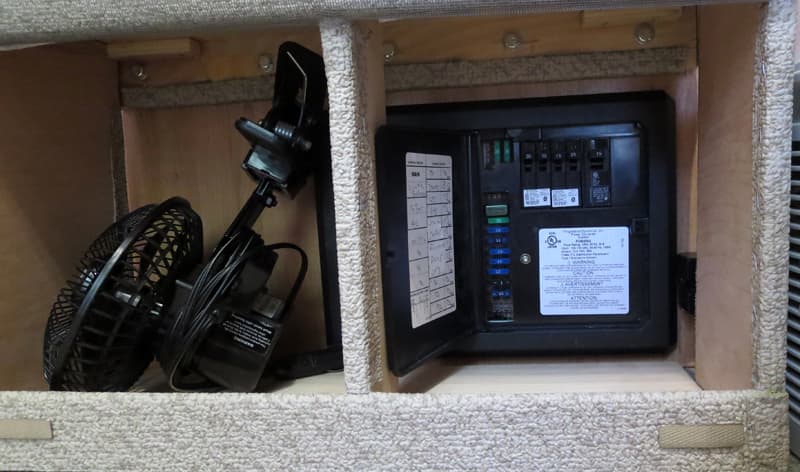
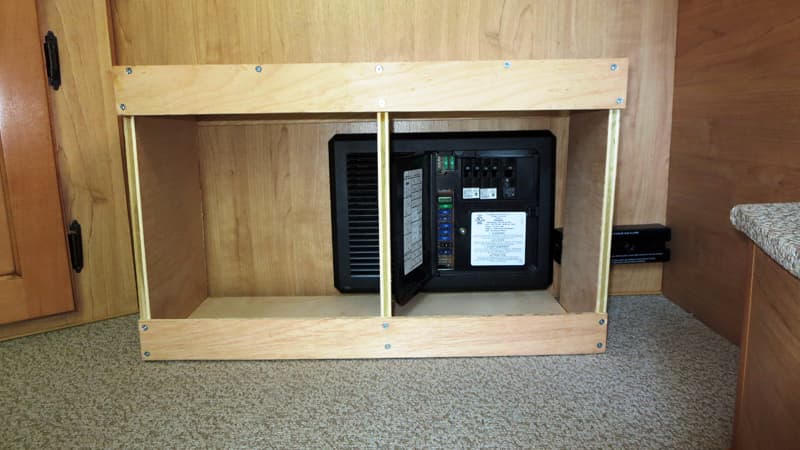
The step riser covers the converter, so it has an open front covered with soft screen material for proper ventilation and access. The screen is secured with two magnets at the bottom.
Here’s a video I made of this modification:
The step riser makes a world of difference! Getting up and down from our cabover bedroom is now much safer and easier. Over fifty nights of camping and about 10,000 miles of use, it has been trouble free.
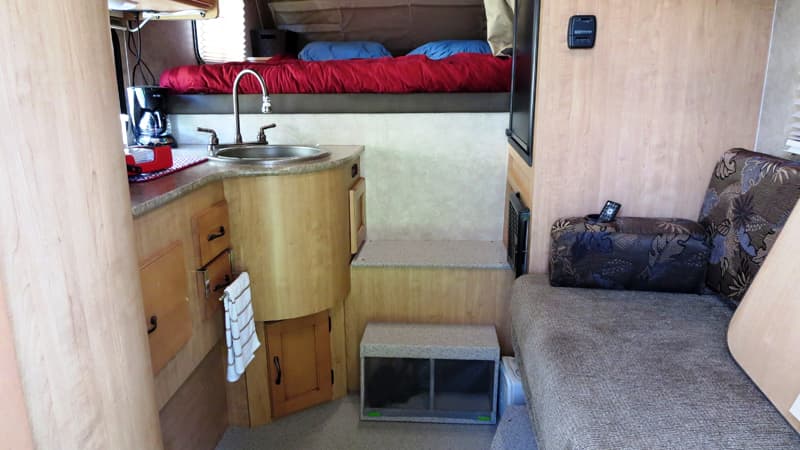
The step riser also makes a great little jump seat with back support. It can be utilized for sitting in a position that allows one to look out the back door while putting on shoes or boots.
It took me five hours to complete this modification and cost me $100 (covering material was $78 from the manufacturer). In my opinion, the skill level of this modification is easy.
3. Scott Richards, Prince Rupert, British Columbia
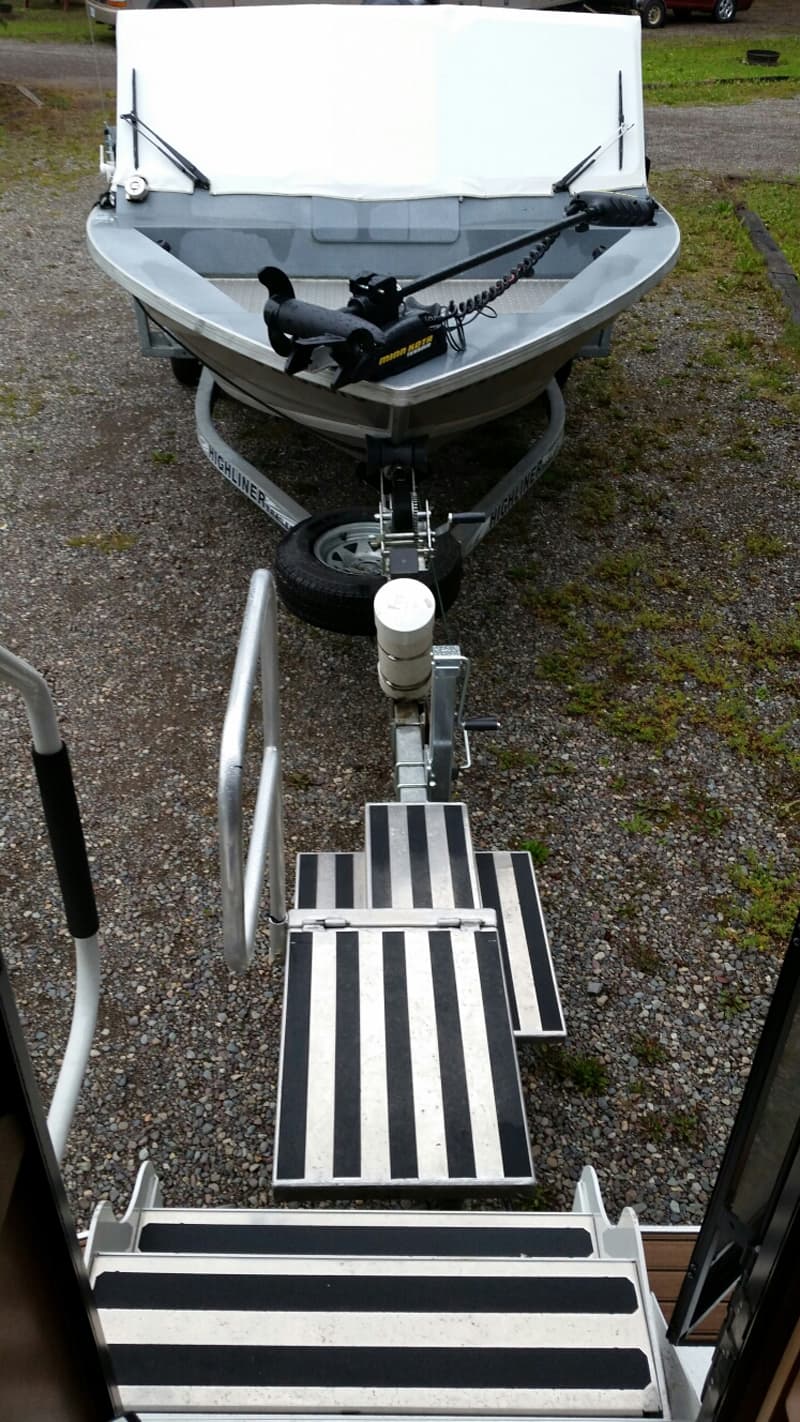
Camper Step System To Use While Towing Boat
2015 Chevrolet 3500
2015 Adventurer 89RB
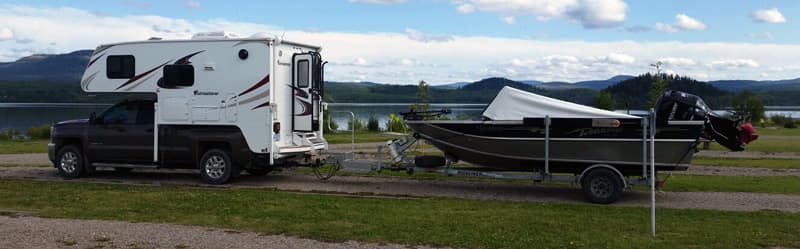
The primary reason we chose a truck camper was to tow our boat to Canada’s wealth of lakes and rivers. After our first trip across the four western provinces, we found accessing our camper difficult while the boat was hitched.
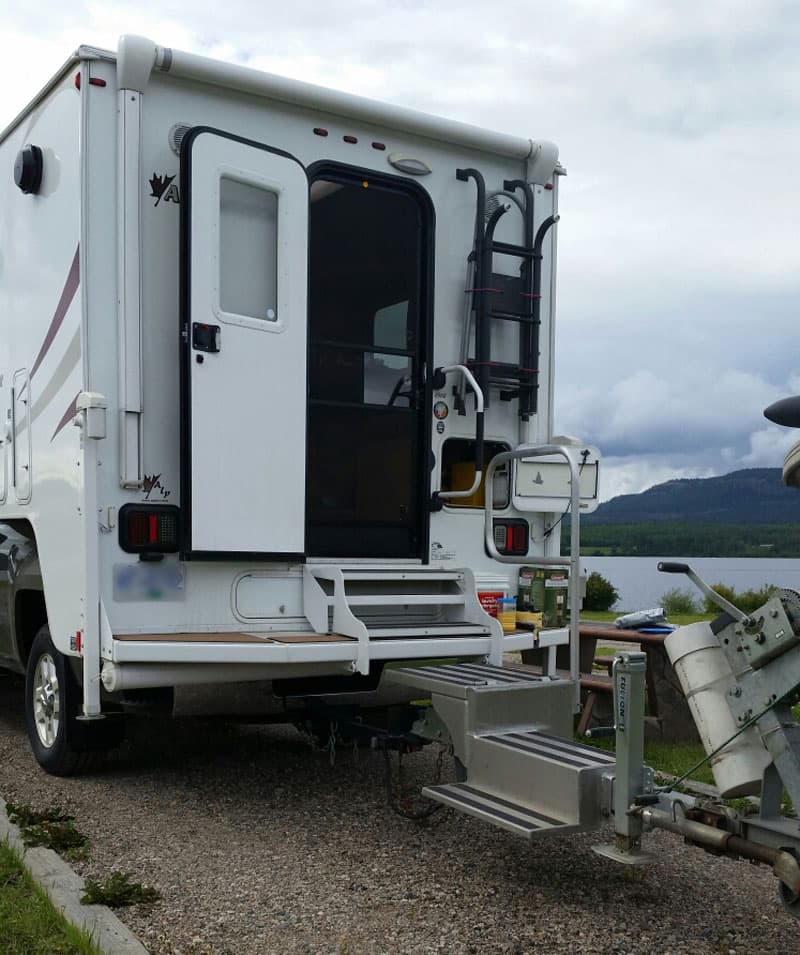
My modification is an access step system over my boat trailer. I designed what I needed and took it to a local fabricator for certified welding assistance. After six hours of building, we celebrated victory.
I am extremely satisfied with this modification. It took six hours to complete and cost $1,000 Canadian. In my opinion, the skill level of this modification is hard since you need certified metal fabrication skills.
4. Jodie Ramsey, Madison, South Dakota
Screen For Air Flow In Cabinets
2012 Chevy Silverado 3500
2014 Adventurer 116DS
The clothing in our cabover cabinets were damp to wet in the morning from condensation. I placed some moisture absorber buckets on the shelves as a possible solution, however, I was always worried about the contents spilling as we traveled.
As a child, I remember my father installing soffits under the eaves of our home and thought that might be something to try. Originally I thought of cutting holes in the base of the cabinet and installing the round soffit covers found at hardware stores. With that potential solution, I was concerned that items would be covering those vents which would negate their purpose. I also thought items could catch and tear on the rough edges of either the cut cabinet or vent cover.
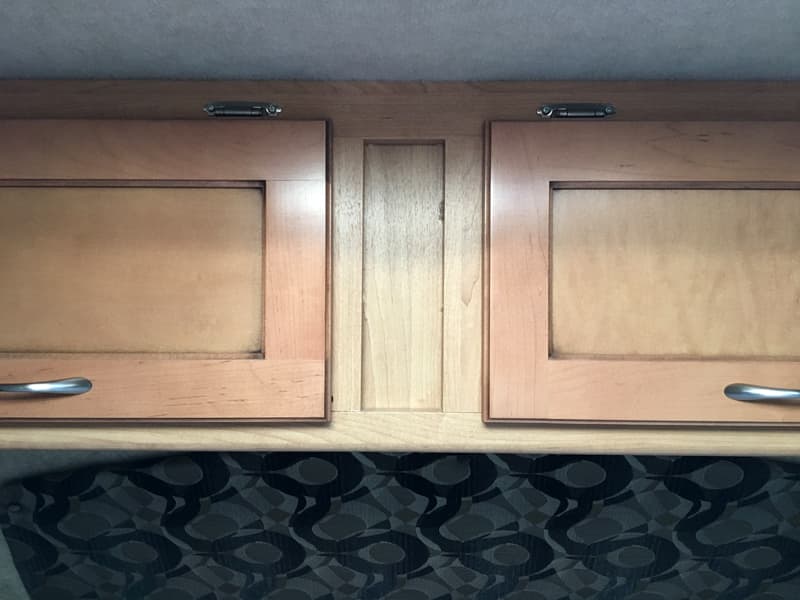
My attention then turned towards the front of the cabinetry and how to create airflow there.
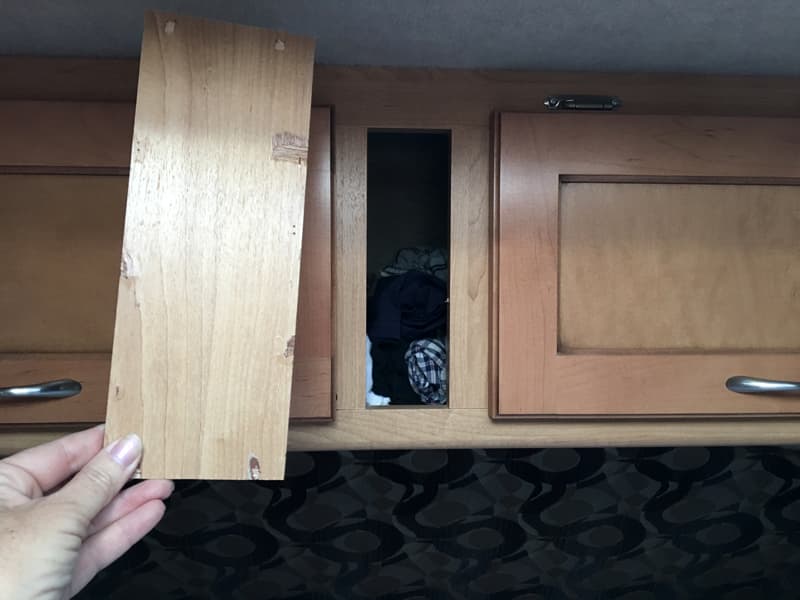
Between the cabinet doors were small veneer panels which were easily removed by plying the staples out of the back. Now to find something safe and simple to fill that area.
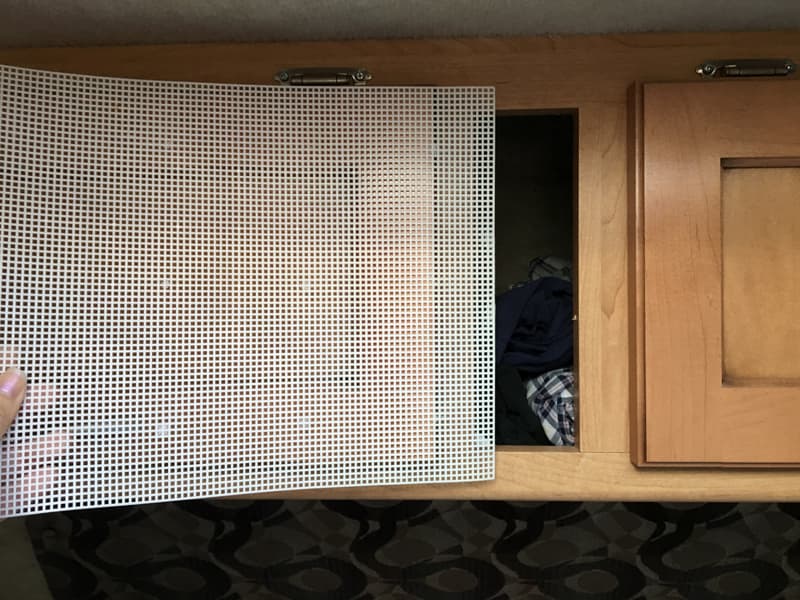
At the hardware store we looked at floor register covers, chicken wire, and even roof gutter screens. None of these possible solutions were what we wanted. Then I hit upon a brilliant idea – plastic canvas for crafts.
I cut the plastic canvass to match the size of the veneer I had already removed. To apply it, I used packing tape to hold it in place and stapled it.
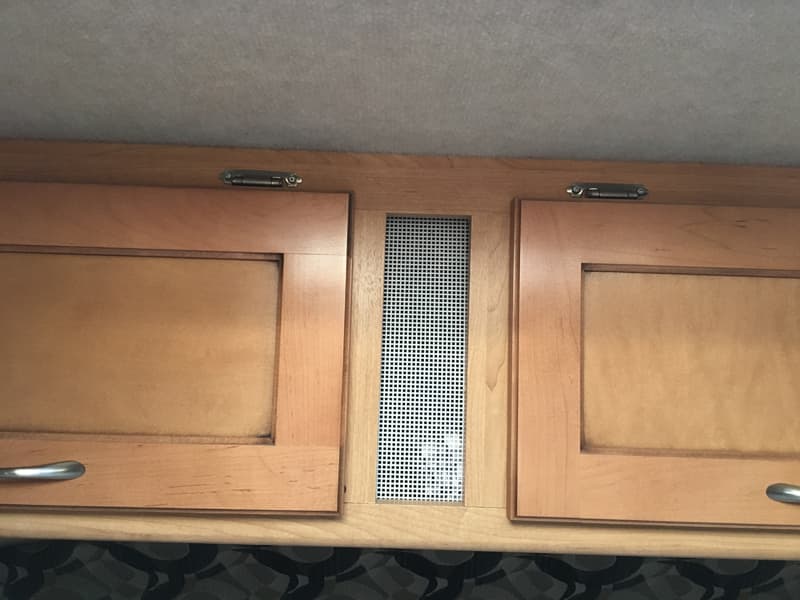
The mod looks like it was factory installed. Airflow into the cabinet is improved and we no longer have damp clothes in the morning.
It took me less than one hour to complete this modification and cost me $1. In my opinion, the skill level of this modification is easy.
5. Dale Wilson, Lynchburg, Virginia
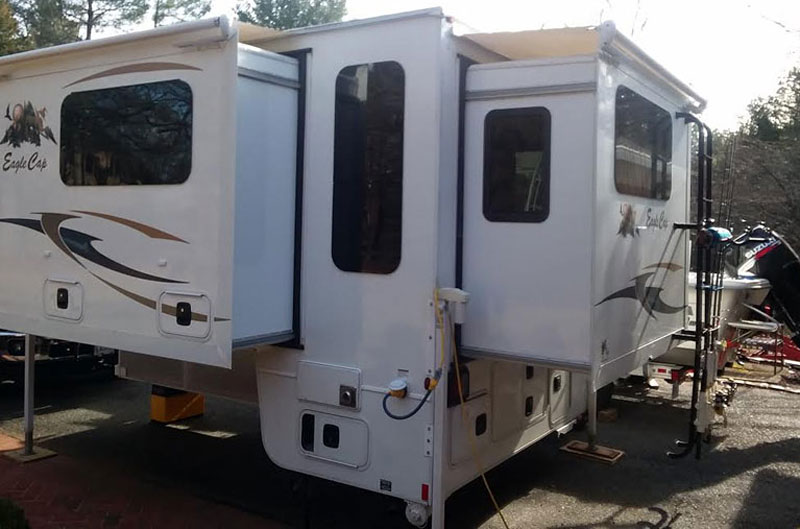
Added Window To Slide-Out in Eagle Cap 1165
2016 Ford F350
2017 Eagle Cap 1165
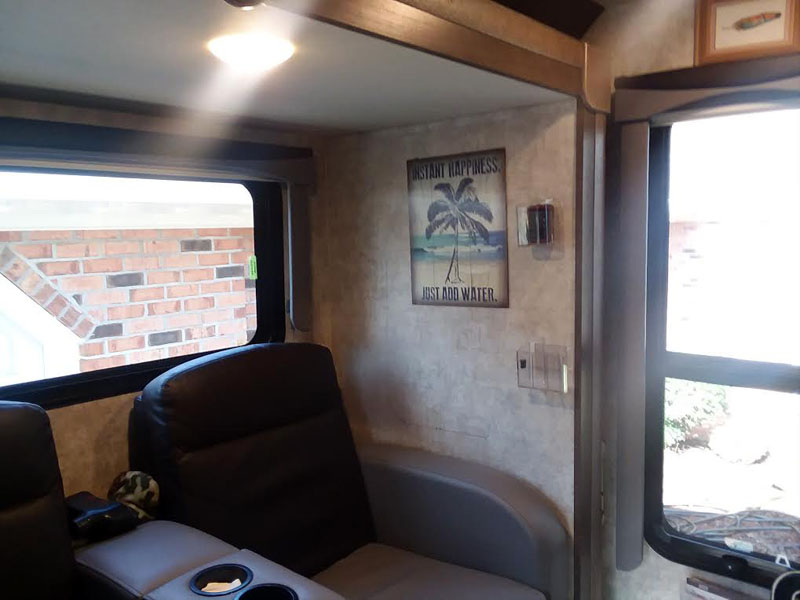
I could not see outside when sitting in the theater seats of our Eagle Cap 1165 triple-slide, so I wanted to add a window.
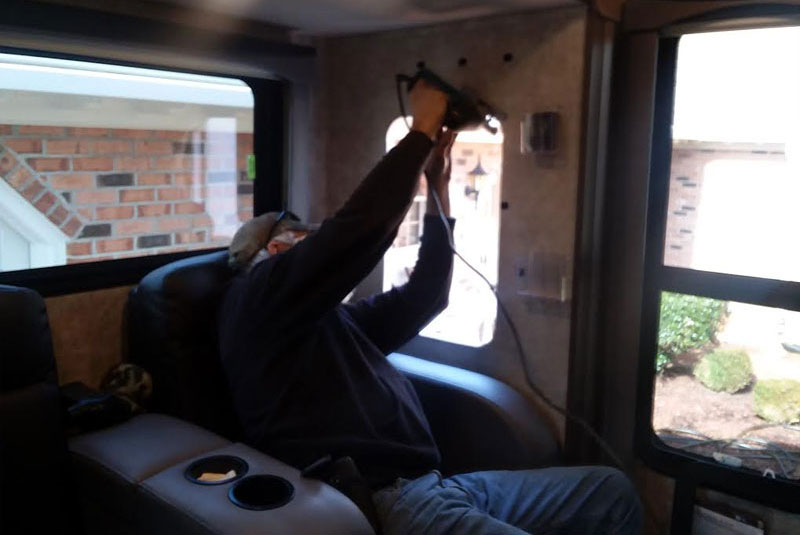
First, I found and bought a window online. I used a drill to start the cut and then used a jigsaw to cut it out.
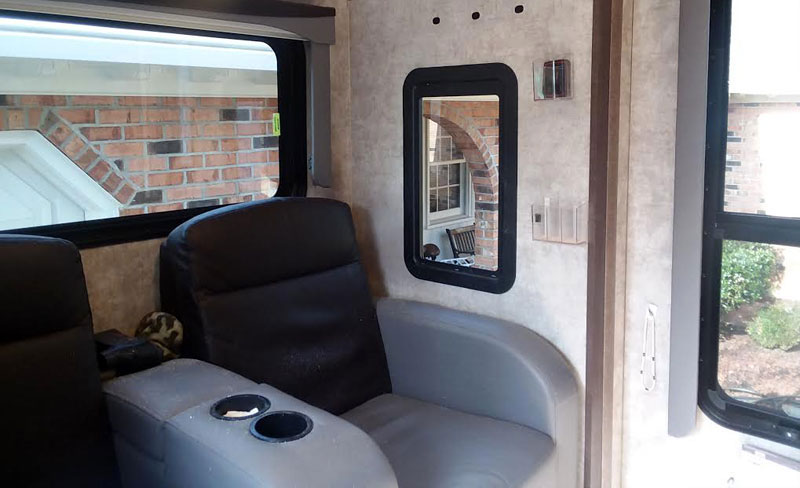
It worked out great! It took me two hours to complete this modification and cost me $100. In my opinion, the skill level of this modification is medium.
6. Jim Goodrich, California
Fiddle Rail
2006 Chevy 3500
2009 Lance 1191
Our Lance 1191 has a shelf above the hanging wardrobe closet beside the bed. Things we store up there inevitably slide off the shelf onto the bed.
During our sailing days we had the same problem. Shelves would empty on each tack. The solution on boats is a simple device called a fiddle rail.
Fiddle rails are usually made of a wooden rod or slat that spans the gap on the shelf. Fiddle rails can be secured permanently or removable to blocks on either side of the shelf. When in place, the rail blocks items on the shelf from sliding off.
I made a fiddle rail for my problematic shelf using a piece of 1-inch by 1/4-inch by 48-inch poplar that can be found at Lowes or Home Depot in their lumber section. To make the end pieces, I cut three 3-inch long sections for each end block.
Using one section, I cut it to make an L that is about 1/4-inch wide at the side and bottom. Then I sandwiched the L between the other pieces and glued them together. I added a fourth 3-inch section to give the end piece a little more strength. The thicker part of the end block will face out.
I used a rough sandpaper (80 or 100-grit) to even up all the layers and to round the upper corner (facing the slat) for aesthetic purposes. I trimmed a section out to suit my tastes. See photo of end block (below).
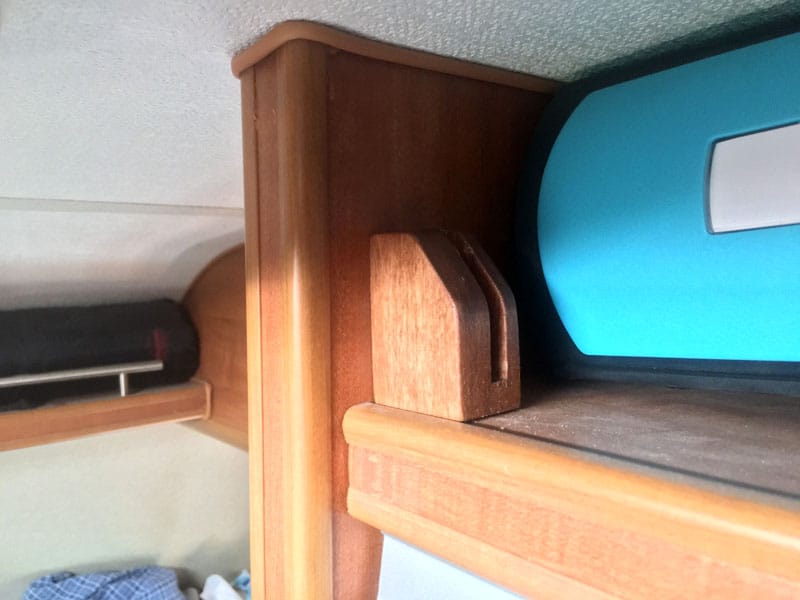
Then, I drilled two holes through the back of the L to secure the block to the wall. I counter-sinked the holes so the slat doesn’t hit the screw ends. I cut the slat so that it fit between the L blocks positioned temporarily against each wall.
The slat may be too thick to fit into the block’s slot. That’s okay because you will sand the end of the slat later to make it thinner. Don’t force the slat into the block slot. The final slat length should be about 1/4-inch less than the span between the Ls.
I sanded the last 3-inches of each end of the slat so that the slat easily slides into the L slot in the block. The sanding should taper from 3-inches from the end to the end. Next, I finished sanding the blocks and slat (220-grit sandpaper, at a minimum).
We have cherry wood finishes on our camper so I stained the blocks and slats to match the surrounding cabinetry, followed by varnishing with satin-finish spar varnish. Then, I screwed and glued the blocks into the walls at the sides of the shelf. To secure items on the shelf, I dropped the slat into place in the blocks.
7. Darrin Pickett, Uxbridge, Ontario
Wardrobe To Custom Pull-Out Pantry
2016 Ram 3500
2016 Lance 855s
Our Lance camper had limited kitchen storage and my wife really likes to cook. Some models have a pull-out pantry, but ours didn’t have that option. To the left of the kitchen was a small closet that we thought would be better used as a pantry.
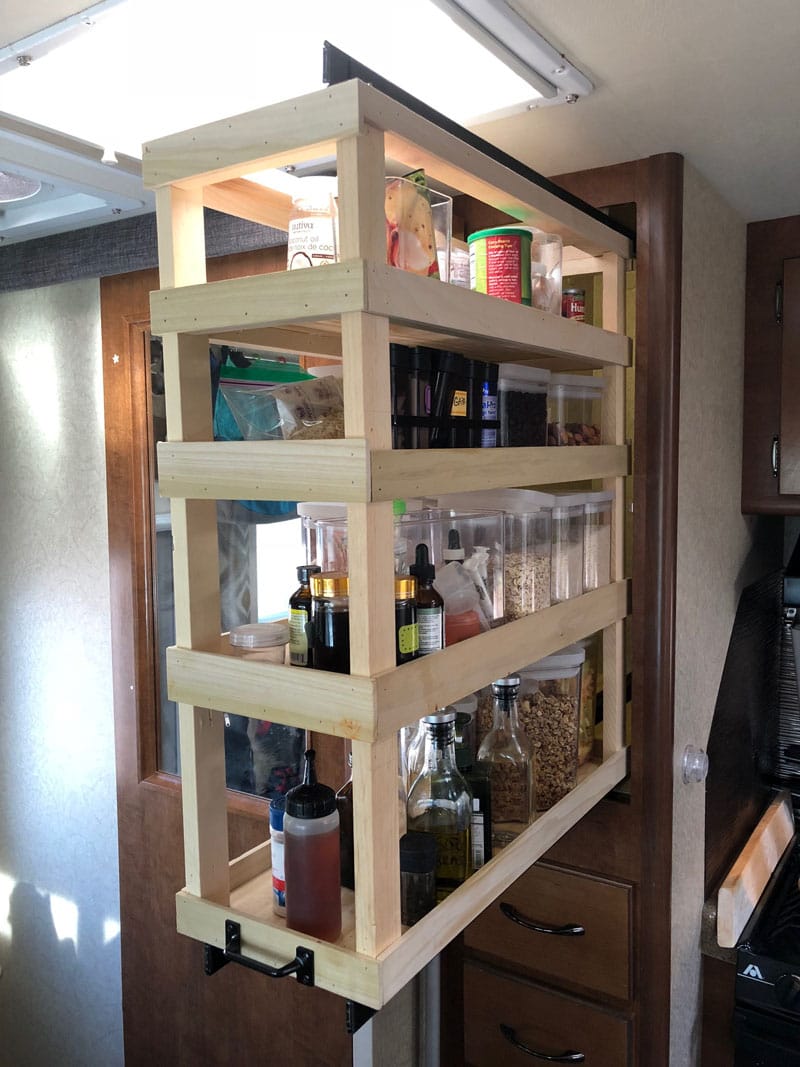
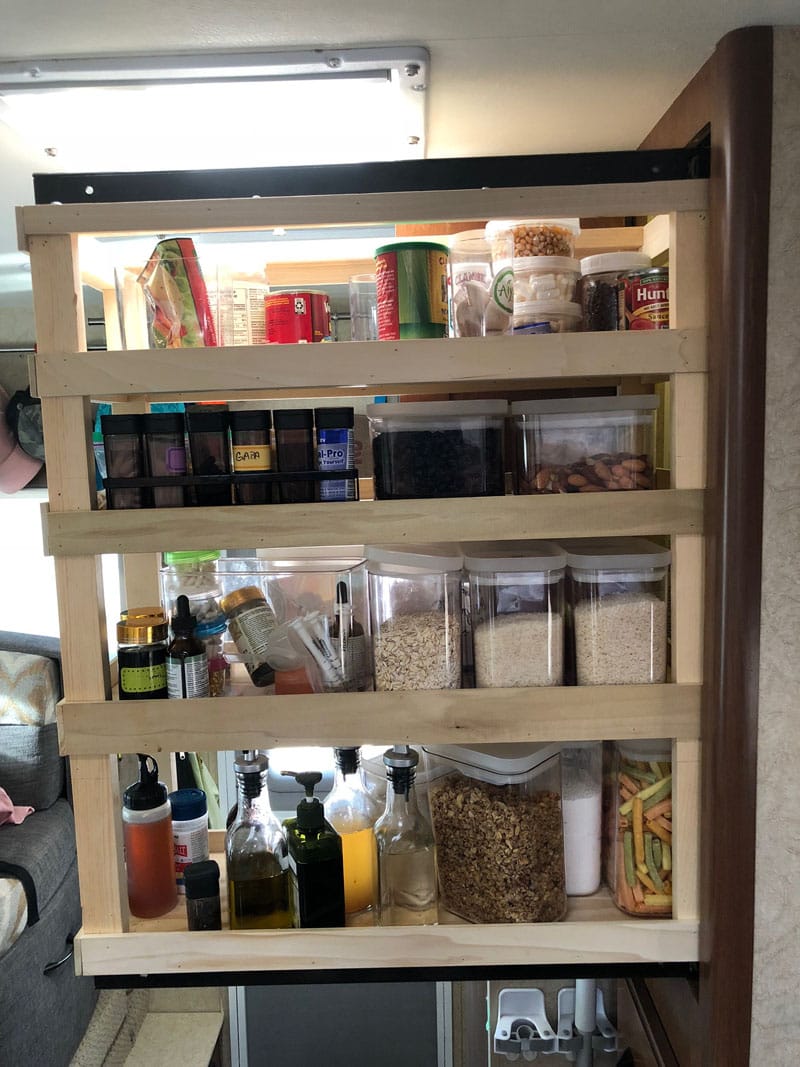
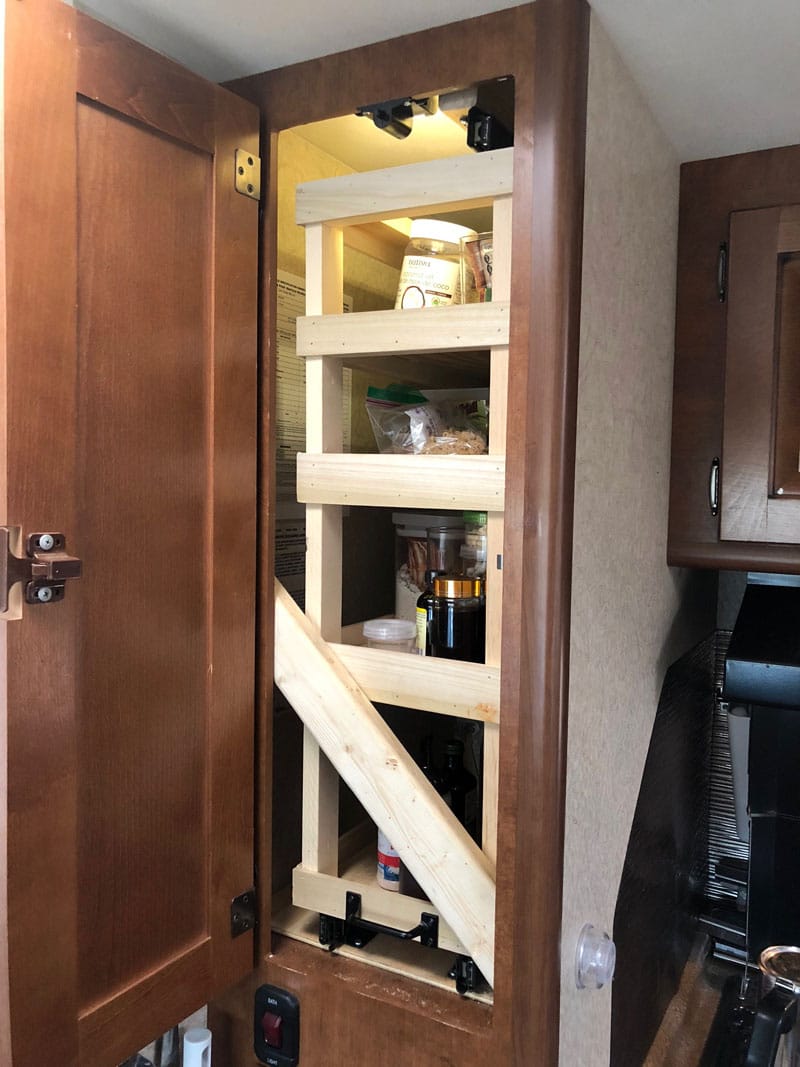
After looking around extensively, I couldn’t find a ready-made pull-out pantry that would fit our closet. I decided that I could make my own pantry that would fit the space exactly without wasting any room.

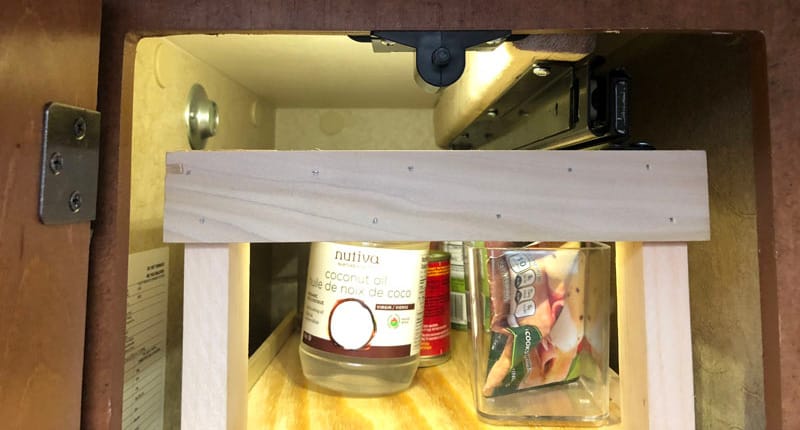
Using 130-pound, 24-inch entertainment center slides, I built my own pantry. It has four shelves and fully extends from the closet to provide full access from the side. To prevent the top from moving when we travel, I added a third slide on the top and use a small piece of wood in front.
I used small poplar pieces from Home Depot so that I wouldn’t have to rip bigger pieces of wood. While a little more expensive, it made the project way easier. Probably two-thirds of the cost were the three heavy-duty slides.
The mod worked amazingly well. We’ve just completed a three month adventure and the extra storage was an absolute must.
It took me eight hours to complete this modification and cost me $150. In my opinion, the skill level of this modification is medium.
8. Mark Joslin, Parker, Colorado
More Lounge-able Dinette
2006 Ram 3500
2005 Lance 1181
We wanted more lounge-ability in our truck camper dinette, but we still wanted to keep our standard dinette. Our 2005 Lance 1181 had a couch option, but we use the dinette as a bed for our kids.
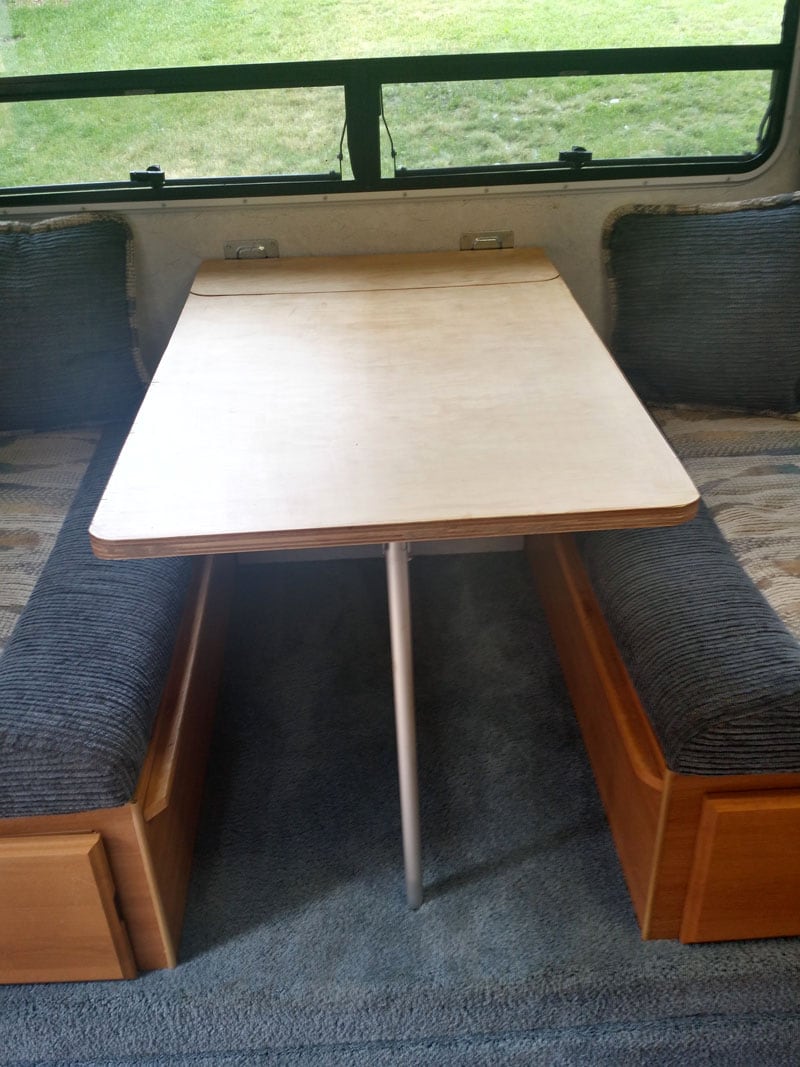
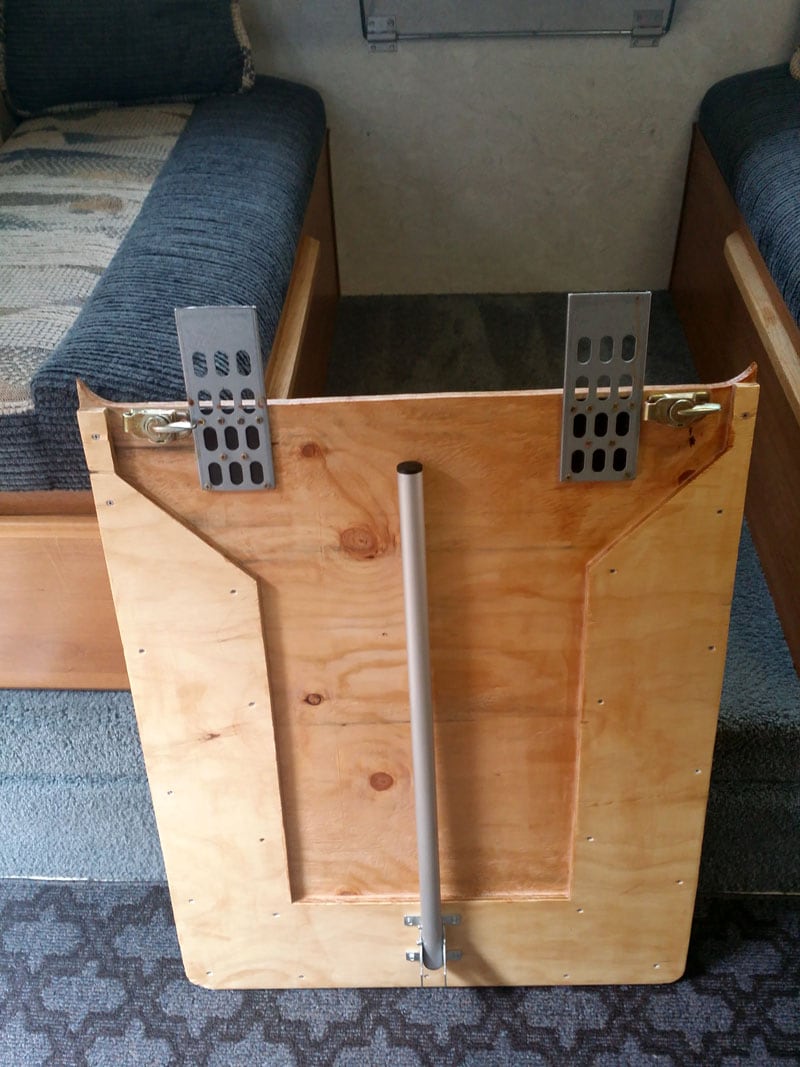
Our modification is fairly simple. We cut the dinette table and made brackets to allow the dinette table to separate – like a table leaf. The pictured table was meant to be a prototype, but it worked so well that we kept it.
I bought a sheet of plywood and cut it to the same dimensions as the original table. I then cut the new table “shelf” to be 8-inches from the wall side. I used a jig saw so the ends of the permanent piece (against the wall) have rounded edges.
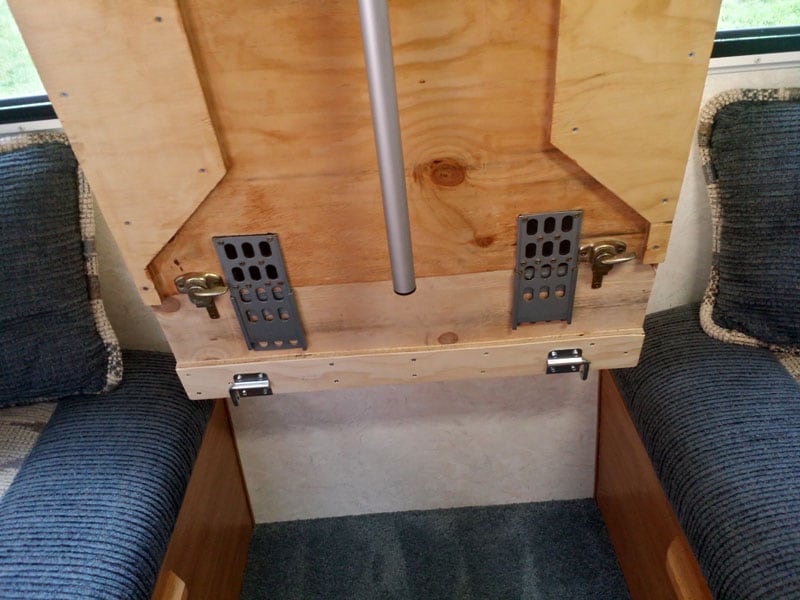
Next I transferred the hardware from the original table to my plywood prototype. I used computer server rack mounting rails (throw aways from work) to be the slides. Finally, I used a pair of table locks that I had left over from a previous project.
The resulting table can be used fully assembled, or just the shelf. With just the shelf, the dinette opens into a lounge-able area with a convenient shelf for beverages, magazines, books or whatever.
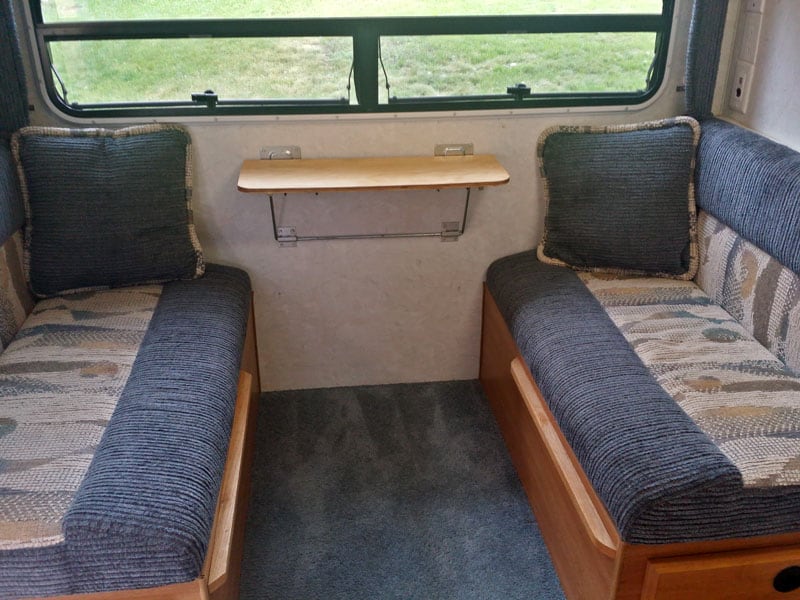
Removing the table is extremely easy. Release the two table locks and slide the table off. The table can be stored in the closet when not needed. The plywood prototype worked so well that I’ve polyurethaned it and we’ve kept it as a final solution.
With the table removed, the dinette area becomes much more comfortable to hang out and relax. It’s also very easy to put the back into its regular configuration.
This mod has been great! It took me six hours to complete this modification and cost me $40. In my opinion, the skill level of this modification is medium.
9. Roger Odahl, Vancouver, Washington
Velcro Screen over Escape Hatch Window
2008 Dodge Ram 3500
2004 Eagle Cap 950
We wanted to improve air circulation in the cabover of our Eagle Cap 950. When we opened the driver’s side window and the overhead vent, we were still lacking good cross flow air.
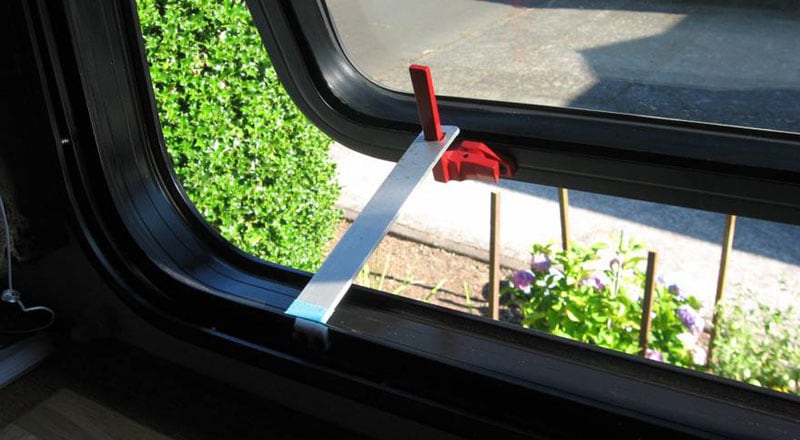
The passenger’s side window in the cabover is the escape hatch. It has two red latches to open this window, but there’s no screen. Once opened, it’s a magnet for letting in bugs, especially at night when you have reading lights turned on.
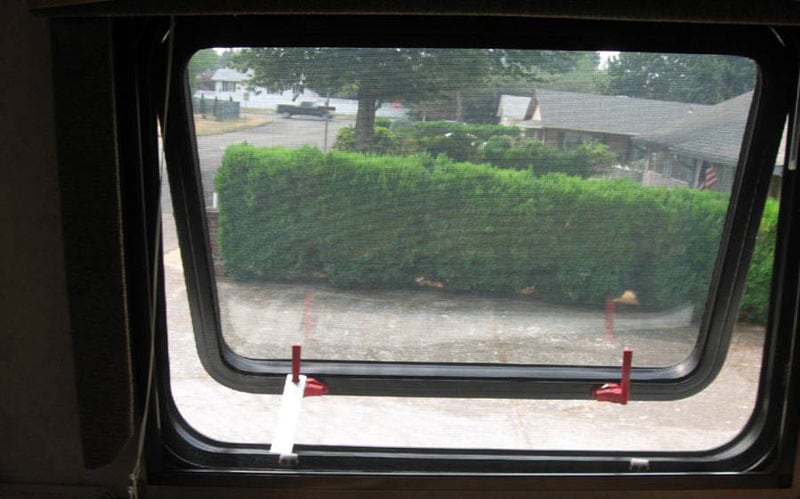
I knew a screen over the window was the obvious answer. Naturally, a screen is not difficult to push or kick out of the way in case an emergency exit is necessary. For added peace of mind, I would use velcro.
I had to figure a way to keep the window pushed open. I used a 1-inch wide by 1/8-inch thick piece of aluminum about 7-inches long. Then I drilled a 5/8-inch hole and used a square file to make a square hole to fit over either one of the red latches that presses against the window frame.
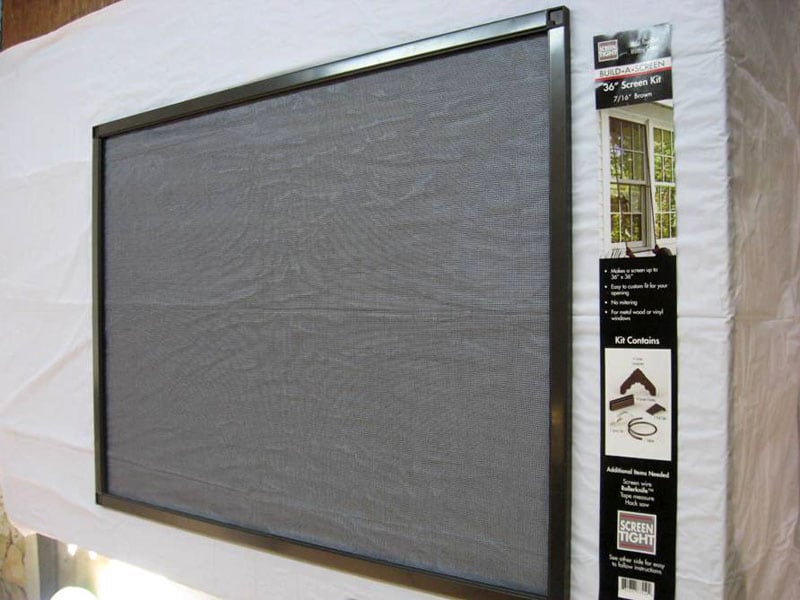
At Home Depot I purchased a 36-inch screen kit along with a screen and a roller to fit the screen to the frame. I cut the framing to 30-inch wide by 22-inch tall and installed 5-pound strength velcro strips. They are about an inch long on both the left and right side. I applied them top and bottom. The top frame didn’t need the velcro.

This mod has worked exceptionally well to create a much needed cross flow of air. I pull the screen from the frame, slide it to the right, open both latches, slide the aluminum piece over the latch and reattach the screen to the velcro in under a minute.
It took me about two hours to complete this modification and cost me under $25. In my opinion, the skill level of this modification is the skill level for this mod is easy.
10. Kevin Mooney, Nimpo Lake, British Columbia
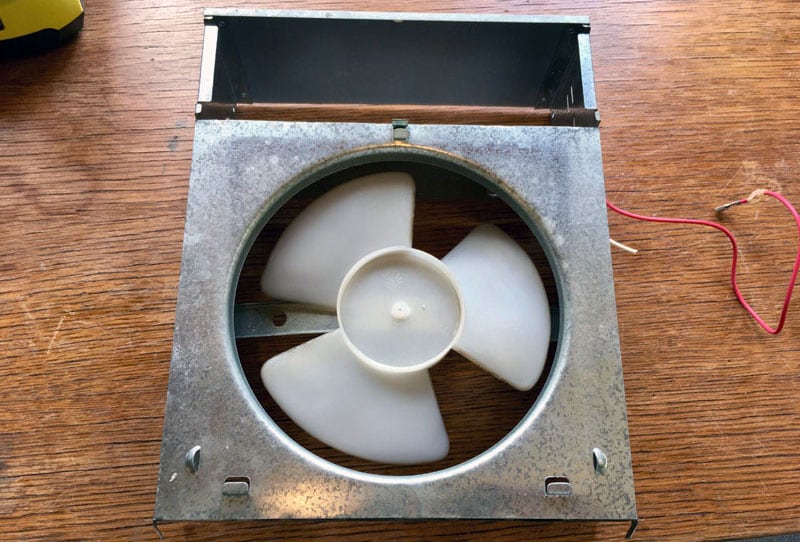
Range Hood Fan Replacement
2014 Ford F350
Okanagan 106UDB
The sole reason for this replacement was because of how loud the stock hood fan was in the kitchen. It was horrible. My wife would never turn on the fan while cooking. I can’t blame her. I figured there had to be a better way.
I have used small 4-inch computer fans for a couple of projects in the past. I was impressed with how much air they moved and how quiet they were.
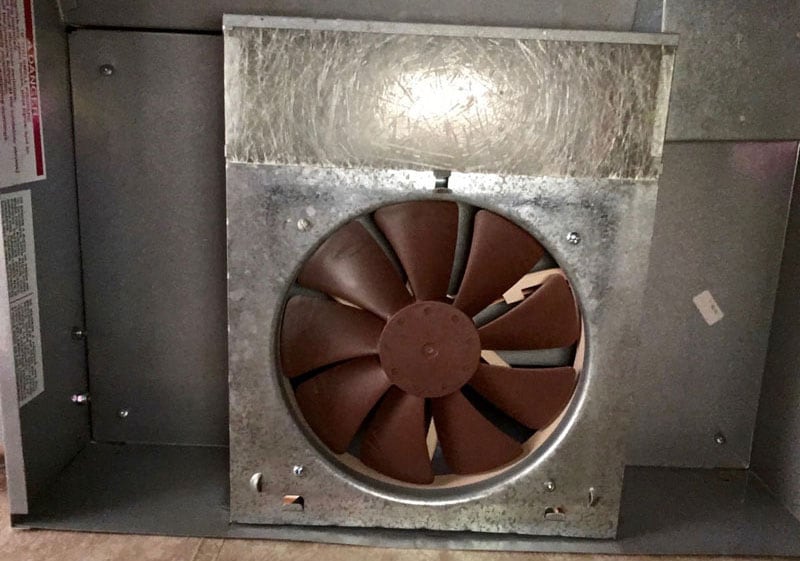
I measured up the round opening under the hood where the stock fan was, and ordered up a 7-inch computer fan. I went with the Noctua brand as they have sealed bearings, which I figured would last longer being subjected to heat and steam.
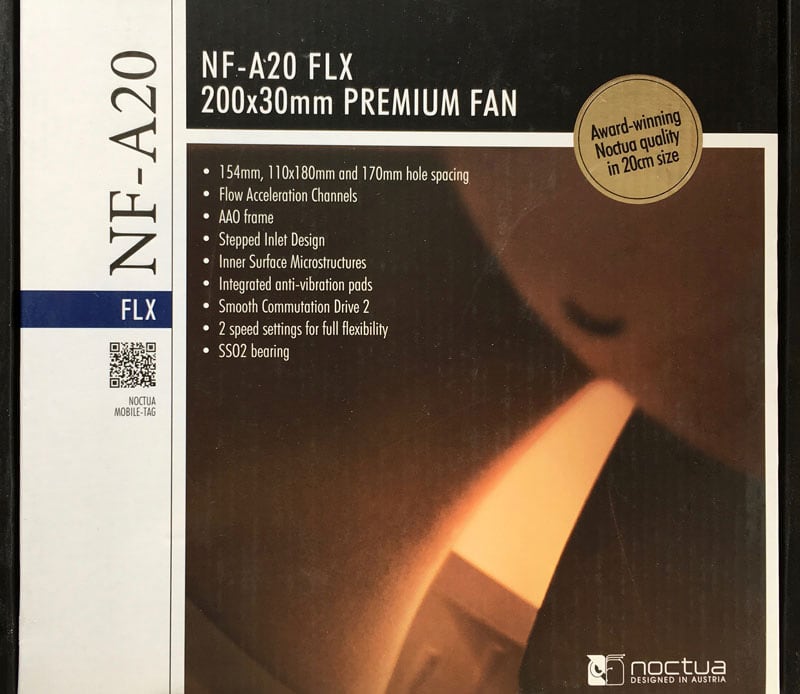
The Noctura fan moves roughly 90 CFMs (cubic feet per minute) of air, which I believe was similar to the stock fan. It is capable of two speeds, which really sold me, since I wanted something quiet. It also uses very little power.
All the wiring and mounting is $30 on Amazon. If you want to go real cheap, you can find a sleeve bearing fan for about 15 bucks. They are pretty quiet as well.
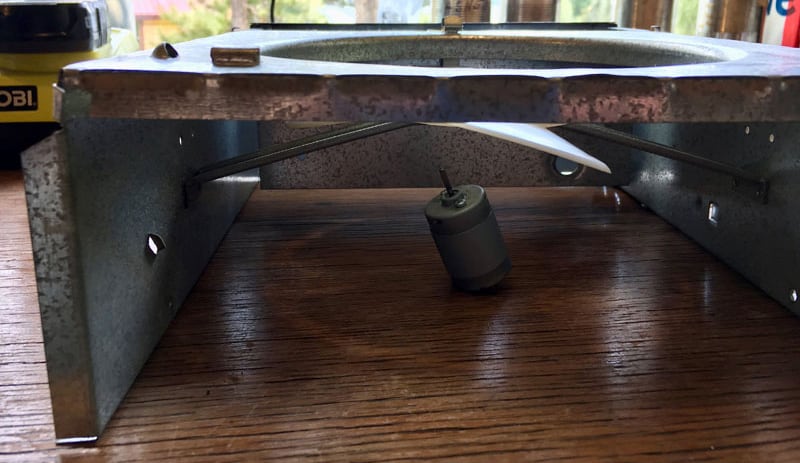
I originally took off the fan housing under the range hood but, upon re-installation, removed the whole hood and re-assembled it on my bench. That is way easier than trying to do it upside down over the range.
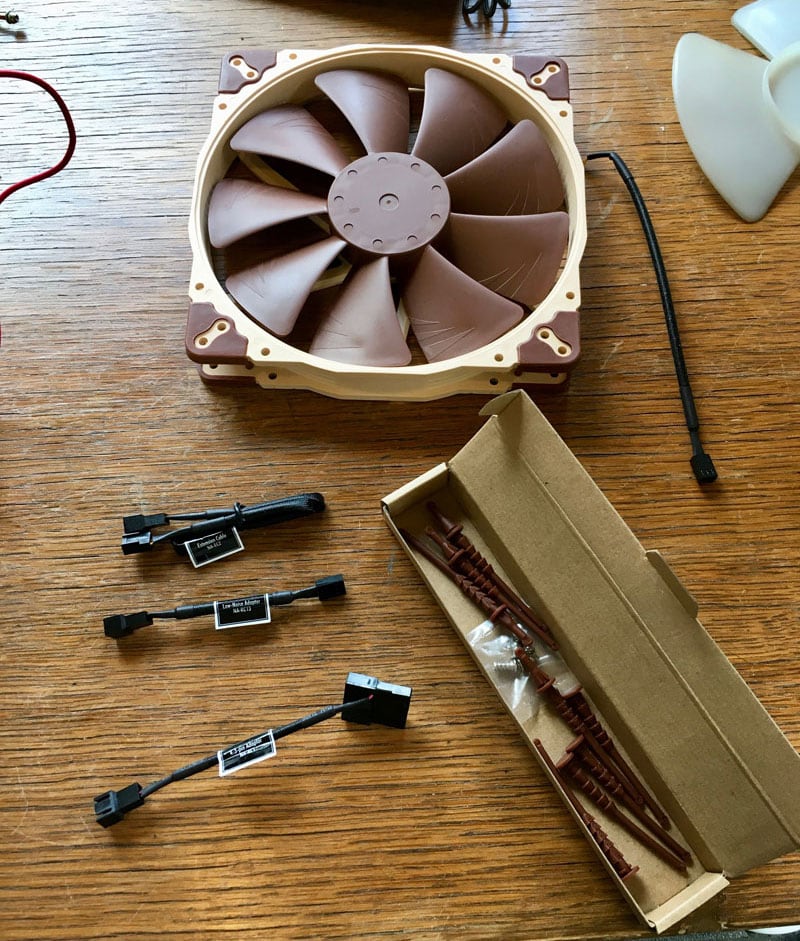
This fan comes with two wire harnesses; one for 800 RPM and the other for 550 RPM. I wired both to the same power source. All I had to do was unplug one and plug in the other. It turns out this is completely unnecessary as the fan is so quiet at 800 RPM that it is hard to tell if it’s even running. I’m guessing we could leave this on all night for a little extra air flow. It is way quieter than a Fantastic Fan.
Other than undoing a few screws, I had to drill out four small rivets from the original bracket, and drill some holes for the new fan. It is almost a perfect match up for the opening of the old fan, which makes it a pretty easy mod.
Remember that the air flows in the direction of the label on the fan. I learned this after I installed it. You can’t just switch the wires around because it won’t work. I tried that already.
The fan has been great so far. I’m curious to see how many years it lasts. For 30 dollars, it has already been worth it. I am almost temped to wire the fan into the light switch. At least then we might have a better chance of remembering to turn it off!
It took me 1.5 hours to complete this modification and cost me $30. In my opinion, the skill level of this modification is easy.
CLICK HERE TO VOTE FOR YOUR 3 FAVORITE MODS
Disclaimer: The modifications above are submitted by Truck Camper Magazine readers. It is your responsibility to make sure that any do-it-yourself modification project you undertake is safe, effective, and legal for your situation.
Enter Your Mods Now!
If you’d like to enter a modification you’ve done on your truck camper, click here. You can enter as many mods as you want, at any time. Good luck mod makers!


