10 Medium Mods attack truck camping kind including a turnbuckle tuck, false bottoms, invisible generator box, sewer stink siphon, and a field repair that stuck, and beyond. Run for your lives!

Welcome to the March 2017 Super Cup Monthly Mod Contest. Please review the following ten Medium Mods and vote for your favorite. We will announce the winner next week. If you’d like to enter mods into TCM’s Monthly Mod Contest, click here.
Click here to vote for your favorite 3 mods from this month’s contest.
1. Roland and Kate Goetz, Westbank, British Columbia
2008 Ford F-350
2016 Northern Lite Special Edition
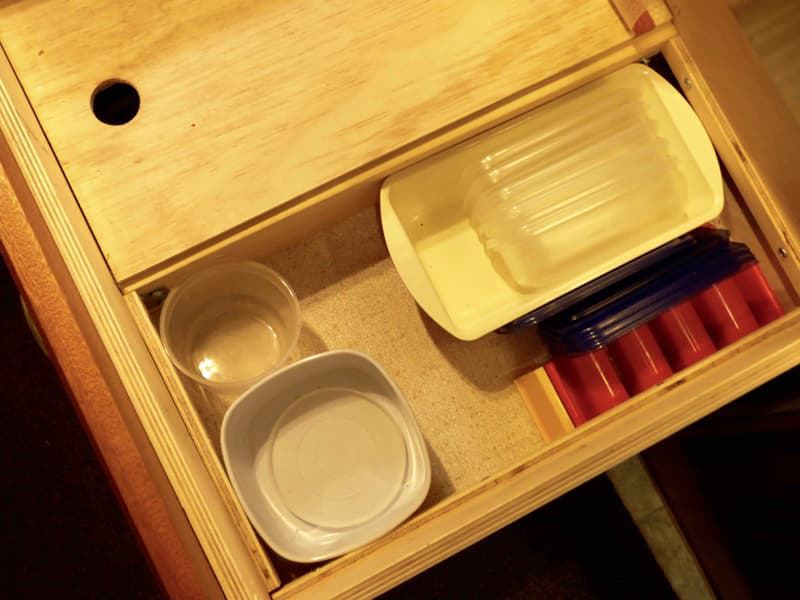
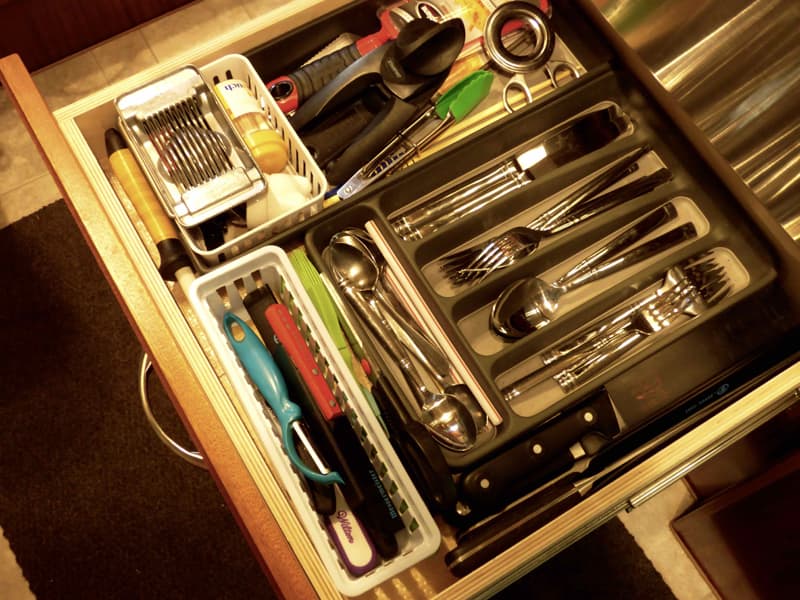
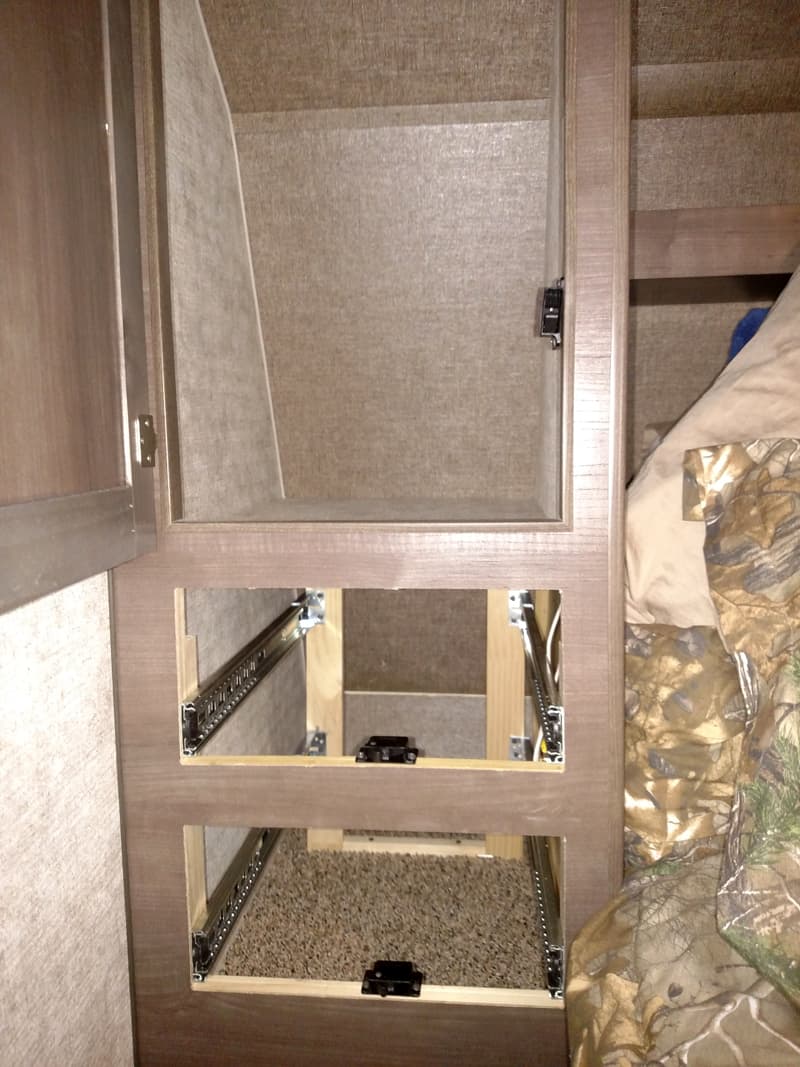
We wanted extra space in some our drawers. The drawers were quite deep and Kate felt the space was being wasted.
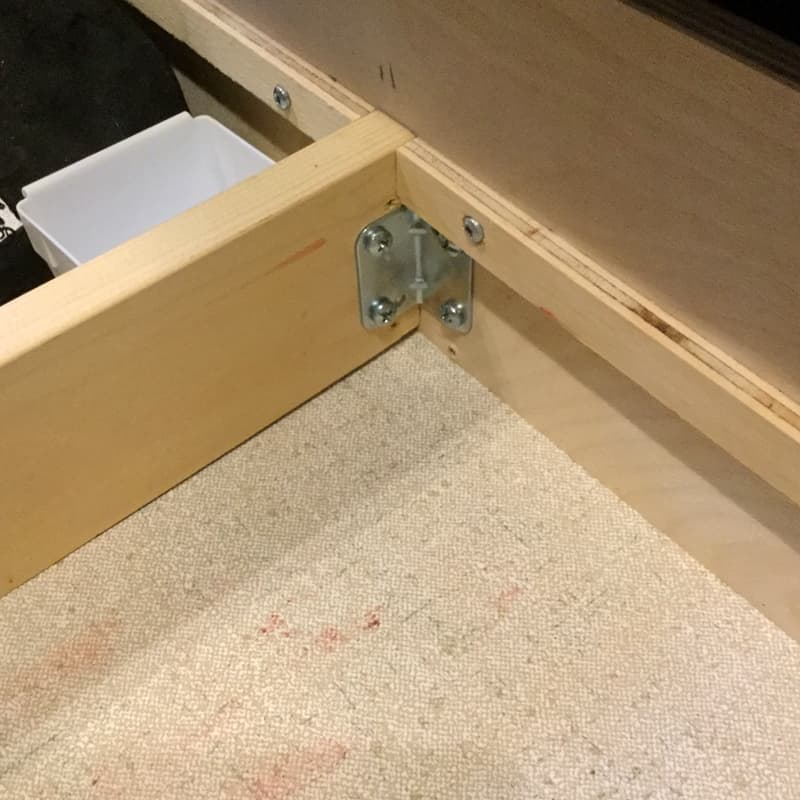
I installed false bottoms in the drawers and created extra space for things we don’t use on a regular basis. I used 1/4-inch good-one-side plywood for the false bottoms and then cut the same plywood into strips for the braces the false bottoms sit on.
The above photo is a shot of the rails (or braces) that the false bottom sits on inside the drawer. They are made out of plywood cut into strips for strength.
The braces are screwed into the drawer sides using 1/2-inch roundhead screws.
I used a 1¼-inch saw attachment on a drill to make finger holes for ease of opening.
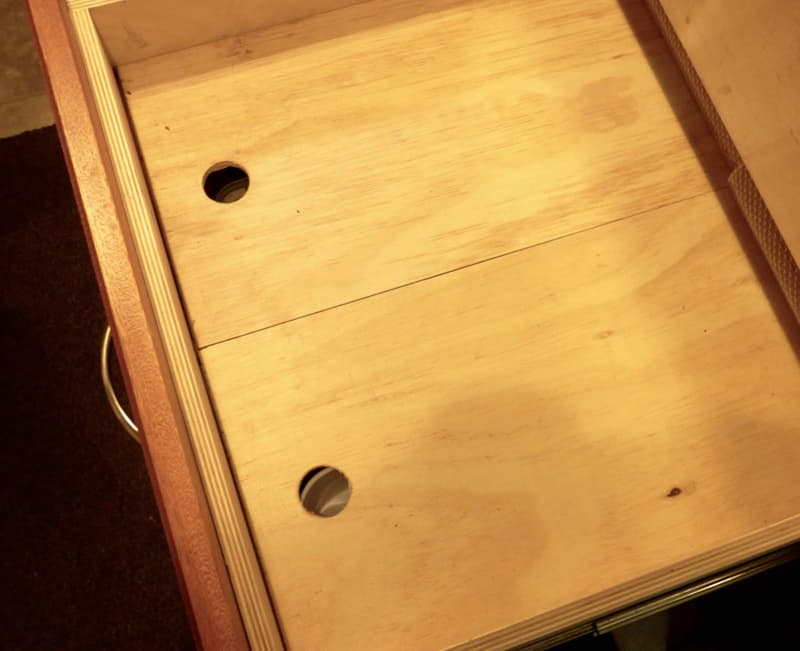
For the wider cutlery drawer, I put a piece of 1-inch by 4-inch pine as a brace in the middle of the drawer and cut the false bottom into two halves so that we only need to lift up the side we need.
This modification has served us extremely well in the five months we’ve been on the road.
It took me two hours to complete this modification and cost me $30. In my opinion, the skill level of this modification is medium.
2. George Randall, Grandby, Massachusetts
2012 Ford F350
2016 Arctic Fox 865
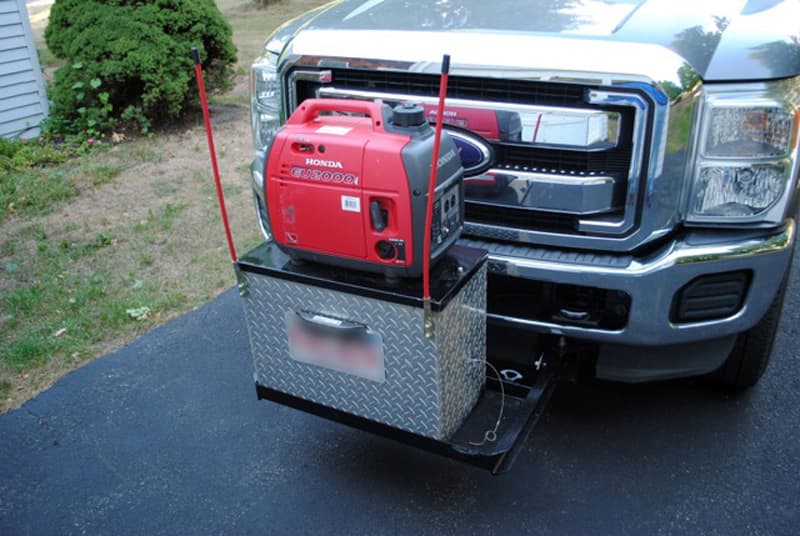
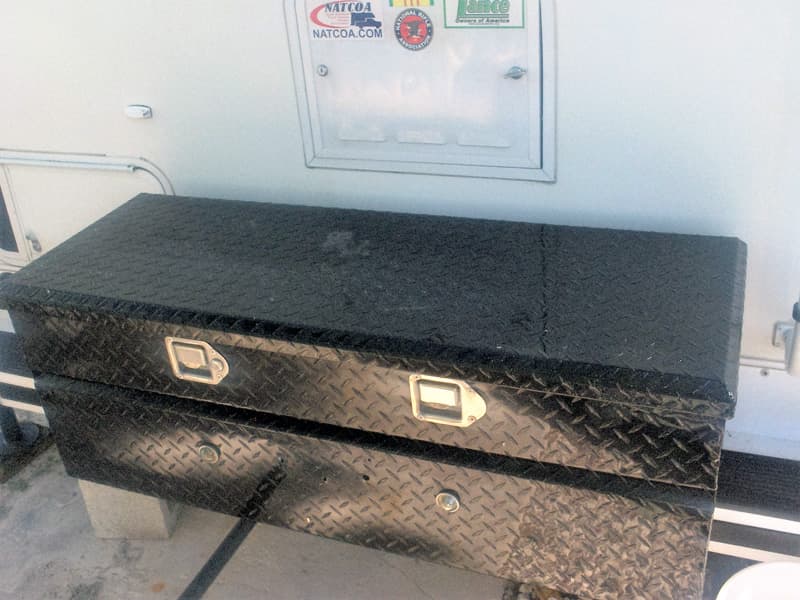
I made a generator box for the front of my truck. I took steel channel stock that fit into the plow frame of my truck and bolted it to the plow frame. I built the remainder of the frame from there.
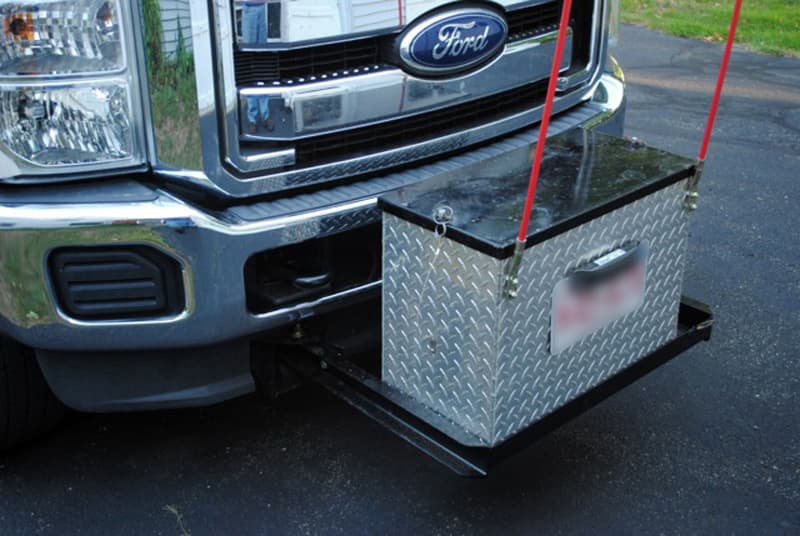
The aluminum box used to cover a generator on my trailer. We turned the cover upside down and it now houses a Honda generator. We made the cover in our shop.

The frame of this carrier was made to fit into the existing plow frame on the truck. There are four bolts that fit into the existing plow pin holes. Spacers and brackets were designed and built in the body shop.

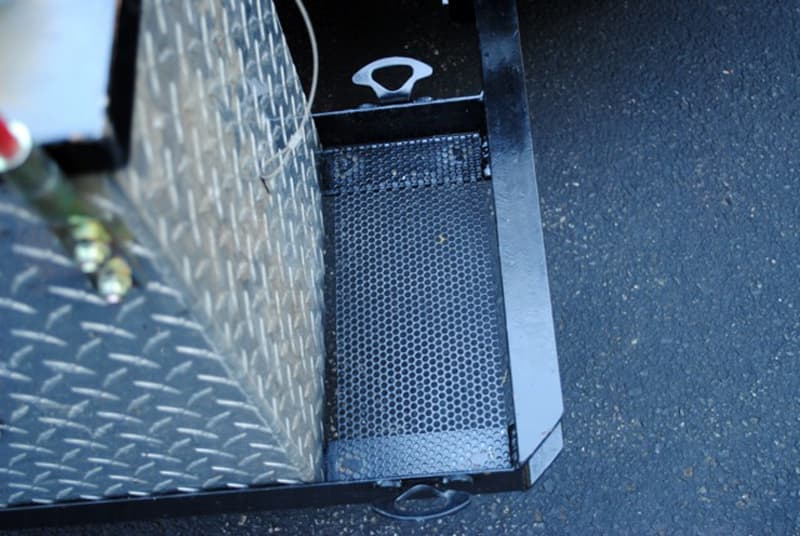
If you can cut and weld, you can do this. On the side of the frame is a space to strap a two gallon gas can.
The plow guides are essential in that they show how far out the box is while you’re driving. Otherwise, you can’t see it.
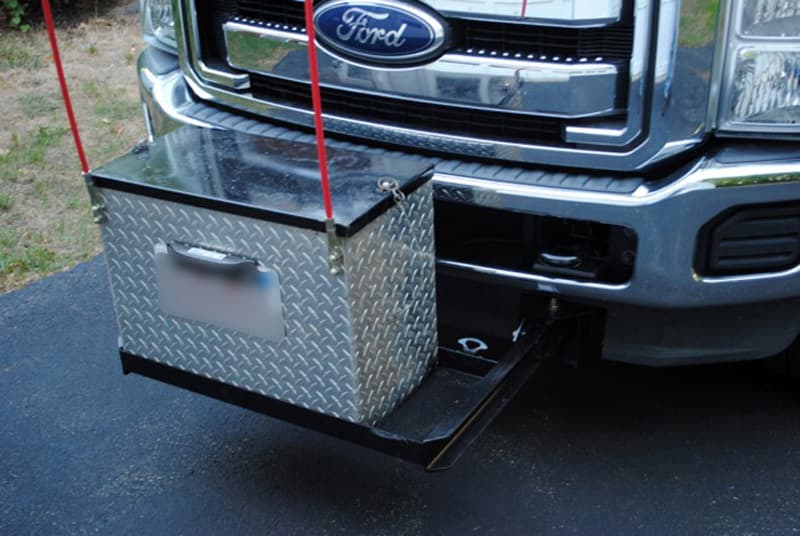
The generator box may be small, but it does everything I need it to do. And it is on and off in a couple of minutes. Inside the box is a grade 8 chain and safety lock that secures the generator to the truck when I am not around.
We have about four hours of time involved and the total investment was around $80. In my opinion, the skill level is medium.
3. Ray and Brenda Fair, Hopkinton, Massachusetts
2013 Chevy Silverado 2500 HD
2015 Eagle Cap 850
It never fails. When the family is sitting at a picnic table, someone needs an extra napkin or paper towel. The task of retrieving the needed paper falls upon the person closest to the truck camper door. To make the task easier, I installed a paper towel rack outside.
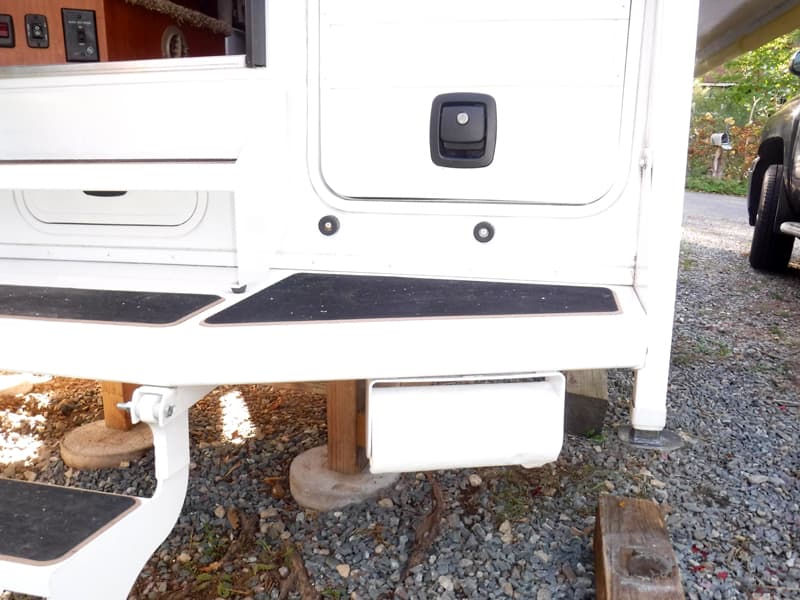
I purchased a paper towel holder that had two-sided tape and mounting screws. The location chosen was below the bumper and to the right of the stairs. The tape on the rack held it in place so no hardware was needed.
A roll of towels is kept in the storage area just above the rack. When we park and set up the truck camper, the roll of towels is mounted and restored when we are packing up. The towels are also removed when there is a chance of rain, and before we travel.
After traveling 3.5 years, we have not lost the paper towel holder yet (knock on wood). What you see in the photos is the original towel holder.
It took me fifteen minutes hours to complete this modification and cost me the price of the holder, which was under $5. In my opinion, the skill level of this modification is easy.
4. Charles Coushaine, Punta Gorda, Florida
2001 Ford F350
2012 Chalet DS116RB
We travel a lot with our truck camper. Consequently, we sometimes go over a week at a time boondocking without any power or water.
After a week or so of dry camping, we have noticed a slight sewer smell emanating from our black water tank and into our RV. This was despite a very good cleaning regiment, extra water, and appropriate chemicals.
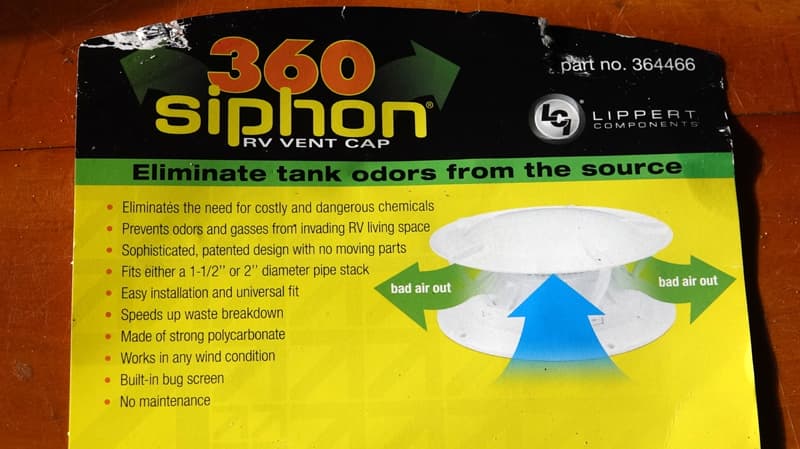
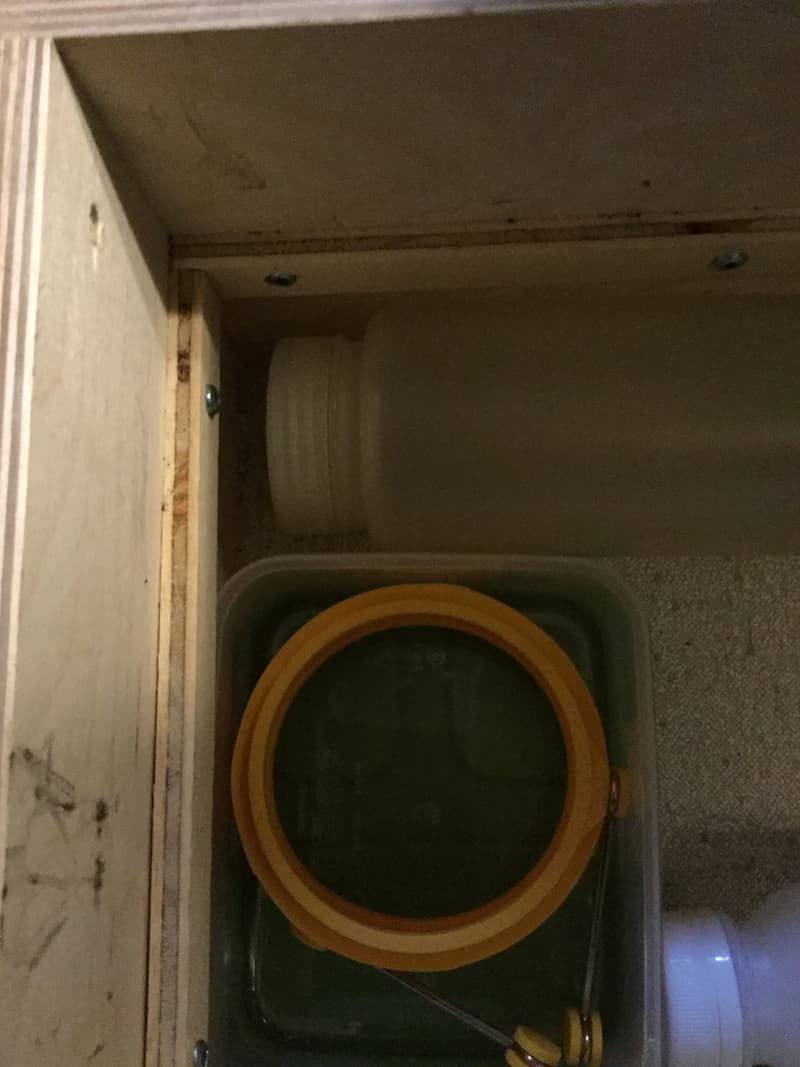
After much research, we discovered you can buy a device that attaches to the sewer vent pipe on your roof to replace the stock vent pipe cap.
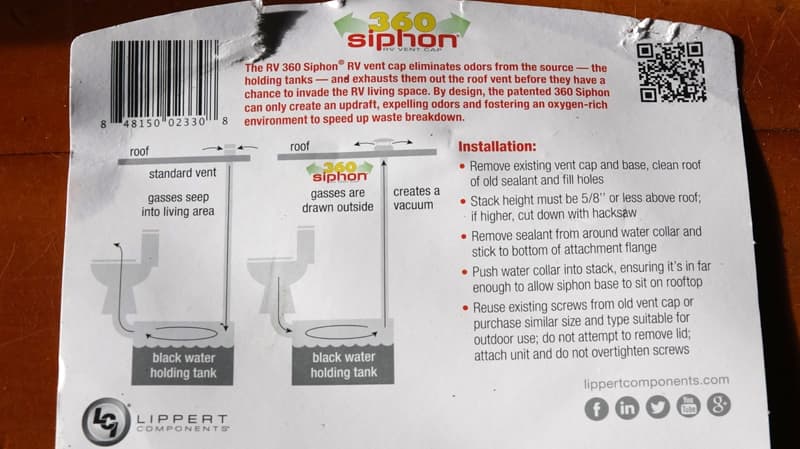
These devices are designed to create a suction on the pipe by the wind blowing over them such that any black tank fumes are sucked up and out and do not go into your RV.
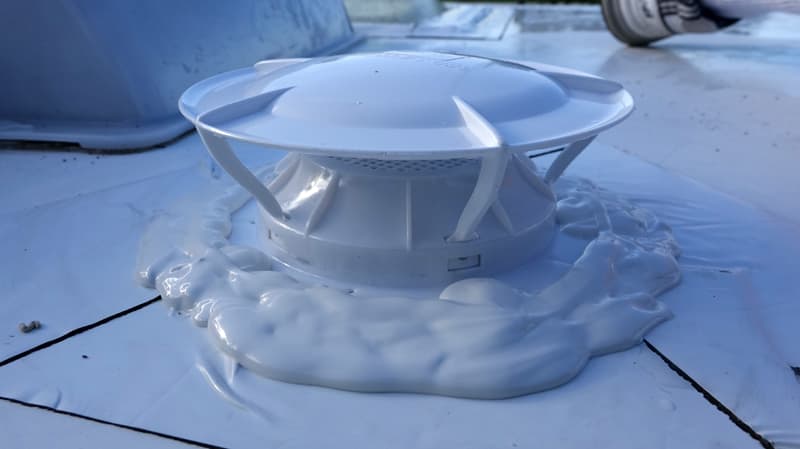
We purchased the 360 Siphon Vent because it had no moving parts and had great reviews. The installation was quite easy and took less than an hour. Watch the video at the attached link to see how it was done:
We have had the 360 Siphon Vent on our roof for over a month, with over two weeks of boondocking to put it to the test. Much to our surprise and amazement, the smell is gone! Highly recommended!
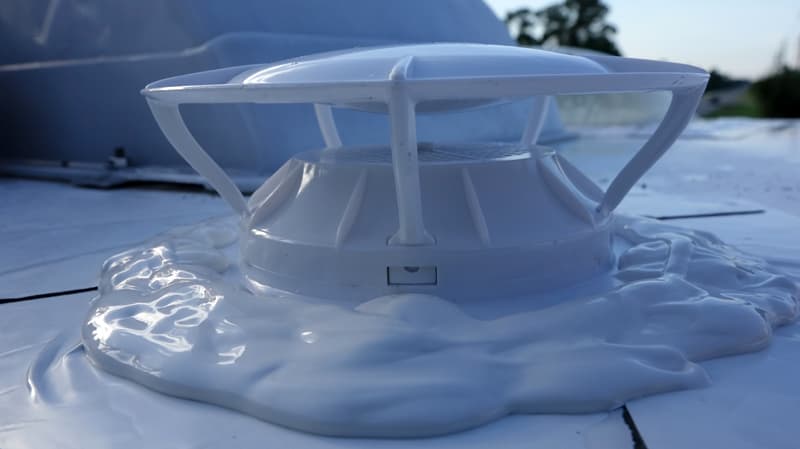
It took me one to two hours to complete this modification and cost me $55. In my opinion, the skill level of this modification is medium.
5. Gary Raymond, Key West, Florida
2014 Ram 3500
2006 Lance 1191
I added an ice machine. We always take a boat with us and it’s so nice having an ice machine.
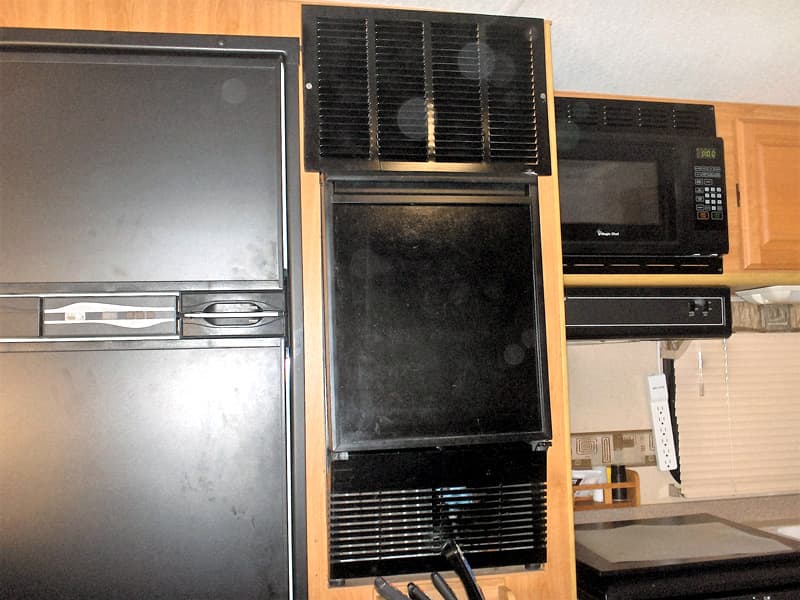
All I had to do was take the door and side trim off the closet. I added a vent at the top to let the unit breathe. I tied the water line into the cold water supply that feeds the hot water heater. I was able to snake the water line down through the cabinets as well as the power line.
It all worked out like Lance had planned it that way. There was no cutting at all and the vent at the top also hid what would have been a gaping hole.
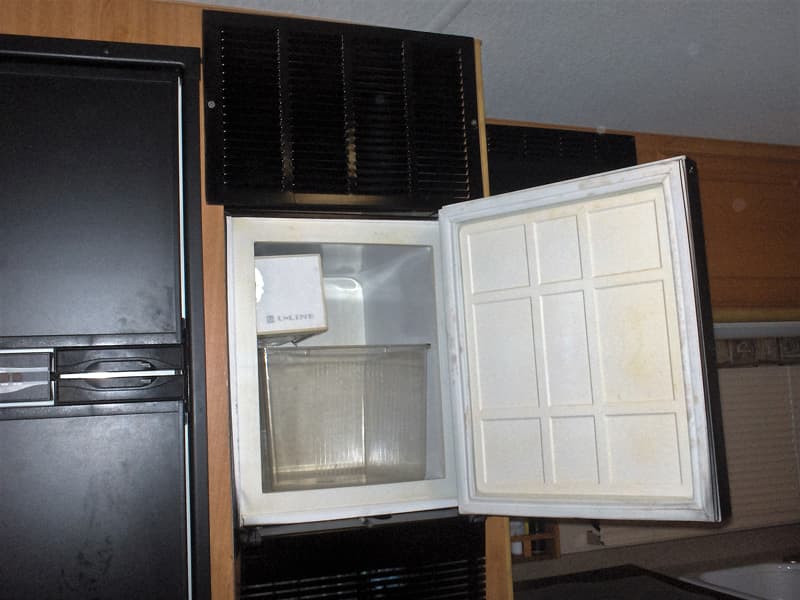
I don’t miss the closet at all. I put a dock box mounted to the rear of our camper to keep extra stuff, plus the hanging locker in the bunk is plenty big for our hanging things.
I did this mod four years ago and it has never been a problem. The condensed air from the unit could make the camper stuffy, but the air conditioner takes care of that. The ice maker also adds a little heat into the camper during the winter.
It took me three hours to complete this modification and cost me $6 for a vent. I had all the other stuff. In my opinion, the skill level of this modification is easy.
6. Greg Chambers, Orangevale, California
2015 GMC 3500
2015 Lance 855s
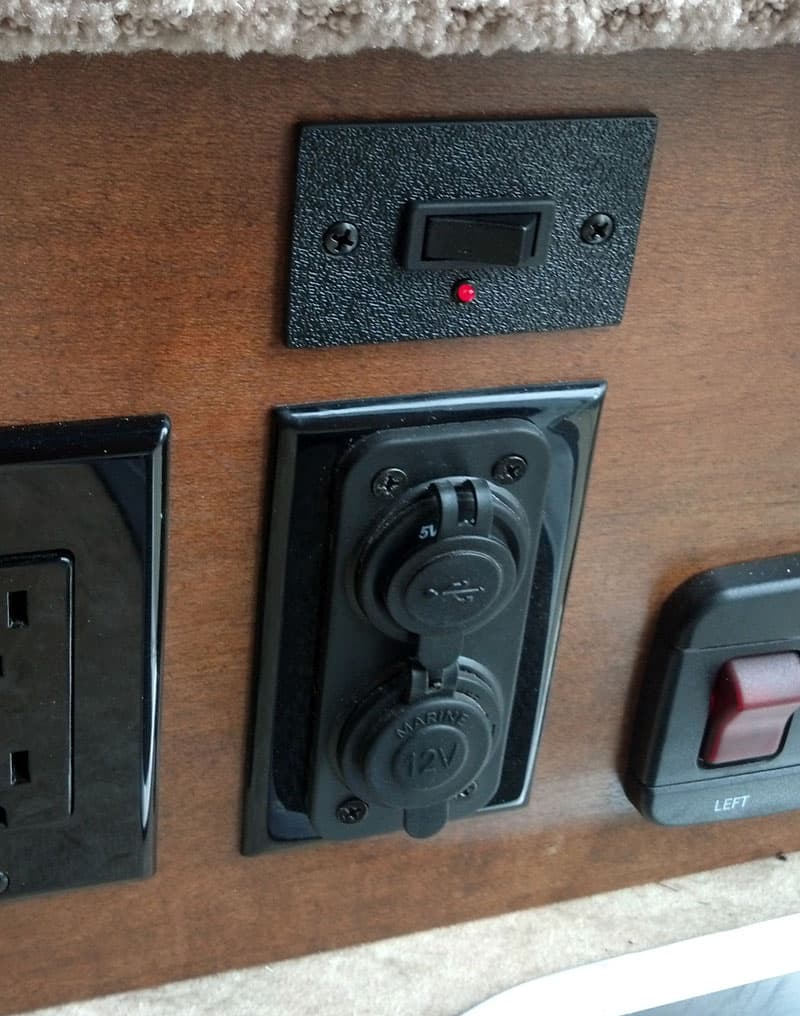
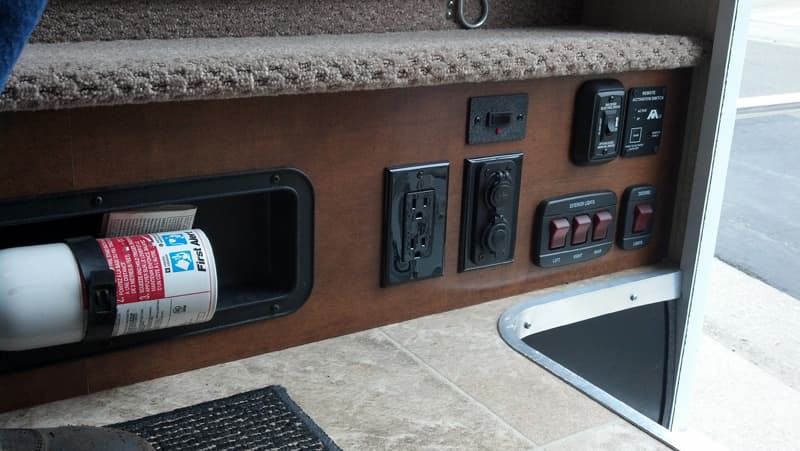
Our Lance 855S is a great camper, but had a two issues that bugged me. We did not get the built-in generator, opting instead for solar and a portable generator. The camper came wired for a generator including the starter switch that would never be used. I don’t like things that have no function!
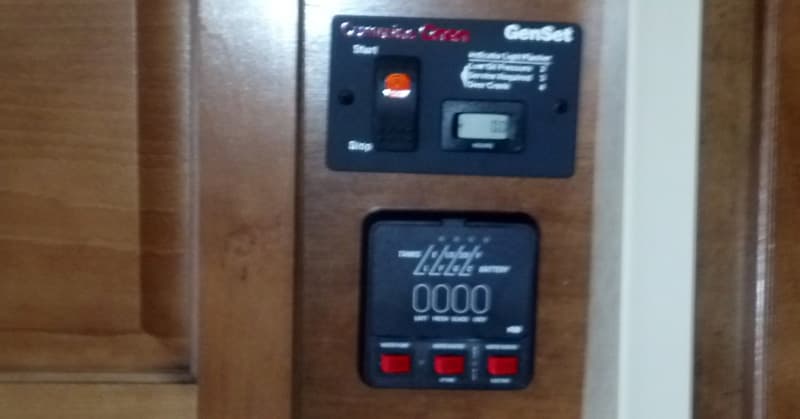
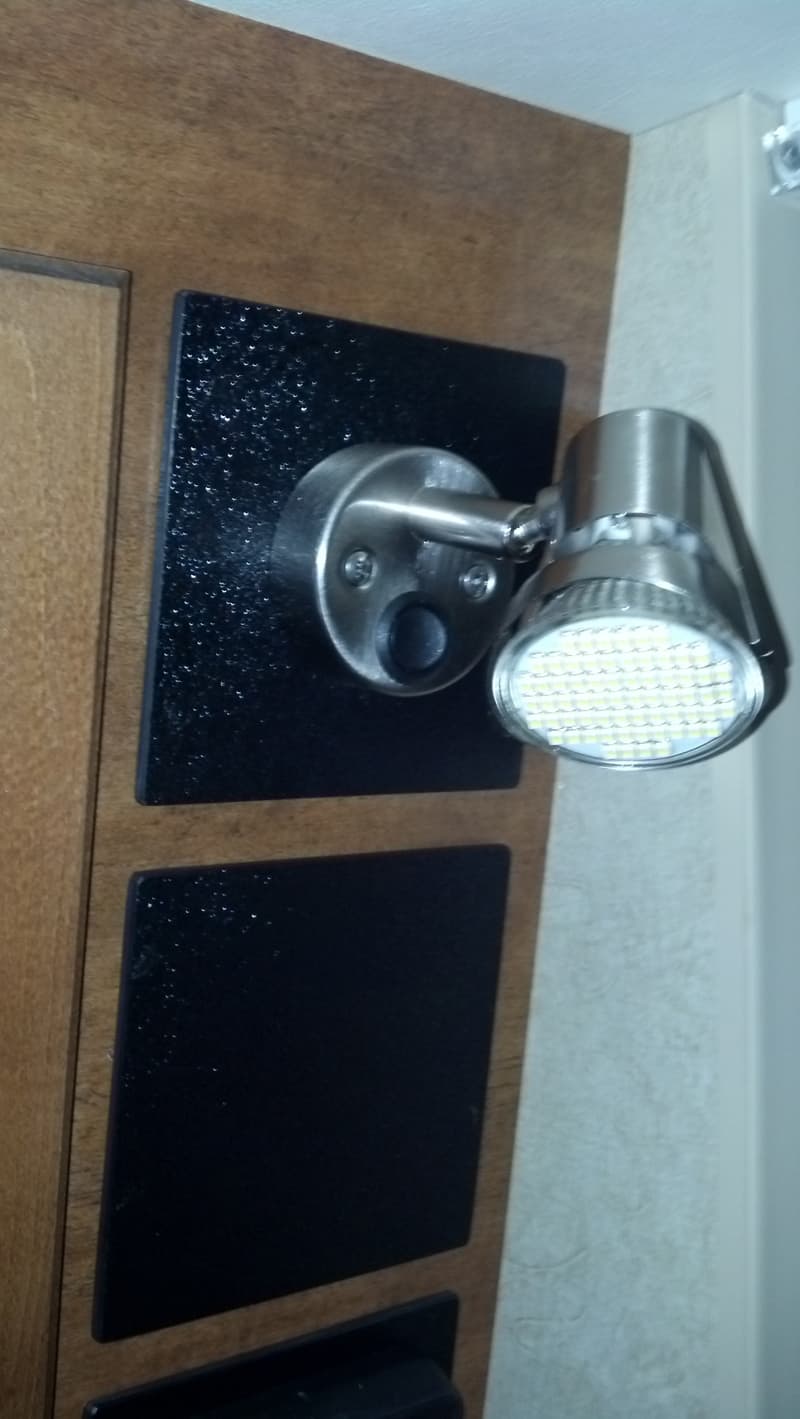
The camper also had no way to turn on an interior light upon entering. Outside lights were plentiful, but you had to climb inside and fumble around for a light switch. I wanted an interior light that could be turned on prior to climbing up the steps so I could see where I was going. This mod took care of both issues.
I removed the generator start switch and discovered that there was a multi-conductor wire connecting it to the generator compartment next to the rear door. By removing the generator switch, I now had the wires needed to install my light.
On Amazon, I found a light fixture that matched the bed reading lights, two different three-way switches, and an indicator light. A trip to Tap Plastics netted me some nice textured ABS sheets from the remnant bin.
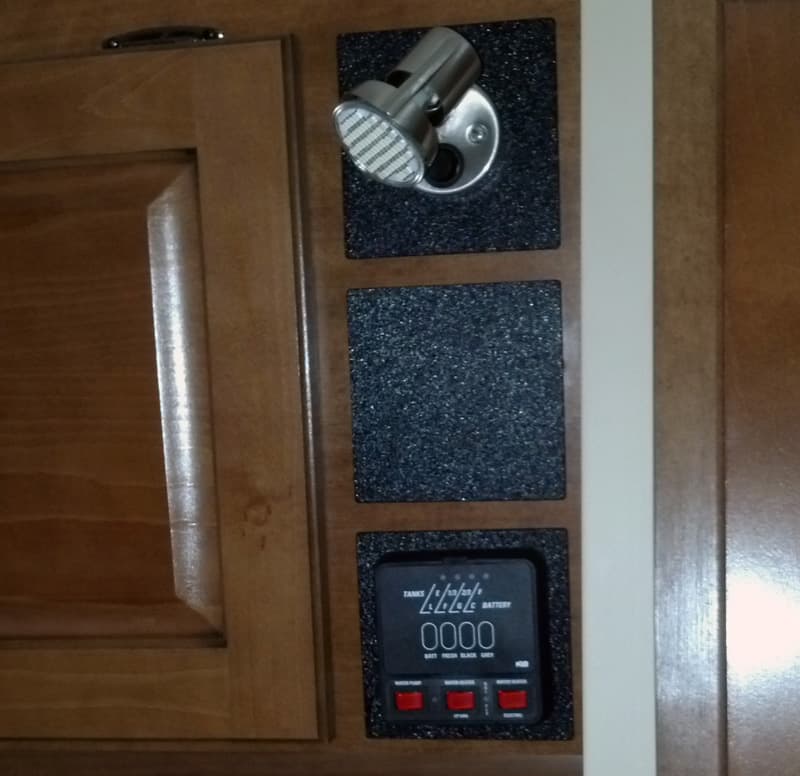
The rest was easy. I replaced the two-way switch in the fixture with a three-way switch to allow the light to be activated from either the door location or at the light itself. I slightly relocated the camper’s monitor/switch panel to center it in one of three ABS plaques with the light fixture mounted in the top position for a more symmetrical look.
Inside the camper’s door, the three-way switch was also mounted in an ABS plaque so I could add the small LED indicator light that shows us where the switch is when it is dark outside.
The mod has worked great by giving us an interior light that we can turn on before entering the camper, and the mod eliminated the unused generator switch. An added benefit is that this light can be reached from the bed. It is often the first one turned on when entering, and the last one turned off when retiring for the night.
It took me six hours to complete this modification and cost me $40. In my opinion, the skill level of this modification is medium.
7. David Fern, Pueblo, Colorado
2005 GMC 3500
2017 Eagle Cap 1160
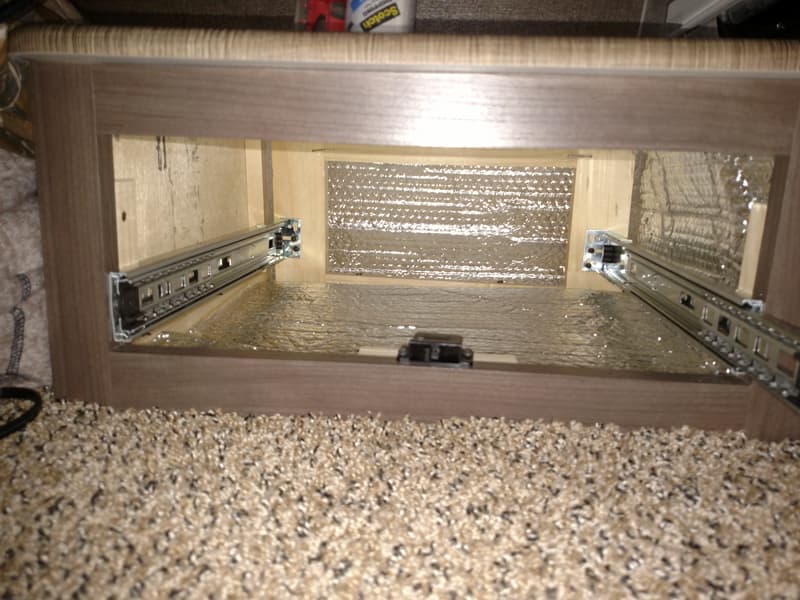
In the cabover section there are cabinets on each side of the bed; a small one-drawer night stand on one side, and a two-drawer with door on the other.
On our last trip it got down to 17 degrees and the wind was blowing. When we got up the next morning, you could feel the cold from the cabinet area and the clothes in both areas were quite cold.
Thinking that the compartments are actually exposed on three sides (front, bottom, and side) it is no wonder that they were so cold. I pulled the drawers and began cutting some double bubble foil insulation and making panels to line the outside facing panels of the cabinets.
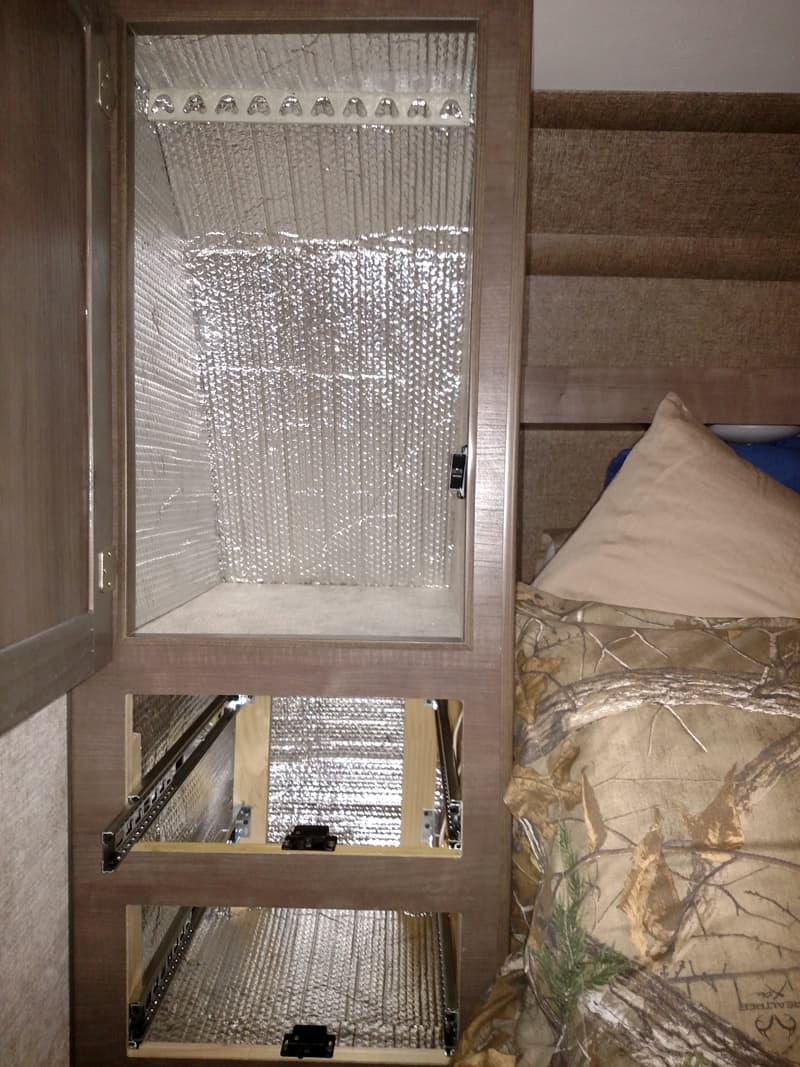
The next night it got down to 22 degrees. We did not feel the cold radiating form the cabinet area and the clothes were not nearly as cold. I think this will also help in the summer with the heat of the sun.
It took me three hours to complete this modification and cost me $25. In my opinion, the skill level of this modification is easy.
8. Steven Sternberg, New London, Wisconsin
2013 Chevrolet 2500HD
2012 Palomino Maverick 8801
I needed to get more room in the dinette by getting the table out of the way. I purchased the Lagun table pedestal and installed it. You can swing the table out of the way when you want.
It took me one hour to complete this modification and cost me $200. In my opinion, the skill level of this modification is easy.
9. Frank Ross, Moss Beach, California
2006 Dodge Power Wagon
2005 Hallmark Milner LX
I wanted to improve/repair the mounting of the camper. Someone said, “necessity is the mother of invention”. It can also be the mother of mods.
On the first day of a recent trip, I hit an unexpected wash/dip in the two-track desert trail I was driving down.
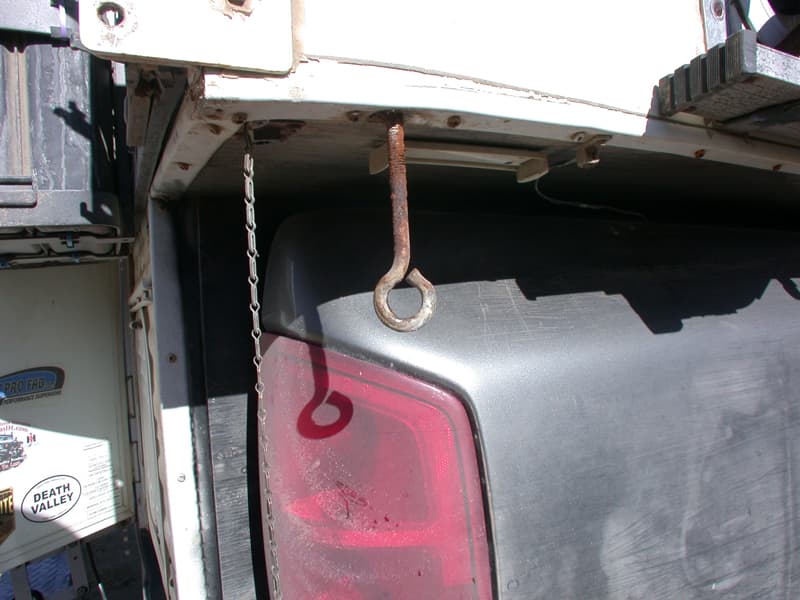
I could feel the back end of my camper lifting up from the bed and I looked back in the mirror just in time to see my right rear turnbuckle falling to the ground. The eye bolt had almost been pulled from the camper.
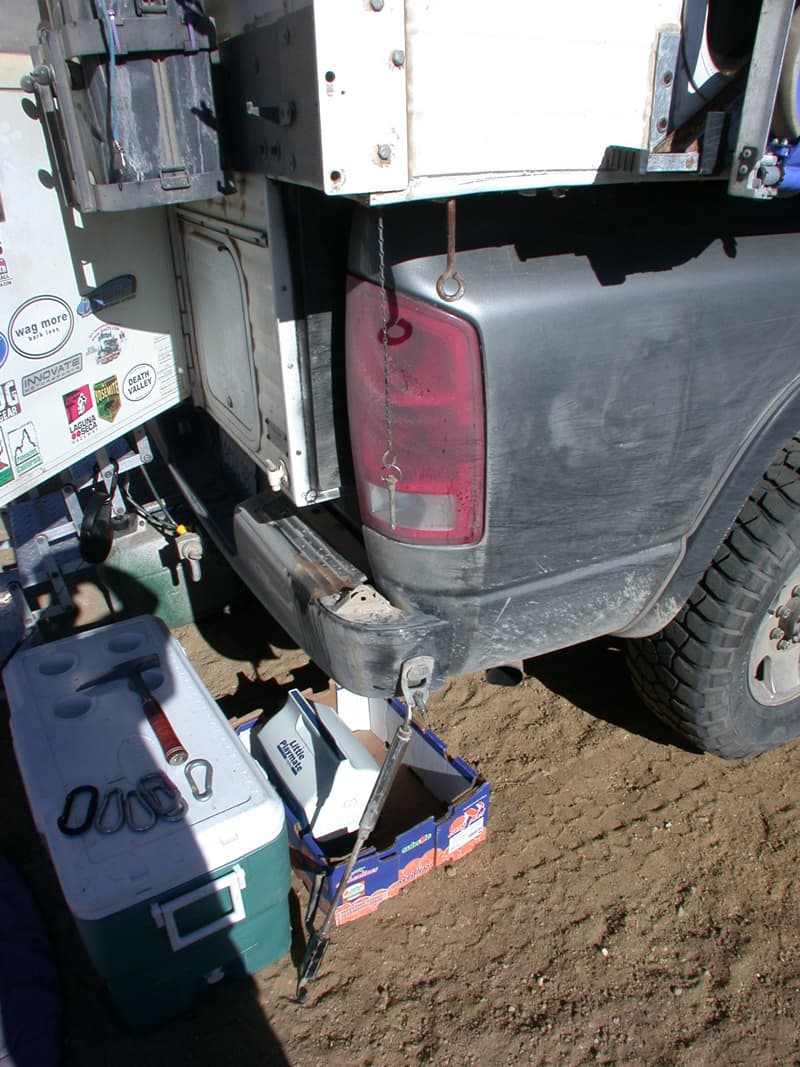
I needed a mod to get me through the rest of my trip. I ended up drilling out the bottom hole of my right-rear jack mount to except a carbineer and my turnbuckle. Once completed, I was back in business with what became a permanent mod.
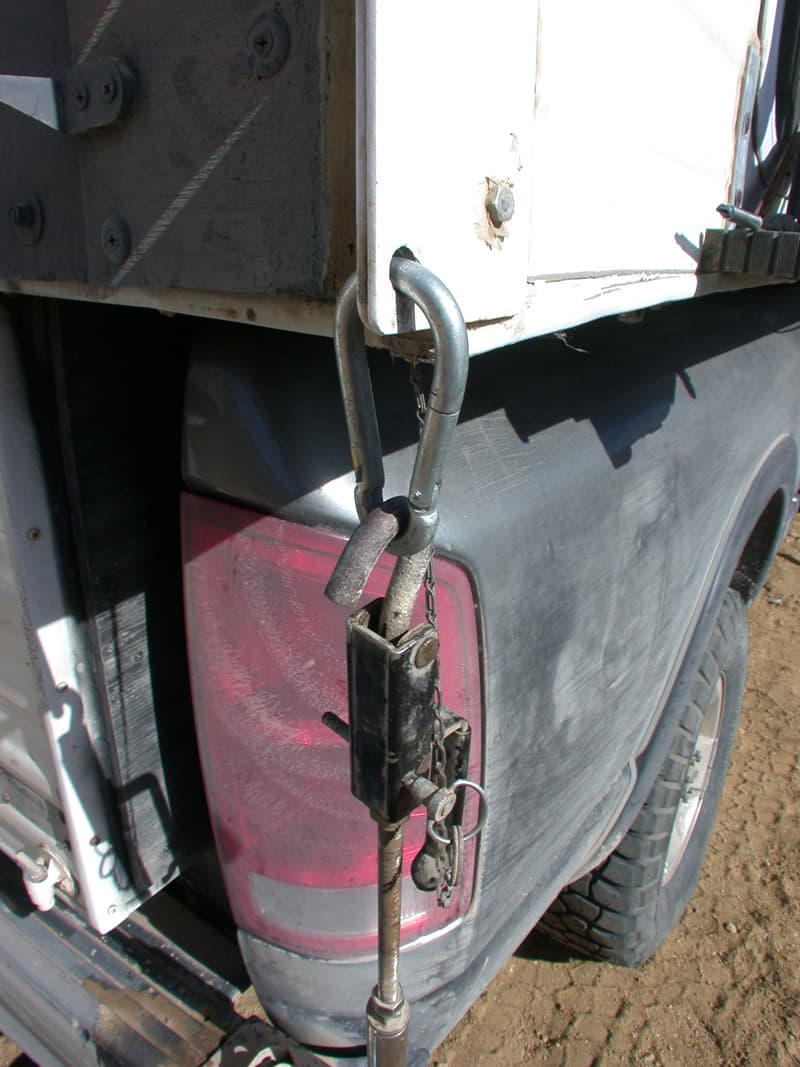
When I got home, I noticed that the left-rear eye bolt was also failing. So I repeated this mod for the left-rear as well. The camper jack mounts are much stronger and should hold up to the off-road environment I live in while truck camping.
It took me less than one hours to complete this modification and cost me $7. In my opinion, the skill level of this modification is easy.
10. Doug Lamb, Fairland, Indiana
2013 Chevy 2500HD
2015 Travel Lite 960RX
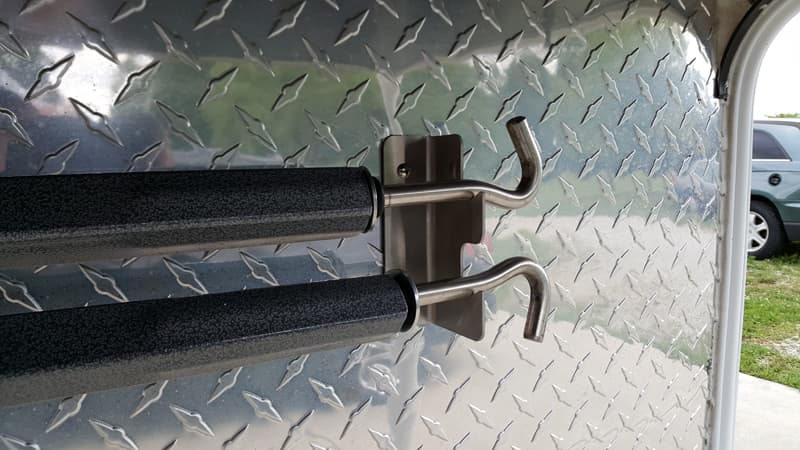
I was always looking for a place to store my turnbuckles and have them handy at loading time. This modification was made for ease of turnbuckle storage before and after a trip.
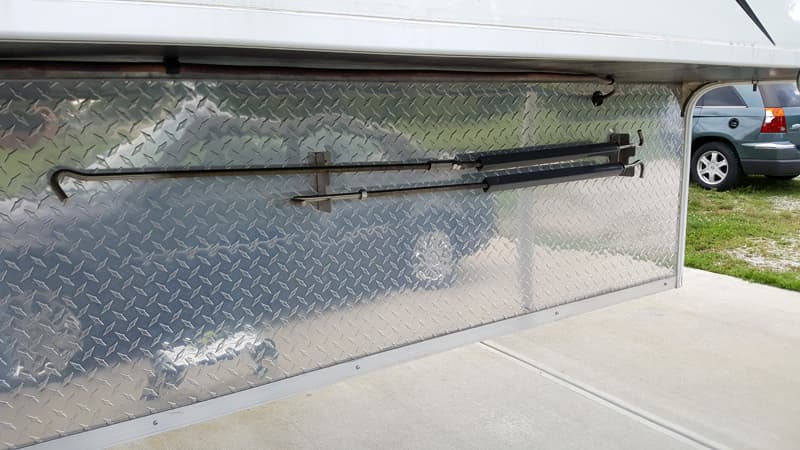
I work in a machine shop where we specialize in sheet metal fabrication.
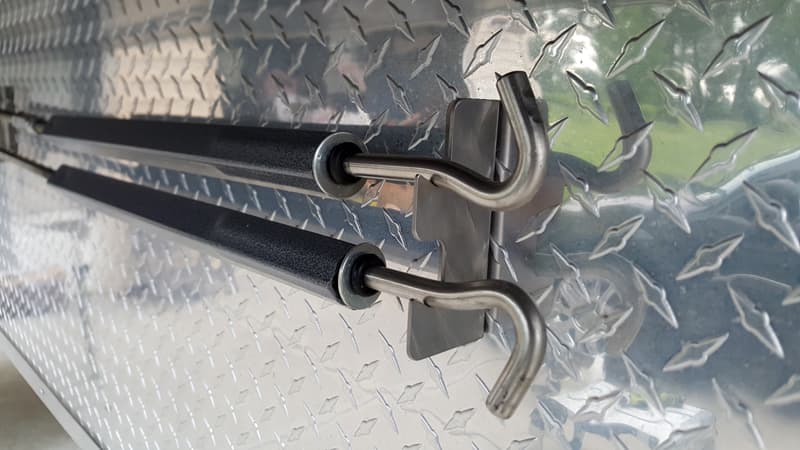
I designed turnbuckle storage brackets using stainless steel for corrosion protection. Painted mild steel or aluminum would work fine as well.
This modification has been great! No more turnbuckles leaning in the corner of the garage collecting cob webs. They always stay with the camper and never get misplaced.
It took me two hours to complete this modification and cost me $5. In my opinion, the skill level of this modification is medium.
Click here to vote for your favorite 3 mods from this month’s contest.
Disclaimer: The modifications above are submitted by Truck Camper Magazine readers. It is your responsibility to make sure that any do-it-yourself modification project you undertake is safe, effective, and legal for your situation.
Enter Your Mods Now!
If you’d like to enter mods into TCM’s Monthly Mod Contest, click here. You can enter as many mods as you want, at any time. Good luck mod makers!


