Welcome to the fifth entry in July’s Medium Mod Contest. One Medium Mod will be published in every Email Alert in July. At the end of the month, we’ll hold a reader vote to determine July’s winner. Click here for information about the 2023 Mod Contest, including how to enter.
Steve Osburn, Poulsbo, Washington
High-Low Awning Light Mod
2019 Ford F-350
2023 Northern Lite 10-2 LE
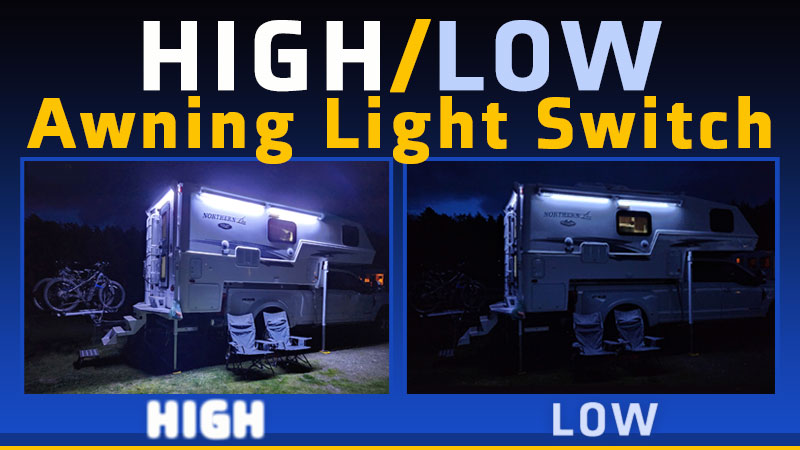
Have you ever been in a campground and had a neighbor who keeps their outside and/or awning lights on? You’re trying to enjoy the light of a campfire or stargaze, but all you can see is your neighbor’s blinding lights. What’s worse is that your neighbor might be inside and not even realize their outside lights are on. This mod helps you to be a better campsite neighbor.
The standard light strips that come with awnings these days, and many other styles of outside lights, are just too bright for campground use. Even when you’re boondocking on your own, they’re too bright when you want to see the stars. The bright light is great if you are trying to work under your awning or you’re cleaning up the campsite before heading to bed but, for just sitting around, they’re too bright.
You can purchase dimmers for LED lights, and they work great, but many dimmers have a parasitic load (meaning that they use a small amount of battery even when they are off). Most LED dimmers require both power and ground wires running directly to the light. In my case, the power wires went to the switches, but the ground wire ran via another path and was nowhere in sight. The ground wire doesn’t need to be run in the same bundle as power as long as it connects to the ground somewhere.
You can put a potentiometer (variable resistor) in the circuit and accomplish the same thing, but at near full brightness, you could be running one amp (or more) through the potentiometer, and that will toast most low-power potentiometers.
What I did was just decide on a high/low setting, where I could flip a switch between full brightness, low brightness, and off. The low brightness is just a fixed current that results in a fixed level of light.

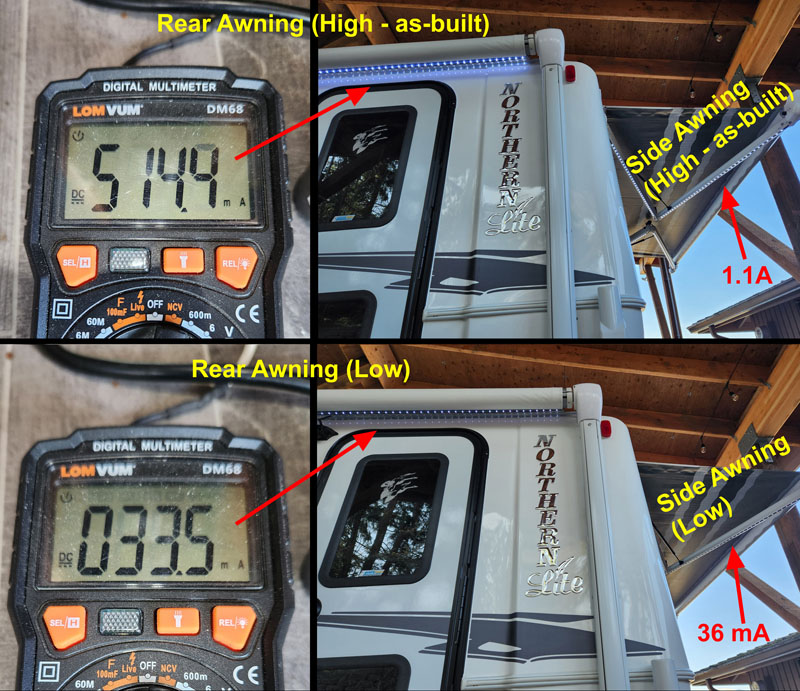
In my case, the original side awning LED lights drew about 1.1 amps, and the rear awning LED lights drew a little over 500 mA. I picked from a selection of two-watt resistors that I already had and chose ones at about 180 ohms. This resulted in a low light level that I liked. It also resulted in an amperage level of just thirty-six milliamps!
For the layman, that means I can run my side awning light at low power for 30 hours for the same battery drain that I could run the same light for one hour at full brightness. Yes, I’m an engineer (retired), and the math checks out.
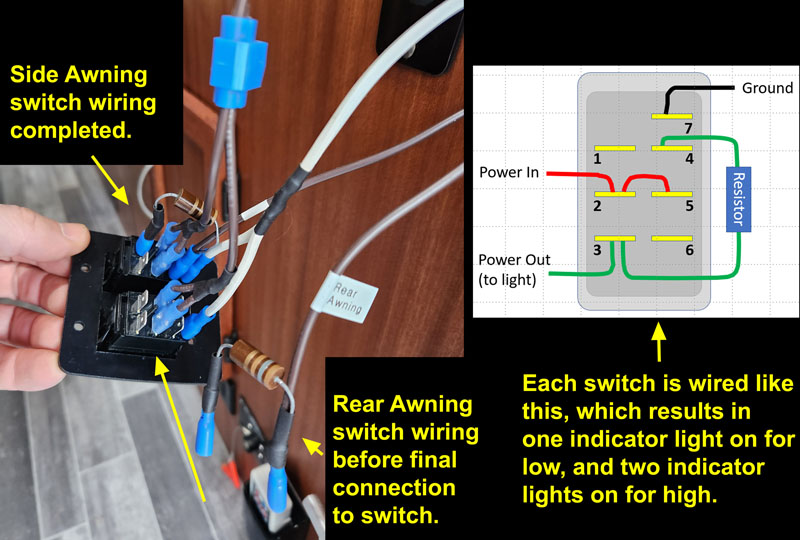
There are times I still want full brightness, so I wanted to be able to switch between high and low. The other issue is knowing that the light is on when you are inside the camper, so that was a simple matter of choosing a light switch that had indicator lights built-in. When I switch to high, I’ve got it wired so that two indicator lights come on. When I have it on low, only one light comes on. In either case, I know from across the camper if I’ve left the outside lights on, and whether it’s high or low brightness.
The wiring is fairly straightforward, and all of the connections are made right at the switch. The only complicating factor is making the switches look decorative.
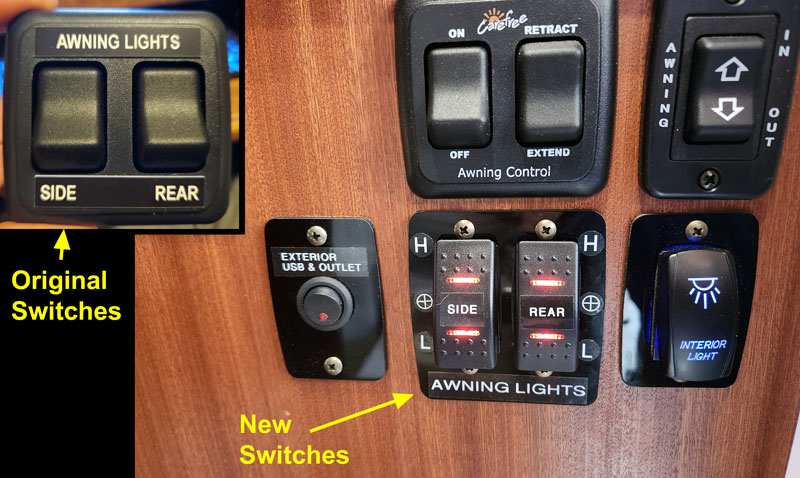
I used a laser cutter and black plexiglass to make a switch plate that the switches pop into. If I didn’t have a laser cutter, I’d have done the same thing by using drills, saws, and files on a backplate made of plastic, aluminum, stainless steel, or even wood. The only added wire you have to run is to find a ground somewhere. It can be from anywhere; from another light, the frame, the battery, or wherever it’s convenient.
Selecting the resistor value to suit your tastes might take some trial and error, but for those that want some more technical details, you’ll want to make sure your resistor can handle the power (won’t overheat). Make sure you buy resistors that can handle the power.
For a 12-volt system, if you want to limit your power to a two-watt resistor, you would want to make sure your current is less than 170 milliamps. This means your resistor must be 72 Ohms or more. You can go any number higher than 72 Ohms to further reduce the light (and the current/battery drain), but if you go less than 72 ohms you will exceed the 2-watt limit you picked (brighter light, but more heat, more current, and you’d need a higher power (Watt) resistor). Hope that’s not too complicated.
If you want to do calculations on this, your equation for current is: Amps = Watts divided by Voltage, and Ohms = Voltage divided by Amps. If you pick a number for watts, then everything else flows from there. I didn’t want to go higher than two-watts because that just means consuming more power. You might have to experiment a little with different resistor values to get the light brightness where you want it. I also recommend you wire it up with temporary jumper wires when you are first putting it together so you can swap in and out various resistors before selecting the permanent value.
The bottom line is I can enjoy my own fire, be respectful of my neighbors and save battery power at the same time. And I can still turn the light on full bright if I need it. I’ve made this mod (or similar) to all of the RVs I’ve ever owned and always with great results. It’s so nice to be able to sit outside with a little ambiance without blinding ourselves or others.
Materials:
Switches: 7-Pin Double Pole/Double Throw (DPDT) LED light switch (Amazon, about $8 each)
Resistors: 180 Ohms (or thereabouts), 2 Watts. Resistors are cheap. You could buy a variety pack and try different values to suit your taste, but I found 180 Ohms did well for my tastes.
Wire crimp connectors (available on Amazon, but might even come bundled with the switch you buy)
Switch face plate (you can make this out of almost any material, but black plexiglass is a great medium when coupled with a standard label maker.)
I used a soldering iron and heat shrink tubing, but these splices can be made without soldering if you use wire tap connectors. As mentioned earlier, I also used a laser cutter to cut out the switch plate backing, but there are many other ways to build this, or even buy a ready-made switch plate. Aside from this, I used a meter to determine current draw, and various other hand tools.
It took me two hours to complete this modification and cost me $16 for two switches. I had everything else on hand, but if I had to buy resistors and crimp connectors, it might add another $5 to $10. In my opinion, the skill level of this modification is medium.
Disclaimer: The modifications above are submitted by Truck Camper Magazine readers. It is your responsibility to make sure that any do-it-yourself modification project you undertake is safe, effective, and legal for your situation.
Enter Your Mods Now!
If you’d like to enter a modification you’ve done on your truck camper, click here. You can enter as many mods as you want, at any time. Good luck mod makers!


