Stop the table wobbles! Quiet the range fans! Clear the door windows! These 10 Medium Mods mean serious business. Pick your three favorites and vote now.

Welcome to the tenth 10X10 Mod Tournament. Please review the following ten medium mods and vote for your favorite.
We will announce the winner next week. For more information about the TCM Mod Contest, including how to enter, click here.
Congratulations to Kevin Mooney (#7) for winning this month’s contest!
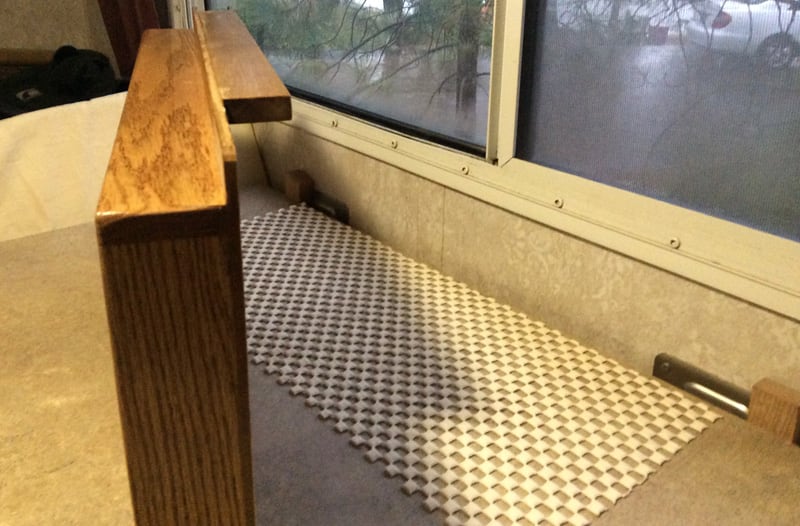
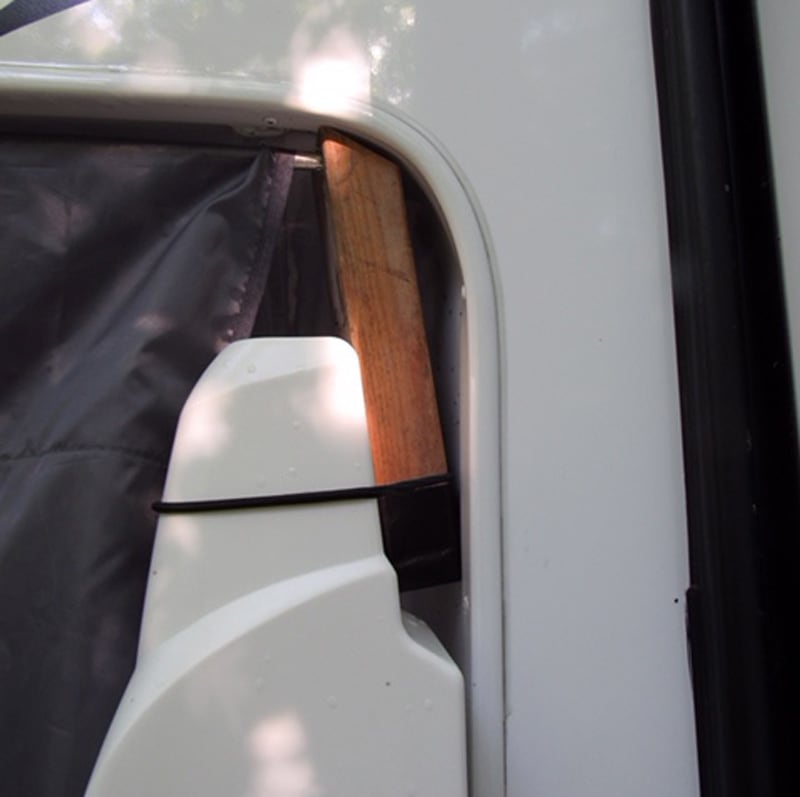
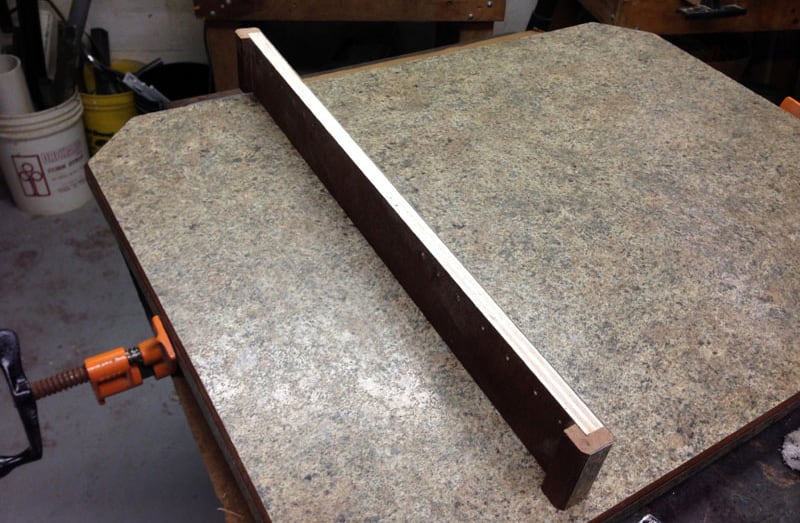
1. Tim Zeh, Simpsonville, South Carolina
Dinette Caddy
2005 Chevrolet 3500
2007 Arctic Fox 1150
We like to keep items on the table and not have to put them away. These items include napkins, salt and pepper, playing cards, paper, pens and even reading glasses.
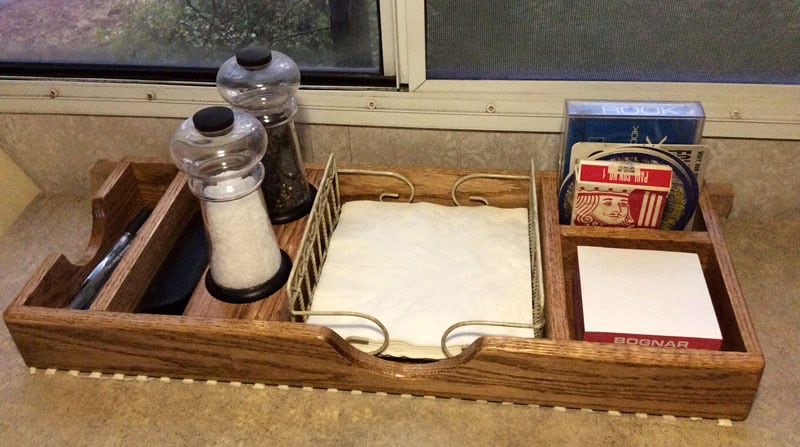
We tried the non-skid pads. They work pretty well when new, but the dust from all the gravel roads we travel eventually make them ineffective.
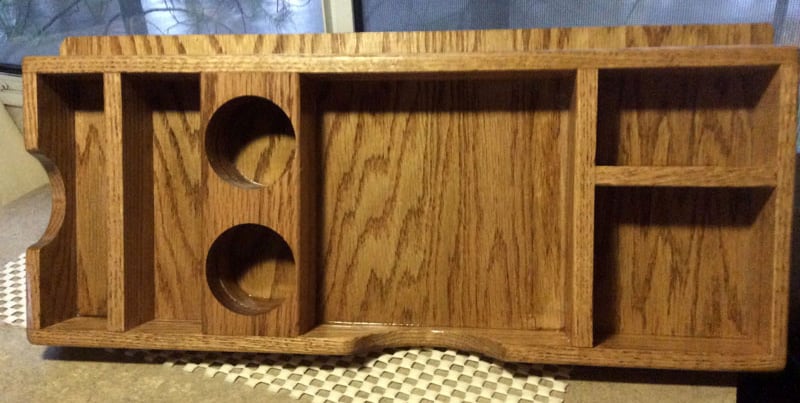
I had some left over oak from a wood working project and built a caddy that hooks between the table and wall. Our 2005 Arctic Fox has the dinette which attaches to the wall. I made the cleat so the caddy between the two table brackets.
I planed down the wood to 1/2-inch and glued it together. With a little stain and poly, it looks like it was part of the original camper. I also added a piece of non-skid shelf liner to keep it from marking the table.
The dinette caddy works great! We’ve been out six weeks now. Even when everything else is on the floor, our caddy keeps everything in place. We could have made it bigger!
Also, we had lots of problems with salt clumping from all the humidity. The solution was to buy a salt grinder. It works!
It took me three hours to complete this modification and cost me $0. In my opinion, the skill level of this modification is hard.
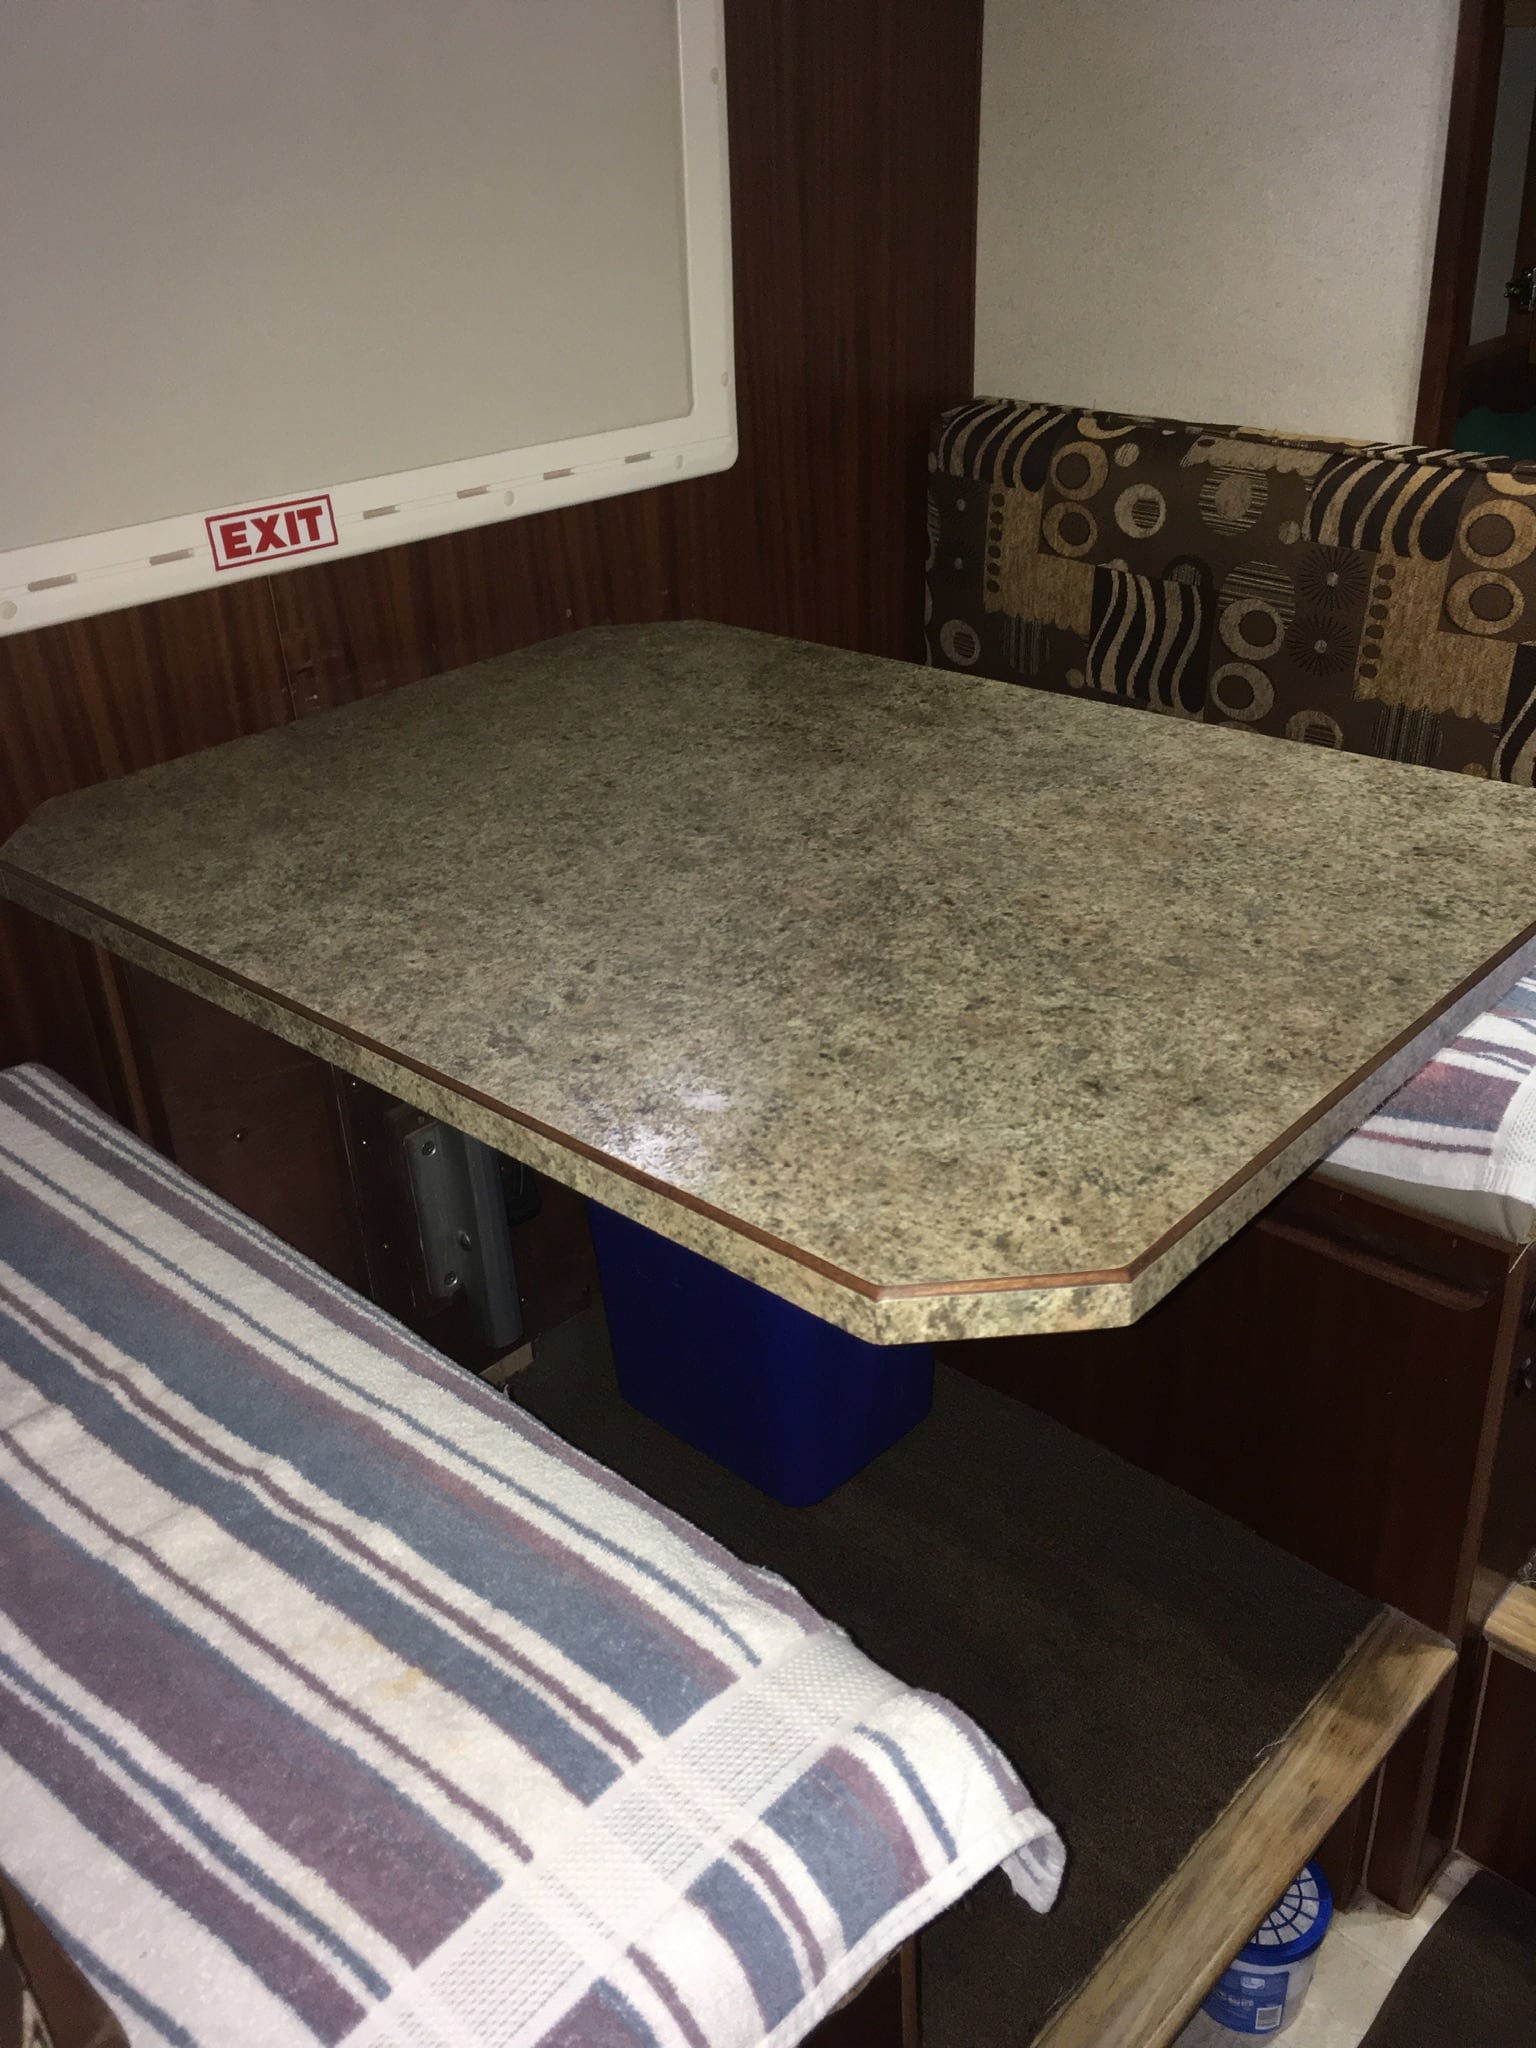
2. Rhonda Nicholas, Polk City, Florida
Stable Dinette Table and Storage
2016 Dodge 3500 Ram
2014 Palomino HS-8801
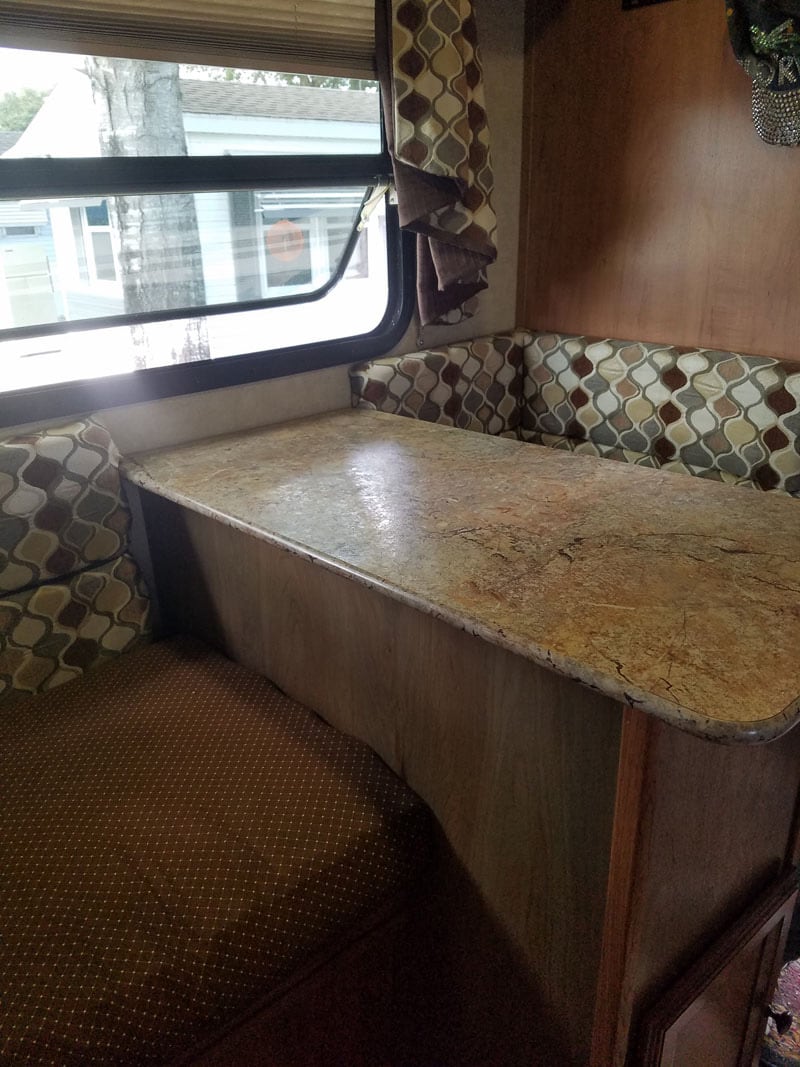
The original dinette table in our Palomino was too wobbly. We modified the table to make it more stable and created more dinette area space in the process.
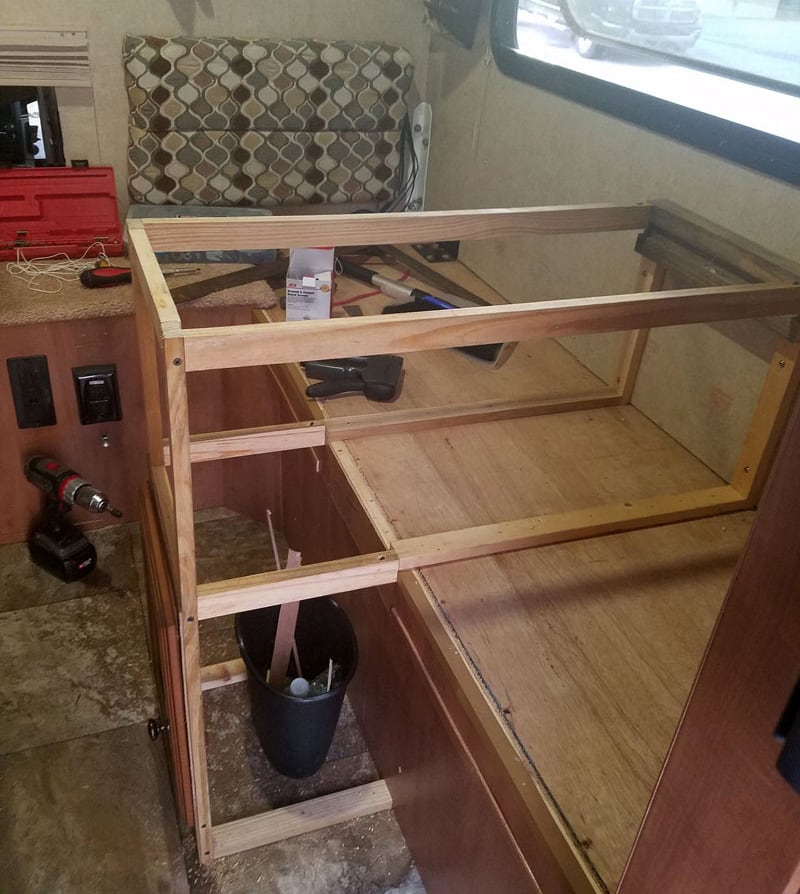
First, we removed the post and built a box for more storage on the floor.
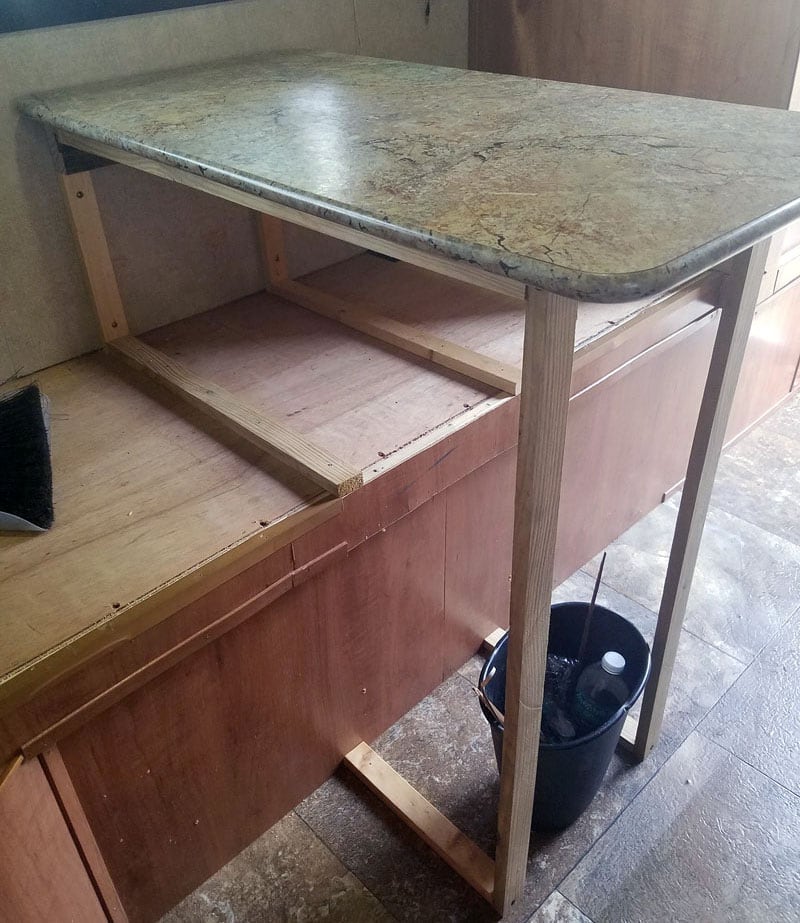
Then we shortened the seats and recovered the cushions.
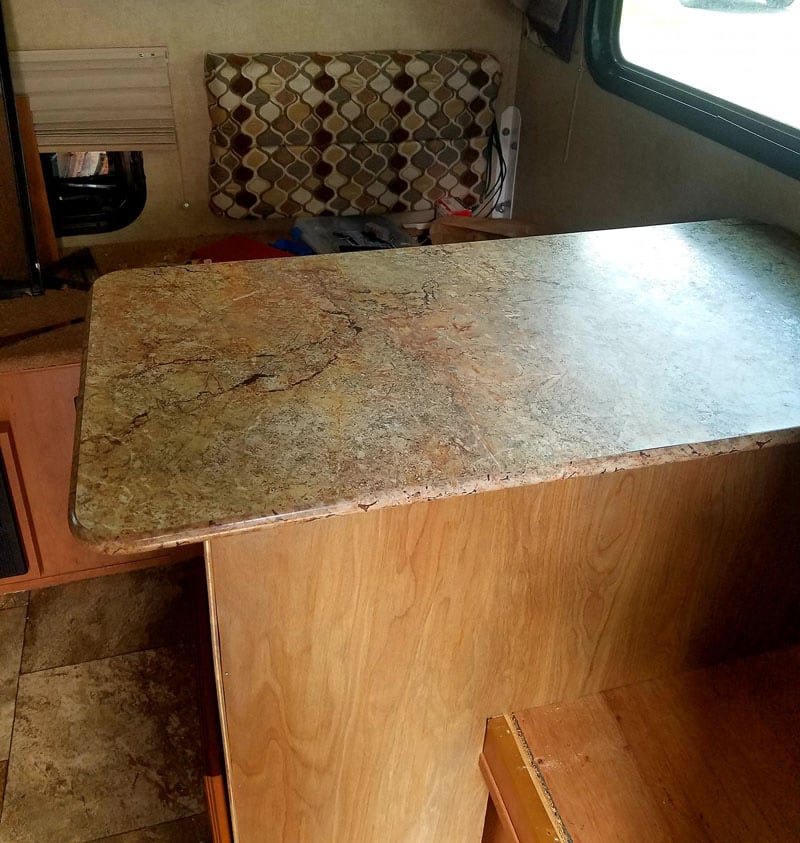
Next we added storage under the lift top table. The great thing is that we were able to use the original table top and materials.
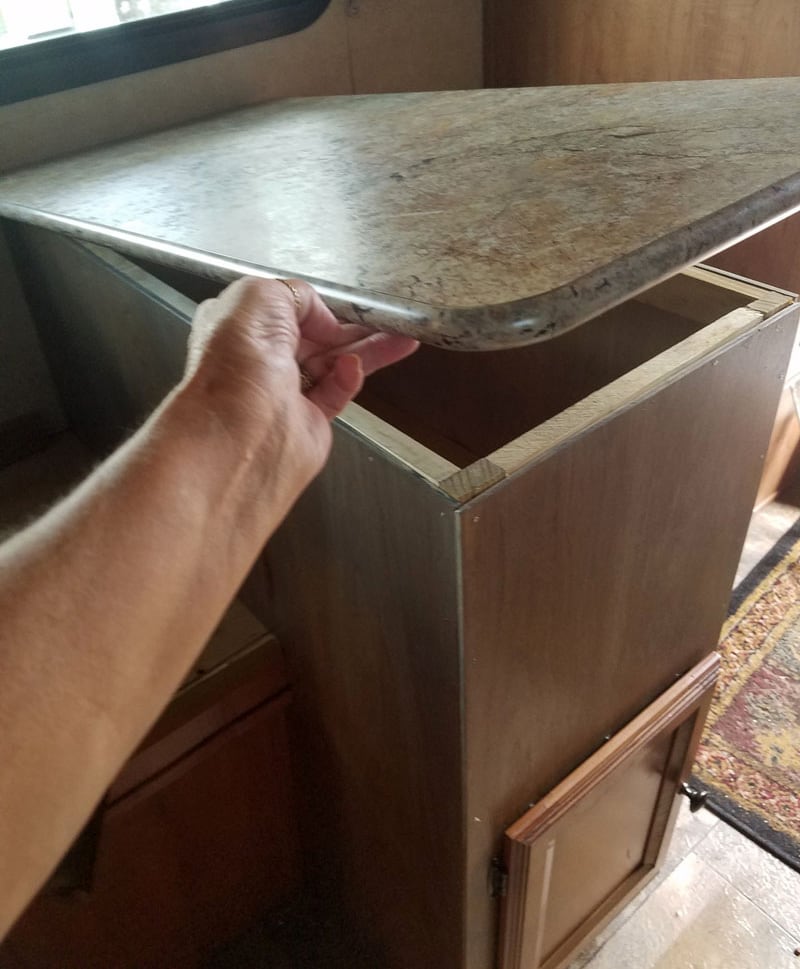
The dinette is now an awesome space. We don’t need the extra bed area, so this set-up is better for us than the original table.
It took me two days to complete this modification and cost me $50 for the side panels and stain. In my opinion, the skill level of this modification is medium.
3. Mike Borrego, Pine, Colorado
Back Seat Bike Mount
2005 Dodge 3500
2008 Host Yellowstone
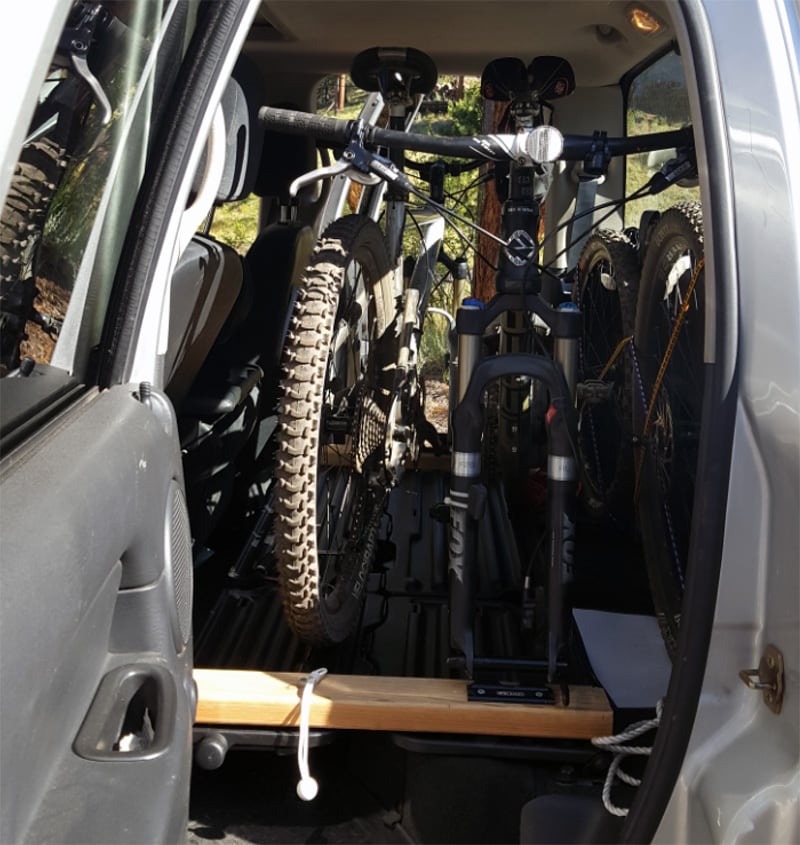
This mod was a result of needing a better way to carry our two bikes. Since the camper extends about 3.5-feet beyond the rear hitch, it wasn’t practical to use a rear hitch mounted bike rack.
I have been using a front hitch mounted rack for several years, but the bikes were getting wear marks and always full of bugs. In 2008, the bikes traveled on the front mounted rack all the way from Colorado to Alaska and back.
The first rack was a side fold-over. It actually folded over at 65 miles per hour and caused a lot of damage to the bikes.
I replaced the rack with a swing out type rack after that, but it was hard to keep the bikes from rubbing against each other. It was also very difficult to drive at night with the bikes on the front since they blocked part of the headlight beam. I needed a safer and more secure way to carry the bikes.
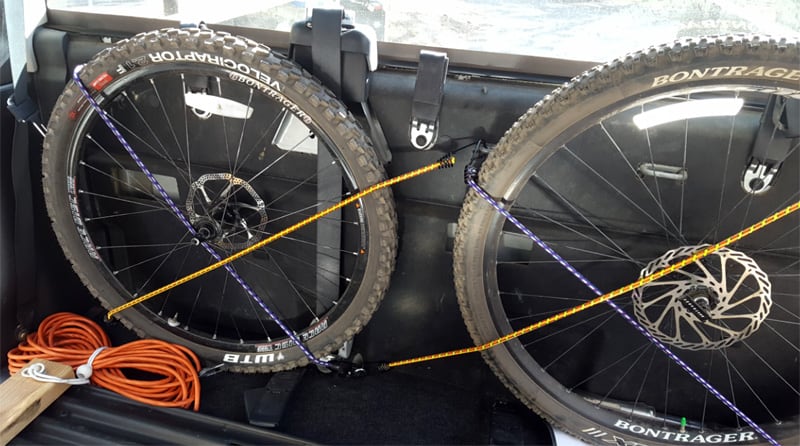
After some trial and error, I figured out a way to put the bikes in the rear seat of my 2005 Dodge Ram 3500 quad cab. The rear seat is a 60/40 folding seat with a fold-out cargo tray. Both bikes wouldn’t fit with the rear seat folded up, so I completely removed the rear seat. That gave me about 5-inches of additional space.
The mod is fairly simple. It took about two hours to figure out the location and spacing. It takes about 30-minutes to install with most of the time spent on removing the rear seat.
There are eight bolts holding the seats in place that need to be removed plus one bolt that holds the center seat belt. To remove the seats they need to folded up and then lifted up about 2-inches to unhook the seat back from the rear cab wall.
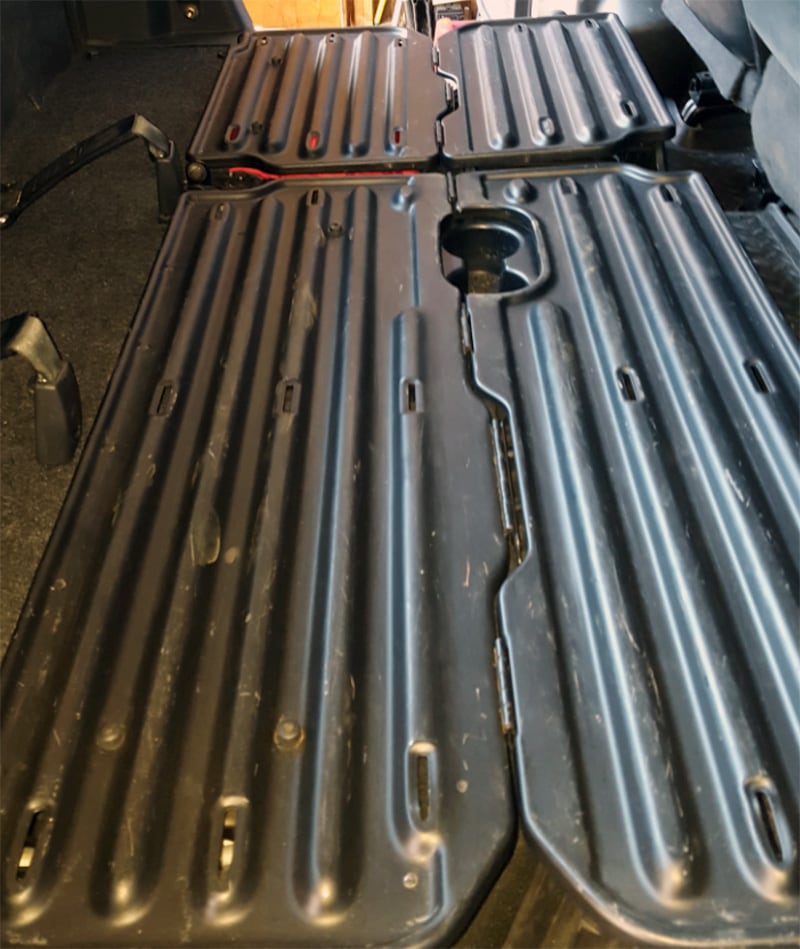
The fold-out cargo tray is attached to the seats with two nuts on each seat. I detached the cargo trays from each seat and reinstalled them using a spacer washer underneath the mounting hole to take the place of the seat bracket.
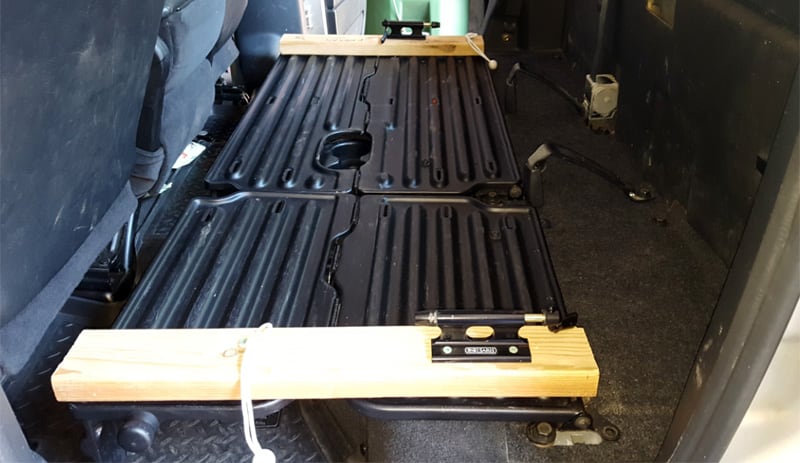
I then cut a piece of 2×4 the length of the cargo tray for each side. Using the existing slots in the outside edge of the cargo tray, I mounted the 2×4 pieces using a 2-inch wood screws in four places.
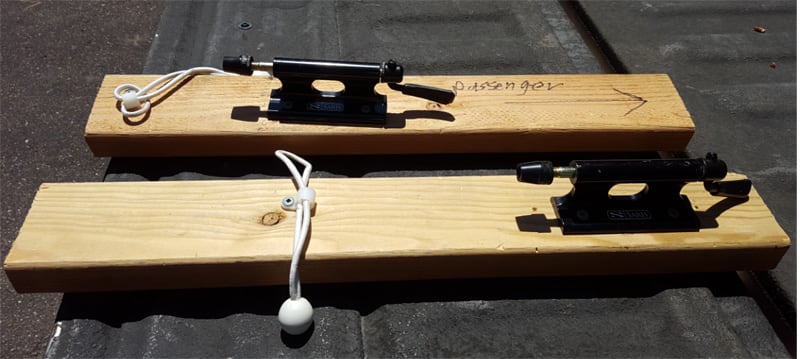
I purchased two inexpensive bike fork mounts with a flat base to hold the bikes in place. I tried some different spacing and locations for the fork mounts to determine the best location. Then, I secured them to the 2×4 with 1.5-inch wood screws.

I added a nylon cable clamp where the rear tire sits and use a bungee with a ball end to secure the rear tire. I also purchased four large S-hooks and bent them at about a 60-degree angle and placed them on the rear seat bolts before I reinstalled the bolts.
It’s necessary to reinstall the seat bolts to keep the road noise down and prevent dirt or moisture from entering into the cab from the open hole. This gave me an anchor point on the base of the rear wall to help secure the front tires to the rear wall with bungee cords.
It is very easy to load the bikes by moving both front seats all the way forward. Once the bikes are in place, the front seat can still slide back to the most rearward position.
There is also room in between the bikes for our biking gear, pump and other items. I am a ham radio operator and usually take my radio gear with me on our trips. There is still enough room left to load three cases with my radios, a small bag with an antenna and a 6-foot folding tripod.
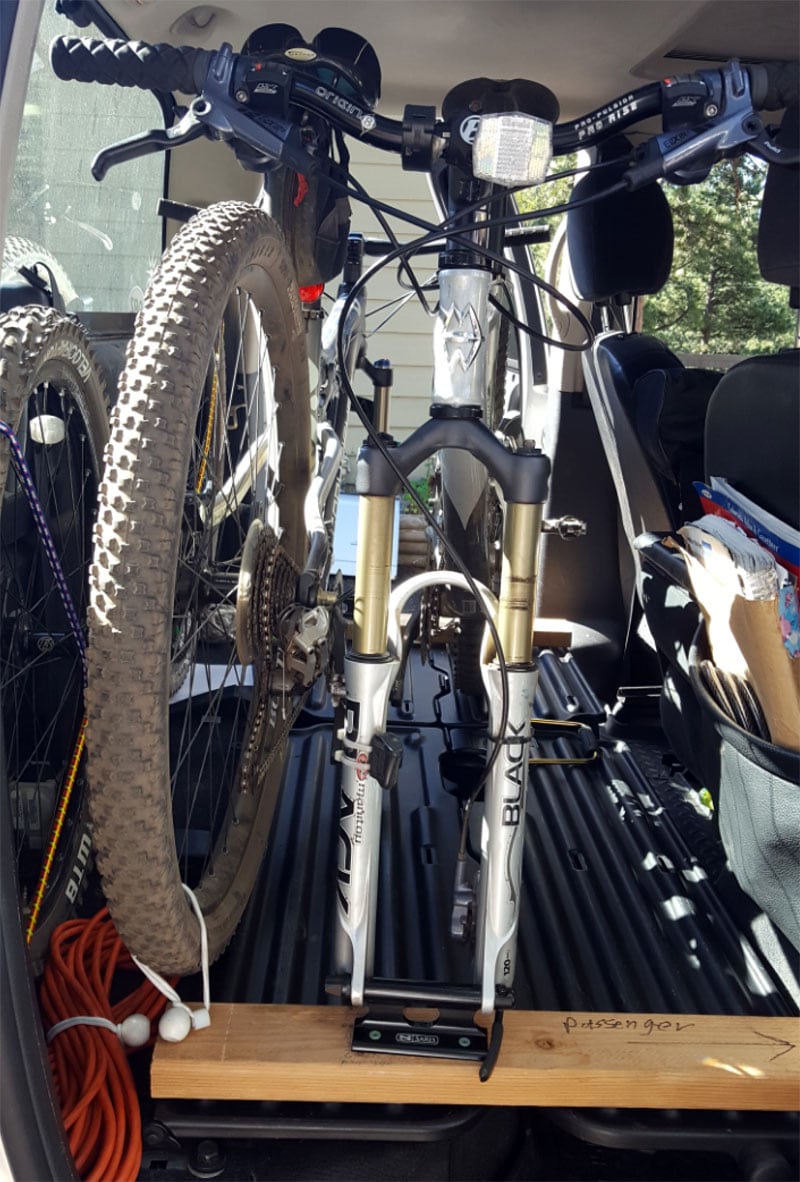
To unload the bikes with all this extra gear, I slide both front seats all the way forward, move the radio cases to the front seat, undo the bungee on the rear tire, and loosen the fork mount an roll each bike out. It takes less than five minutes to load or unload both bikes.
I have done three long trips since doing this mod and its has worked out just fine with no hassles or changes needed.
It took me three hours to complete this modification and cost me $65. In my opinion, the skill level of this modification is medium.
4. Charles Spray, Bryson City, North Carolina
Hitch Mounted Cargo Carrier
2002 Ford F-350
2016 Travel Lite Illusion 1100
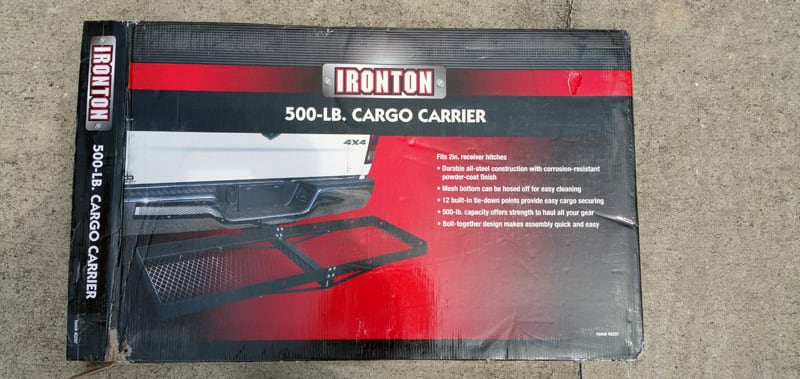
I bought a hitch mounted cargo carrier and modified it to bolt onto a Torklift SuperTruss hitch extension.
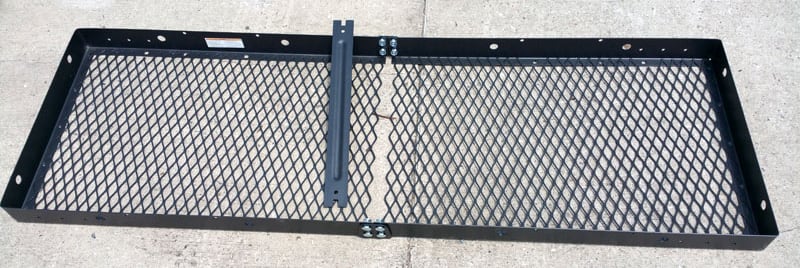
I purchased the kit from Northern Tool and Equipment and modified it by drilling new mounting holes. Then, I used U-bolts to secure the unit to the SuperTruss extension.
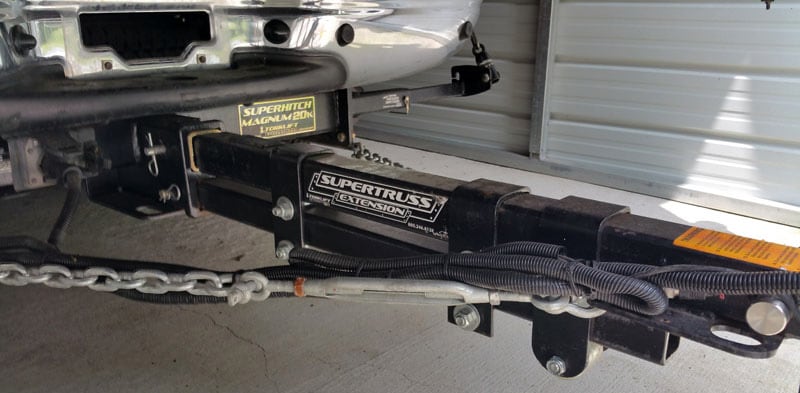
It has worked out great to haul folding chairs and other items that would otherwise fill up the floor of the camper!
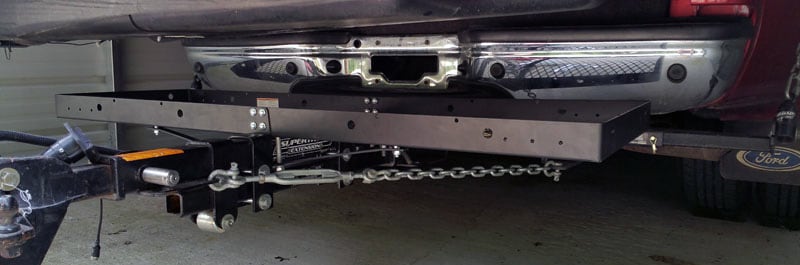
The cargo space is limited by the holding tanks on the camper.
It took me three hours to complete this modification and cost me $90. In my opinion, the skill level of this modification is medium.
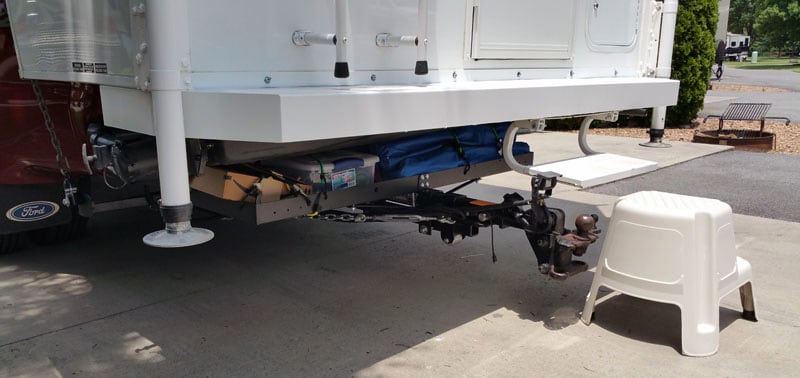
5. Sandy and Mark Anderson, Fort Atkinson, Wisconsin
Under Cabover Storage Area
2017 Chevy 3500
2017 Lance 975
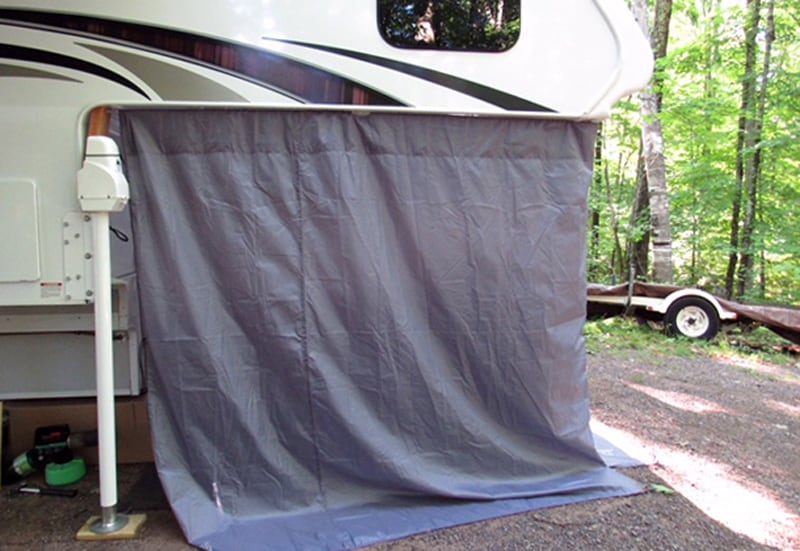
For truck camper stays longer than a weekend, we wanted additional outside storage that kept the campsite neat and our things dry. We also wanted items like our bikes, cooler, grill, and lawn chairs out of sight.
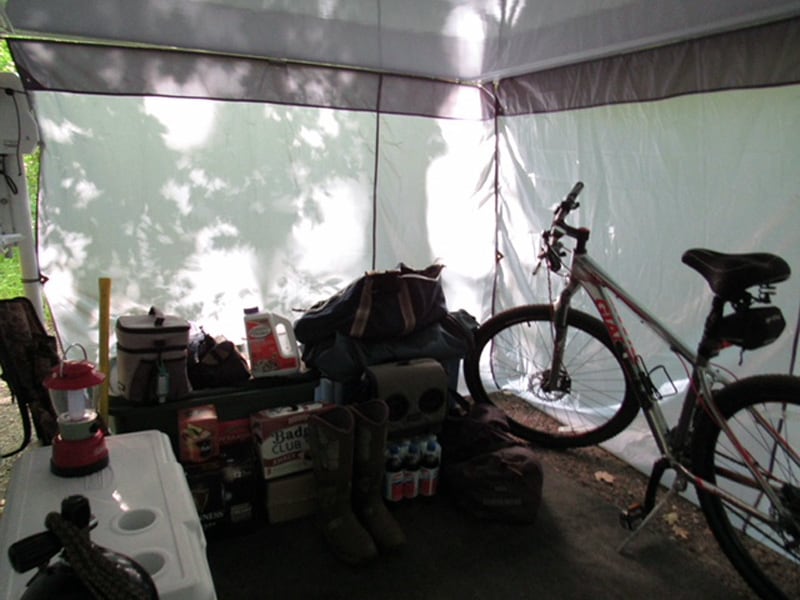
Our modification is a under cabover storage area. It’s great because there are no holes drilled or anything permanently attached to camper.
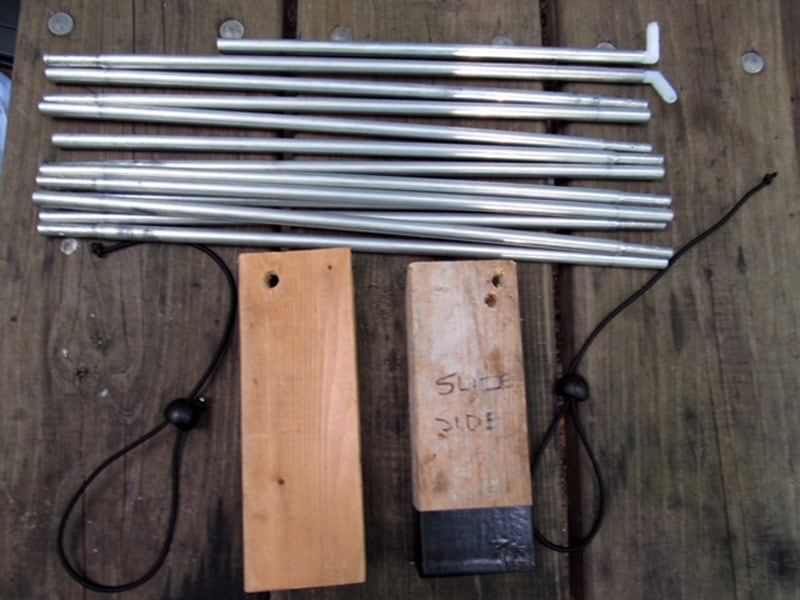
We used recycled corded tent poles to fit the sides and front of the cabover area.
We attached the corded tent poles to the camper with four 3M Damage Free cord clips.
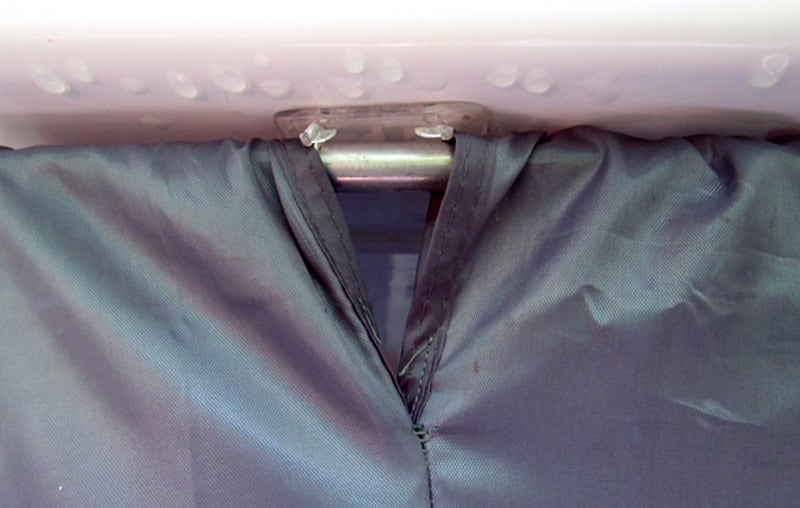
Then we sewed and hemmed waterproof/windproof tarps together with a sleeve and slid the tarps onto the tent poles.
We left the tarp length fairly long as the length needed will vary. The poles are anchored into a piece of a 2×4 with a hole drilled where each pole is inserted. Then the whole set-up is stabilized with a bungee around the top of the jack housing.
The storage area worked perfectly on recent trip and everything stayed dry with wind and rain for three days.
It took me four hours to complete this modification and cost $75. In my opinion, the skill level of this modification is medium.
6. Jeff Hagberg, Sylva, North Carolina
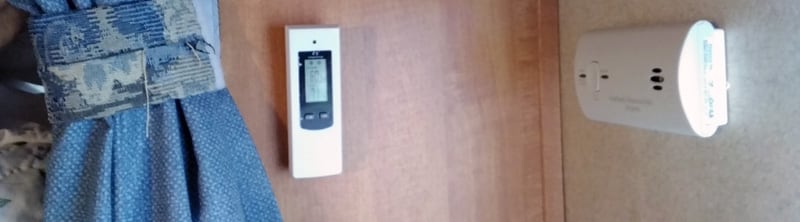
Wireless Digital Thermostat Installation
2002 Ford F250
2006 Travel Lite 800 SBX
Like most roof top mounted air conditioners, the fan always runs and the compressor cycles on and off. I never did like that, so I found a wireless digital thermostat on Amazon to fix it.
The thermostat comes in two parts; a module that plugs into the wall, and a small battery operated wireless unit.
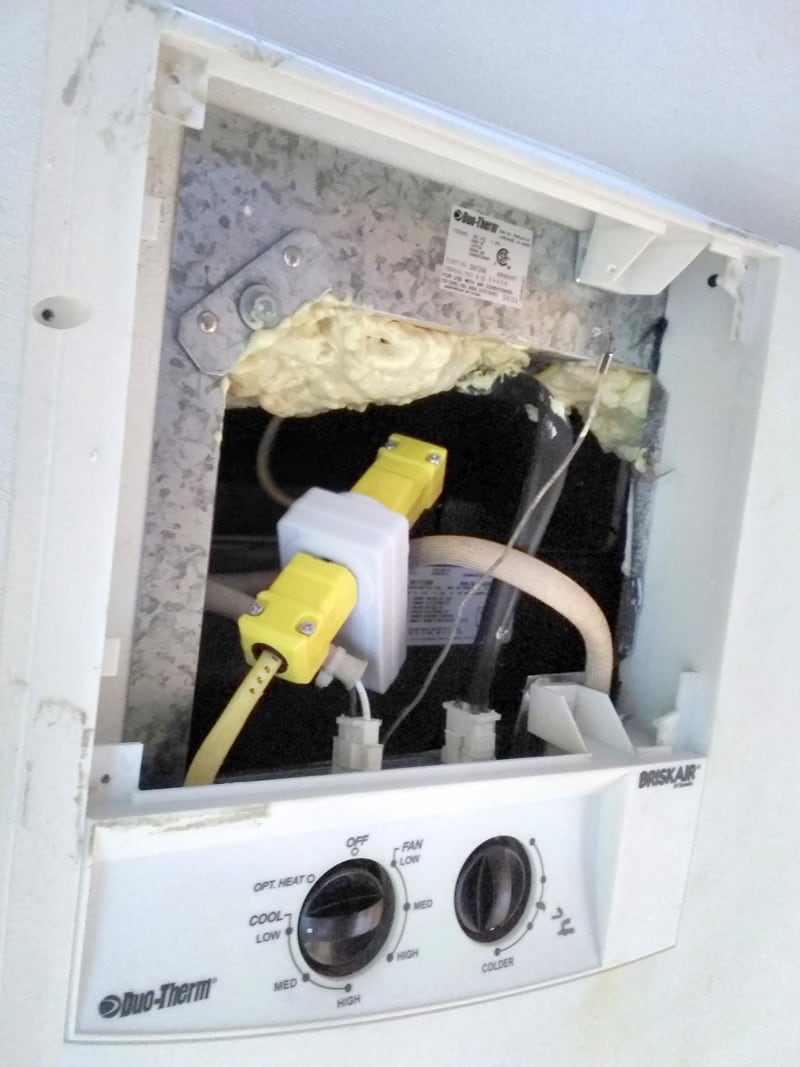
I had to cut the wire going to the air conditioner and put a male and female plug on the wires. Then I plugged the module into the plugs that I wired. Finally, I mounted the little digital control module on the inside wall.
The air conditioner now cycles on and off like a house air conditioner does. The controls are set to whatever fan speed you select. I set the air conditioner thermostat to max.
This mod worked all summer without any worries. If the unit fails, the module can be unplugged and plugged into the air conditioner’s power cords. Then you just have to use the controls on the air conditioner.
The little thermostat is also set up for heat. I have the heat strips in my air conditioner, so I’ll try this out this winter.
It took me two hours to complete this modification and cost me $40. In my opinion, the skill level of this modification is easy if you have a little wiring ability.
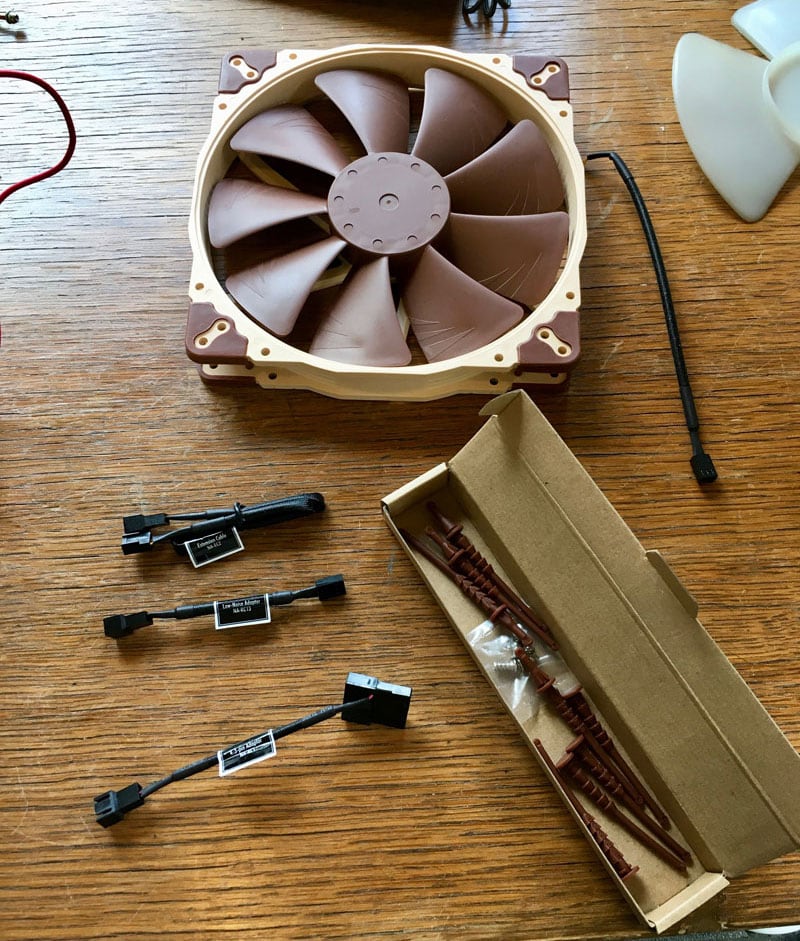
7. Kevin Mooney, Nimpo Lake, British Columbia
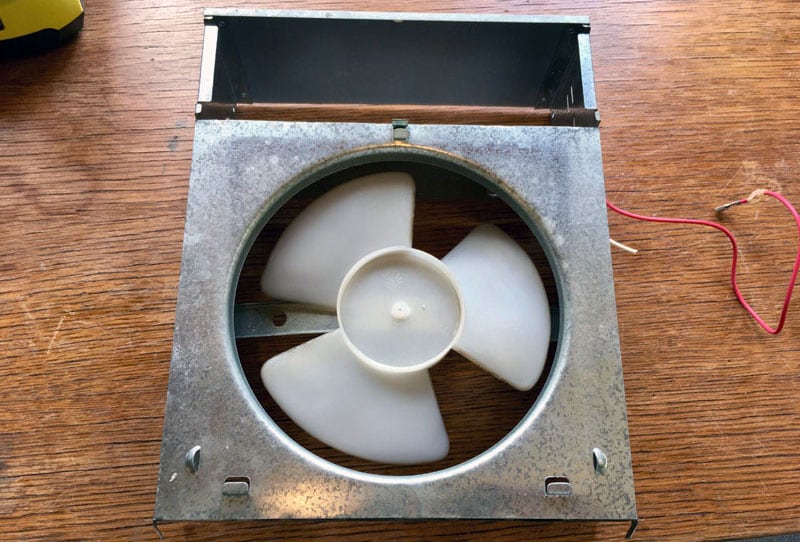
Range Hood Fan Replacement
2014 Ford F350
Okanagan 106UDB
The sole reason for this replacement was because of how loud the stock hood fan was in the kitchen. It was horrible. My wife would never turn on the fan while cooking. I can’t blame her. I figured there had to be a better way.
I have used small 4-inch 12-volt computer fans for a couple of projects in the past. I was impressed with how much air they moved and how quiet they were.
I measured up the round opening under the hood where the stock fan was, and ordered up a 7-inch computer fan. I went with the Noctua brand as they have sealed bearings, which I figured would last longer being subjected to heat and steam.
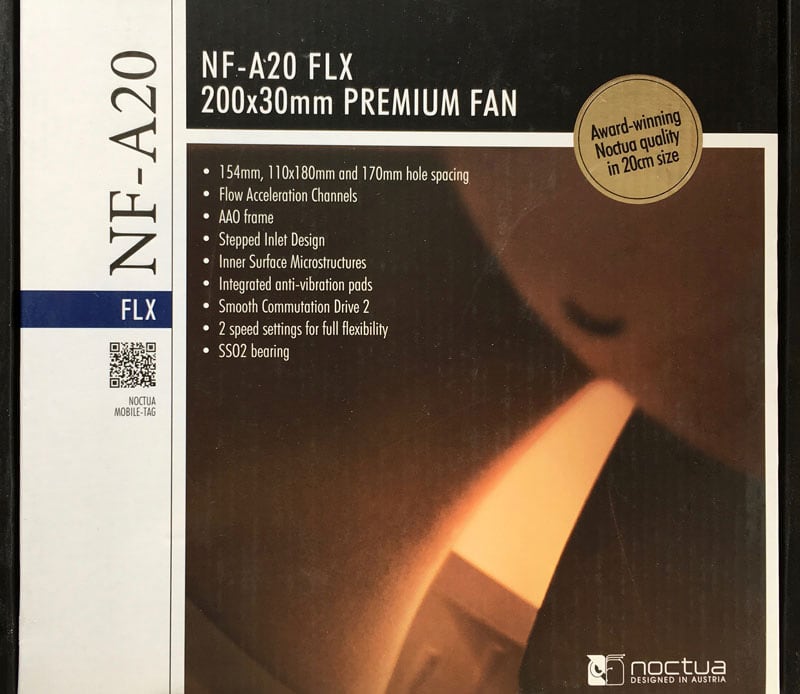
The Noctura fan moves roughly 90 CFMs (cubic feet per minute) of air, which I believe was similar to the stock fan. It is capable of two speeds, which really sold me, since I wanted something quiet. It runs on 12-volts only and uses very little power.
All the wiring and mounting is $30 on Amazon. If you want to go real cheap, you can find a sleeve bearing fan for about 15 bucks. They are pretty quiet as well.
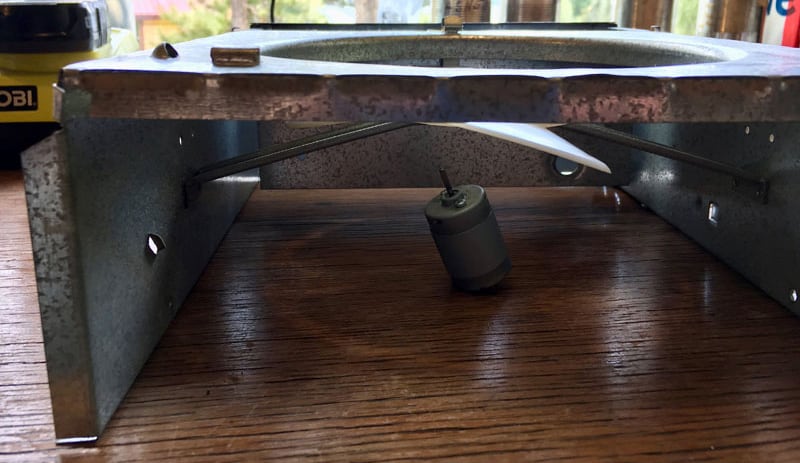
I originally took off the fan housing under the range hood but, upon re-installation, removed the whole hood and re-assembled it on my bench. That is way easier than trying to do it upside down over the range.
This fan comes with two wire harnesses; one for 800 RPM and the other for 550 RPM. I wired both to the same power source. All I had to do was unplug one and plug in the other. It turns out this is completely unnecessary as the fan is so quiet at 800 RPM that it is hard to tell if it’s even running. I’m guessing we could leave this on all night for a little extra air flow. It is way quieter than a Fantastic Fan.
Other than undoing a few screws, I had to drill out four small rivets from the original bracket, and drill some holes for the new fan. It is almost a perfect match up for the opening of the old fan, which makes it a pretty easy mod.
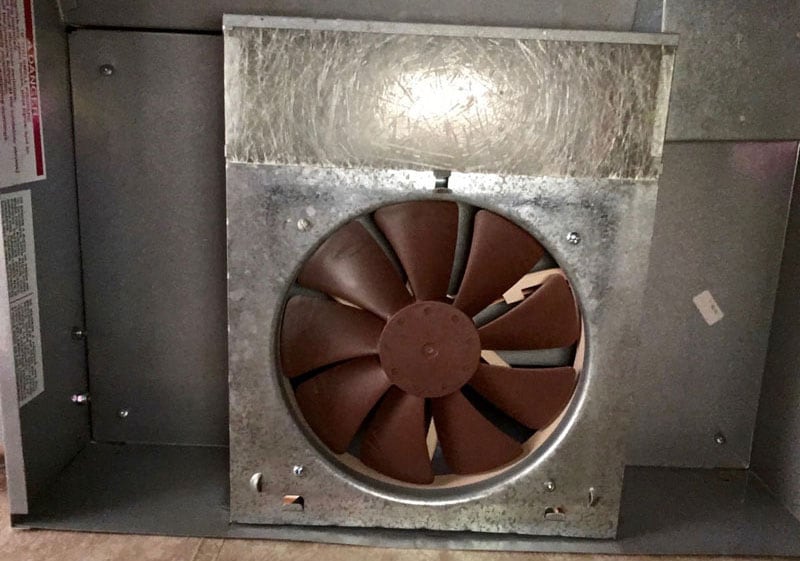
Remember that the air flows in the direction of the label on the fan. I learned this after I installed it. You can’t just switch the wires around because it won’t work. I tried that already.
The fan has been great so far. I’m curious to see how many years it lasts. For 30 dollars, it has already been worth it. I am almost temped to wire the fan into the light switch. At least then we might have a better chance of remembering to turn it off!
It took me 1.5 hours to complete this modification and cost me $30. In my opinion, the skill level of this modification is easy.
8. Dave Riddle, Burbank, Washington
Truck Bed Camper Pad
2015 Chevrolet, 3500 HD
2017 Host Mammoth
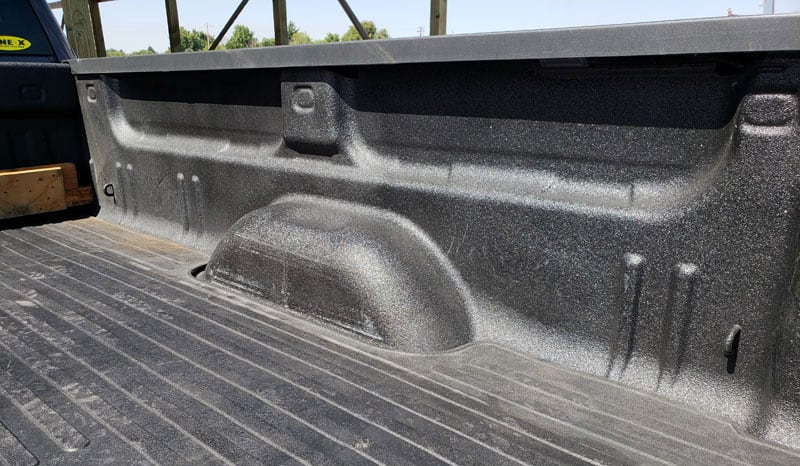
I have always used a fairly thick pad underneath my different campers to cushion the camper from some of the road vibrations. It also ensures that the camper doesn’t slide on the metal surface of the truck bed.
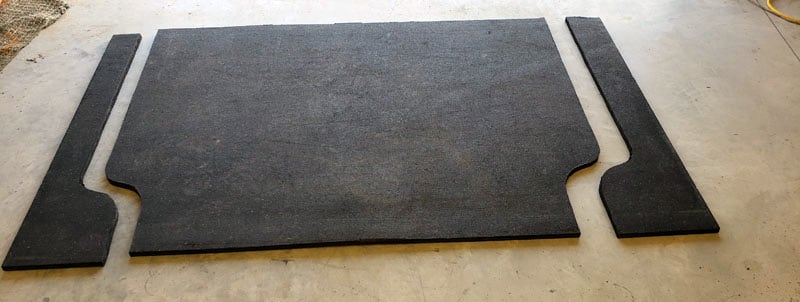
Previously I’ve always used horse trailer mats for this, but have never taken the time to make the mats fit around the wheel wells. I recently had a mat that was damaged from being underneath the camper and decided it was time to upgrade the fit of my mat and make the fit more like a typical rubber bed mat.
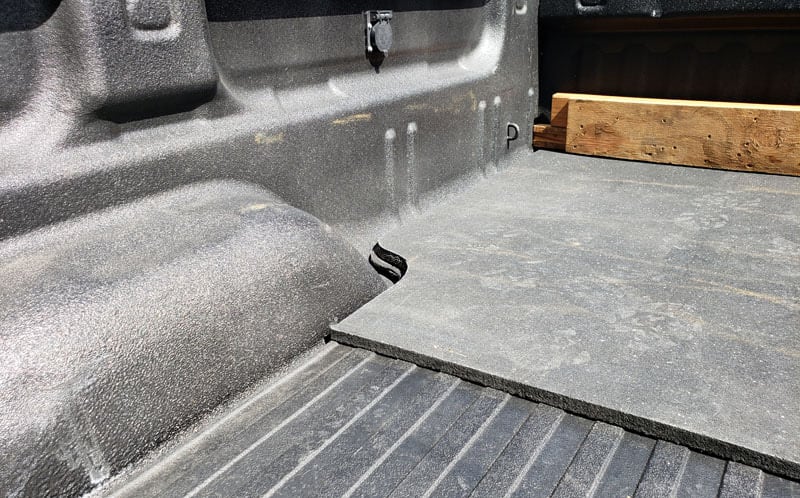
To do this I used one 4-foot by 6-foot mat that I already had (putting the damaged edge towards the front where it wouldn’t take any pressure from the camper) and then purchased a second mat to go with the existing one. I purchased the mats from a local farm and ranch supply business. They cost about $40 each.
I laid them both out on the shop floor. Then I placed my thin full-size truck bed mat over the top as a template. Using a blue felt marker, I made a line around the edge of the template and onto the underlying horse trailer mats. Once marked, the template was removed and I was ready to cut the mats to the same shape as the thinner bed liner.
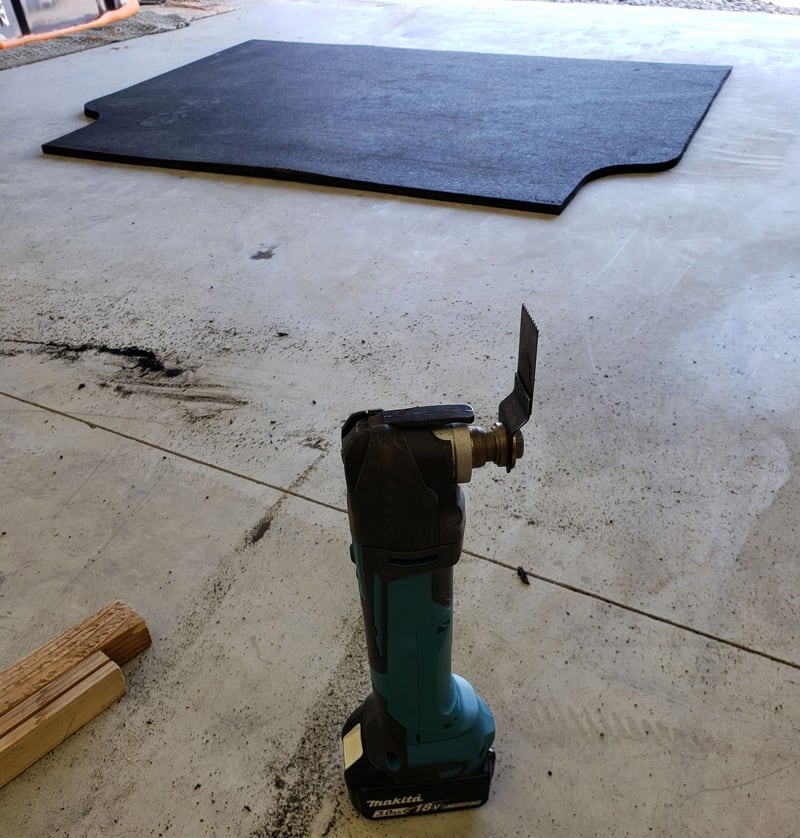
The horse trailer bed mats are 3/4-inch thick and made from recycled rubber. This material makes them very tough and, consequently, very challenging to cut. I’ve tried other cutting tools in the past like circular saws, jig saws, and utility knives. None have worked really well for cutting this material.
For this project, I used a cordless oscillating multi-tool. This tool has proven the best tool so far for cutting this tough material. The cuts were made and each piece was put in the truck bed ready for use.
We recently completed a 1,500-mile trip to the Grand Tetons and the newly designed truck mats worked great! They didn’t slip around at all, and the camper was solidly seated on a thick mat that provided full support to the entire bottom of the camper.
When we returned home, I took the camper off and there was no sign of adverse wear or any other unusual wear and tear. I use a light-duty ratchet strap from the front of the bed, diagonally across the truck bed and over the bumper to keep the mats in place when I’m not carrying the camper or when the tailgate is removed.
It took me two to three hours to complete this modification and cost me $80. In my opinion, the skill level of this modification is medium.
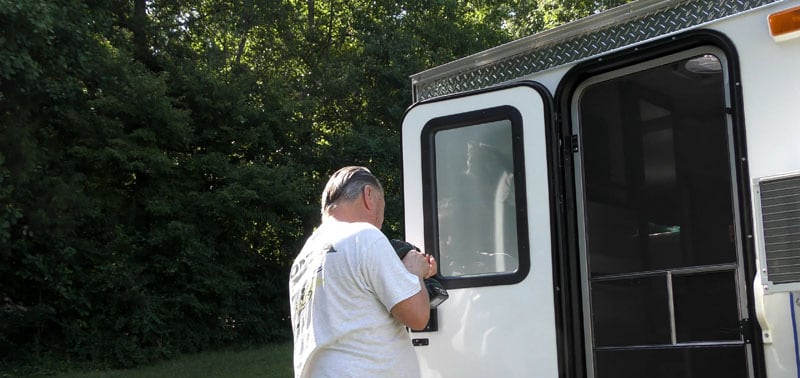
9. Neil and Yoly Mullen, Dawsonville, Georgia
Rear Door Glass Replacement
2016 Ram 2500HD
2018 Eureka Truck Camper
The window glass on the entry door was the opaque frosted type glass that keeps anyone from looking inside the camper.
The only purpose of this window is to allow light in the camper. In doing so it also lets in a great deal of heat in high summertime temperatures and direct sun angles. It also prevents any view of the outside surroundings and scenery. I really didn’t like the idea of someone knocking on the door at night and not being able to see who or what was knocking without opening the door.
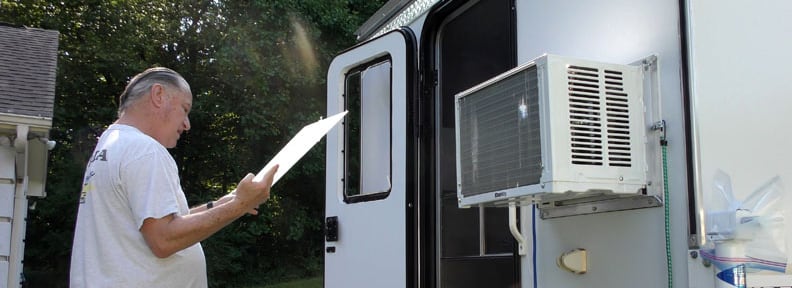
I had a piece of 1/8-inch tempered glass cut to size for about $25. I then had it filmed with a 22-percent film which blocks about 78-percent of the light for another $25. It was then a simple replacement of the glass.
I removed the inner frame after taping the outer frame in place so that it didn’t fall out after removing the screws from the inner frame. Doing it this way allows you to retain the seal on the outer frame which removes one installation step otherwise.
The new tinted window works awesome. I couldn’t be happier. The tint blocks a significant amount of heat from the outside. In daylight, you can’t see inside the camper no matter how many interior lights are on and no matter how close you stand at the window and look inside. All you see is your reflection.
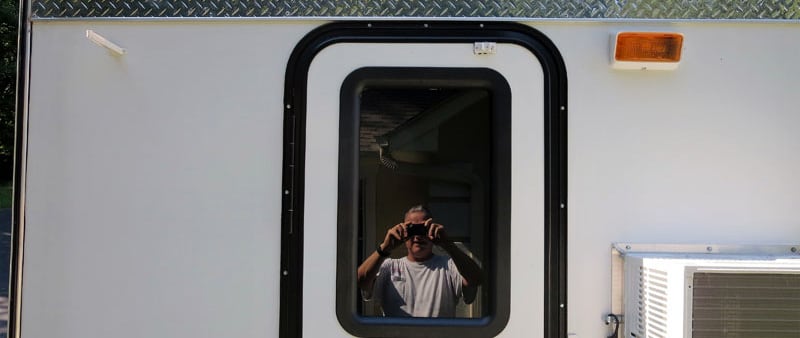
However, at night with interior lights on, you can see inside the camper. You can’t see much because of the upward viewing angle, but you can see inside.
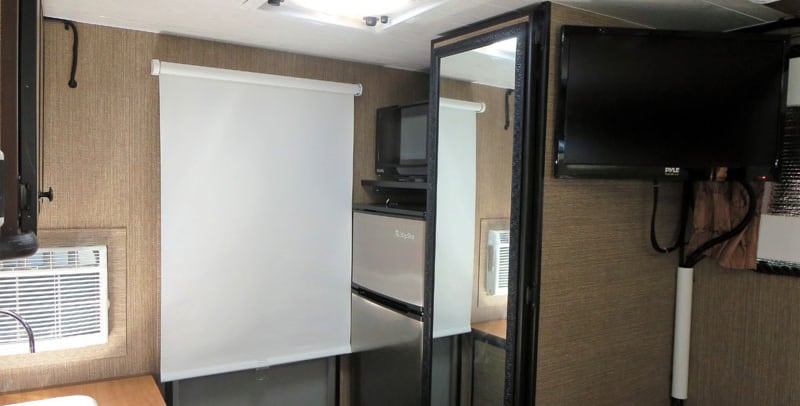
Consequently, I added an inexpensive ($24) Ikea roller blind that completely covers the entire top half of the door. It’s also a blackout material that keeps light out completely when sleeping in lit areas.
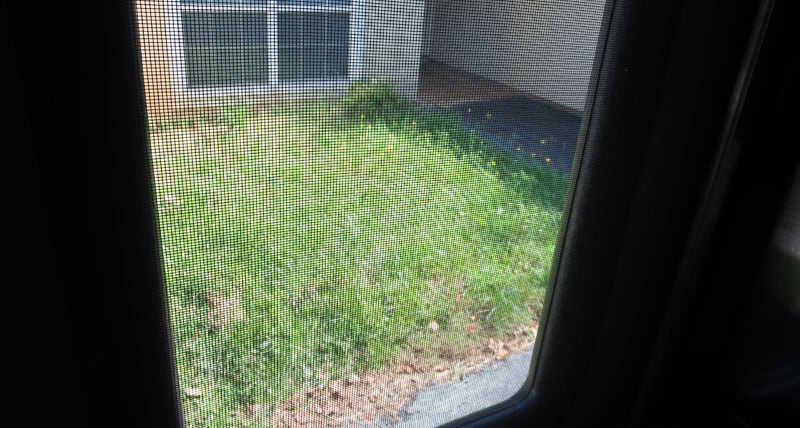
The view from the inside is as good as I had hoped for. The photos show the screen material much more than the human eyes sees it. Our eyes seem to focus beyond the material and I see the scenery much more now.
It took me a half-hour to complete this modification and cost me $74. In my opinion, the skill level of this modification is easy.
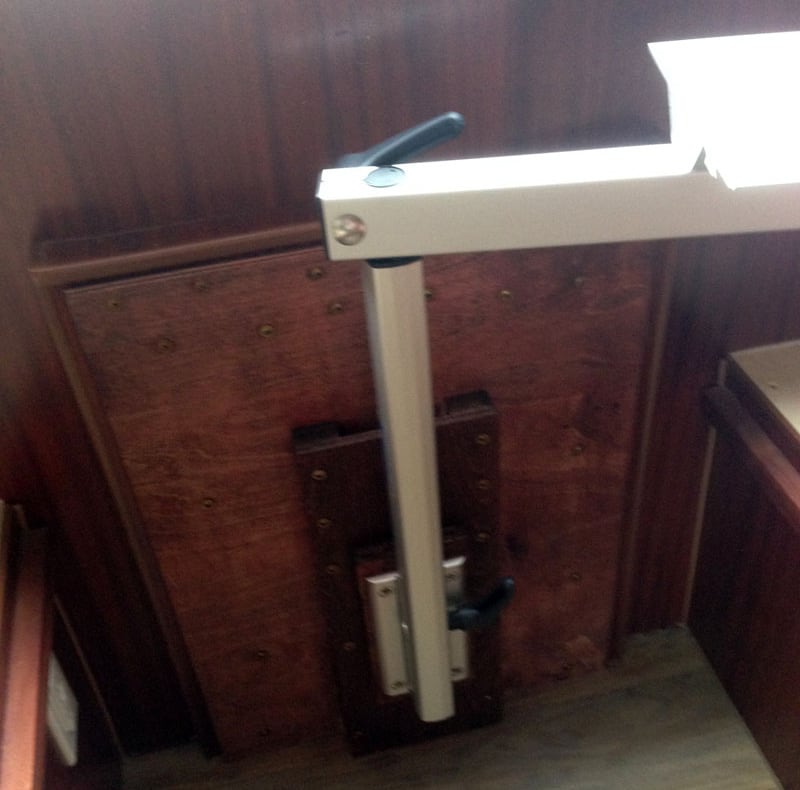
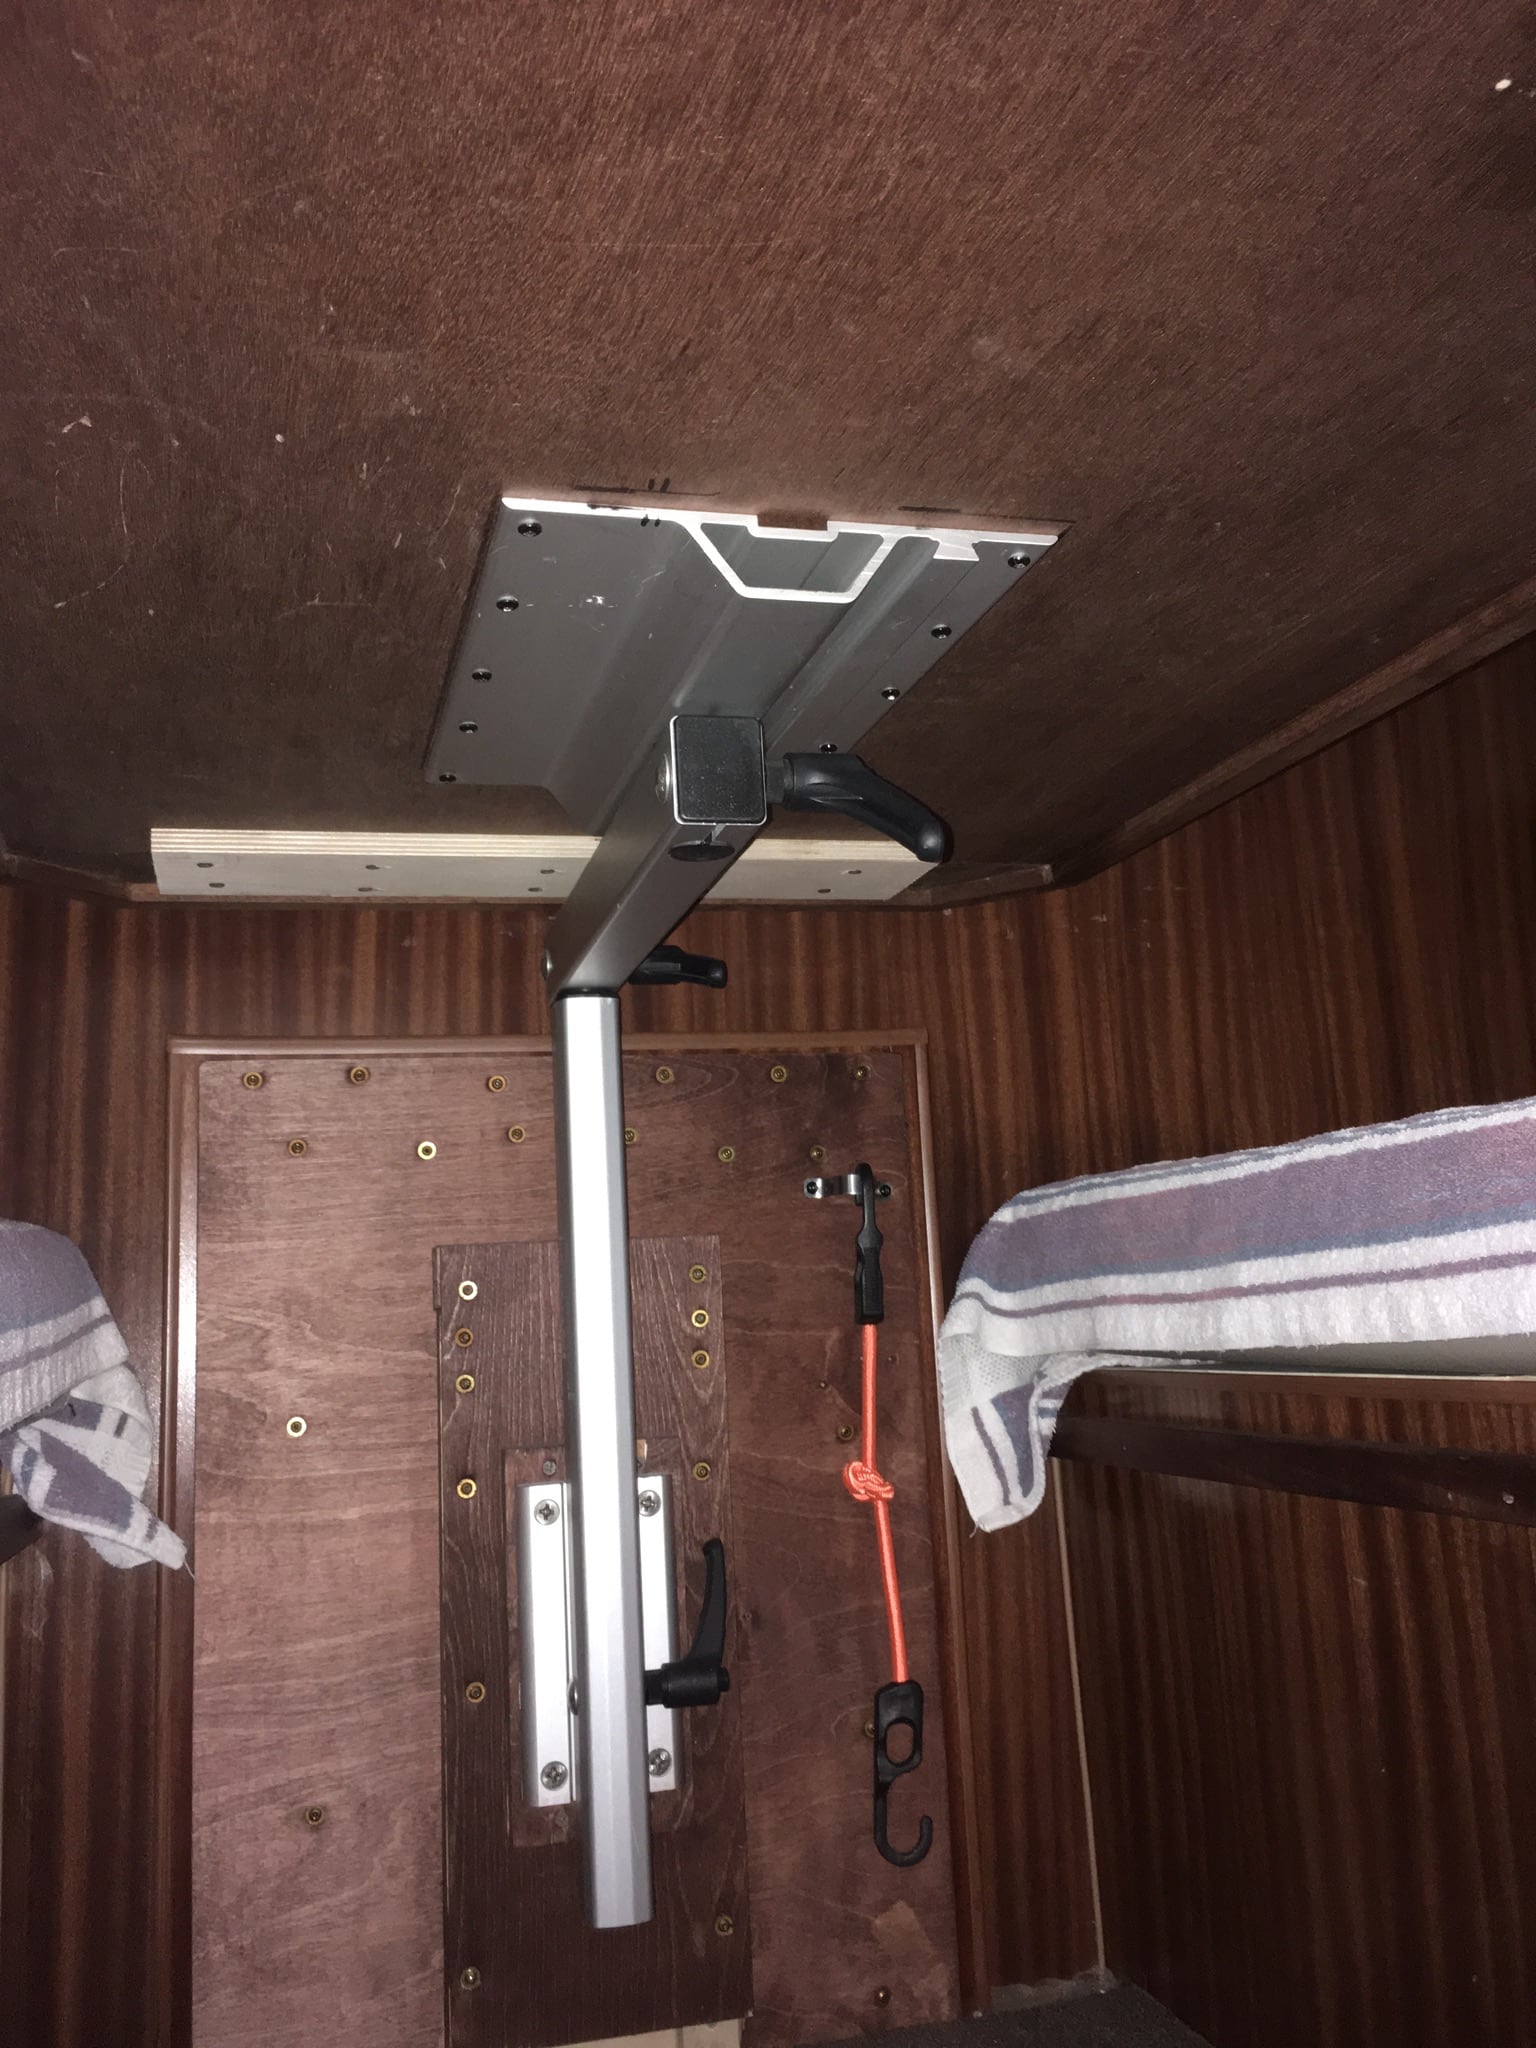
10. Gary Goyette, Chicopee, Massachusetts
Table Mounting Improvement
2016 GMC 3500HD
2011 Northern Lite 8-11
We love our Northern Lite camper, but the stock table mounting system was a definite pain in the knee. I also did not like how much the table protruded into the aisle.
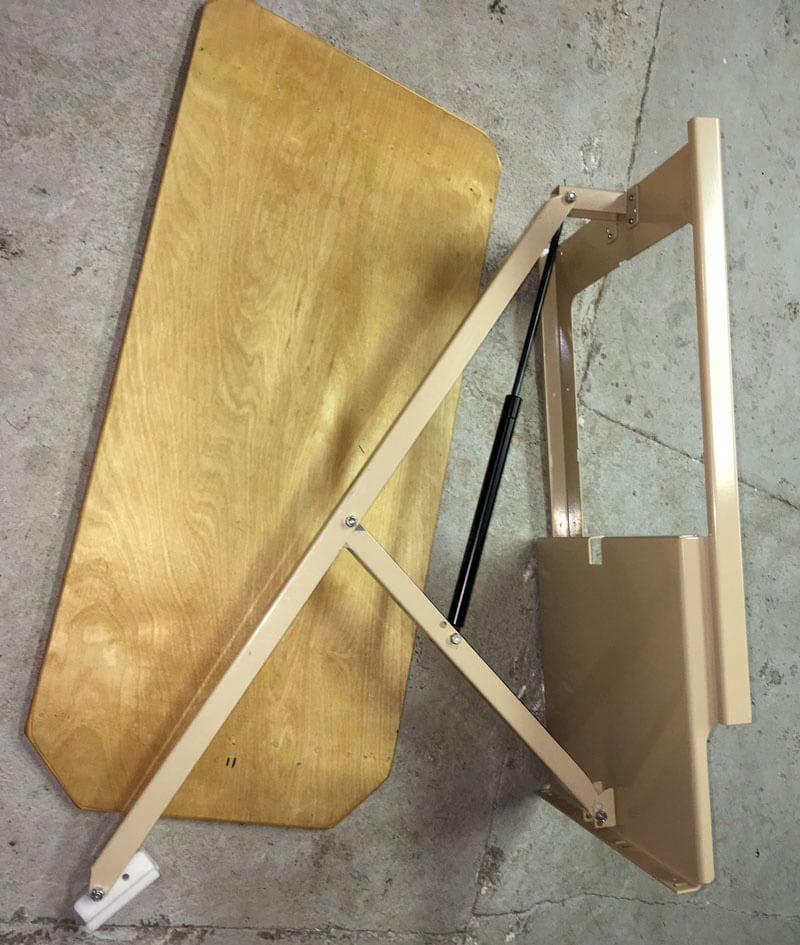
I removed the 21-pound existing mounting system and replaced it with a Lagun adjustable RV mounting system.
Not knowing what was behind our exterior wall, I added a layer of half-inch plywood and an extended area to space out the table.
That added some clearance for mounting nuts.
To shorten the table length I sectioned 3-inches out of the top and glued it back together with a wood cleat on the bottom.
The mods on the table work great and it still easily converts to bed. The weight of the new system is only 10-pounds. As an added bonus, the table can be swiveled 360-degrees. Now there is no more knee banging.

It took me five hours including my design hours to complete this modification. It cost me $180. In my opinion, the skill level of this modification is medium.
Disclaimer: The modifications above are submitted by Truck Camper Magazine readers. It is your responsibility to make sure that any do-it-yourself modification project you undertake is safe, effective, and legal for your situation.
Enter Your Mods Now!
If you’d like to enter a modification you’ve done on your truck camper, click here. You can enter as many mods as you want, at any time. Good luck mod makers!


