Truck Camper Magazine presents a step-by-step process to inspecting a used truck camper including exactly what to look for, and look out for. Step 1: Put the Jacks Down and Unload.
Truck campers are very complex products with a myriad of materials, components, systems, and structural details that should be carefully examined prior to making a purchase. The condition and integrity of these elements can mean the difference between purchasing the used camper you hoped for, or ending up with a horror story.
What follows are our recommended steps to inspecting a used truck camper. This is the second article in a two part series on buying a used truck camper. If you haven’t read the first article, 6 Tips For Buying A Used Camper, please start there.
IMPORTANT: We strongly advise having a professional and certified RV service technician perform any tests involving 110-volt shore power, 12-volt battery power, and propane gas. Do not proceed with any tests without proper safety precautions.
Step 1: Put the Jacks Down and Unload
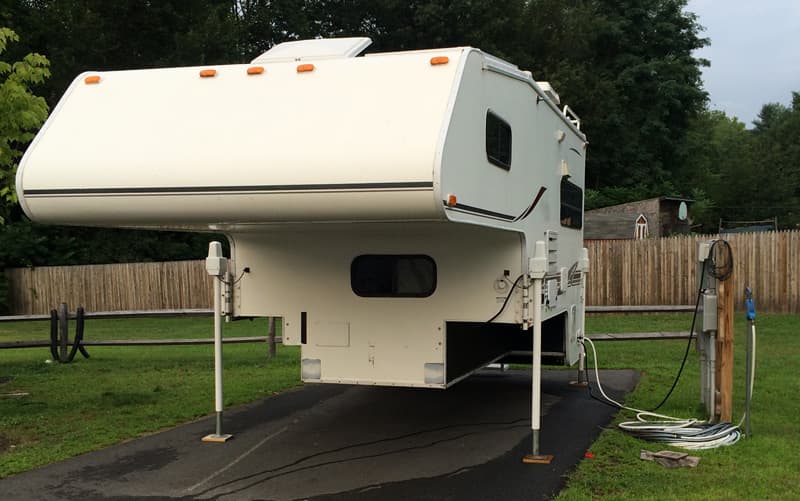
Above: Demounting the camper from the truck is important for inspecting the underbody
Before beginning your in-person inspection, we recommend that the truck camper be unloaded from the truck. You want to see the full exterior of the unit including the lower section and underbody that would otherwise be hidden from view in a truck bed.
You also want to observe the camper on its corner jacks to make sure it’s stable. Any signs that the camper cannot hold itself on four corner jacks is a warning of significant and potentially dangerous structural damage. If it can’t stand or isn’t stable, walk away from the table.
Step 2: Start With The Smell Test
Believe it or not, your sense of smell is essential for your used camper inspection. Have your nostrils prepped and ready the moment you open the entry door.
Before entering the camper, make note of how the camper is presented to you. If the entry door, windows, or vents are wide open, it’s possible a mold, smoke, pet urine, sewer or other tell tale odor is being hidden. Before making your final decision, close up the camper completely for at least a half-hour (preferably more) and return to sniff out the truth.
The first thing to smell for is propane. While it’s highly unlikely that you will smell propane in a used camper, it’s possible if a unit has been closed up with open propane tanks.
If you smell propane (in any camper), do not enter the unit and leave the rear door wide open. The propane and propane smell should dissipate quickly. If a propane leak is suspected, a certified RV technician should be immediately brought in for a propane safety inspection.
It’s far more likely that you’ll encounter a stale and/or sewer smell in a used camper that’s been closed up. In fact, a stale and/or sewer smell is normal for any camper that’s been used and then closed up for an extended period (like over the winter). With ventilation, these smells should subside quickly, but they’re not something to ignore.
If the sewer smell persists despite ventilation, there could be a sewer system leak. If a sewer smell quickly returns after a unit is closed for a half-hour, that too could be a sign that there’s a sewer system leak.
Note that a sewer smell could simply mean the black and grey tanks need to be emptied, flushed, and cleaned. Or it could mean there’s a sewer system leak. If the black tank is not empty, have the camper owner or dealer empty, flush, and clean the tank before proceeding.
If you open the entry door and are hit with a strong musty smell, stop there. Chances are a camper with an intense musty smell has a significant number of broken seal leaks, water intrusion, and possibly wood rot. Unless you’re looking for a major rebuild, or are looking for a mobile mold farm, stay far away from used campers that smell extremely musty.
The Inside Job: An Open and Shut Case
If a camper passes the smell test, the next step is to visually inspect the interior. First, check the ceiling for water stains, deformed material, or any other possible signs of water damage. We recommend a high quality flashlight for this step.
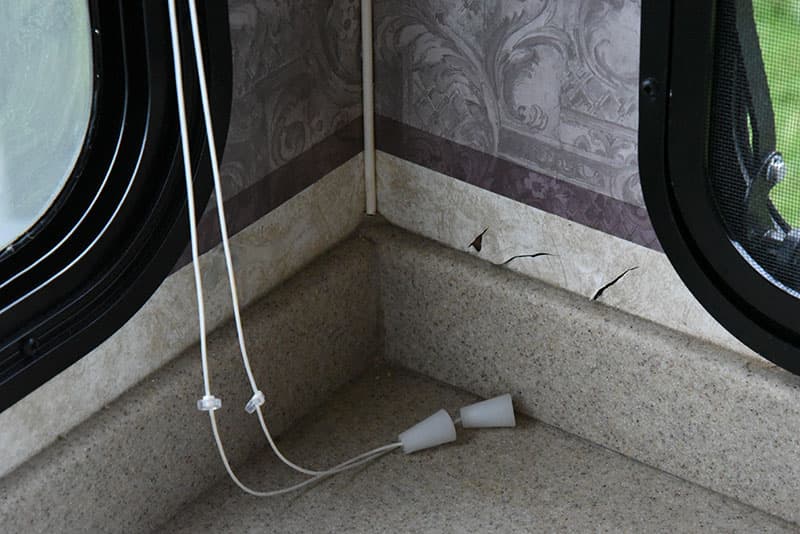
Above: Rippled and/or ripped wallpaper could be a sign of water damage
Next, open every cabinet throughout the camper and inspect the floor, walls, and ceiling inside that compartment. Again, what you’re primarily looking for are any signs of water damage. If you open a compartment and it smells musty, that’s a possible sign of water damage.
Once the cabinet spaces have been checked, remove and inspect any cabinetry drawers. Once removed, look behind drawer openings with your flashlight. Again you’re looking for signs of water damage, but you should also see plumbing and electrical systems. Are there any loose wires, cracked plumbing lines, or other signs of plumbing or electrical damage?
As you’re walking inside the camper, also note how the inside camper floor feels under foot. Is it firm, or soft? Are there sections that feel warped, uneven, or otherwise move as you walk across the floor? That could be a possible sign of water damage. If you sense any floor issues in a used truck camper, tread carefully.
The Mold Monster Under the Bed
One hidden place condensation can creep up on a truck camper is under the cabover mattress. When it’s cold outside, warm bodies sleeping in the cabover can cause condensation under the bed. Left unchecked, this moisture can cause mold and even rot.

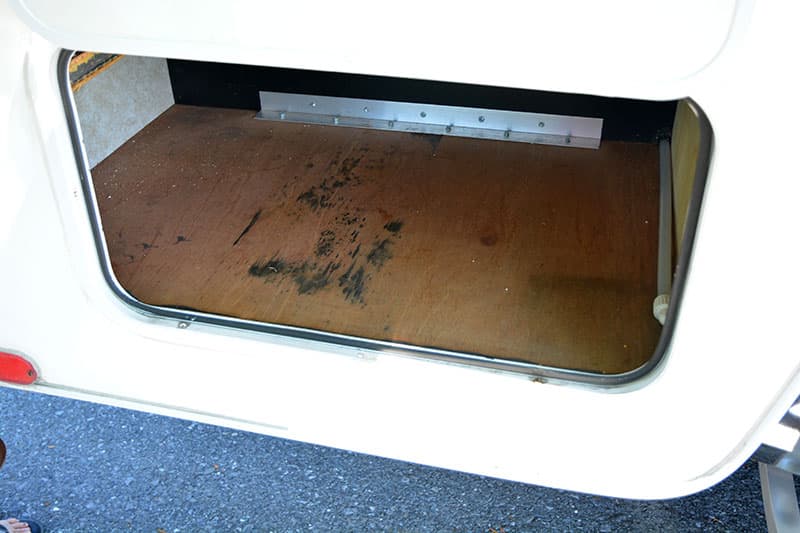
Above: Lift or remove the mattress and inspect the cabover floor
During your inspection, lift up the cabover mattress and look at the cabover floor. If there’s an issue, you’ll see signs of water damage including spots, discolorations, and/or rippled material. You may even feel moisture on the floor or underside of the mattress if the camper has been recently used.
If the damage is confined to minor spots or discoloration, the mold can be cleaned and the mattress can be replaced; no big deal. If the condensation has been going on for a long time, there may be more serious structural damage to the cabover floor. Always check under the bed.
Turn It On. Turn It On Again.
NOTE: The following appliance and systems tests are intended only as a basic overview. Each of these appliances and systems has additional complexities that only a trained RV technician can fully evaluate.
It’s time to turn everything on and make sure it all works properly. We recommend doing the turn-on test twice; first with 110-volt AC shore power, and once with 12-volt DC battery power.
Note that some 110-volt only appliances (including air conditioners and microwaves) will not work without shore power. These appliances only operate when plugged-in, or with a generator.
Start the turn-on tests with the camper not plugged into 110-volt shore power. First, check that there are batteries installed and wired in the battery compartment. The camper will require installed batteries for this test to work.
With the camper running on 12-volt battery power only, turn on all interior lights and ceiling fan(s). If the lights and fans work, turn them off.
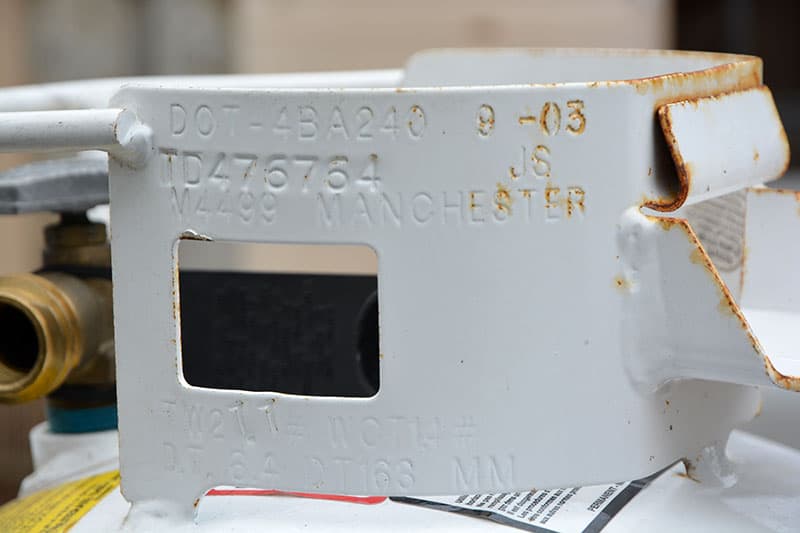
Above: Propane tanks last twelve years from their first certification. The cylinder above is marked 11-03 (November, 2003) and is over 12 years old, which means it is now expired. Read about re-certifying your tanks in Propane System Maintenance.
Next, open the exterior propane compartment and turn on one propane cylinder. The owner or dealer should be able to confirm that the propane tank is full, or at least has enough propane to check the propane-fueled systems. If in doubt, have a tank properly filled with propane before proceeding.
With the propane tank open, light one burner on the cooktop. Once that burner is lit, light the other burners. Once all the burners are lit and working, turn them off and light the oven.
The next step is to turn on the propane furnace at the thermostat. You will hear the furnace fan blowing as the propane heater heats up. Wait a few minutes until you confirm heat is blowing from the vents before switching off the furnace at the thermostat.
Once the propane cooktop, oven, and furnace tests are completed, turn the refrigerator on to propane. You should hear the refrigerator click-click-click and start on propane. For your 110-volt AC turn on test, switch the refrigerator to AC and check that the refrigerator is running on AC power.
After you have completed the exterior inspections (described in the next section), return to the interior of the camper and check that the freezer and refrigerator are at least beginning to cool. Note that if it’s hot outside and/or the sun is hitting the back of the refrigerator, it can take a lot more time for the refrigerator and freezer to cool.
Before testing the water pump and plumbing system, check the tank monitors to verify that there’s water in the fresh water tank. If the holding tank monitor shows there is fresh water in the fresh water tank, continue with the tests. If not, put at least five to ten gallons of fresh water into the fresh water tank before proceeding. When in doubt, fill the fresh water tank.
With water in the fresh tank, turn on the water pump. You should hear the pump growl and vibrate as it pressurizes the RV plumbing system. Once the pressurization is complete, turn the faucet on in the kitchen sink. It may take a few seconds for any built-up air in the system to work itself out and have only running water. Perform the same test with the bathroom sink, toilet, inside shower, and outside shower.
The next step is to make sure water is being supplied to the water heater. Locate the water bypass and verify that it’s turned to allow water into the water heater.
If the camper has been winterized, the bypass will be turned on to prevent water from entering the hot water heater. In this situation, turn the bypass off. Then turn on the water pump to allow the water heater to fill with water.
The water pump should stop once the water heater is full. You can then turn on a hot water faucet in the bathroom or kitchen to verify that water is running through the water heater. This water will not be hot as it has not been heated.
Now it’s time to test the water heater. A few seconds after hitting the water heater switch, you should hear the water heater click on and begin heating. Do not leave the water heater on for more than a few seconds if you’re not 100-percent certain there is water in the water heater’s tank.
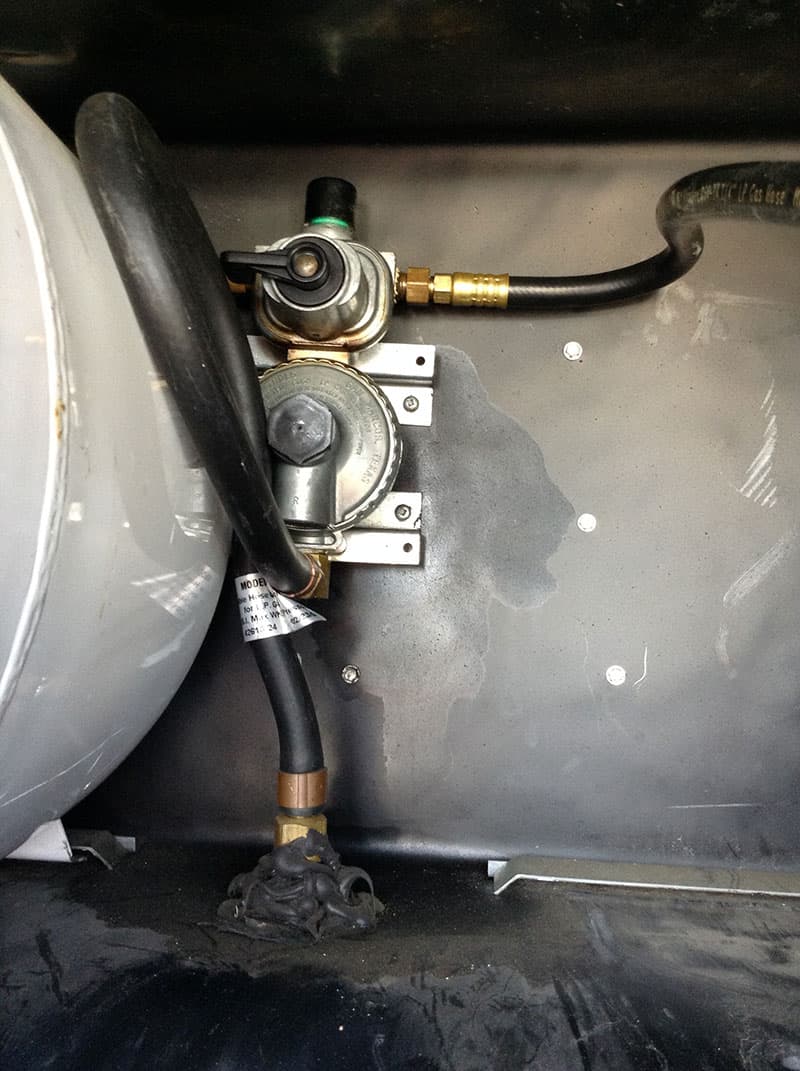
Above: The propane compartment is another area that should be inspected. The spots on the rear wall and floor are propane oil; a sign that the regulator should be replaced.
There are many other systems onboard a truck camper including the converter, fuse panel, detectors, battery disconnect, holding tank system, low water drains, and more.
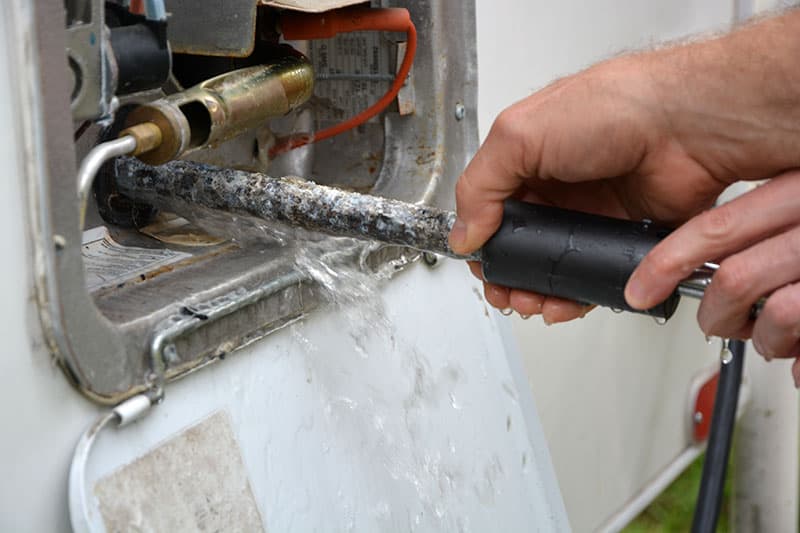
Above: Suburban water heaters have anode rods. Before using the camper you should inspect the anode rod condition and replace it if needed.
We can’t recommend strongly enough having an RV tech help you with a pre-purchase inspection. They may not cover every possible facet, but they will make sure the basics are covered.
Get Out and Push
If the inside of the unit passes the smell, stain, and turn-on tests, it’s time to get out and inspect the exterior. Here we continue the search for potential water damage by really getting pushy.
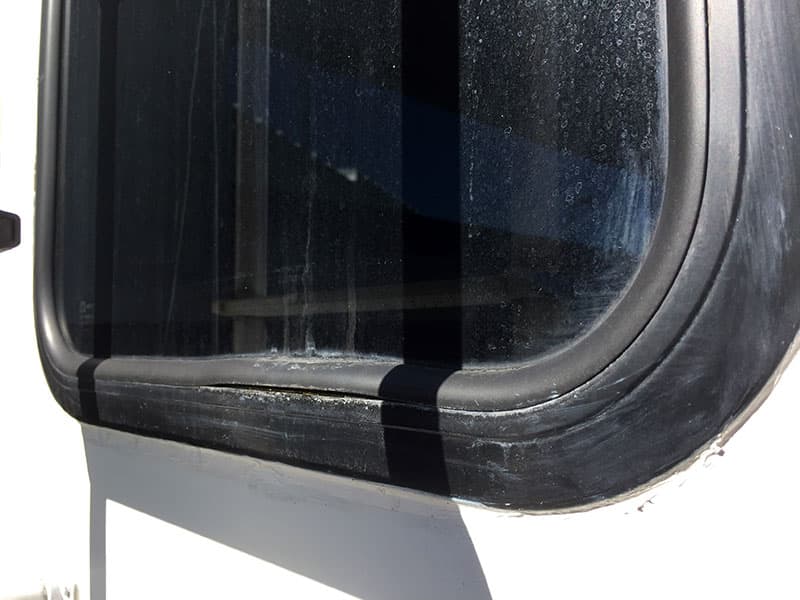
Above: Take careful note of anything of concern, like this split window seal
As you walk around the unit, place a flat hand on the exterior walls and push. The exterior walls should feel uniformly firm. Push on the front nose area, front wall, lower mid section, rear wing walls, and rear walls. Basically, push on all of the exterior walls and surfaces. You may need a ladder to reach some of the higher areas of the unit. Be careful.
If a wall area feels soft, that’s a sign that there’s possible water damage in the wall. By pushing on the wall in different areas, you may be able to discover where the possible water damage starts and ends. Sometimes the push test can lead you right to the leak source. For example; broken seals around front or rear marker lights.
If you find a lot of soft wall spots, walk away from the camper. Fixing water damage is a major job that requires tearing out and replacing the water damaged siding, framing, and insulation. Unless you’re looking for a rebuild project, this is not the used camper for you. Look for a used truck camper with firm exterior walls.
Look Out For Delamination
The majority of modern RVs feature laminated exterior sidewalls. Lamination is a process of using adhesives and pressure to fuse the frame, insulation, inside wall, and exterior filon into a single unit. Done right, lamination can work extremely well and offers significant benefits in structural strength.
Unfortunately, lamination can also fail. Most lamination failures are caused by water intrusion from non-maintained roof or side seals. We have also seen laminations lose adhesion after a decade of camping and exposure to the elements.
And that’s not the really bad news. Once de-lamination takes hold, it’s not an easy fix. In rare situations you can squirt adhesive into the wall and apply pressure, but that’s really the exception.
Our Cautionary De-Lamination Story
Our project camper had de-lamination when we bought the unit. We knew about the de-lamination prior to the purchase and accepted the challenge. We thought that we would learn about how to fix de-lamination from the industry experts and document this knowledge in the magazine.
Above: The delamination on our project camper’s side wall – see the rippling?
Well, things haven’t worked out like that. After several years of talking to the truck camper manufacturers, dealers, and other RV repair professionals from coast-to-coast, we have confirmed one thing; there is no simple or reliable solution to de-lamination.
If we ever discover a proven solution that makes sense and is remotely cost effective, we’ll do it and report our experience. Until then, de-lamination remains unsolvable. You’ve been warned.
The best answer to de-lamination is to fix its likely cause; a leak from broken seal. We sealed our camper as tight as possible, and learned to ignore the de-lamination. Believe it or not, this is exactly the course of action our most trusted industry advisors gave us. Seal the unit, and live with the de-lam.
Roof Seals, Material, and Vents
Do not purchase a used truck camper without getting on the roof to inspect the condition of the roof material, seals, vents, and (if installed) air conditioner. Too many folks either forget about the roof, or don’t want to make the climb. Given the critical importance of the camper’s roof, this is a big mistake.
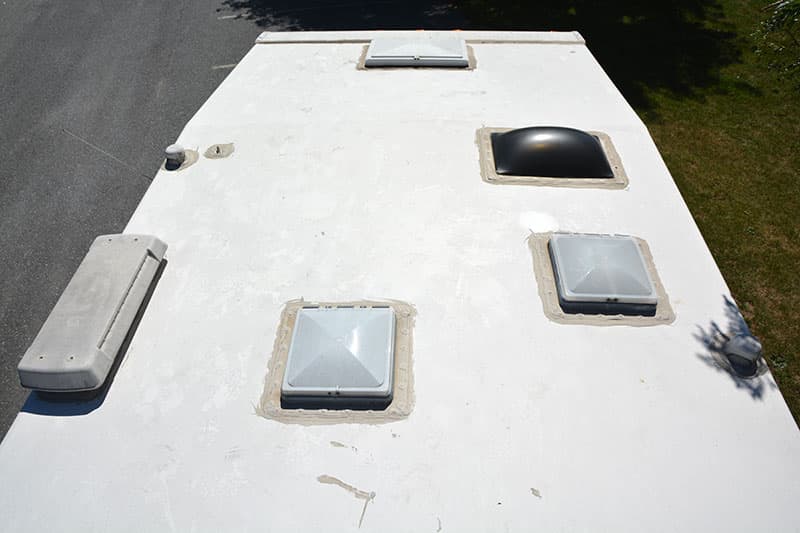
Above: The roof of our project camper when we bought it. There were almost no signs of seal maintenance, and the seals were in immediate need of replacement.
Of course we don’t want you climbing on the roof if you feel unsafe. If you’re unsure about ladders and/or heights, have a friend or the owner/dealer selling the unit take photographs of the roof. Even better, take the unit to another dealer for a pre-purchase inspection.
The very first thing to note when you’re on the roof is how it feels under foot. A heathy truck camper roof should be solid with little flexing. If the roof feels overly squishy and soft, it might have a leak and wood rot. You will feel this by simply walking around on the roof.
There should be no punctures or tears in the roof material. The roof material should also be white, not black with mold or dirt. If the roof is black or dirty, ask to have it cleaned so you can better see any potential trouble spots. You could easily miss a small puncture or tear if the roof is dirty.
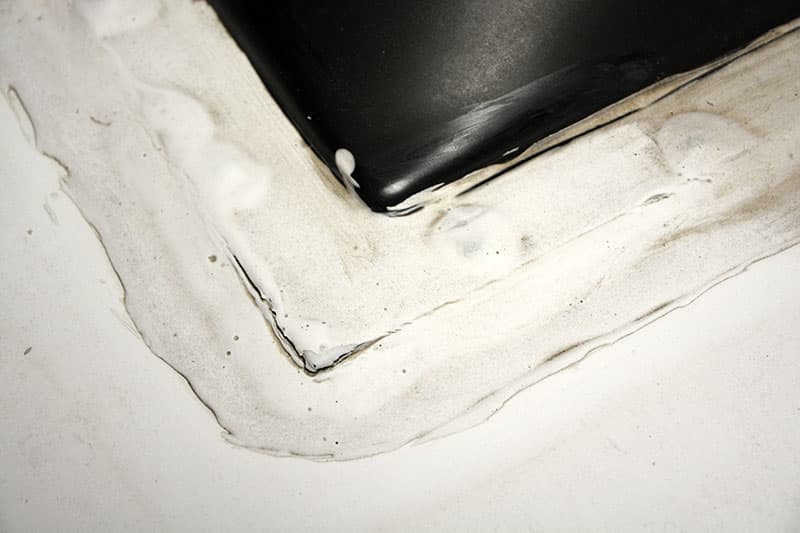
Above: See the crack in the corner of this skylight? That’s a leak!
The seals should also be free of punctures or tears. The sealant on the roof should be a little soft and squishy, not hard and dry. You should be able to firmly push into the seal and have it return to form. If roof seals are hard and dry, they will crack and create leaks.
Vent and fan covers should also be free of punctures and cracks. It’s not unusual for plastic vent and fan covers to develop cracks over time, and leak. We have replaced several in our camper due to cracks from old age.
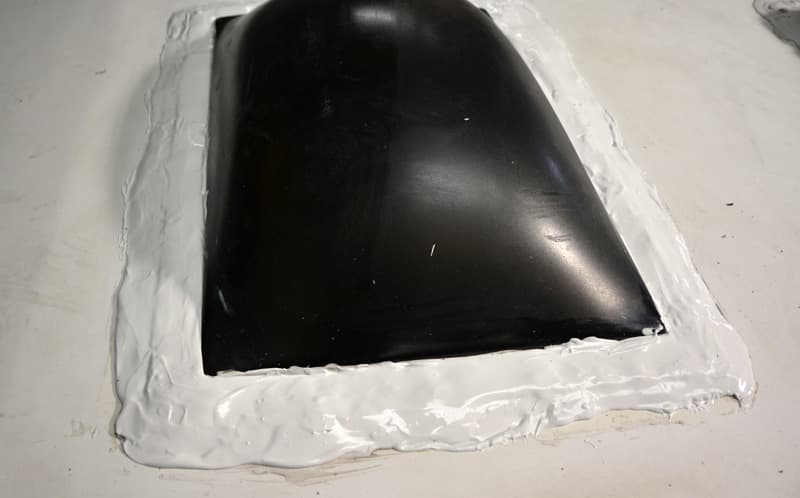
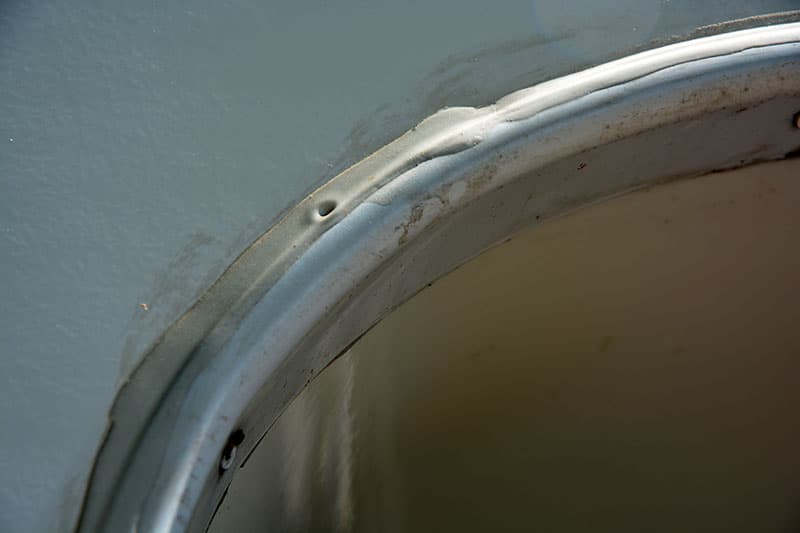
Above: After we saw the cracked seal (above) we removed the old caulking and applied new self leveling roof sealant. This an example of what maintained roof seals should look like.
The best thing you can find on a camper’s roof are signs of routine maintenance. The roof should appear white, not dirty. You want to see places where roof sealant or EternaBond has been added. You might even find a vent cover that appears newer than the others. If you don’t see any signs of roof maintenance, that’s a warning that the roof might not have been maintained.
Obviously you want to see more signs of seal maintenance the older the camper is. If a camper is less than two years old, you may only find a retouched seal or two. If a camper is more than five years old, you want to find clear signs of roof maintenance in multiple areas. Any camper past ten years should have signs of seal work stem to stern. This is the nature of good roof maintenance.
As owners of a 14 year old truck camper, I get on the roof at least once a week for a quick visual inspection. About twice a year, I catch a broken roof seal or vent cover that needs immediate replacement. We carry roof sealant and EternaBond with us at all times for exactly this reason. Every time it rains I am thankful that we take good care of our roof’s seals.
Exterior Inspection: Exterior Front, Sides, and Rear Seals
Anywhere there are exterior seams or features, there are seals that need to be routinely checked and maintained.
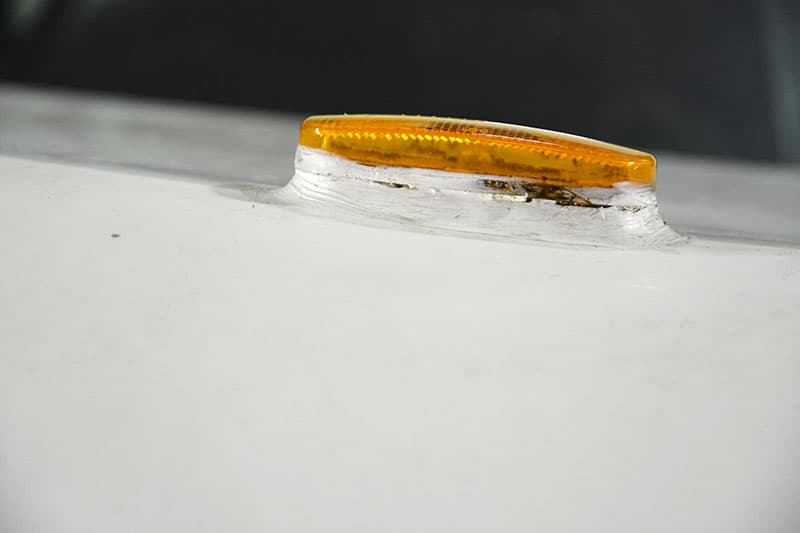
Above: Marker lights are an area where people forget to check. See the cracked seal where the lens meets the base? That’s a leak!
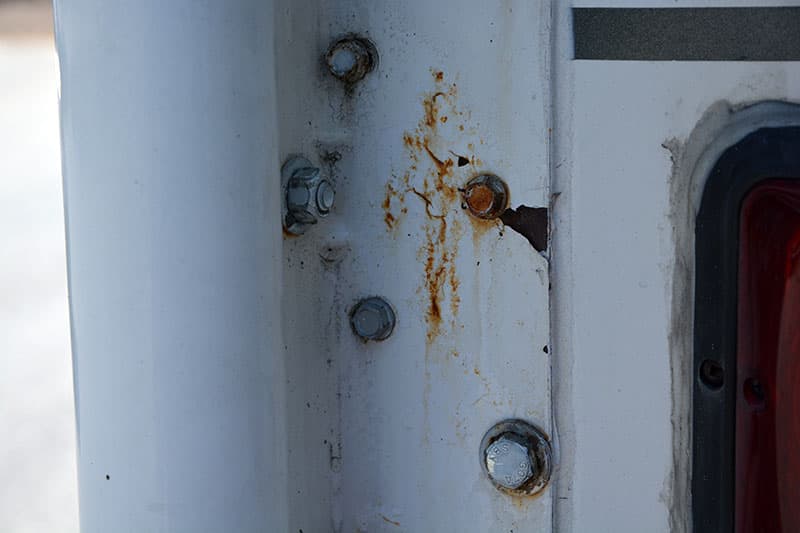
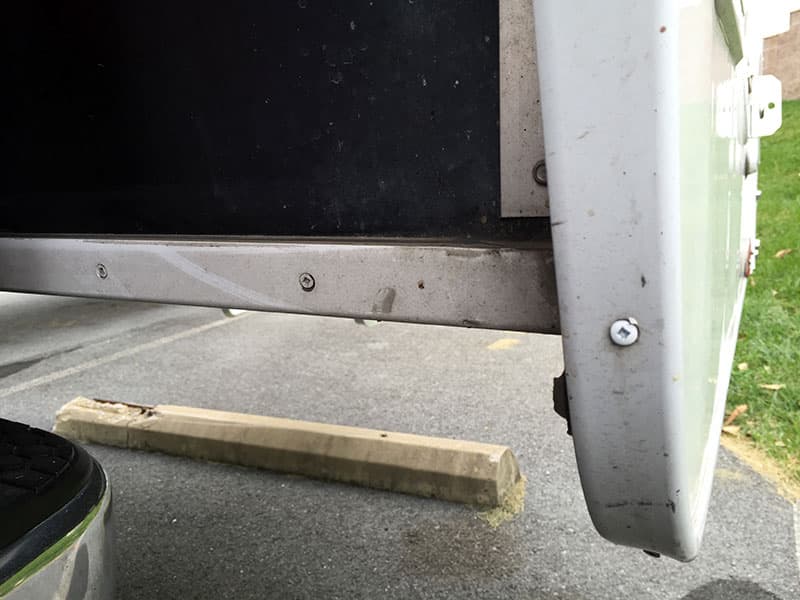
Above: Jack bracket powder coating and screws are an area to inspect. The brackets were cracked and rusting when we took possession of our project camper
This includes the seams around exterior windows, compartment doors, vents, side lights, marker lights, jack brackets, and beyond.
Where any two things meet on the outside of a camper, there’s a seal that needs to be checked and maintained. In the picture above, there’s a hole in the seal. Depending on how deep that hole is, it’s a possible leak.
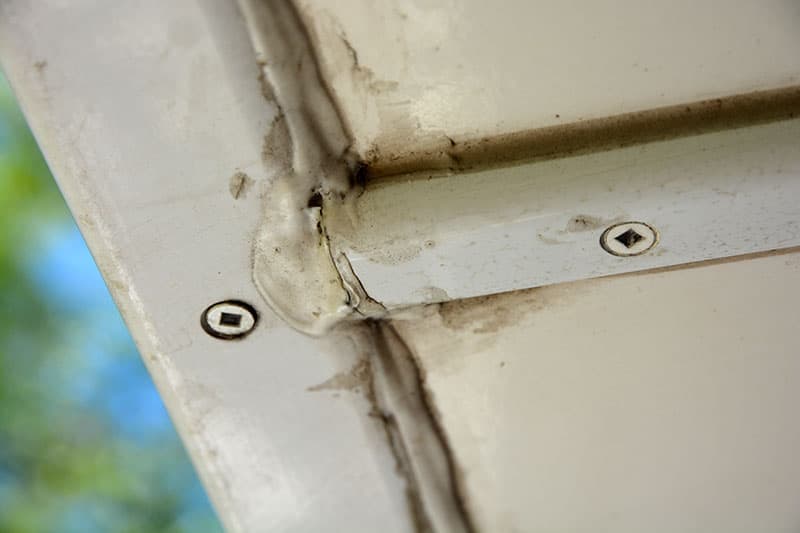
Above: This front wall seal under the cabover is cracked, brittle, thin, and in desperate need of removal and replacement. Old seals like this are likely leak points.
A good exterior seal will be clean, continuous and tight to the camper. The sealant should be just a little soft and pliable, not dry and hard. If a seal is pulling away from the camper, is cracked, or has sections missing, it needs to be immediately removed and replaced. Put this off and you will develop leaks.
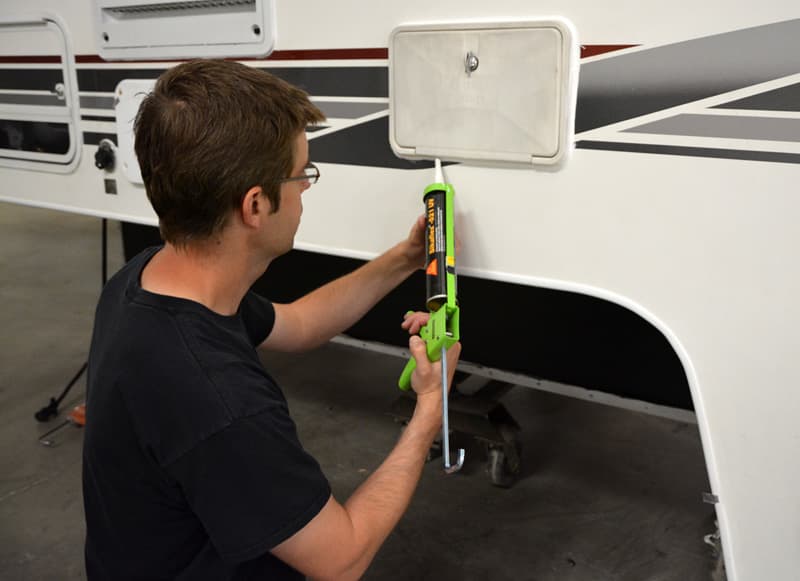
Again, you should find signs of seal maintenance. There will be places where the sealant has obviously been removed and reapplied. The new sealant might be a different color from less sun exposure. It might also not be as pretty in its application as it was done by the owner, not the factory.
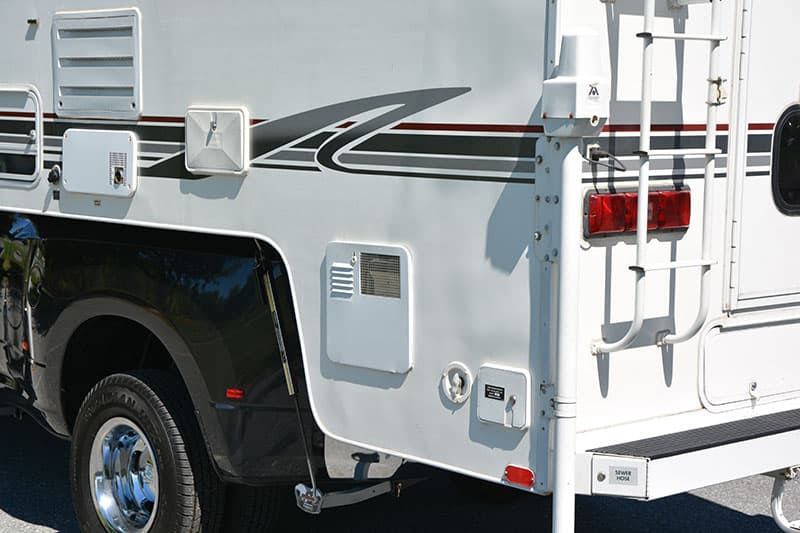
During your exterior inspection, open every exterior compartment door and look at the condition of the compartment’s interior. Look inside storage compartments, battery compartments, propane compartments, generator compartments, outside shower doors, and sewer/service areas and look (and smell) for signs of water intrusion.
Above: An exterior compartment with some minor water damage (dark patches)
Maintaining the seals on an RV takes a lot of time and effort. Failing to do so is also how most RVs get ruined. If you don’t have the ability or time to maintain your camper seals, have a dealer do a seal inspection and repair at least once a year. Failure to do so will destroy even brand new campers within a few short years. We have seen it many times.
The Screw Test
While you’re inspecting the seals around the unit, look at any and all screws you find. Screws that are rusted, loose, or missing are another warning sign of possible water intrusion.
Another trick is to remove a screw and see if the threading is rusted and deteriorated. Screws should back out and return with appropriate tension and should not be rusty or deteriorated. If you do this, make sure to remove only one screw, and then tighten that screw back in before moving another.
We discovered a lot of loose, rusting, or missing screws on the underbody of our project truck camper. These screws were all replaced with stainless steel screws. Each of these was dabbed with Sikaflex 521 sealant before being driven back into the camper. One day I would like to replace all of the exterior screws on the camper using this approach.
Look Out Below: The Underbelly
Once you’ve checked the roof and side seals, it’s time to look at the seals on the underside of the unit. Under the wing walls there are a number of joints that make up the underside box of a truck camper. These joints are joined with seals that need to be checked and maintained.
While you’re inspecting the underbody seals, also make note of the general condition of the underbody. Push on the walls to check if anything feels soft or spongy. While there will likely be scratches from loading and unloading, there shouldn’t be any evident punctures or cracks.
Smooth Operators: Slide-Outs and Pop-Up Roofs
Folks who are buying a slide-out truck camper, or a pop-up truck camper have some additional steps to complete the inspection.
Slide-outs should be extended and retracted multiple times to ensure proper operation. While slides are extending, watch and listen for any binding or other mechanical issues. Slide-outs should go out smoothly at the push of a button or rocker. If they grind, get stuck, or otherwise don’t push out and back in smoothly, there could be a problem.
Like slide-outs, pop-up roofs should extend-up and retract-down smoothly. Pop-up roofs with electric lift mechanisms should pop-up and come-down smoothly with push of a button or rocker. Again, there should be no grinding noises or stuck points; just smooth sailing.
If a pop-up camper has a mechanical crank or lift system, make sure to try it out at least once or twice. You want to make sure that it’s working properly, and that you’re comfortable with operating the lift system. It’s something you will need to do quite often.
Final Details: Manuals, Cranks, and Detectors
While not essential, it’s a good idea to have a copy of the camper’s manuals and appliance manuals. Chances are that these are with the unit, but sometimes an owner keeps these inside their homes or garage. They may also have copies of the original brochure if you ask.
It’s more important to locate the manual camper jack cranks and (if so equipped) electric jack remote control. These items are replaceable, but can be hard to track down, and are expensive.
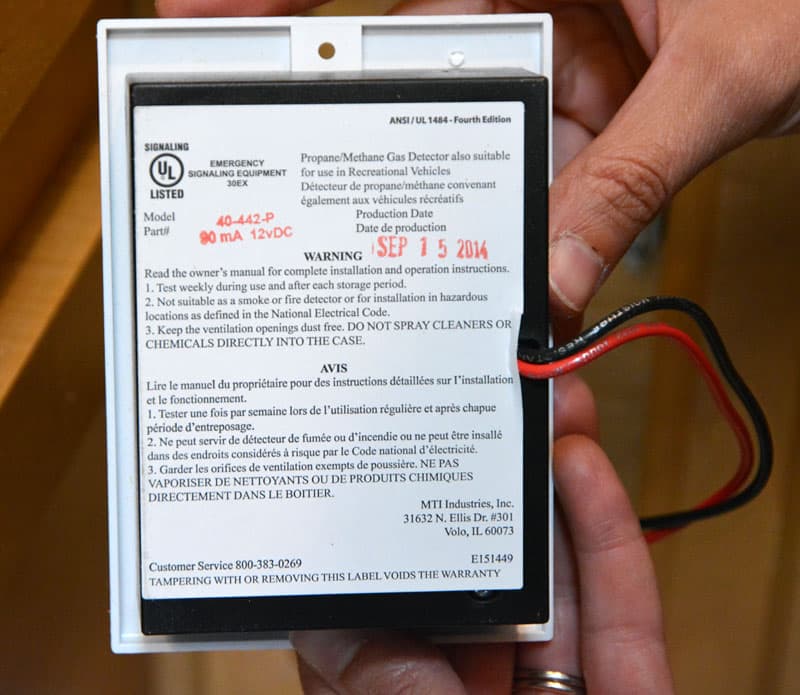
Another item that’s expensive to replace are the detectors. It’s quite common for smoke detectors, LP detectors, and CO detectors to be out-of-date in a used camper. For your personal safety, we strongly recommend these detectors be checked and replaced prior to using the camper.
The Challenge Is Worth It
If you follow the tips and suggestions outlined in this article and, 6 Tips For Buying Used Campers you will find a fantastic used truck camper. We have purchased two used truck campers in the past 15 years and both have been excellent buys. Did we have problems? Absolutely, but that’s to be expected with any truck camper – even brand new ones.
Speaking of brand new truck campers, buying a new camper is the obvious alternative to going through all this testing. You may have realized that there’s more to inspecting a used truck camper (and more that can go wrong) than you want to take on. If that’s the case, step up to a brand new truck camper. You still need to look over a new truck camper before signing the paperwork, but you don’t need to worry about many of the used camper pitfalls.
The one big takeaway for everyone should be this; maintain your truck camper, or you will have significant problems. New or used, you need to properly winterize, maintain your seals, and care for every appliance and system of your truck camper. Do these things and the value of your camper will be preserved for years to come. It’s a challenge, but this amazing lifestyle is worth it.


