Four readers share creative ways to maximize storage in their truck’s backseat. Dewey, Martin, Danny, and Jay have four different approaches to organizing this easy to clutter area.
Submitted by: Jay McClellan, 2018 Ford F-350, 2018 Wolf Creek 840
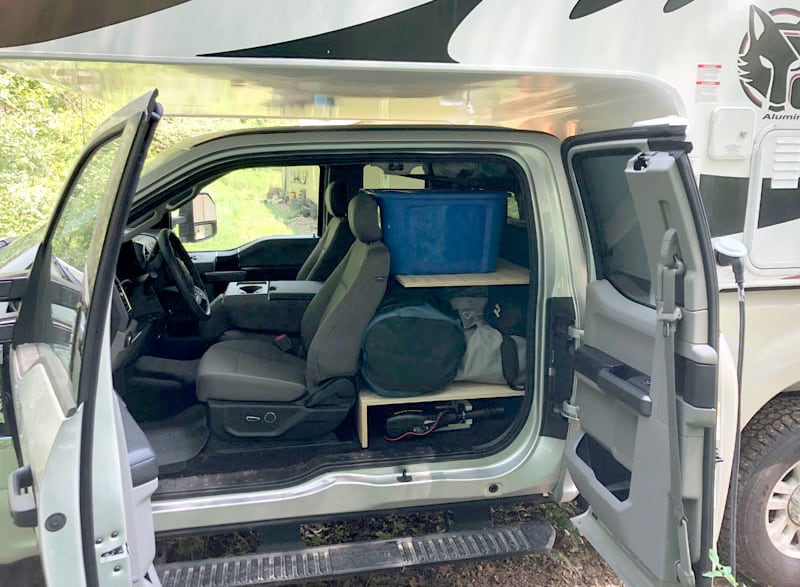
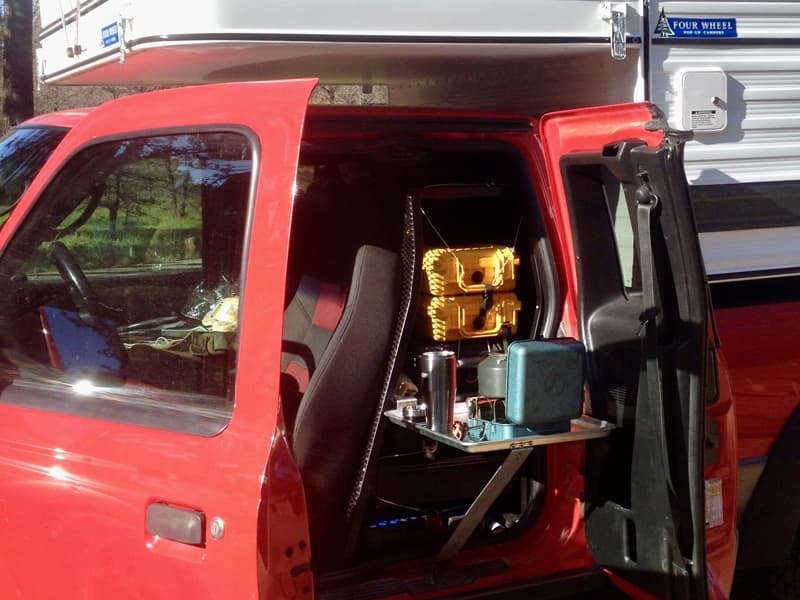
We use the rear cab of our F-350 for hauling gear, not passengers, so the rear bench seat was just taking up space. Once we had the cab loaded full of stuff, it was a major chore to access anything on the bottom without removing lots of other stuff first.
I wanted a way to use all of the available back seat space and to be able to access any piece of gear with minimal effort. I also wanted to be able to reconfigure the space easily and to accommodate different kinds of gear on different trips. Finally it had to be simple, inexpensive, and not require any permanent modifications to the truck.
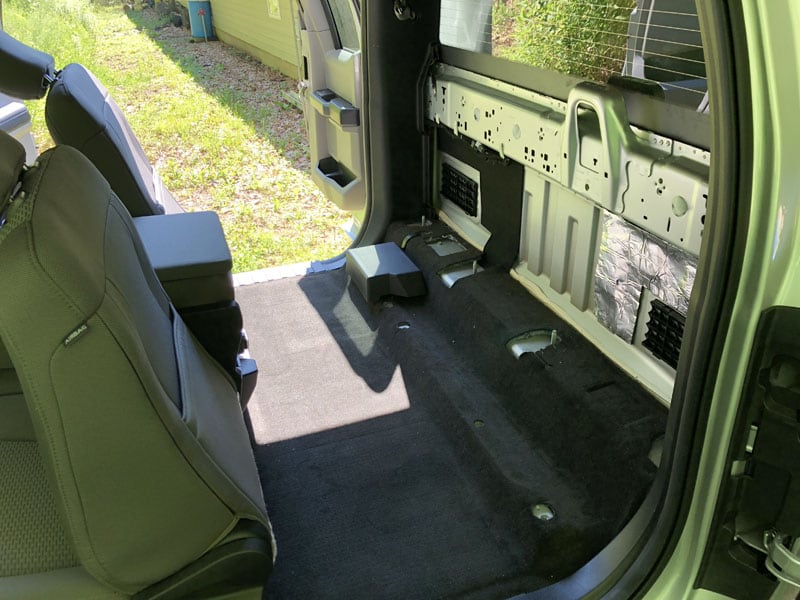
I started by removing the rear seat and all the associated hardware. Everything just unbolts so this is completely reversible if I ever want to put the seat back in. There were three M8-threaded attachment points conveniently located across the back wall, so I decided to use those to attach shelf supports.
The original carpet on the back wall had lots of openings and contours for the seat hardware. After removing the hardware, I cut a piece of black carpet to cover the wall. It’s not sealed around the edges so there’s enough openings to allow air to exit the air conditioner exhaust vents on the back wall.
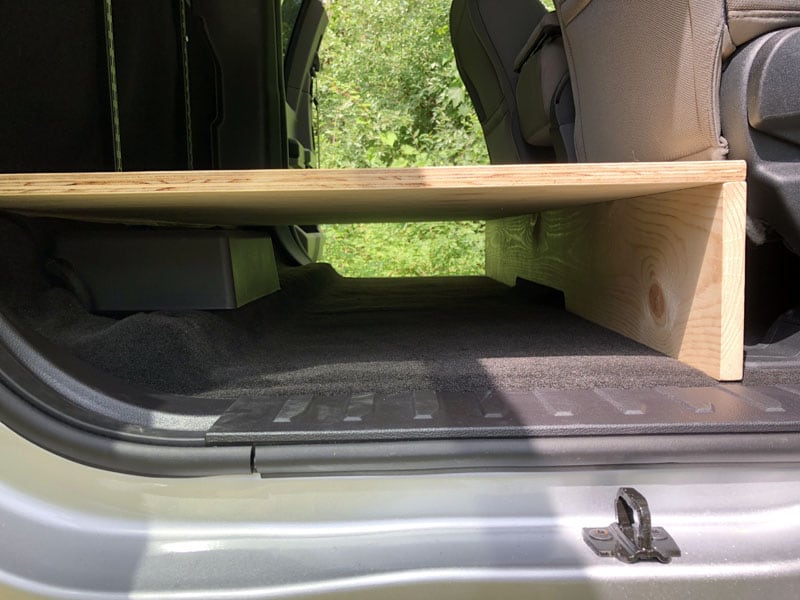
I made a 3/4-inch plywood floor that is secured to the seat attachment studs at the back and screwed into a 3/4-inch board that supports it at the front. The new floor is 59-inches wide and 34.5-inches front-to-back.
I sized it by putting the front seats in comfortable riding positions, and then building the floor to fit the available space. It’s made from two pieces of plywood so the grain of each piece runs front-to-back for rigidity. The space underneath the main section is 6.75-inches inches high.
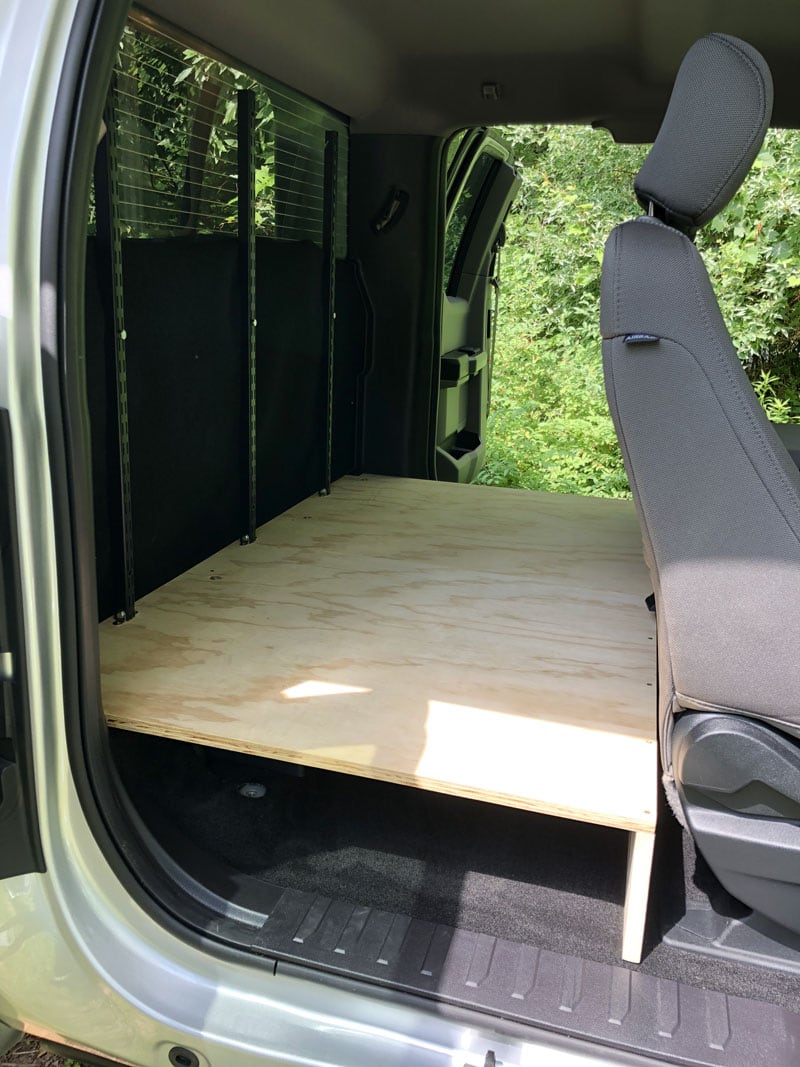
Above the new floor I attached three heavy-duty shelf rails, using M8 bolts to secure them to the threaded attachment points on the back wall. At the bottom they’re held to the plywood with small angle brackets and screws.
The rails are 34.5-inches high and, although the top half is unsupported, they are very beefy and quite rigid. I plan to put only lightweight loads near the top.
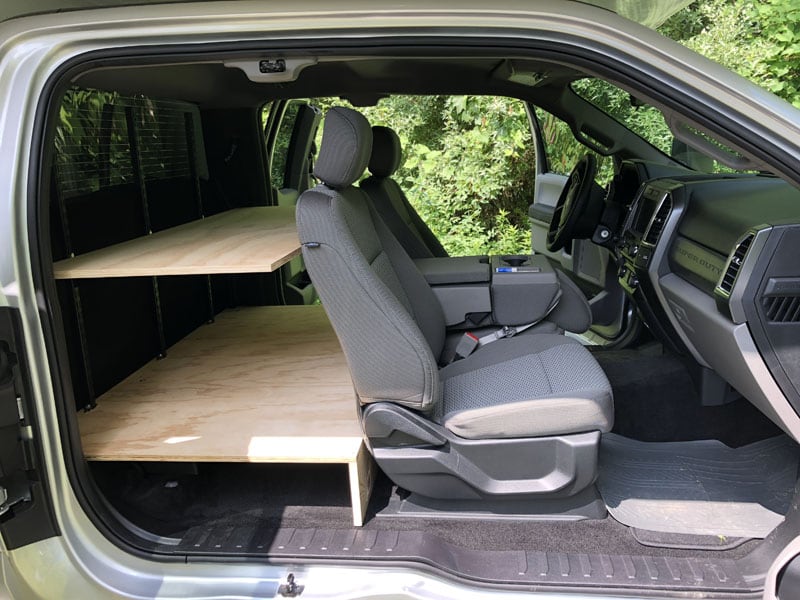
Next I added a shelf 24-inches wide and 59-inches long. It’s also 3/4-inch plywood so it’s very sturdy, and I positioned it just below the attachment bolts on the rails.
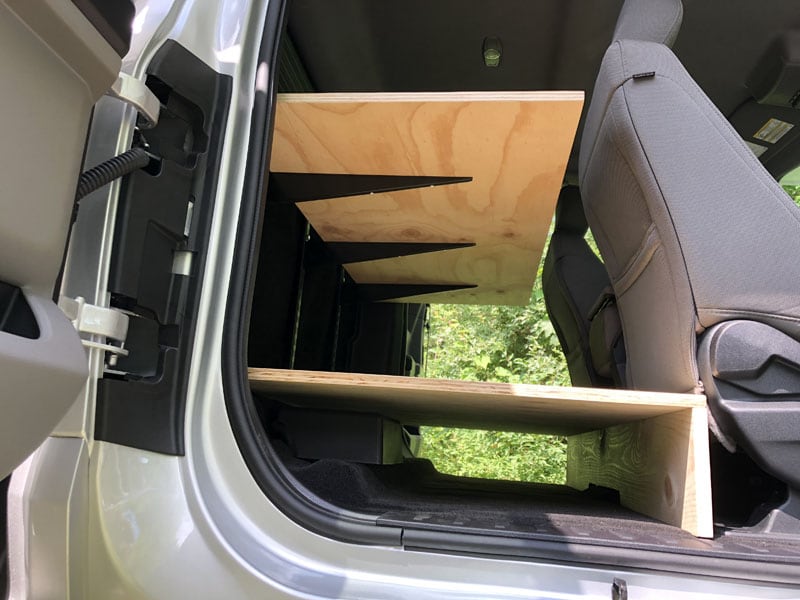
The shelf is attached to the brackets with 2-inches of space between the shelf and the vertical rails behind it. It has enough clearance to be lifted up easily and repositioned to a different height or removed entirely, if desired.
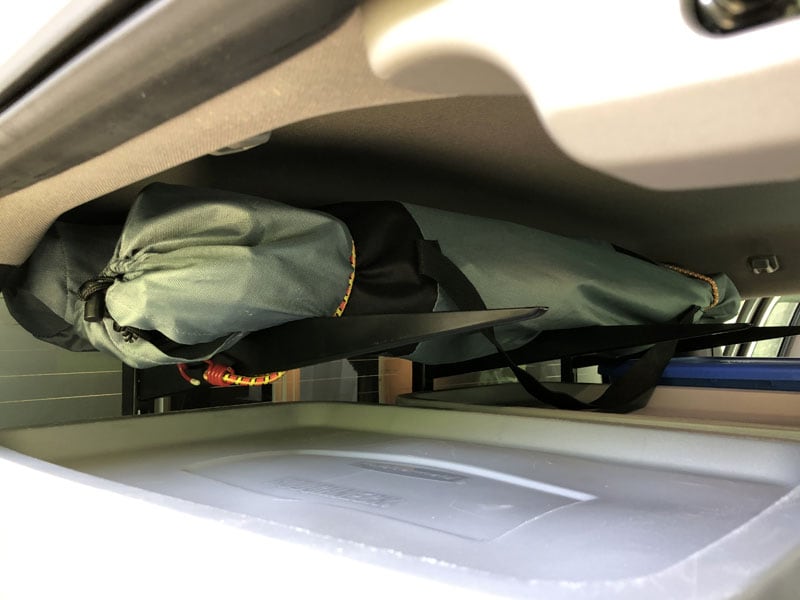
At the top of the rails I attached bungee cords using eye-bolts so they can’t get lost or slide off. Then I added a second set of shelf brackets at the top. I can use the captive bungee cords to secure light loads like our camping chairs.
The shelving takes up minimal volume but it makes the area far more usable. Even when it’s stuffed full I can remove most items without having to move anything else. At most I have to move just one item out of the way. I can reconfigure the space for different sizes of storage containers or quickly convert it into a big open space if needed.
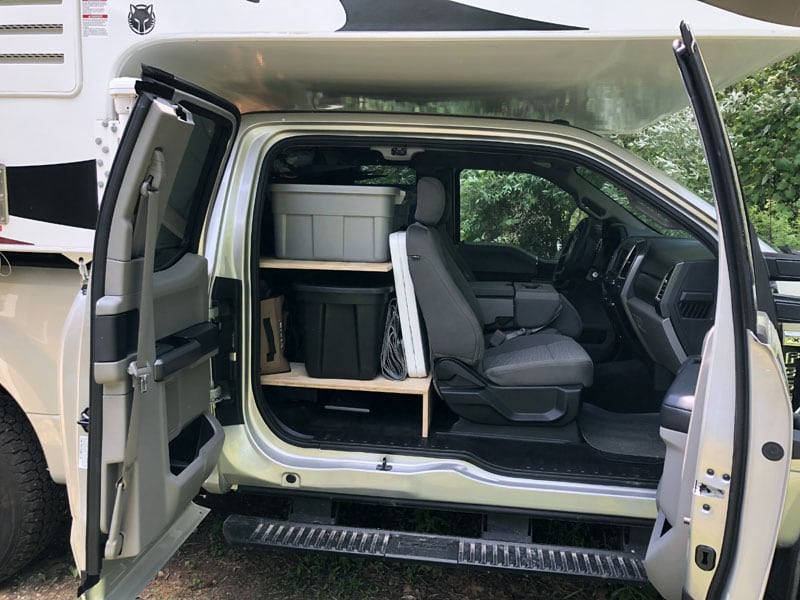
The space underneath the floor proved a great place to store the trolling motor for our inflatable kayak. The kayak itself sits just above with its accessories and inflator pump. I used plastic totes to organize camping gear on the top shelf.
This mod was easy to build and it worked out great! I still have some space left over – even with a boat, trolling motor and battery, all my road safety supplies, camp chairs (see picture below), and several totes full of assorted camping gear.
I was also able to shift quite a bit of stuff from the camper into the truck. That frees up some precious space inside the camper. The best part is how quickly I can now get to any piece of gear, and how the movable shelf brackets let me easily reconfigure the space as needed.
It took me ten hours to complete this modification and cost me $75. In my opinion, the skill level of this modification is medium.
Submitted by: Martin Spriggs, 2007 Ford Ranger, 2014 Four Wheel Camper Eagle
Being an amateur wildlife photographer, speed and ease of access to photography equipment is a requirement when I pack my gear. Building a storage container purposely built with these requirements in mind seemed a logical step in the evolution of my truck camper.
Small trucks have limitations when it comes to storage but, if you utilize space well, there is ample room to store equipment and gear. For example, the space behind the seats of an extended cab is well suited for storage purposes.
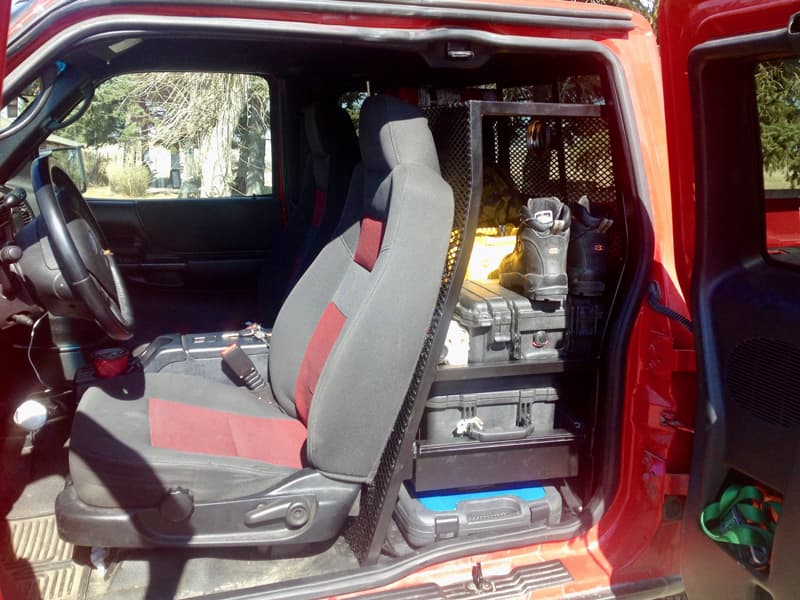
I designed and built a metal cage to house camera gear, road safety gear, and survival equipment – including winch accessories for my Ford Ranger. It’s not your average Ford Ranger, but that’s another story.
The cage is made from one-inch metal stock custom bent to align with the rise of the seat and fit the space in the extended cab behind the driver’s seat.
The stock fold up seats and tire jack mount were removed from the extended cab to maximize available space for the cage. The driver’s seat no longer leans back for a road side nap with the cage in place, but that’s not a problem because I have a Four Wheel Camper for that purpose.
The cage extends two-thirds of the way across the extended cab allowing for a fold-up kayak to be packed on the opposite end of the cage, behind the passenger’s seat. The cage is bolted to the floor of the truck and is enclosed on three sides and the top with wire mesh. All joints are welded. The cage is so solid that you can actually rock the truck by pushing and pulling the cage.
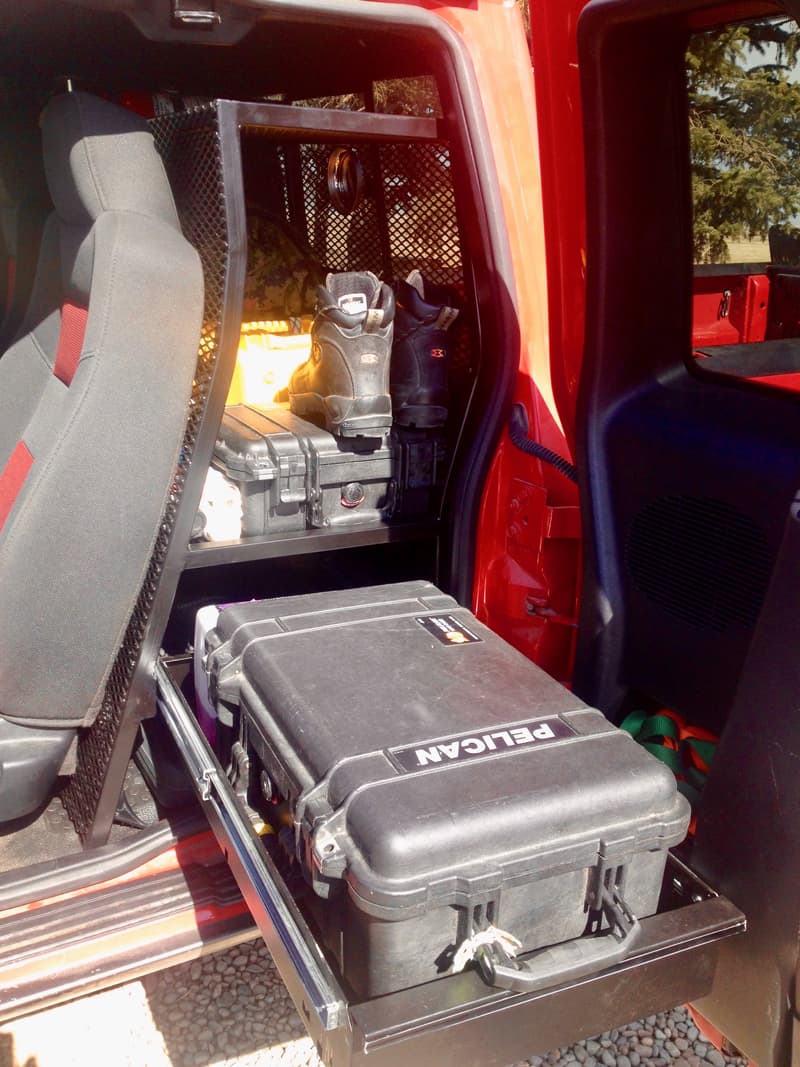
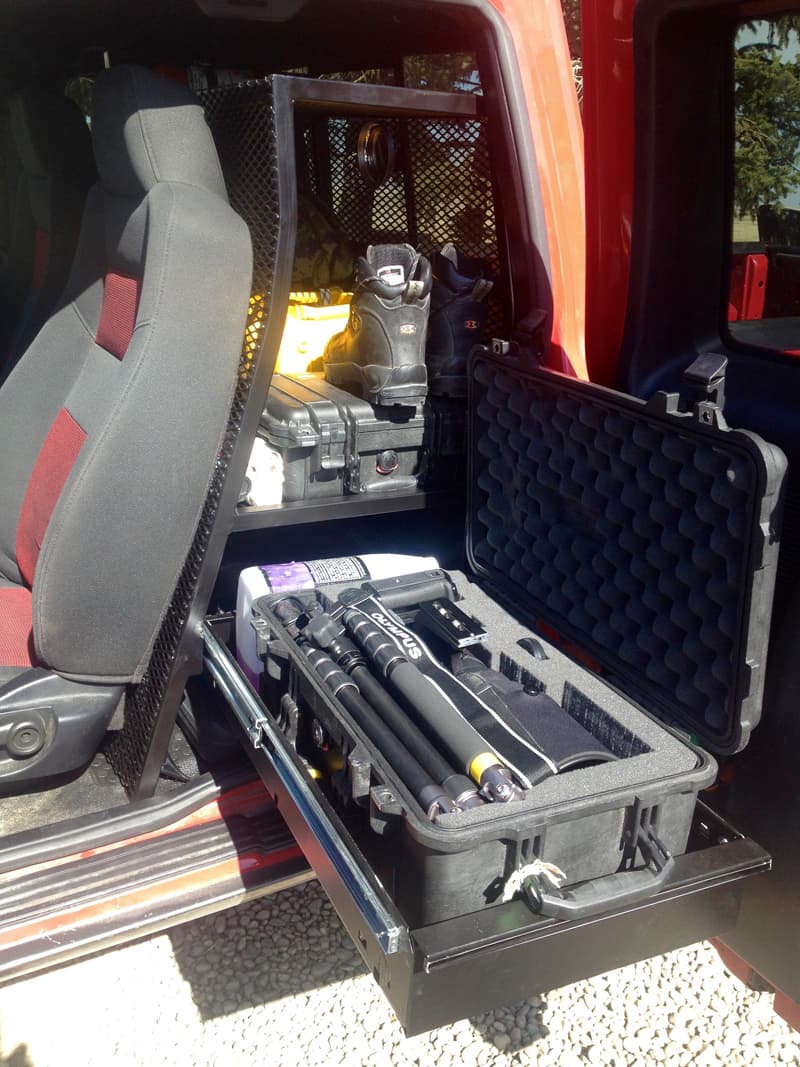
The cage features a pull out drawer from a heavy duty tool box, purposely positioned for rapid access to a camera with a telescopic lens. One shelf above the drawer neatly holds the bulk of the gear. The space on the floor of the cab below the shelf is also utilized, holding a tool set. Even the space above the top is utilized with a fire extinguisher mount.
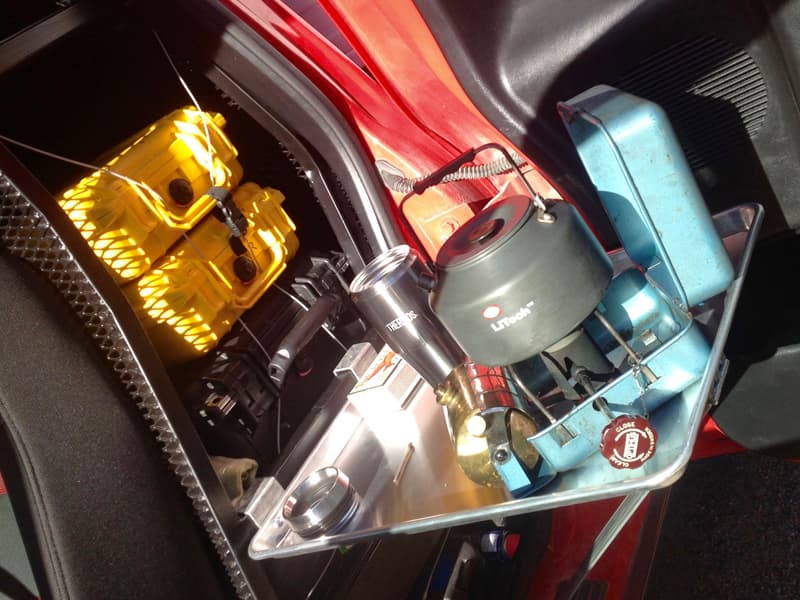
The coup des gras was the portable shelf I made out of a twenty-five dollar cooking sheet from Sears. This sheet fastens onto the cage shelf and extends out of the truck. Now I have a place to boil water and make my tea when I am in the back country.
In hindsight, the one-inch tubing was overkill. Half-inch tubing would be more than enough and I would certainly consider using aluminum in future builds to save weight.
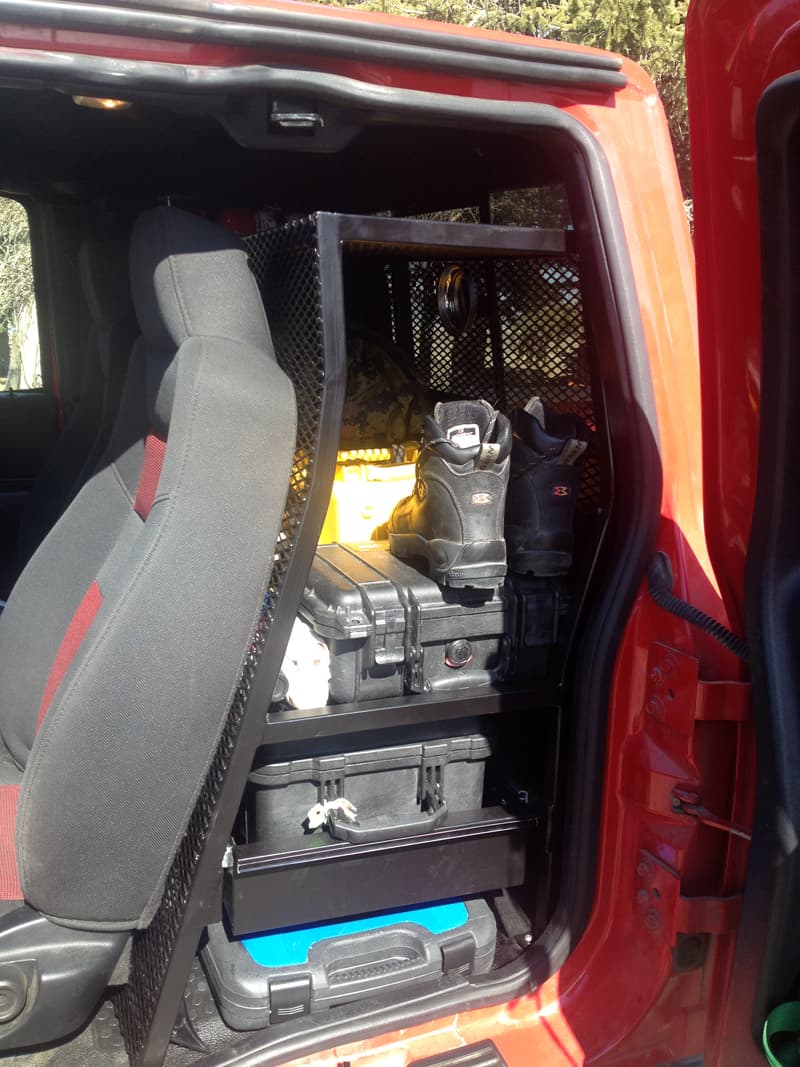
An added and unforeseen bonus was the security aspect that such a cage delivers. I now run a wire lock through the handles of my cases and through the front of the shelf which secures all my camera gear safely in the cage should a thief break into the cab.
Welding the cage puts the modification into the moderate to expert range, but everything else is relatively easy to construct.
The build took approximate 20 hours to complete and materials cost about $300. The drawer was expensive! At the end of the day, the result was a purposely built for housing road safety equipment and rapid access to photography gear, perfect for the minimalist wildlife photographer with a light truck.
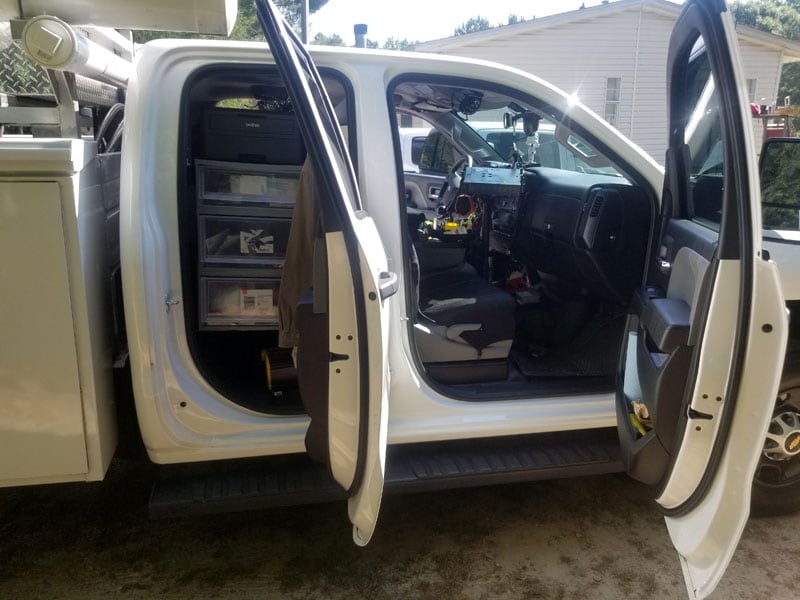
Submitted by: Dewey Lackey, 2003 Chevy Silverado 3500, 2014 Lance 1172
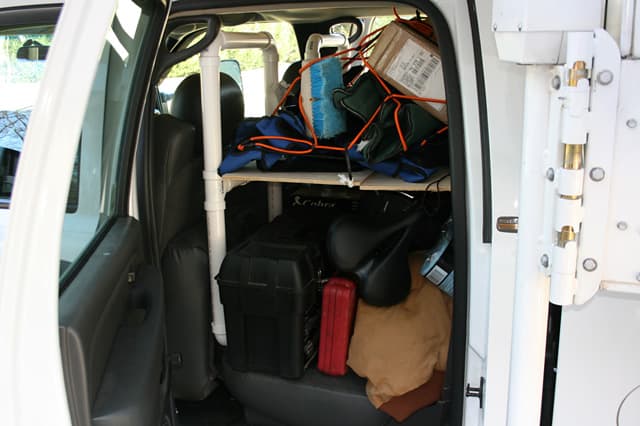
I made a modification to the back seat area of our crew cab truck. The decision to make this addition came as a means to organize the items that we carry on our camping trips with our 2014 Lance 1172.
 |
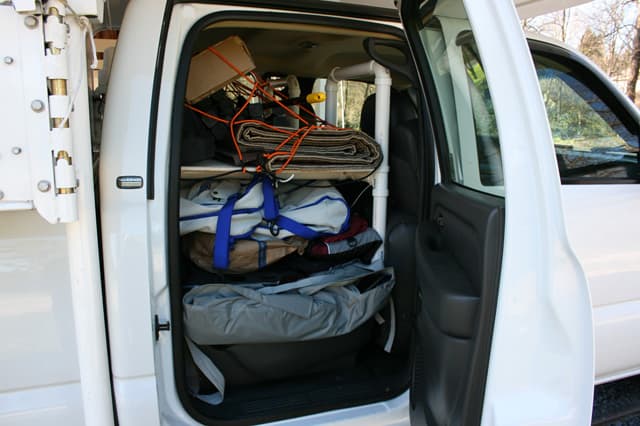 |
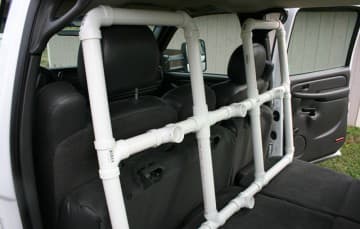
Now, instead of having the back seat piled up even with the top of the front seats, we can put everything in the truck in an orderly fashion. We will put the larger, heavier items – tool boxes, portable jump start kit, and inflatable kayak – in the bottom area and the lighter items – jackets, rain gear, soft side cooler with beverages and food for travel, additional lawn chairs – in the top area. All of these items will be secured by a 4-foot by 6-foot stretchable cargo net.
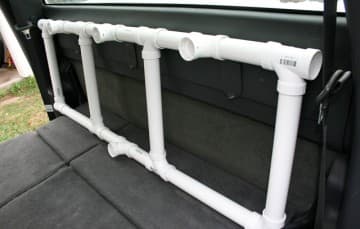
I made the front section of the rack to extend upwards even with the top of the head rests of the front seat to prevent anything from shifting forward in a sudden stop. This approach also compliments the cargo net (ordered but not yet received).
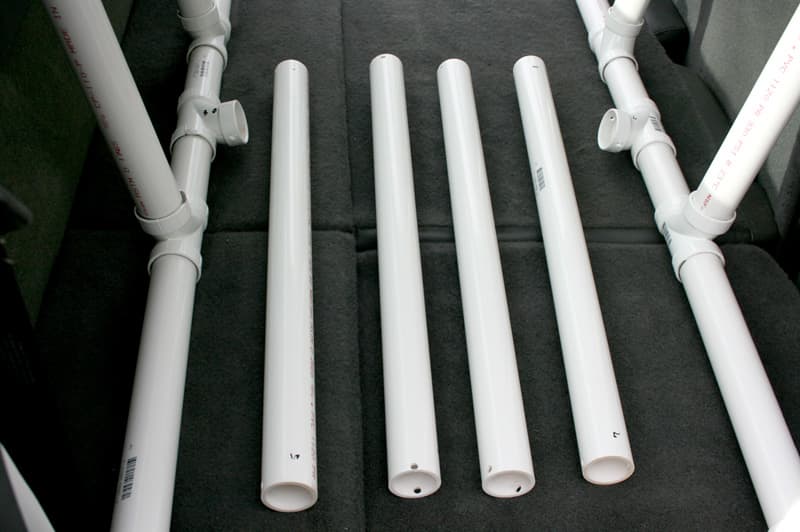
The rack is constructed from 1½-inch PVC pipe, with tees and elbows. The front and rear portions are permanently glued together with PVC glue.
 |
 |
After placing the front and rear sections in the truck, I then add the cross members and secure them with ¼-inch bolts. ¼-inch spring pins will work as well.
Then, I added the ⅜-inch plywood shelf, which is notched in the front to prevent shifting in transit. The shelf is hinged to facilitate getting it into the truck. This shelf can also be attached to the framework by drilling holes in the plywood and using tie wraps.
The cost of this project, including the cargo net, is about $125.00. In my opinion, the skill level of this mod is medium.
Submitted by: Danny Shaw, 2018 Chevy Silverado 2500HD, Open service body
I got a new work truck and the back seat was useless. I needed better storage.
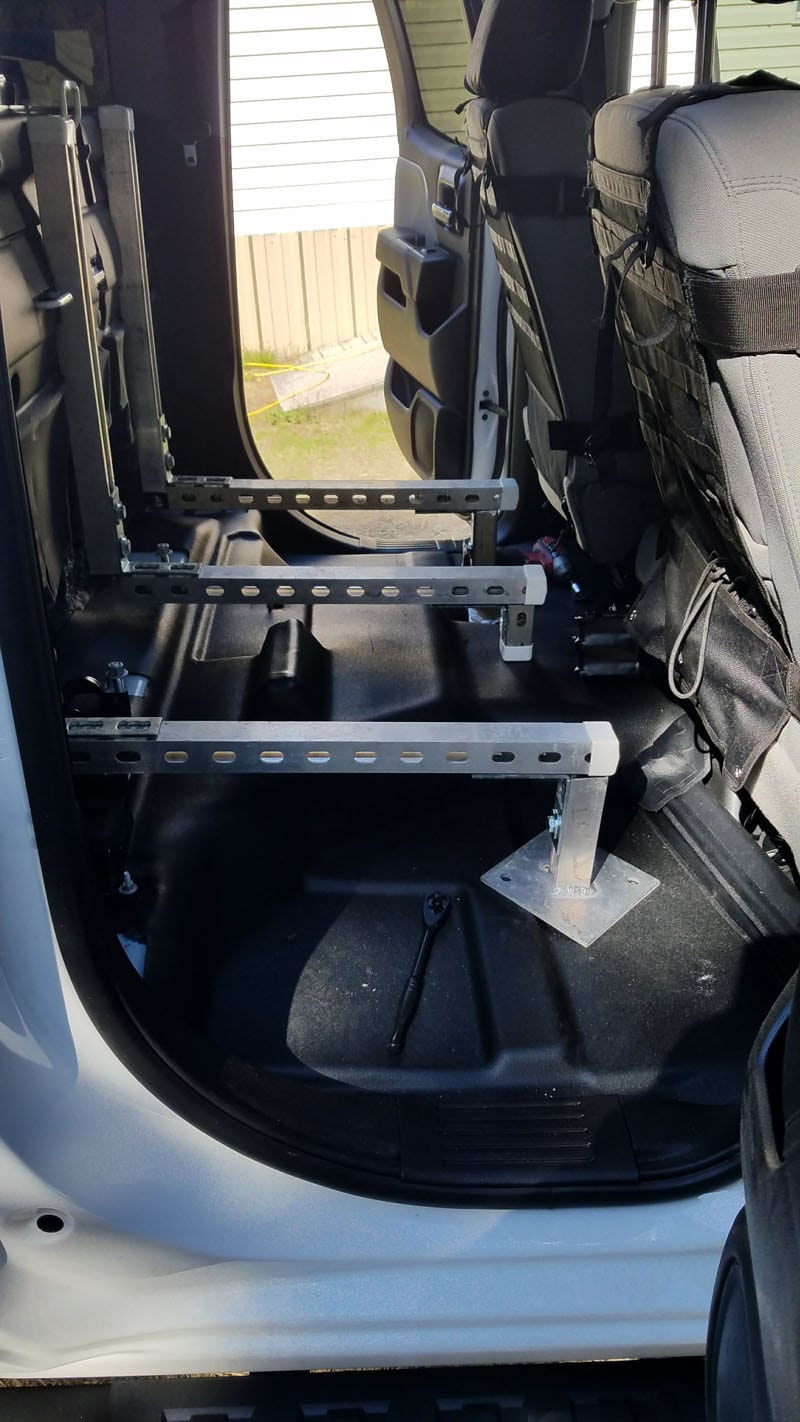
I removed the back seat and put 1/4-inch diamond plate down and a Unistrut on the back wall using the holes designed to hold the seatbelts. I used pipe stands to support the front.
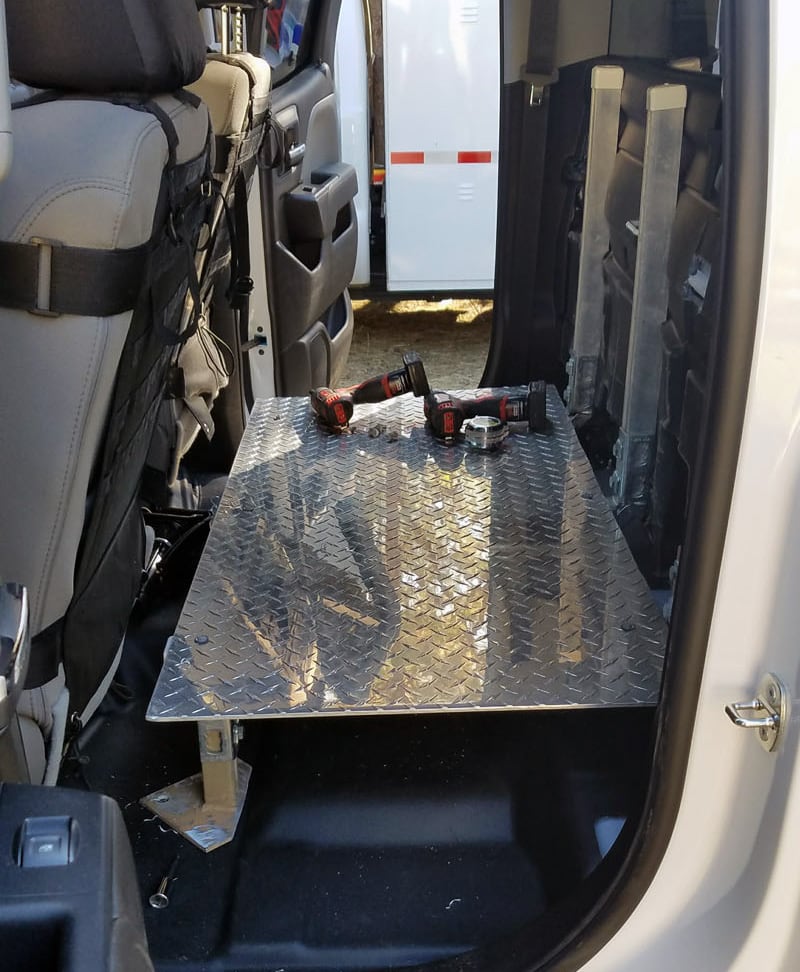
I put in a drawer unit like one that is used in a dorm. I also carry a printer. The rest of the space I use for stackable boxes and my luggage.
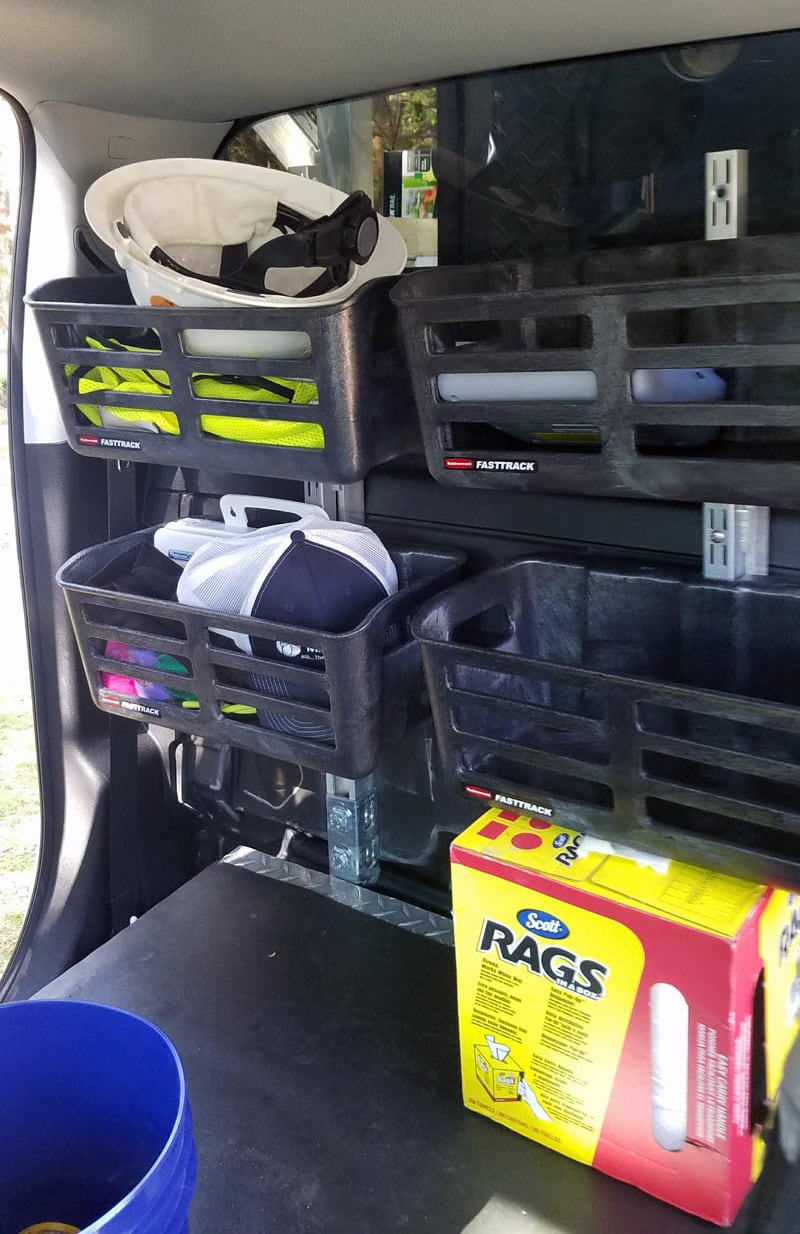
I love it. I change things up every once in a while trying to make it perfect.
It took me six hours to complete this modification and cost me $0 because all of the materials were laying around. In my opinion, the skill level of this modification is medium.
Disclaimer: The modifications above are submitted by Truck Camper Magazine readers. It is your responsibility to make sure that any do-it-yourself modification project you undertake is safe, effective, and legal for your situation.


