Drawers have been added, a dinette table changed, exterior steps built, a pop-up shower improved, and lots of new storage created. Select your favorite core mods, and vote.

Welcome to the November 2015 Monthly Mod Contest. Please review the following twelve Core Mods (aka medium) and vote for your favorite November 2015 mod. We will announce the November 2015 Mod Contest winner next week. For more information about the Monthly Mod Contest, including how to enter, click here.
November 2015 Mod Contest Entries:
1. Vic Smith, Coquitlam, British Columbia
2015 Ford F350
2013 Adventurer 89RB
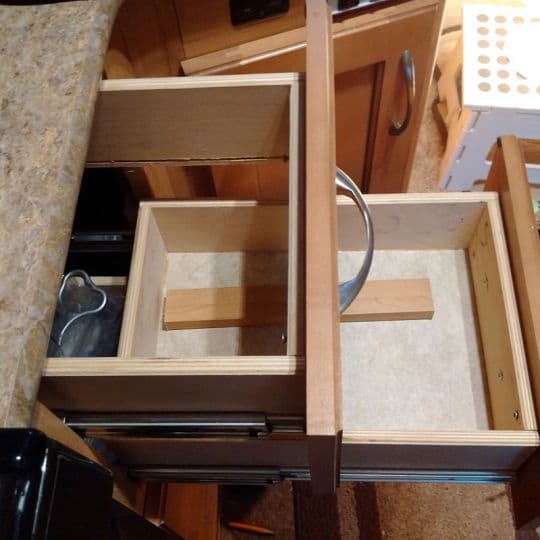
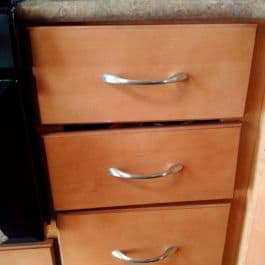
From the factory, my camper storage drawers are four inches in depth. With only four inches in depth, items would sometimes disappear into the cavity behind the drawers. After having this experience on multiple occasions, I decided to improve the drawers to better utilize the vertical space inside the drawer area.
Above: The storage drawers before the modification – click to enlarge
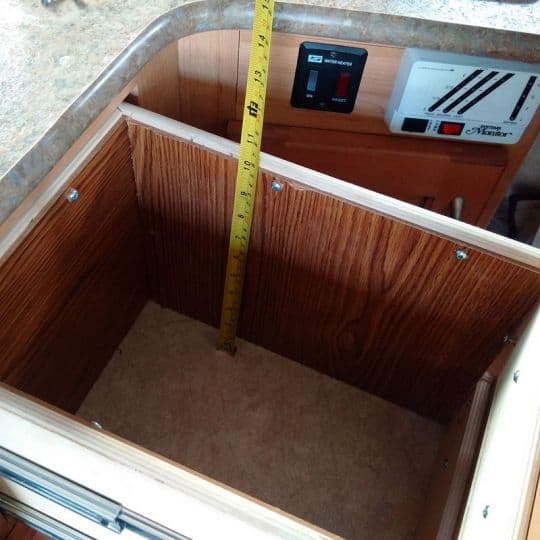
I started by removing and dismantling the upper four inches of the drawer. I kept the drawer slides on, removed the drawer bottom, removed the lock, and reassembled it. I then removed the drawer frame cross member between the top drawer and the middle drawer. I cut some spare wood panel to a ten inch size and screwed it into both the top and middle drawers, making one big drawer.
Above: The new bigger drawer – click to enlarge
I put the new bigger drawer back into the two drawer slides with the lower part having the lock. Eight plastic glasses are used to store items vertically, like utensils. If I need an upper drawer again, it can be returned to its original state as two separate drawers, as nothing was destroyed or discarded. The deeper drawer has greater volume capacity with an increase of 25%. Items are efficiently accessed much better.
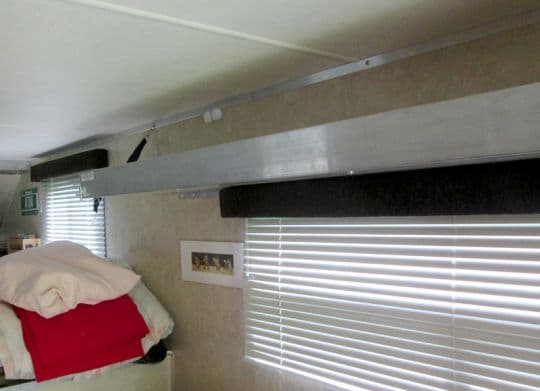
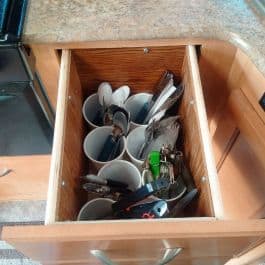 |  |
Above: The new drawer can store bigger items – click to enlarge
It took me one hour to complete and cost no money at all (I already had the wood panel). In my opinion, the skill level of this mod is easy.
2. Cheryl Nelson, Enid, Oklahoma
2004 Chevy Duramax 3500
1990 Shadow Cruiser 9.5
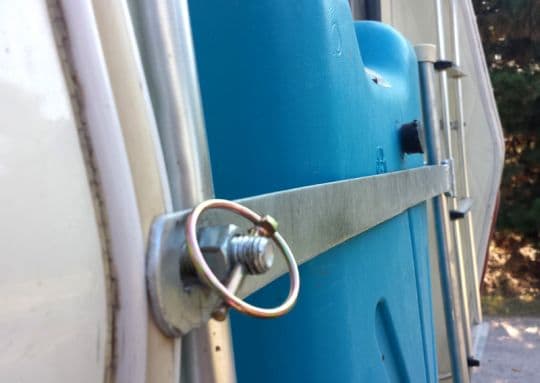
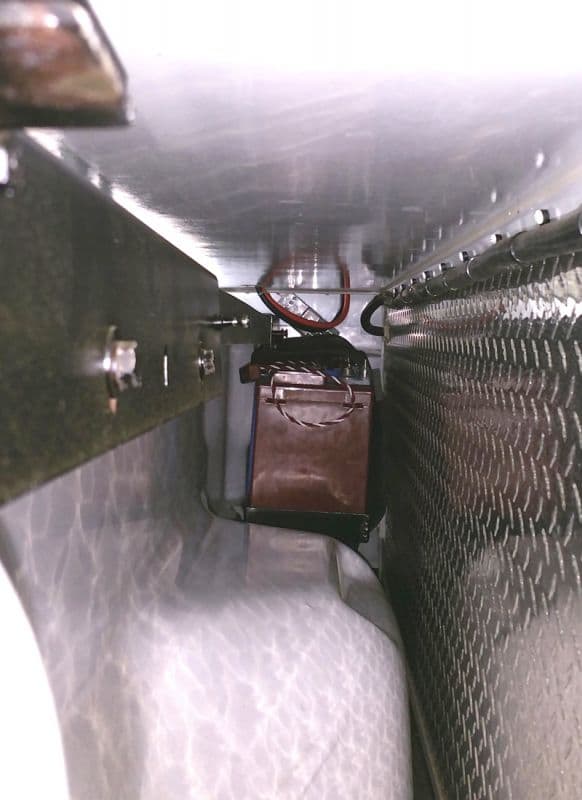
On our Shadow Cruiser 9.5, we have an offset rear entry door which leaves a big empty space. With no grey water tank, the “blue boy” portable grey water holding tank ended up inside the camper. I hated that.
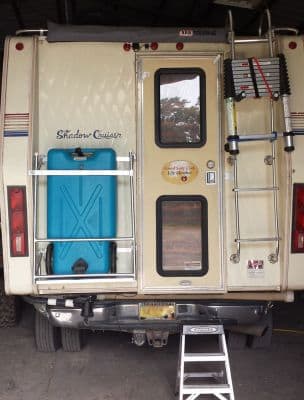 |  |
Above: A welded up a cage/track transports the old blue boy – click to enlarge
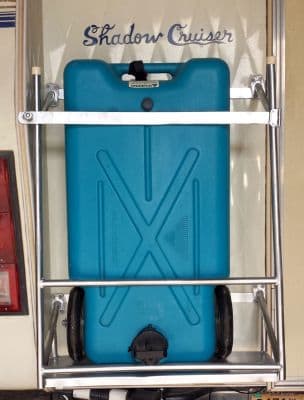
Using a bow rail off a boat hanging out in our barn, we designed and welded up a cage/track to transport the old blue boy outside of the camper where it belongs.
Above: Easy access with a swinging retainer bar – click to enlarge
A swinging retainer bar at the upper end makes for easy access and the solid piece of aluminum scrap is a sturdy tray for the wheels to sit on. We added a strap through the handle to the bar for extra stability during travel. It works great, looks neat, and the bars make handy hangers for other stuff when we’re in camp.
It took me four hours to complete and cost no money as we had all the materials on hand. In my opinion, the skill level of this mod is medium.
3. Duncan Crawford, Westminster, Maryland
2008 Ford F450
2015 Northstar 12STC
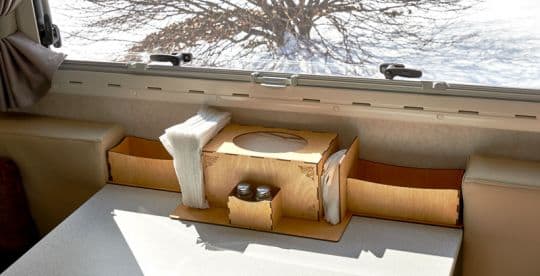
I made a dinette table organizer for all that stuff that needs a regular home including napkins, salt and pepper, tissues, cell phones, keys, ibuprofen bottle, and a bottle opener.
I designed it in CorelDraw, and cut it from 1/8-inch Baltic birch on my laser engraver. The finish is blonde shellac, which is adequate to minimize grandkid fingerprints. The unit is glued to the table with a couple of drops of silicone caulk, plus it’s captured between the corner seat cushions.
It hasn’t moved in several thousand miles, holds everything we want, and has defeated the grandkids (even better).
It took me three hours to complete and cost $6 for materials. Don’t ask about the tools or software costs. In my opinion, the skill level of this mod is hard, if you don’t already have the tools. It’s easy if you do.
4. Jim Duarte, Plainville, Massachusetts
2015 Ford F350
2013 Eagle Cap 850
As we are always off-the-grid, we depend on our battery power a great deal. I have a 2500 watt inverter built into my system for basic AC needs like using my coffee maker. The twin, solar charged batteries were not getting us through a complete coffee brewing cycle, so I decided to first add two more batteries and then, if needed, increase my solar panels.
The battery compartment on the Eagle Cap didn’t have room for larger batteries. I decided I could mount a pair of identical batteries in the bed of the truck and connect them with 4 gauge cable and a large plug. I already had a really strong 175 amp Anderson Powerpole plug that I had bought as a connector for the winch on the old truck, but never used it. There’s a start!
I downloaded the data sheet on my Trojan 27TMH batteries to get some dimensions. I then did some measurements in the truck bed. This will work, I thought.
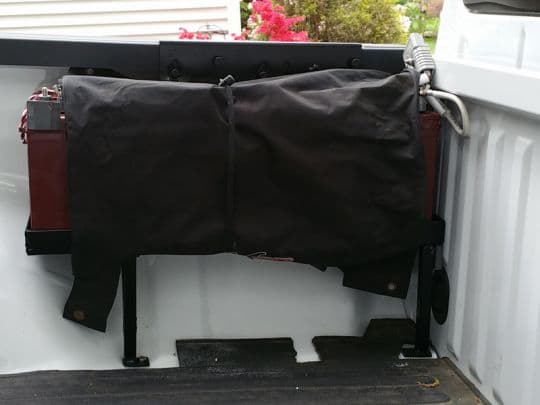
I picked up some 1.5-inch angle iron and some .75-inch square steel tubing at Home Depot and began to fabricate my auxiliary battery tray. After completion, I sanded everything down, cleaned and sprayed it with two coats of Rust-Oleum primer and three coats of black Rust-Oleum semi-gloss. I let the tray and brackets dry overnight and started fresh the next day.
I was able to use the bolts from one of the factory tie-down hooks as my front mounting point and drilled a single hole in the bed for the rear point. I mounted everything and tightened it all up. Then I called it a day.
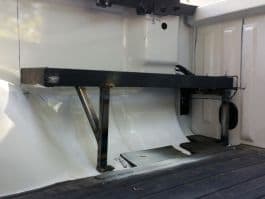 | 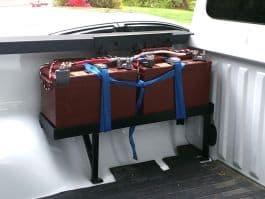 |
Above: The auxiliary tray with and without the new Trojan 27TMH batteries – click to enlarge
The next day I bought the new Trojan 27TMH batteries, brought them home, got them mounted, and then cabled them before it got dark. I took the connector cables from the truck and camper inside and soldered the Anderson Powerpole ends on in the comfort of my workshop.
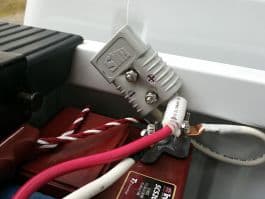 | 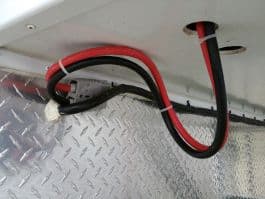 |
Above Left: The truck’s half of the 175 amp Anderson Plug, bolted in place for convenience, Above Right: The camper’s half of the connection, dropping down through one of the drain holes – click to enlarge
The next morning I went out and installed the truck connector cable and its half of the big plug. I actually bolted it to the front of the bed so that it would be easier to plug into. I then mounted the camper end up through one of the battery box drain ports and to the outboard camper battery. I tightened all battery connections on all four batteries and then backed the truck back under the camper. I checked the battery voltage in the camper, disconnected the house power, and I was ready.
I left the camper battery compartment open so that I could see any issues as I plugged the new Anderson Powerpole into the truck. Everything went together fine with no issues.
Above: The batteries inside the bed with the camper on the truck – click to enlarge
One final test before plugging the house power back in; a capacity check! I turned on all the camper lights inside and out, and the Fantastic Fan. Then, I loaded the coffee pot with twelve cups of water. I plugged it in, turned on the inverter, and turned on the pot. Fourteen minutes later, the pot was brewed (just hot water – no coffee) and my battery voltage was still reading 12.9 volts. That’s what I wanted to see. The solar panel was only giving about 0.4 amps as there was no sun!
Above: The batteries are covered when the camper is not on the truck – click to enlarge
There’s nothing like a project that does what you had hoped it would do. After checking it over the course of several days on the beach, it’s evident that the single 140 watt solar panel will keep us going. Mod complete!
This mod took me 18 to 20 hours to complete and cost $450, including the batteries. In my opinion, the skill level of this mod is hard because there is welding involved.
5. Kevin Jenckes, New Durham, New Hampshire
1996 Ford F250 7.3 PSD
2006 Northstar 850SC
I have a Northstar 850SC, which I love. It is, however, a typical, non-slide, U-shaped dinette. I was not particularly enthralled with the dinette set up. The table took up a lot of floor room and the table leg was in the way of getting comfortable. The fold up support for it dug into the side of my leg.
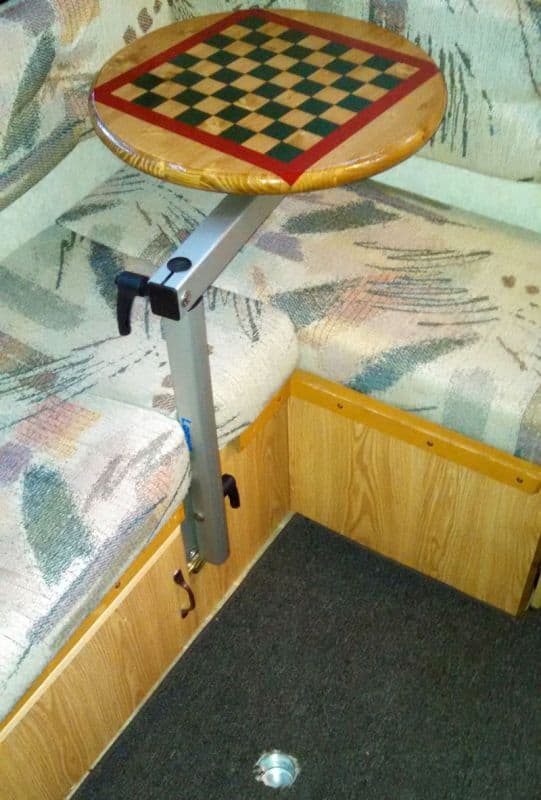
The original rectangular table that is the dinette bed support was impossible to move around. To replace it, I bought a round, unfinished, twenty-four inch pine table top from Lowes and made a regulation-sized chess/checkers board. Then I polyurethaned it. This table was still on the damn round table leg out in the middle of the floor and the support still dug in.
I thought long and hard about putting in office or boat chairs, or building two boxes and setting up the chairs and tables at bed rail height. This would give me a better view through the pop up windows, but I just couldn’t make up my mind.
Then I saw a table leg set up that Northstar offers; a Laguna table leg. The Laguna table leg is adjustable in height and pivots around two points. It’s pretty cool looking.
Internet here I come. Not quite. The only place I could Laguna table legs was in Australia and, with shipping and handling, it was going to be about $400. On my way home from Gettysburg, I swung into Truck Camper Warehouse (where I bought the camper) and Bill Penney had them! He told me that he and Rex from Northstar bought a bunch together from Italy. It was $240 out the door and I bought an extra wall mount for flexibility. Now if I could only find that spare mount in my shop.
It took a little time to decide where I would mount it. This was a little more difficult because the wing door on the dinette side is bigger than the other. I use that space to store water bottles in the truck bed. I had to get the height right and out of the way of the door latch, so I cut out a small chunk of the bed support.
The cushion is squished a little, but so what. The Laguna pivots completely out of the way when I am moving about. No matter which section I sit at, I can swing it around to me, tighten it a quarter turn or so, and clamp the two nice handles. It won’t move if that’s what I desire.
The round table is mounted off center for more positional options. I may just buy better foam and leave everything as it is now. This table leg would work in any camper table set up. It’s well worth the money. It comes with the hardware and shims for leveling in case you need them. In the picture you can see the floor cup for the original table leg and how nicely this swings out of the way. The Laguna table leg is awesome.
It took me two hours to decide where and how, and thirty minutes to drill and bolt. The Laguna table leg cost $240. In my opinion, the skill level of this mod is easy.
6. Mike and Kellie Nyholm, Forestville, California
2008 GMC 3500
2015 Host Mammoth
I think, “To gain additional storage” has to be in the top three answers to “where are you going with that tape measure”?
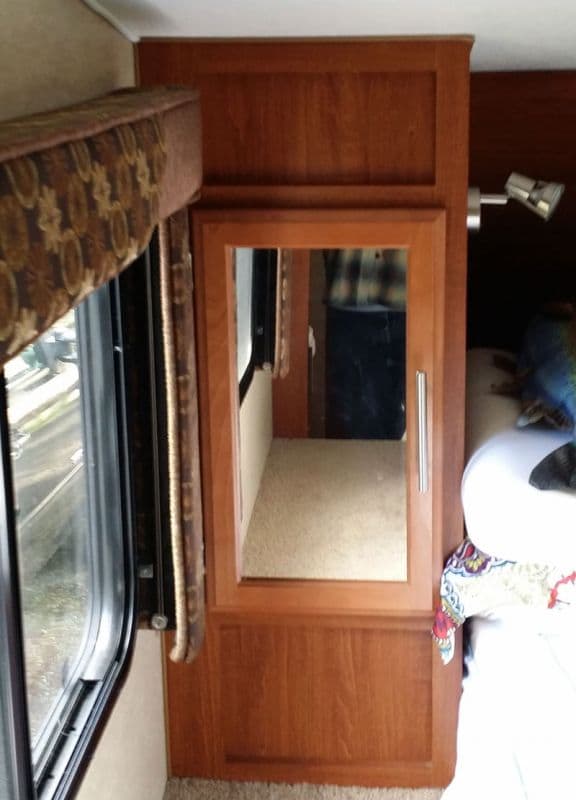
Above: The closet next to the bed before the storage modification
Our first long range, multiple state trip challenged the capacities of the single pole closet on each side of the bed.
This storage modification was a no-brainer. First, I ordered four (two for each side) unfinished raised panel cherry doors to match the existing doors. I found white wire basket bins on glides that barely fit the inside of the cabinet opening.
Then I reversed the swing of the factory mirrored door, modified the valance so the door swings more than ninety degrees, and stained and finished the doors. I matched the hardware and utilized unclaimed areas for a total of three storage areas on each side. The pole is gone!
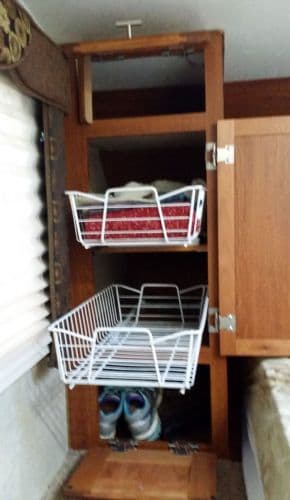 | 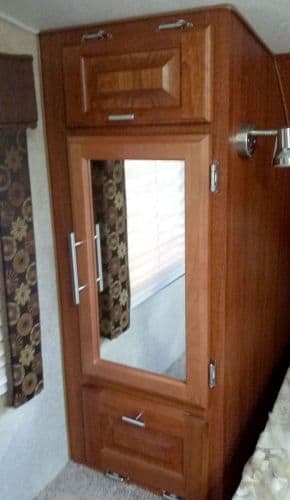 |
Above: The closet storage area finished – click to enlarge
I think the factory should consider this option. Kellie loves it. It maximizes storage and minimizes looking for that other shoe.
It took me 16 hours to complete and cost $350. I got the unfinished raised panel doors off the internet. The hardware and baskets came from a local hardware store. The pre-finished cherry cabinet flat panel (used for the shelves and support the glides) came from Home Depot.
In my opinion, the skill level of this mod is hard. It was also stressful because our camper is brand new and we’re punching holes in the cabinets.
7. Joe Garrett, Alberville, Alabama
2008 Chevy 2500
2005 Arctic Fox 990
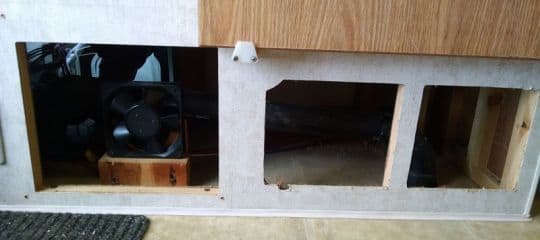
We always need more storage in our 2005 Arctic Fox 990. So I started a new project, copying somewhat the storage area under the shower in the new Arctic Fox campers that was shown in a TCM article. The 2005 has different tanks and the shower drain runs through that area, but it’s still usable space.
I used a pattern bit to cut out the two panels to the right of the existing basement vent area. The vertical support between the the two holes was stapled in so it tapped out easily.
Above: Initial cut-outs for the extra storage area – click to enlarge
Under the shower there are three 2×4 supports for the bath floor. Only the far right support was actually touching even when I’m standing in the shower. I removed the two on the left and cut a new one to a length that actually supports the floor, reinstalling it on the left side of the new storage area in the center of the shower floor. Also, there is a support for the drain pipe which I removed.
I removed the staples from the slide, removed the basement fan wiring, and slid it to the back. It was loose, so no splicing was necessary.
I cut panels from ¼-inch plywood for the sides, back, and top. It trimmed out to about 14 x 17 x 8.5 inches. The left panel for the new storage area installs approximately in the center of the bathroom floor, so I cut the left panel to act as a support for the drain pipe that runs through the compartment.
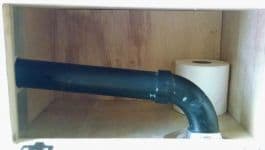 |  |
Above: Even though the pipe runs through the storage area, it is still a good storage area
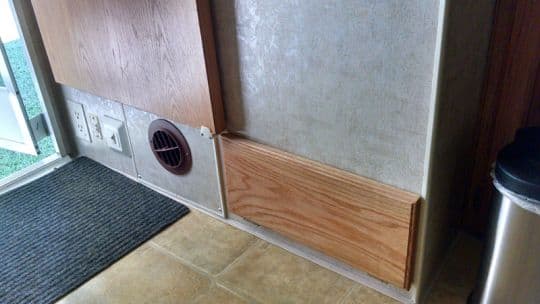
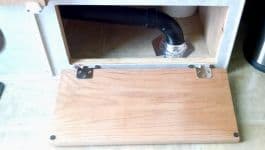
I sealed the drain open to the grey tank with aluminum duct tape. I then made an oak door that matches the doors and drawers already in the truck camper. The hinges, bought at Lowes, are almost identical in style to the originals. They are spring loaded closing, so I didn’t need a latch to hold the door closed.
Above: An oak door was made that matches the doors and drawers in the camper
Even though the compartment has a pipe running through it, the extra storage is great. You never know when you’ll need an extra roll of tissue. The area turned out to be two rolls high.
It took me three hours to complete and cost $4 for hinges. I used scrap wood from other projects. In my opinion, the skill level of this mod is easy.
8. Gary and Laurii Gadwa, Stanley, Idaho
2012 Ford F350
2011 Eagle Cap 950
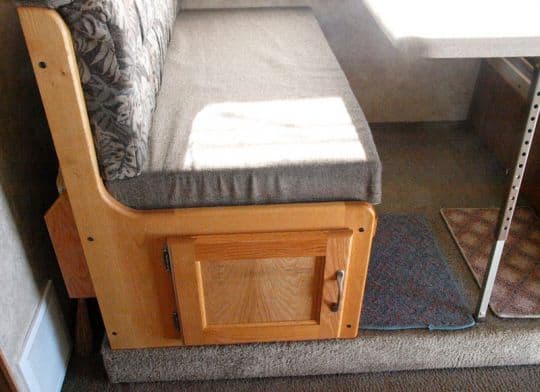
We are always on the search for improvements to our 2011 Eagle Cap 950. We’ve done many mods, but Laurii needed more storage space, and somewhere to store her portable sewing machine and related sewing items. We also needed storage for many other items; folding chairs, walking poles, camera tripods, dog and cat food, etc.
Above: The small cabinet door under the dinette – click to enlarge
The dinette seat benches each have a small cabinet door on the inside. Each storage area was impractical and completely boxed in with the camper’s interior siding making the storage areas small, cramped, and hard to access, especially if you have longer or heavier items.
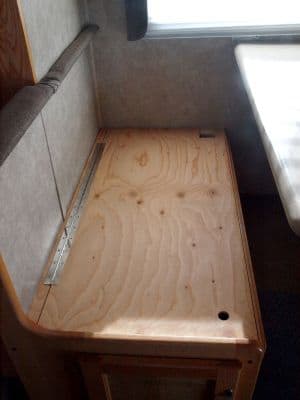 | 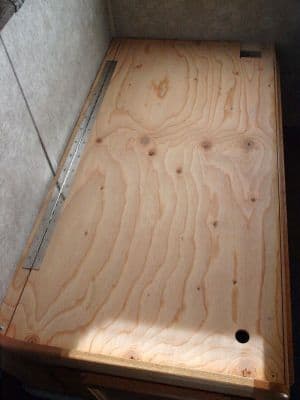 |
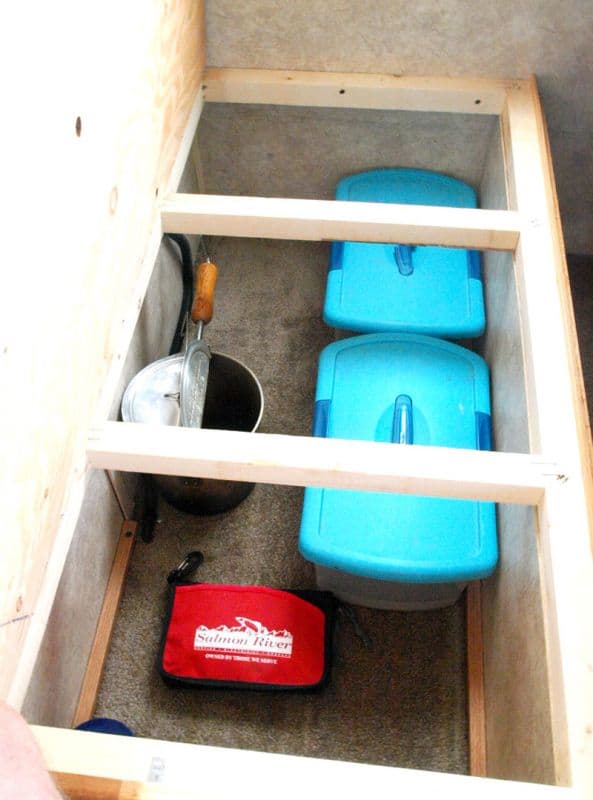
Above: For easier access, a plywood cover was made that swings up with a piano hinge. Note the notch to swing past the valance and the thumb hole to lift the lid. Click to enlarge photos.
I removed the plywood bench top under the cushions and then removed the interior box siding instantly making the storage area larger. Then I cut the plywood cover and added a piano hinge. I notched the end corners to lift or swing past the window edge of the valance. Then, I drilled a simple thumb hole in the plywood for lifting the lid after removing the seat cushions.
Speaking of seat cushions, we also spent the money to buy heavy duty firm foam for the seat cushion bottoms making the cushions much more comfortable. The firmer heavy duty seat foam has been a major benefit in comfort.
Above: The storage is easier for larger items and easier to access – click to enlarge
The added storage has been wonderful for those two to three month winter season trips. We aren’t hoarders, but having the extra space just makes every trip that much more enjoyable. I have done the same mod to a couple friends’ camper dinette seats and they sure enjoy the increased storage space as well.
It took me 2.5 hours to complete both benches and cost less than $10 for the piano hinges. It cost considerably more for the seat cushion upgrade. In my opinion, the skill level of this mod is medium.
9. Maaja Sutak, Kingston, Ontario
2012 GMC 2500
2015 Northstar Liberty
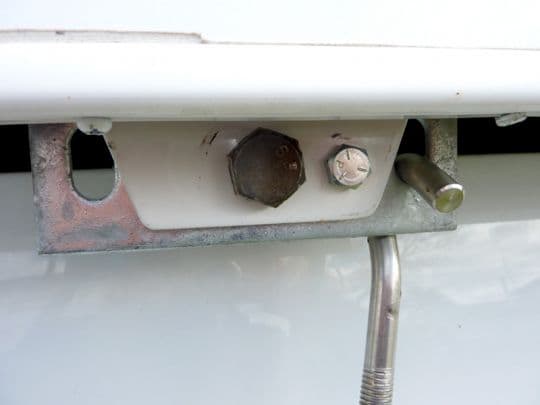
The original tie-down went right across the fuel door on my truck, which meant that I had to remove it each time I had to gas up. I do not have Fastguns, so I had to use a wrench to first loosen the nut and then turn the tie-down until it was loose enough to remove. After the fill up, repeat steps. That was a royal pain. I know I’m not the only one with that problem.
Above: A heavy duty piece of galvanized steel was added with three heavy duty bolts with lock nuts – click to enlarge
My solution was to get a heavy duty piece of galvanized steel, 3-inches longer and about the same width as the original anchor plate for the tie-down. I bolted it on to the original plate with three heavy duty bolts with lock nuts. Then I drilled a new hole for the tie-down. That was actually the hardest part of the project; drilling into that thick steel.
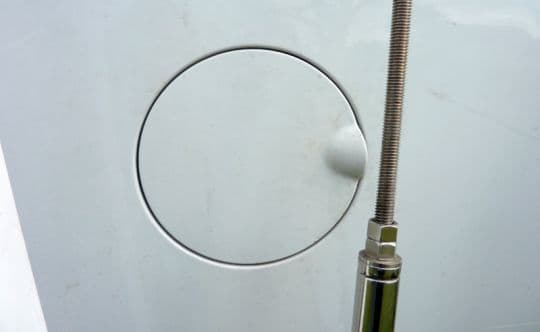
Above: Now the fuel door is easy to access – click to enlarge
It works like a charm! The tie-down now clears the fuel door so it can easily be accessed when it’s time to gas it up. I don’t have a before picture, but I’m sure many of you have the same problem, so you’ll know what I’m talking about. I have painted the steel plate white since I took the picture.
It took me over 3 hours, but I’m sure some guys could do it faster. It cost $20 or so. In my opinion, the skill level of this mod is medium.
10. Bob Cooke, Anderson, South Carolina
2002 Dodge Ram 2500
1966 Avion C-10
I needed a second level step just under the folding step on my Avion truck camper.
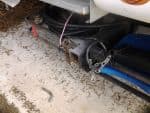 | 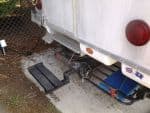 | 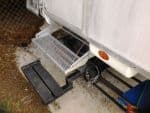 |
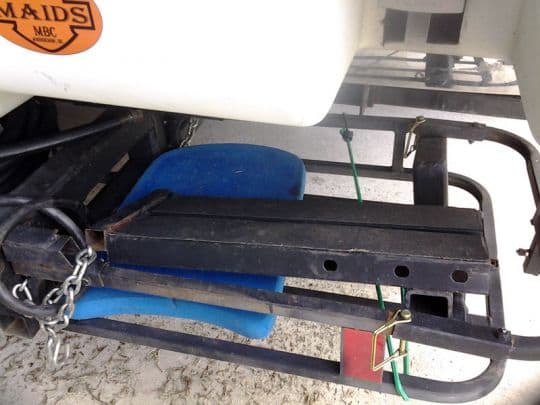
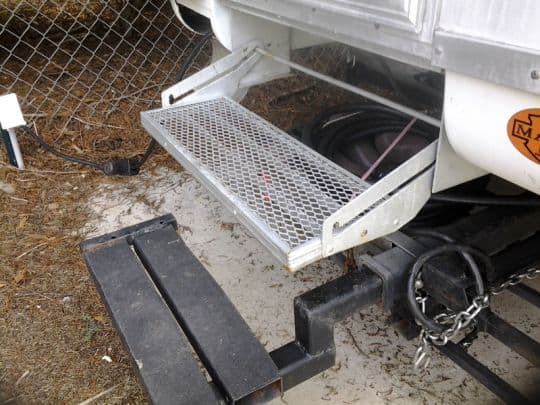
Above: The receiver tube, one step, and two steps – click to enlarge
I welded together a step platform onto 2×2 inch square tubing to fit into the two foot extended receiver tube. It can be removed and stored under the back of an Avion C-10 on a drop-down carrier. I just remove the step and install the trailer tow ball kit if needed.
Above: It’s stored on the Avion C-10 on a drop-down carrier – click to enlarge
Usually the trailer front tube serves as a step if it’s needed when the step has been removed. Also, the original step can be folded up if more space is needed when pulling a trailer.
Above: The two step system on the Avion – click to enlarge
It has worked well so far and is much more stable and firm after stepping down with full weight from the top step. At 80 years young next year, safety is a must. The truck camper is 49 years young and we are both doing good.
It took me two hours of cutting and welding to complete and cost $20. In my opinion, the skill level of this mod is medium.
11. Frank Mehaffey, St. Albans, Vermont
2012 Ford F250
2013 CampLite 10.0
My wife and I recently purchased a 2013 CampLite 10.0 truck camper. The camper is great, except for the interior storage space above the couch.
We had a bunk, which stored against the ceiling, instead of having cabinets or a way to use the bunk as a storage shelf when in a lowered position. With two large dogs, they could not stand up with the bunk was down. With the bunk up, we had, or more specifically, I had no storage for my clothes. My lovely wife has the closet.
After thinking of having a shelf put together with aluminum framing (with or without the bunk in its use position), I came up with a compromise. I took the bunk, which was about two feet wide and 70-inches long, off the wall of the camper. I took a jig saw, marked a line at 70-inches long down the middle of the bunk, and cut it in half the long way.
I took some aluminum L-shaped bracing, and mounted the bunk about a foot from the ceiling, using the nylon strap already in place for the bed, to suspend it on one side, and a Stanley DIY shelf bracket for the other end.
Above: The new 70-inch long shelf is half the width of the bunk – click to enlarge
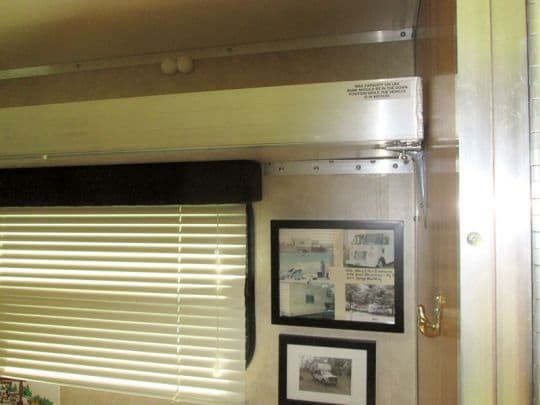
The resulting shelf is 70-inches long, 12-inches from the ceiling, and has the front edge of the bunk, with the upward corner, across the front, keeping everything from tumbling out. I covered the existing holes from the bunk with pictures of our last four campers.
Above: The existing holes from the bunk were covered with pictures of their truck campers – click to enlarge
The new shelf has worked out great! I can get all my clothes on the shelf, with room for secure storage for purchases, and our computer bag. We still have the lower couch for any guests who might stay with us, and the dogs can lay down, stand up, and jump into the sleeper, without hitting the modified bunk shelf.
It took me 2.5 hours hours to complete and cost nothing because I had any additional parts in my junk pile/work table. In my opinion, the skill level of this mod is easy.
12. Bill Hall, New Orleans, Louisiana
2008 Chevy Silverado 1500
2012 Palomino Bronco 1251
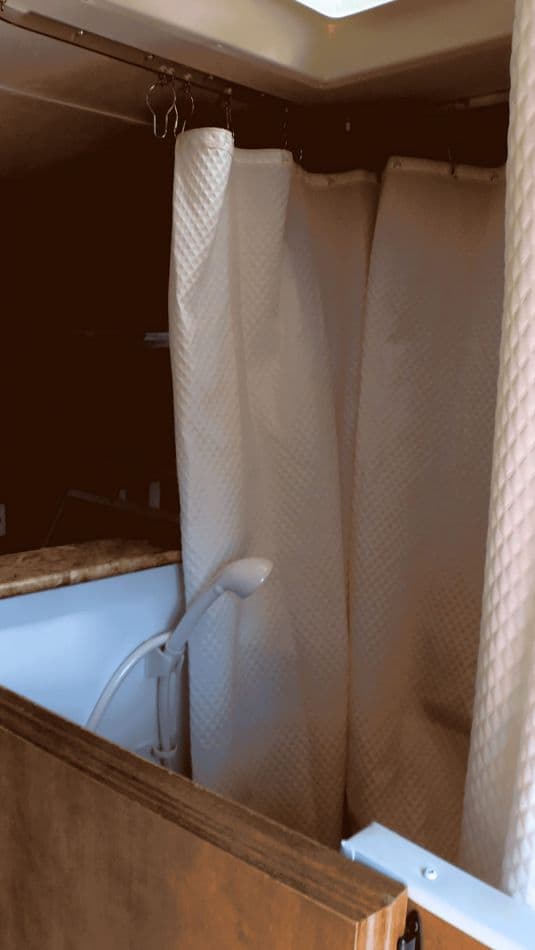
Above: Pop-up shower before picture – click to enlarge
I upgraded my pop-up shower from showering in a wet sock to a hands free shower with lots of elbow room. I installed a fold-away plexiglass shower wall that holds the shower handle and provides more useable space in the shower stall. It works really well. I enjoy taking a shower without having to hold the shower handle.
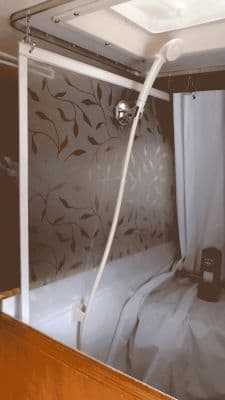 | 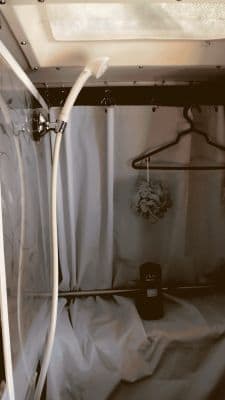 |
Above: New shower fold-away plexiglass wall – click to enlarge
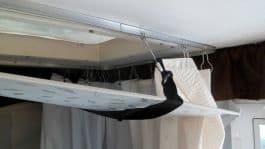 | 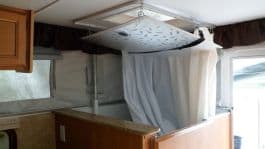 |
Above: New shower fold-away plexiglass wall in travel mode – click to enlarge
It took me four hours hours to complete and cost $50. In my opinion, the skill level of this mod is easy.
Click here to see the winner of this Mod Contest.
Disclaimer: The modifications above are submitted by Truck Camper Magazine readers. It is your responsibility to make sure that any do-it-yourself modification project you undertake is safe, effective, and legal for your situation.


