Ten truck camper mods have entered. Only one can win. It’s time to check out the August 2015 mods and vote for your favorite. Welcome to the Monthly Mod Contest!

If there’s one thing our readers love more than anything else, it’s mods!
Every time we run a story with mods, readership rockets to the moon. Every time we ask about favorite content, mods are at the top of the list. No matter what readership metric we measure, it’s mods, mods, and more mods.
“Mods please, can we have some more?”
Earlier this Summer, we were struck with an idea so big, so exciting, and so stupid obvious that we just had to give it a shot. What if, instead of a once a year mod contest, we held a mod contest every month?
The concept was simple; a monthly mod contest would get more mods in Truck Camper Magazine, more often, and give modders more opportunities to share their mods, and win more prizes.
To get feedback on the idea, we sent the “Monthly Mod Contest” concept to mod-makers who entered last year’s mod contest. The response? Overwhelming excitement and support. Even better, we received enough fresh mods to successfully launch the new Monthly Mod Contest series. Thank you mod-makers.
How the Monthly Mod Contest Works
Every month we will publish up to ten mods in a single mod category; Big Mods, Medium Mods, or Mini-Mods. Then the readers will vote for their favorite mods.
The winner each month will win an extremely exclusive TCM “Mod Scientist” T-shirt and a chance to win the annual grand prize; “Top Modder of the Year” bragging rights, and a $250 gift certificate to Lowes of Home Depot (winners choice).
For more information about the Monthly Mod Contest, including how to enter, click here.
Monthly Mods Contest Vote: August 2015
Please review the following ten Medium Mods below and vote for your favorite August 2015 mod. We will announce the August 2015 Mod Contest winner next week. Someone is about to win the very first, very exclusive, highly coveted TCM “Mod Scientist” T-shirt.
August 2015 Mod Contest Entries
#1 – Jim and Anne Beach, Red Deer, Alberta
2009 GMC 3500
2012 Arctic Fox 865
It’s always nice to fly a flag. There are telescopic flag poles and mounts that fit the 1 inch diameter ladders on most RVs. However, with most truck campers, the door is at the rear and the awning covers the ladder when it’s open and partially even when it’s closed.
Truck campers have lots of unused real estate. The jacks are either square like Happijac or round like our Rieco-Titans. The jacks are firmly mounted and constructed of substantial material so they are ideal for mounting removable accessories.
 |
 |
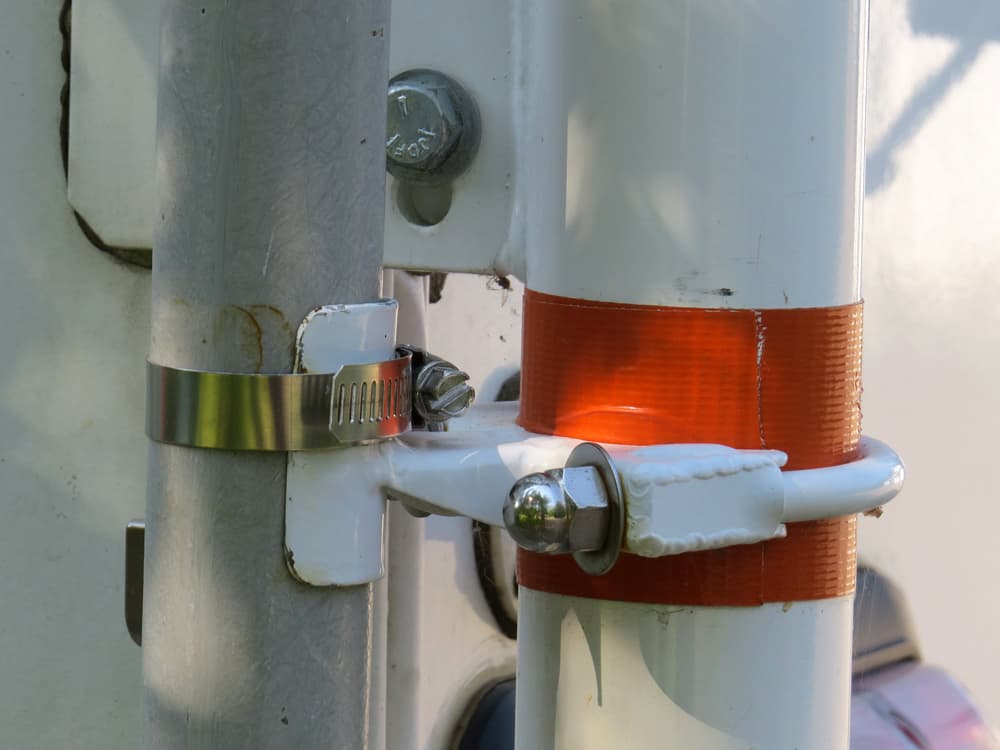
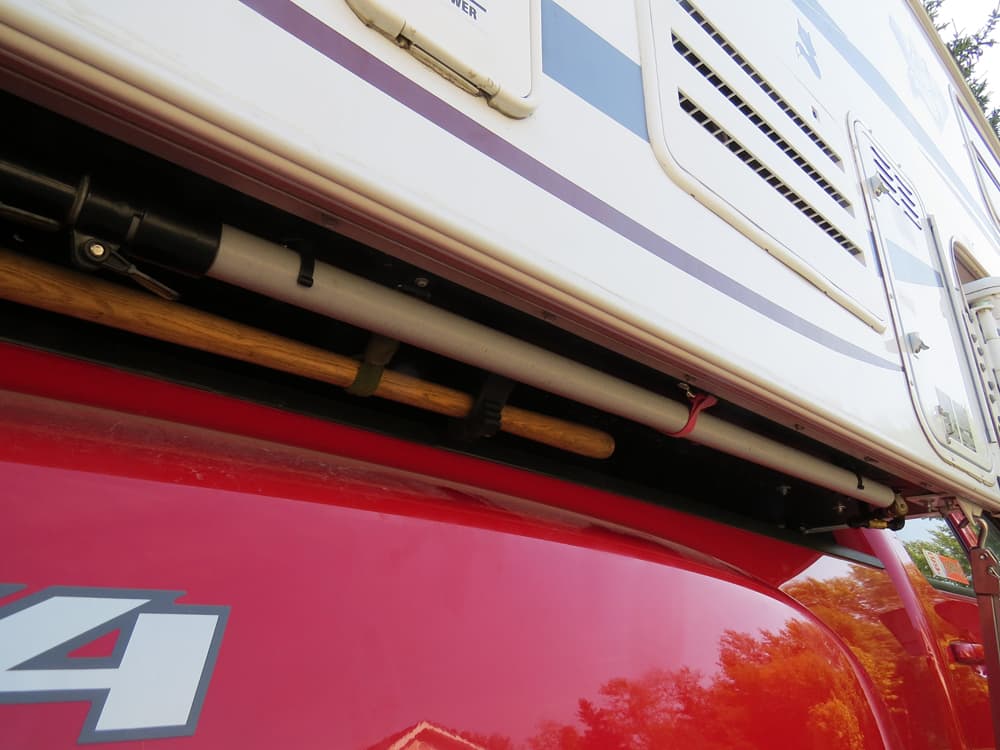
Above Left: This is the half pipe top clamp bracket. Half pipe is the snow board term for a half moon shaped depression. The flag pole fits in the half moon shape and hose clamp secures the pole to the half pipe bracket attached to the jack leg
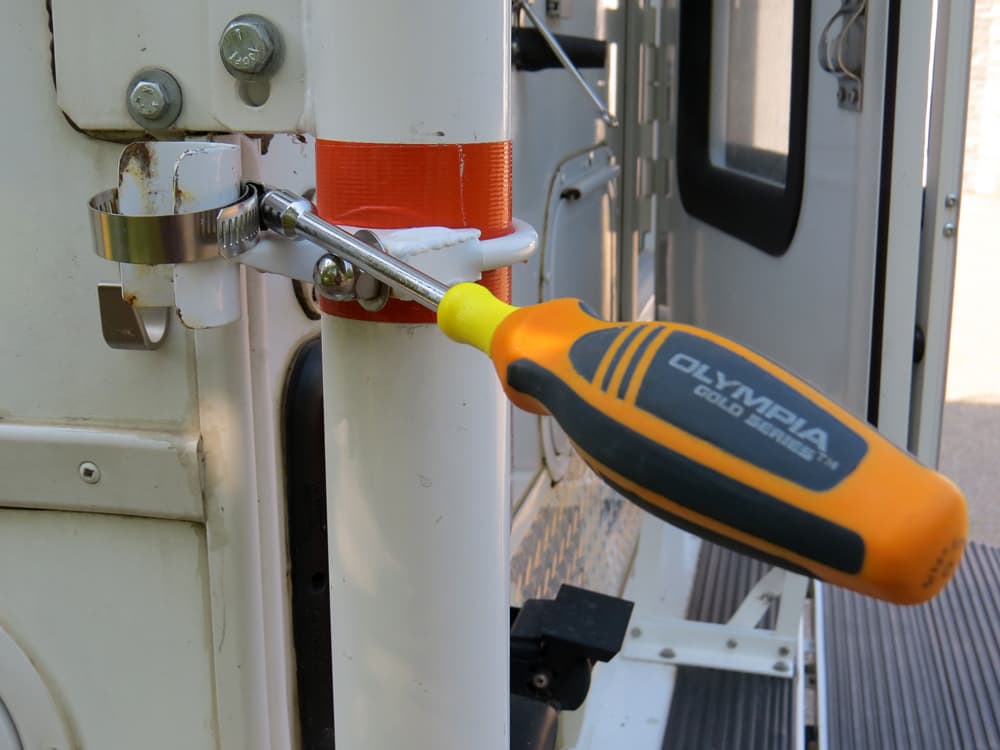
Above Right: This is the top pole clamp with flag pole removed and the hose clamp hanging there with the ¼ inch nut driver that is used to secure and loosen the hose clamp when it is installed or removed from the truck camper.
The picture on the left has the pole installed and the right has the pole removed with a tool used to loosen the hose clamp. Click to enlarge the photos throughout this modification.
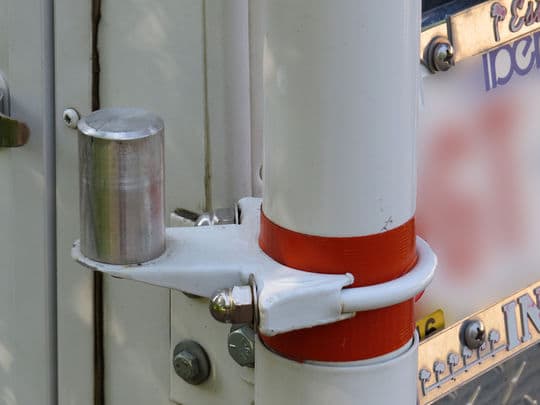
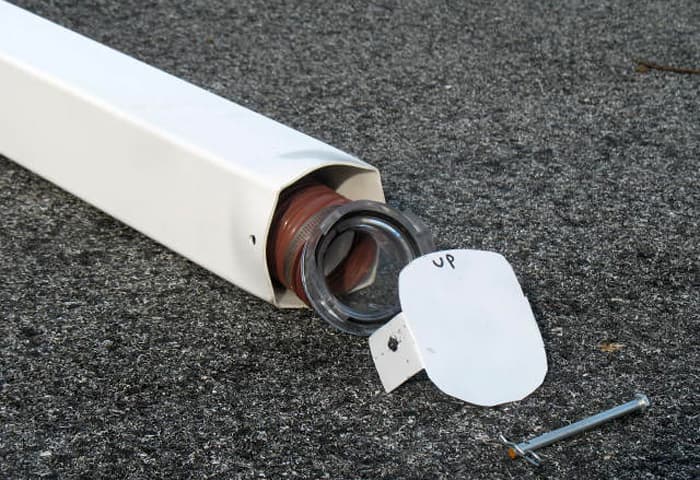
Above: This is the bottom flag pole spigot that the fiberglass pole slips over. The spigot is aluminum; 1¼ inches diameter and about two inches long. It is secured to the U-bolt bracket with a 5/16” by one inch bolt that is below threaded into the spigot.
This modification requires a few fabrication skills to pull off. The jacks on our camper are round and 2¼ inch exhaust clamps fit them well. We modified the two clamps to have a 1¼ inch diameter aluminum spigot for the bottom of the pole and a half pike with a worm drive hose clamp for the top mount.
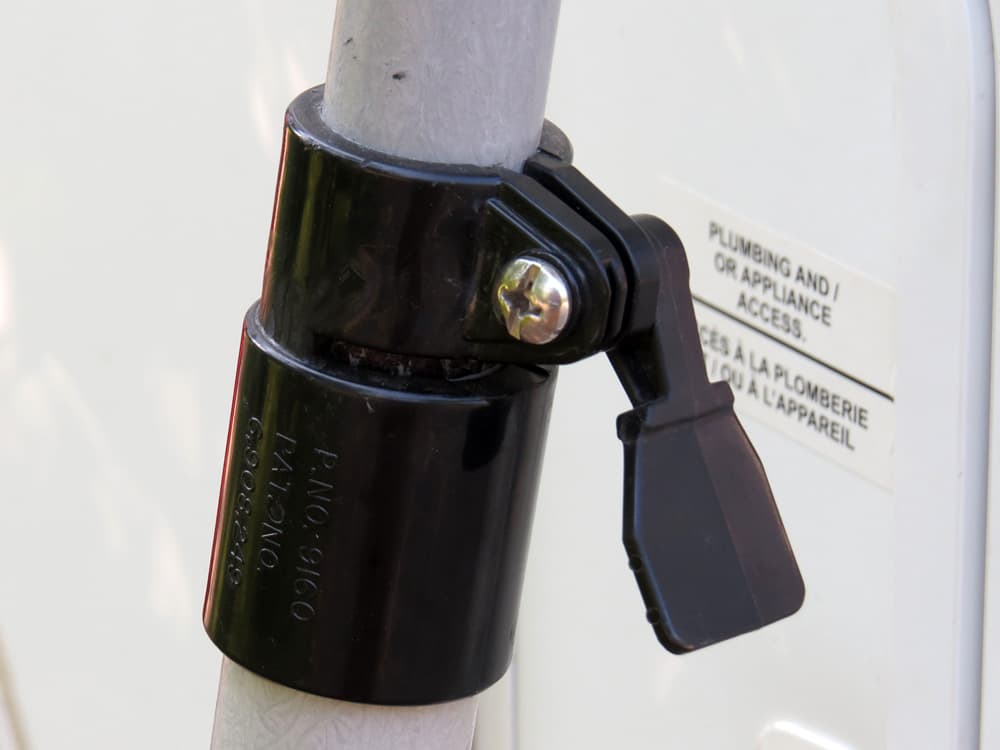
Above: The pinch cam clamp allows the fiberglass pole sections to telescope and be clamped when they are extended or collapsed – click to enlarge.
The pole came from a company called Max Gain Systems Inc., that makes antennas that are readily adapted for flag use. You can choose the parts individually or buy the kit they have for different sizes. The poles are fiberglass and fit together with a good sliding fit. The pinch clamps are adjustable and hold the extended or retracted pole firmly.
There are clip mounts which can be screwed to the underside of the camper wing to hold the flag pole for transport. We keep the top pole with the flag rolled up on the bed when not in use.
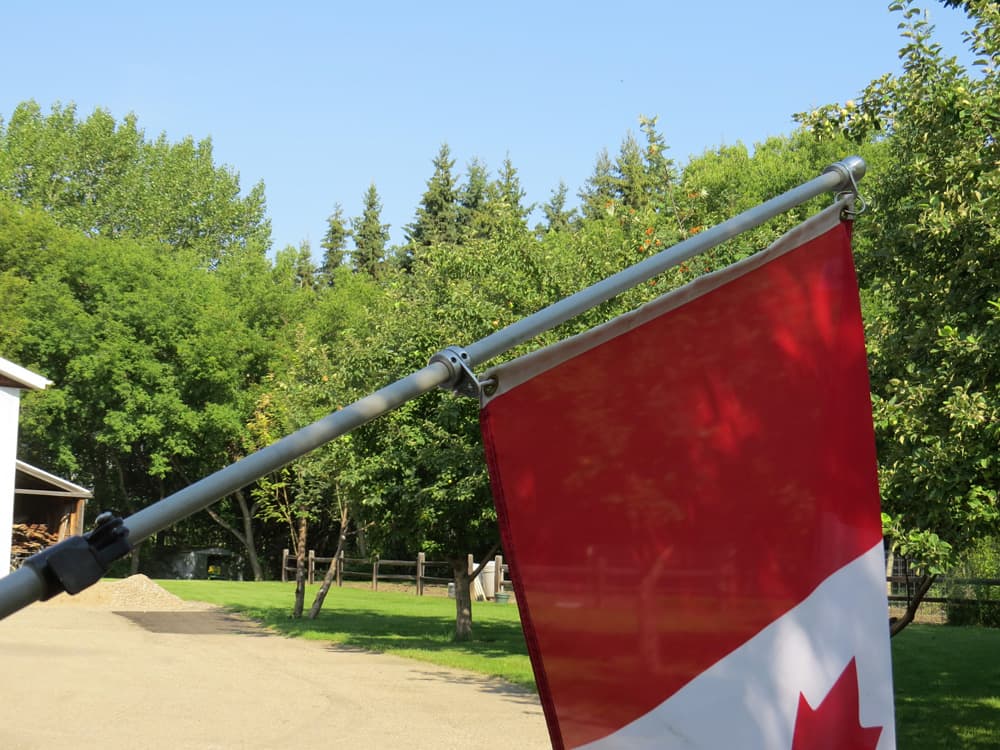
Our poles are 4 feet long and telescope. This gives us a pole which is about 15 feet fully extended and collapsed it is about 4 feet, 9 inches. This is plenty long to put the flag above the truck camper’s roof. The bottom mount is about 4 feet from ground level. We have our flag mounted on the left rear jack leg as we have the BBQ mount on the right rear jack leg.
Now I have two more legs to use for something? I don’t want to wasted real estate.
The flag has been a real hit with us and we have had numerous comments from other campers. If you are in a sea of campers it makes it easy to see your rig from a far. Flag etiquette says that you should fly the flag of the country you in on the top and your own flag lower down, if you are flying two flags and in a foreign country.
This mod takes two to three hours depending on you skill set and tool availability. It costs less than $150, including a good quality 3×5 flag. In my opinion, the skill level of this mod is hard.
#2 – Glenn and Caite Blount, Lake Jackson, Texas
2012 Ford F350
2004 Lance 1010
 |
 |
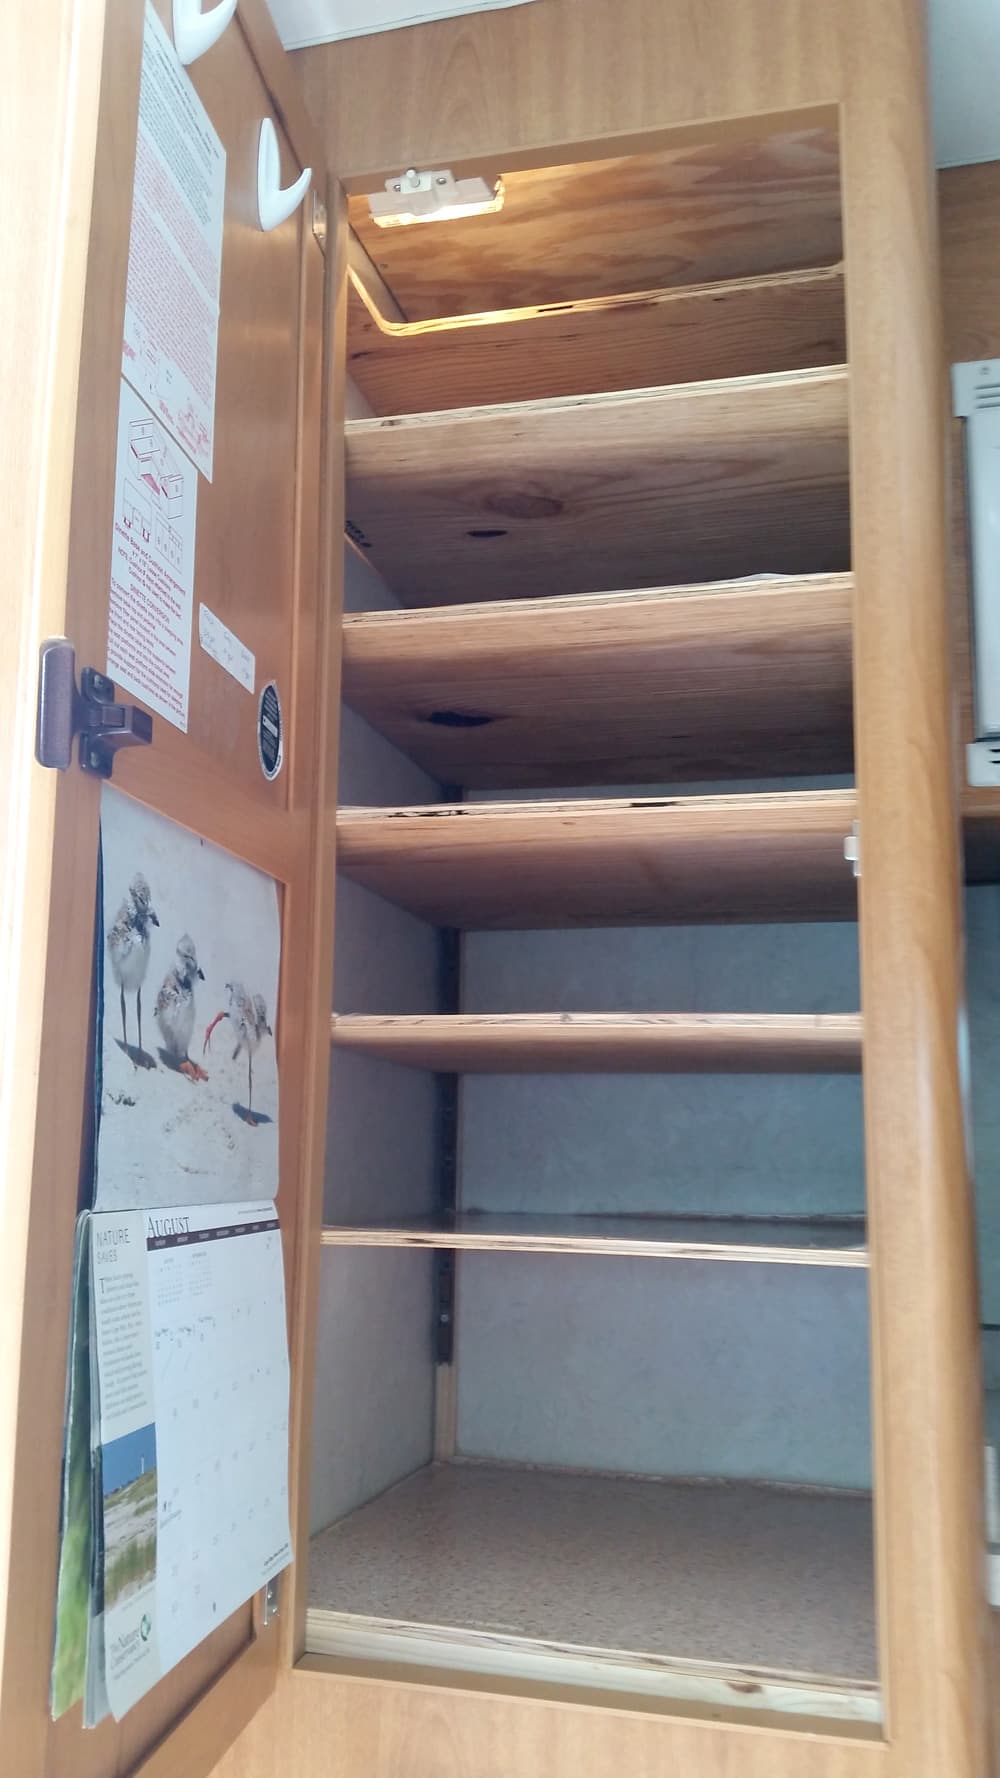
Above: The hanging wardrobe was turned into a wardrobe with shelves – click to enlarge
We don’t travel with any hanging clothes, so we made the large vertical closet in our camper more functional. At first we did hang some coats and put a tall narrow shoe rack in the closet. Every time we traveled, items would not stay in place and the closet had to constantly be straightened up.
We decided that adjustable shelves would give us more flexibility and functional space. We purchased and installed four adjustable shelf bracket strips and then cut four pieces of plywood to fit the space. The top shelf is cut out so we can reach the items on the top shelf easily.
We used contact paper to cover the shelves so tote boxes would slide in and out more easily. We purchased several small plastic boxes to store items.
We are glad for the redesigned shelving. It is much more flexible and we store our shoes, fishing reels, wet weather outerwear, and miscellaneous items on the shelves. Items don’t move as before, so there is less to straighten when we arrive at our destination.
It took me four hours to complete and cost $40. In my opinion, the skill level of this mod is easy.
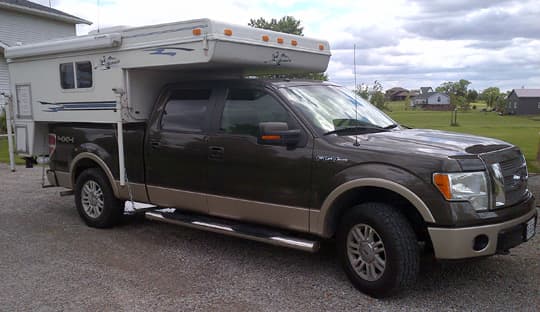
#3 – Gerry and Lynn Minor, Dunnville, Ontario
2009 Ford F150
2006 Palomino 1251
While traveling to Colorado last May, we quickly realized that not having a self-contained unit had some downsides, like what to do with dish water after you stop for lunch in the parking lot in the middle of Indianapolis Motor Speedway.
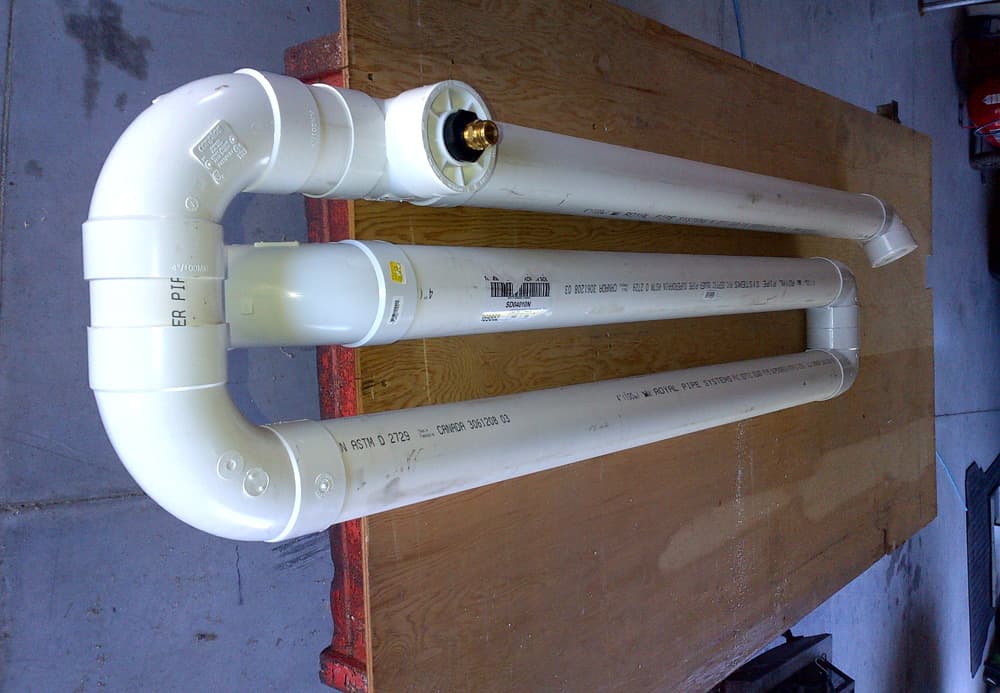
Above: Gerry’s grey water auxiliary tank – click to enlarge Gerry’s photos
When we got home, we first upgraded to a larger pop-up camper since space was always an issue. But, I still had to solve the grey water issue as the camper didn’t have a grey water holding tank. After a failed attempt to use a portable waste tank, I came up with this idea.
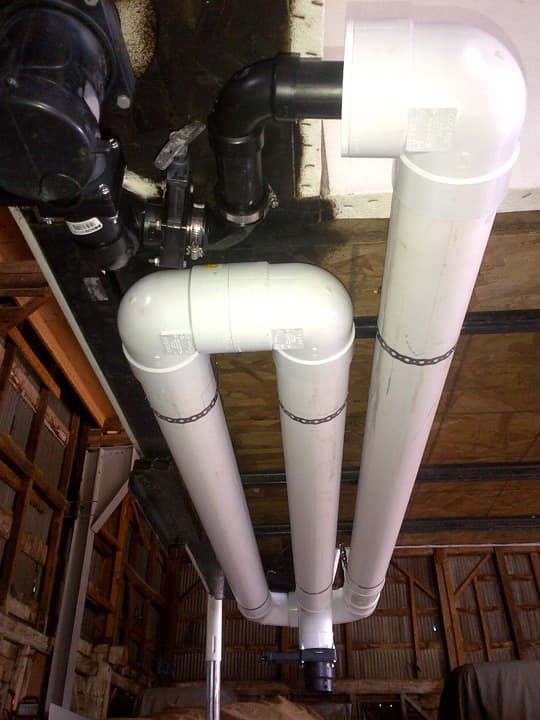
Using just ordinary drain pipe from our local hardware store, and a few plumbing fittings, I created a loop of pipe that holds just about as much water as our onboard fresh water tank.
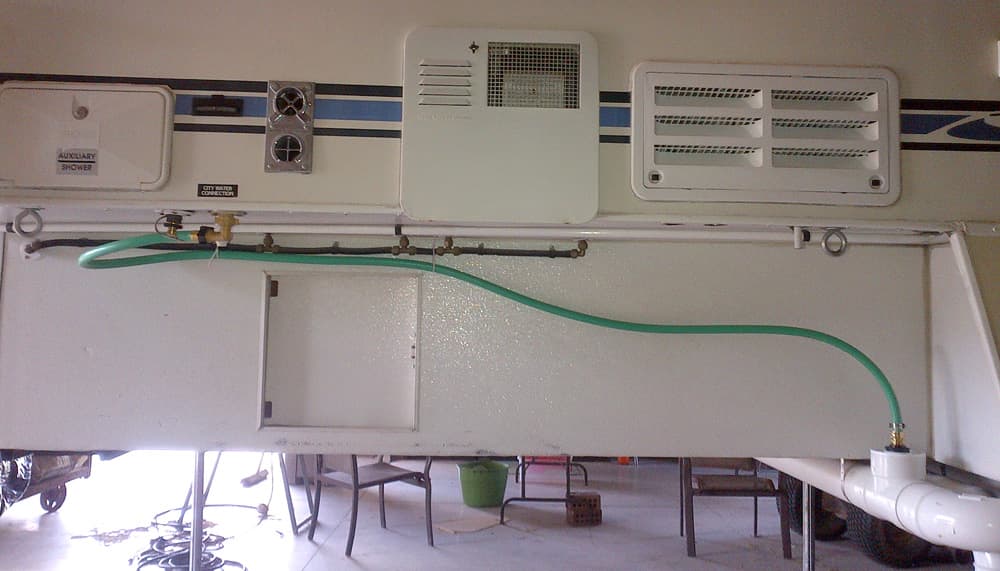

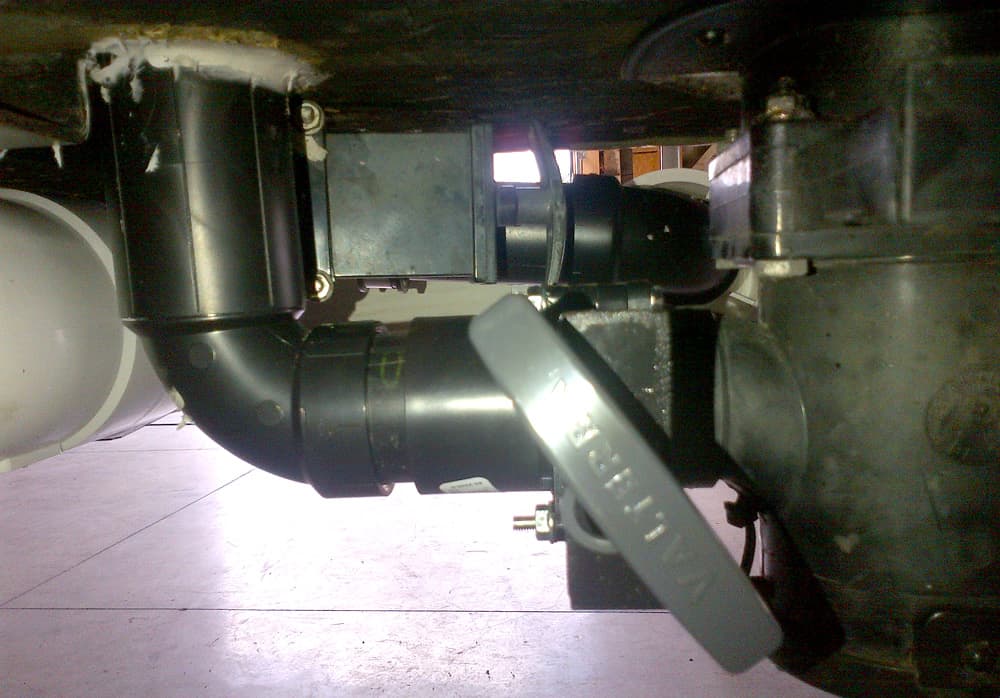
Then, I installed a T where the camper drain came out the bottom and added a blade valve to allow the water to enter the new holding tank.
Hint: It is hard to see in the pictures, but I used a rubber elbow to connect to the camper. This allows for some vibration.
Now we can use the sink, rinse our feet after a day on the beach, or even take a quick shower after hiking. Only basic tools are required for the project, and it works great!
It took me five hours to complete and cost $100. In my opinion, the skill level of this mod is medium.
#4 – Doug Jenkins, Hazelbrook, Prince Edward Island
2003 Ford F-250
2003 Palomino 8801
Before making this latest modification, we made a significant modification to the rear entry area of our camper. This included two steps with room on both sides for storage tubs. These tubs hold items ranging from a barbecue, tent shelter, and a generator.
After that modification, we planned a long trip from the east coast of Canada, down the eastern seaboard to Florida, west through the southern states, up the West Coast, and back across Canada for home.
During our trip planning and preparations, we decided to bring bicycles. The step and storage modification is perfect for our needs, and we were looking for a way to add bicycles while maintaining clear access to the rear camper entry door.
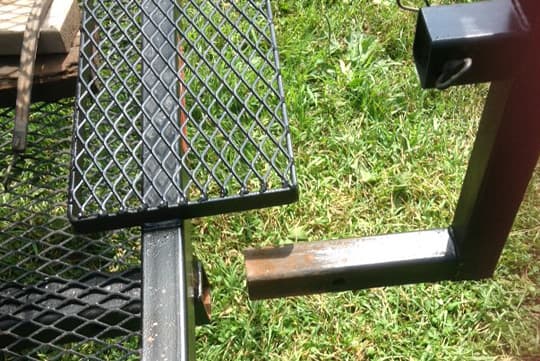
To add a bike rack and ensure easy access to the door, we added a hitch receiver just under the step (with a slight offset) and secured it with a pin. There is an adapter on the pole to hold the pin when not in use. Then we fashioned a rack from 2 inch by 2 inch steel piping, and added the arms from a prior car bike rack.
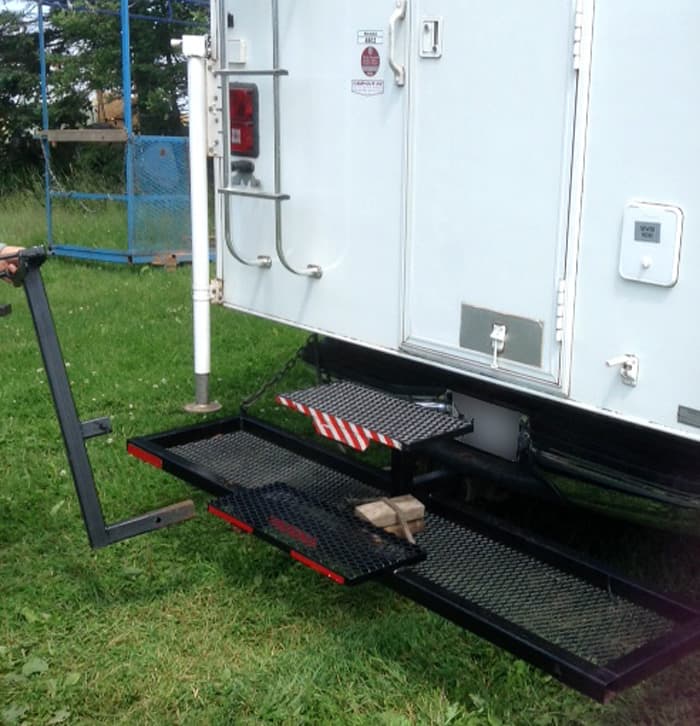
Above: The rack is removed easily from the receiver – click to enlarge
The bikes are attached using a block of wood and a C-clamp. The bikes are the kid’s left behinds and are of little value in the event of a loss.

The rack is removed easily from the receiver when you are staying for longer than a night or two. After 50,000 kilometers (31,000 miles) of camping it still functions well. We haven’t had any issues with it.
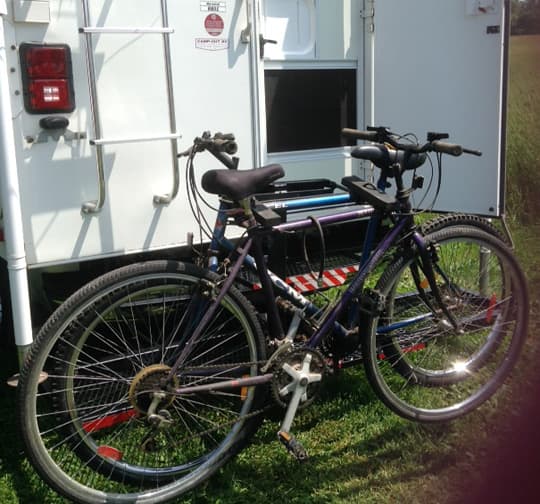
The bikes have proved most useful when touring campgrounds and surrounding areas. They are also great for grocery shopping and going to the beach.
It took me two hours for the fabrication and cost approximately $150. In my opinion, the skill level of this mod is hard, as cutting and welding was required.
#5 – David Carvalho, South Hadley, Massachusetts
2006 Dodge Ram 3500
2013 Alaskan 8′
I wanted to have my batteries fully charged while boondocking without use of a generator. This mod improves the quality and speed of battery charging from the truck.
I installed a CTEK D250S and CTEK SmartPass modular DC to DC charging system.
You can install just the CTEK D250S 25A DC charger. It charges your house batteries while the truck is running. The key features of the CTEK unit are that you can charge at a higher rate while adjusting the voltage output to the house batteries. It is based on the state of charge while adjusting voltage output to compensate for voltage drop. The charging is also temperature compensated.
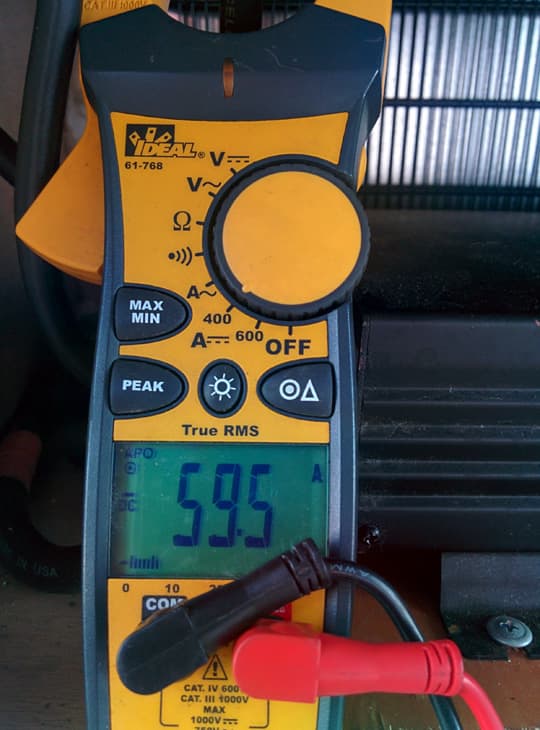
Above: This higher reading is when I started charging.
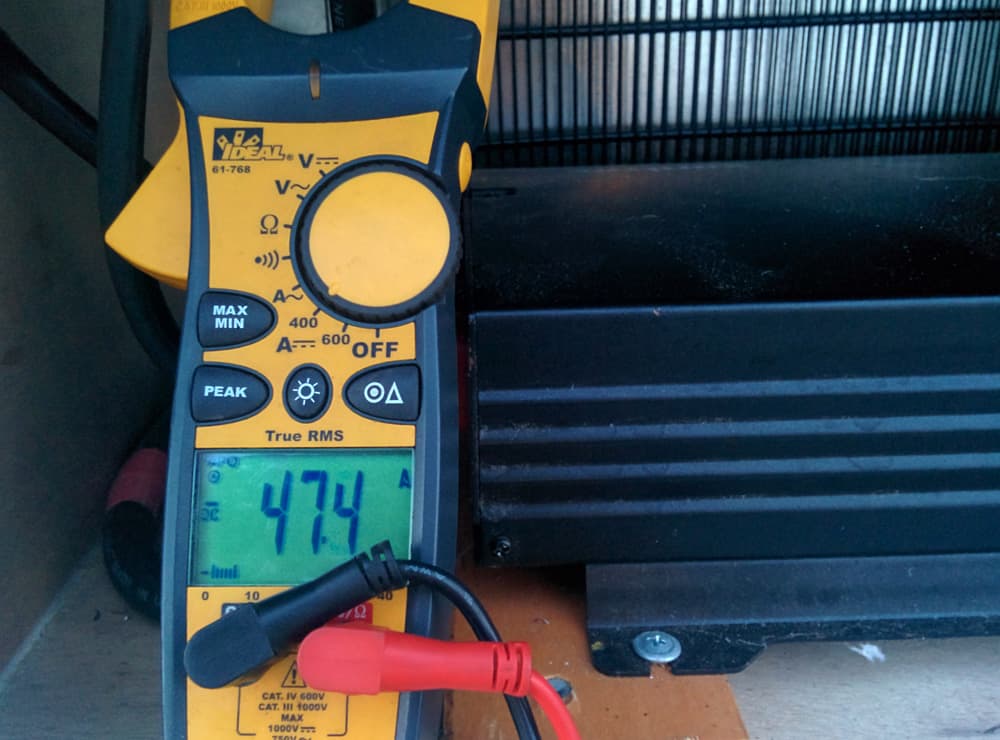
Above: This lower reading is the CTEK adjusting the charge rate as it changes the percentage of charge.
Without the CTEK D250S your batteries will still charge through your truck-to-camper umbilical connection. However, the batteries will charge at a lower rate. There is also no compensation for voltage drop, or the state of your house batteries.
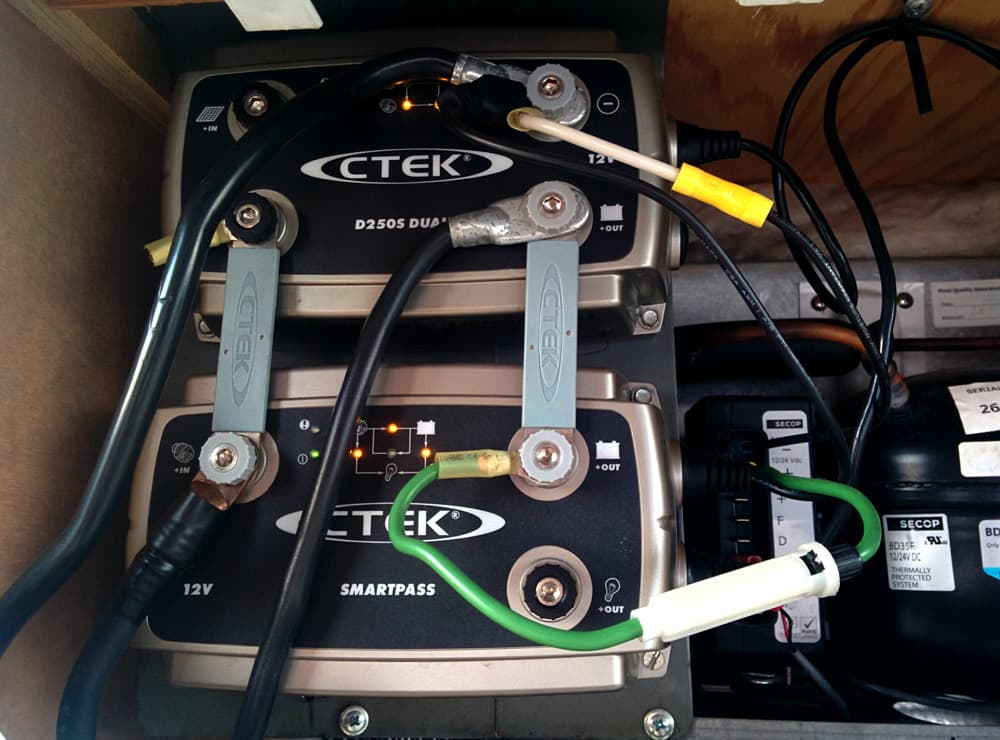
Above: The bottom module is the Smart Pass and is optional. I obtain a higher charge rate by using the two modules together. Click to enlarge.
I went one step further and installed the CTEK SmartPass module. This turns the CTEK D250S 25A charger into an 75 amp charger. If the smart pass module is used, a new 4AWG (American Wire Gauge) cable needs to be run from the engine compartment with the proper fuse protection to handle higher rate of charge. The original factory wiring is only good for 30 amp charge rate.
It also adds a solar input that can charge the truck battery. I have not yet found a need for the solar. The few times that I guzzled the amp hours instead of sipping, I simply turned the truck on and charged my camper batteries at over twice the rate of most truck converters with the CTEK system.

Above: This picture shows the unit mounted behind the compressor refrigerator and alongside the true Sine wave inverter. All of these items need ventilation and fit nicely into this area. Click to enlarge photo above.
I have used this system for about a year. So far it has worked out great. I can go out for an extended boondocking trip without bringing generator. I even use 120V appliances from my inverter without worry. At times I pull into a spot with electricity and don’t bother to hook up to available utilities.
The installation took me a good part of a day. It takes less time if you have everything lined up. It costs $600 to $650. In my opinion, the skill level of this mod is hard.
#6 – Jesse Taylor, York, Pennsylvania
2006 GMC Sierra 2500
2005 Lance 815
When I first purchased our Lance Camper, the sewer hose was a short one. I soon became tired needing to almost drive over the ground level dump cap to vacate my holding tanks.
I soon purchased a 10 foot flexible hose that was fine for dump stations, but was again short for those full-service campsites with electric and water on one side and the sewer connection at the other.
As I do mostly boondock camping, this was not a real big problem. However, the longer 10 foot hose did not fit into the handy hose compartment at the end of the camper.
To solve this, I band clamped a 4 inch white PVC sewer tube to the back ladder, blocked the bottom with a wooden plug with drain holes, and was once again a happy camper. That is, until some dirty, rotten, low down, no good person stole the dump hose from the camper in my driveway the night before a camping trip this year. Thankfully, I didn’t need to dump on that trip as I stayed in family driveways with bathroom privileges.
Above: The 4 inch by 4 inch by 8 foot PVC tube – click to enlarge
When I got back from my trip I went to a major home supply store and purchased a 4 inch by 4 inch by 8 foot PVC tube. It’s the kind that slips over a 4×4 post for a backyard fence. I also bought two 4 foot by ⅛ inch by 2 inch aluminum flat rods.
As I have a rubber mat on the bed of my truck, I had a total of 4 ½ inches from the top of the truck bumper to the bottom of the camper. I cut-off the PVC tube so that it would not interfere with the camper and tie-downs. Now, I am able to remove the hose and connector from the new tube.
I wrapped the metal straps around the tube and used short screws at the corners to hold it onto the tube. The soft aluminum straps were easily bent by hand around the tube. The round hose should not be punctured by the screws as the screws are not near the hose. The metal straps are placed between the camper bottom and the truck bed and the tube sits on top of the bumper, hidden in plain sight.
My next problem was to figure out how to get a 4 ½ inch round bayonet clear plastic sewer connector into a four inch square tube. I heated the end of the tube in a pot of boiling water over my camp stove. When it soft and flexible, I pushed it over a 4 ½ inch clay flower pot and the softened sides bowed out.
I finished expanding the sides by placing the flower pot into the boiling water, and again put the tube over the pot. I drilled two holes in both the expanded end (now cooled) and the other end. I then inserted a smooth shank bolt with a cotter pin and made a cover from some thin metal roofing flashing to hide the bayonet end.
Above: The sewer hose is now in a hidden place – click to enlarge
Above: The sewer hose is now in a hidden place – click to enlarge
My new 20 foot sewer hose is in a happy and hidden place, and so am I. Happy, not hidden. This mod has worked out just peachy dandy!
It took me one hour to complete and cost maybe $15. In my opinion, the skill level of this mod is easy.
#7 – Bill and Sue Billyard, Fort Erie, Ontario
2000 Ram 3500
2008 Palomino Winter Creek 115RS
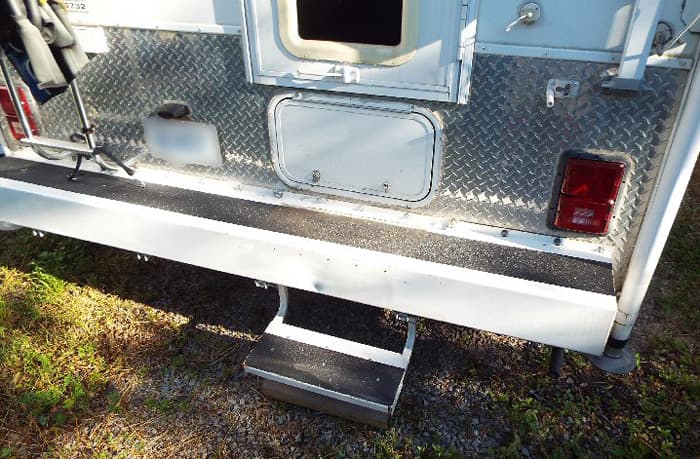
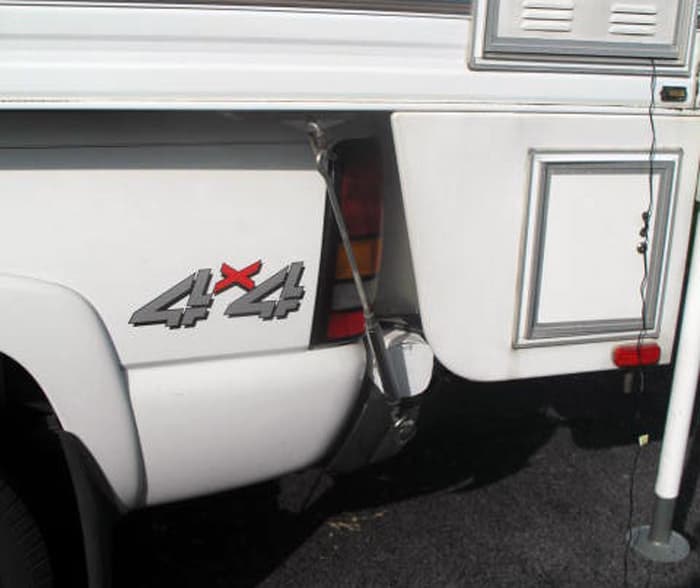
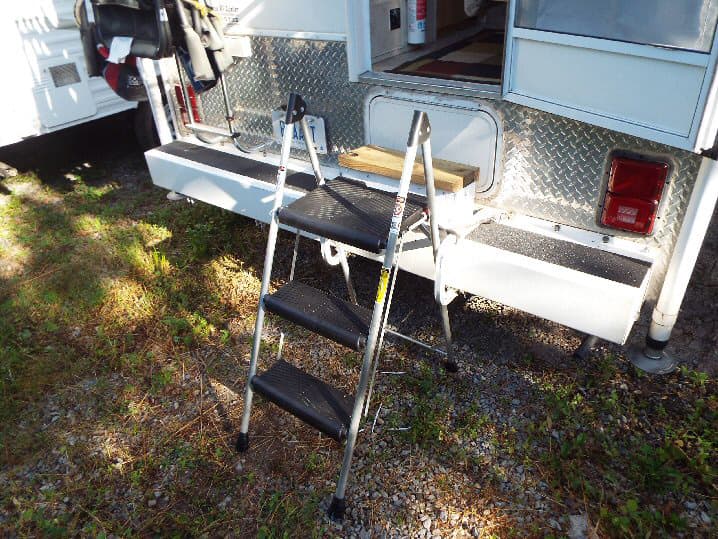
Above: Before the step-stool was added – click to enlarge the photos throughout this modification.
Our new to us 2008 Palomino Winter Creek 115RS came with the factory flip-up step. This works fine if you are a tall tall person (like a basketball star), but not so good for lesser folk like Sue and I.
We had seen and researched scissor steps, but were discouraged by negative comments regarding stability, sturdiness, and cost. So we decided to try a less expensive solution.
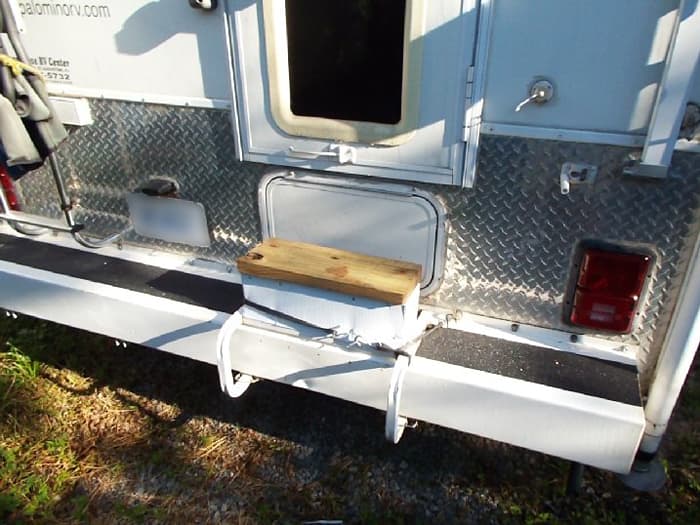
We took the factory fold down step and added lumber to it so it became an 8 inch high step which reached about midway up between the bumper and the door.
 |
 |
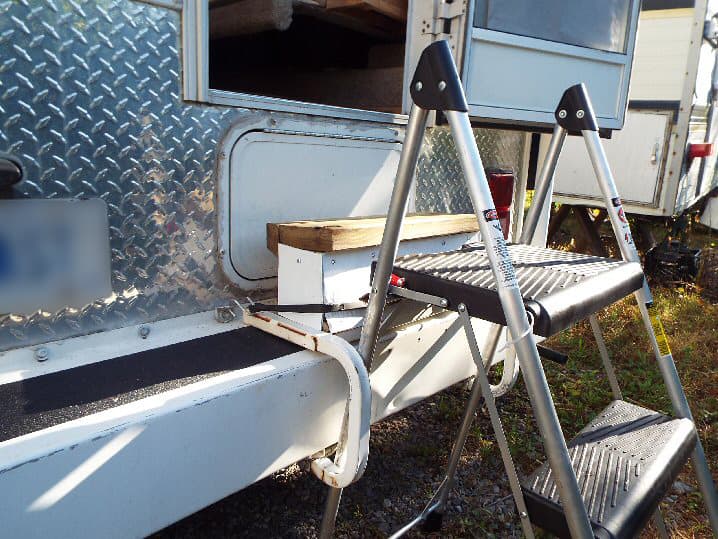 |
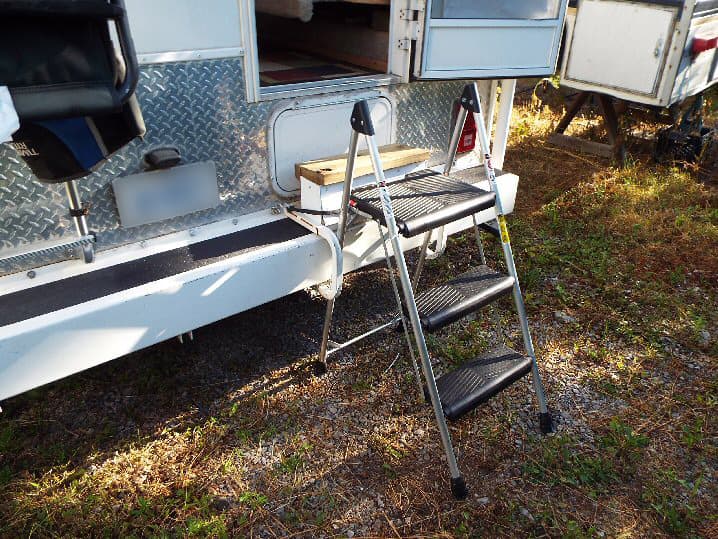
Then we bought a 3-step aluminum folding step stool from one of our favorite national lumber yards. We cut the handle portion of the step stool off so that we could step from it onto the modified factory step, and then easily into the camper.
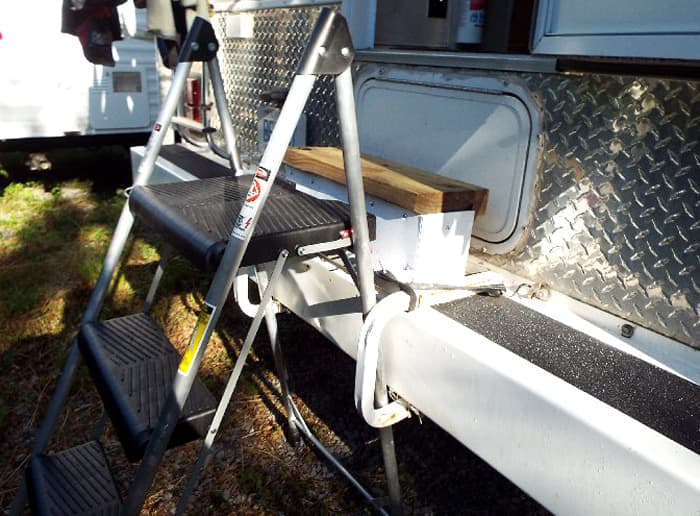
The mod has been great. The width of the step stool fits tightly between the brackets of the factory step so there is no side to side wiggle even if the ground is uneven. The height of the camper may vary depending on terrain but, so far, it has not been enough to make the step from the step stool to the camper inconvenient.
It took me two hours to complete and cost $40. In my opinion, the skill level of this mod is medium.
#8 – Marceil and Paul Gathany, Springfield, Ohio
2009 Chevy Silverado 1500
2007 Sun Valley Sun Lite
After camping in larger RVs over our fifty years of camping together, we have come to appreciate the smaller spaces found in a truck camper. For the most part, we have learned to deal with less space. However, when we see an unused space, our minds go into overdrive.
We found it cumbersome to store the small games and DVD’s we take along on our trips. Those items can consume a considerable cupboard or cabinet space that should be used for linens, clothing, food, or kitchen supplies.
When Paul had the kitchen drawers out to run wires for our monitoring system (another modification for another time), he noticed an empty space below the counter and between the stove and sink. The space was about 12 inches wide, and reached back to the outer wall completely unobstructed.
Looking at the front of the cabinetry in the same area, there was a space between two support members. This space was covered with wood wall paneling attached on the back of the supports.
Bingo! A mod opportunity!
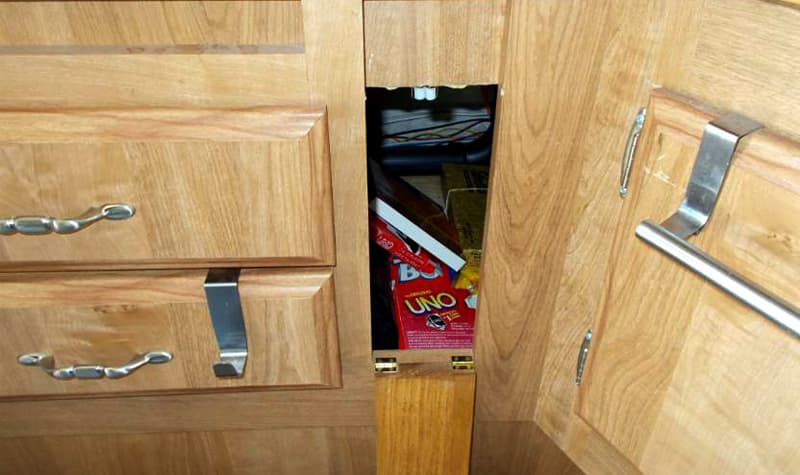
Above: The opening cut in the cabinet, reveals access to new storage space. Click to enlarge.
The first step was to carefully cut the paneling to the size of an access door. For the access door, a nice piece of poplar was chosen, fitted, and stained to match the paneling. A hinge was placed on the bottom of the door. We also added a latch at the top and a knob to match other cabinet hardware.
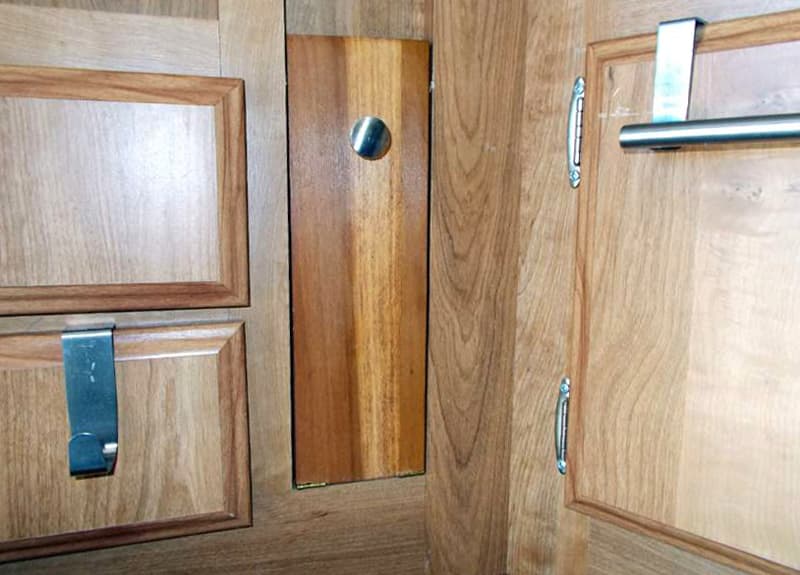
Above: When the new door is closed, it closely matches the grain and color of the cabinetry. Click to enlarge.
Storage space inside is about 12 inches by 18 inches, which is large enough to get small games and a good selection of DVDs out of sight and into their own space. It was a little mod, with a big benefit to us.
It took me two hours to complete and cost $10. In my opinion, the skill level of this mod is medium.
#9 – Don Crafts, Sevierville, Tennessee
2004 Dodge Ram 3500
2012 CampLite 8.5
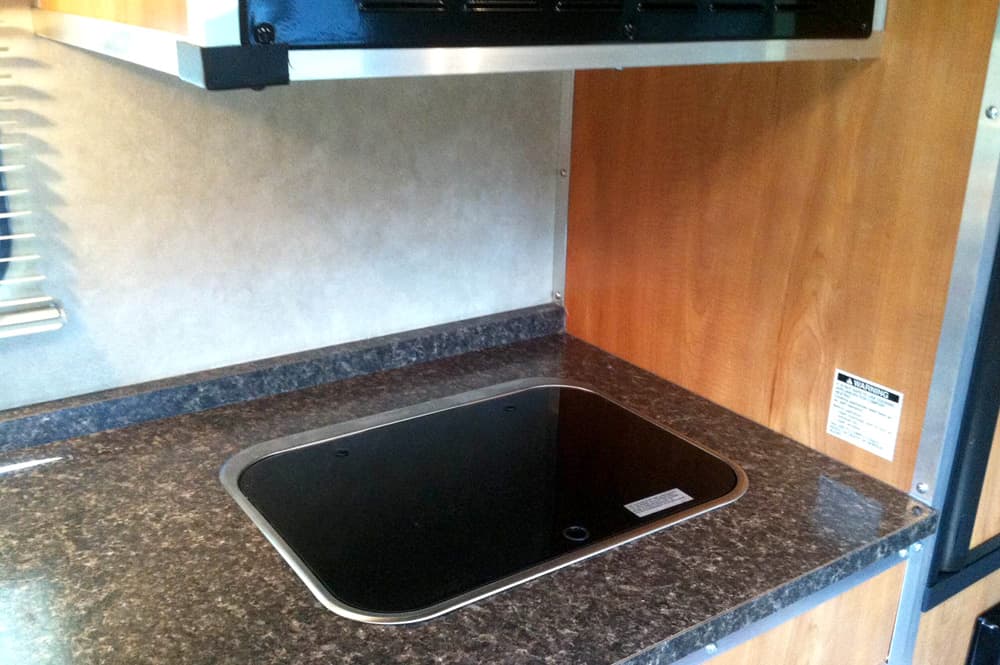
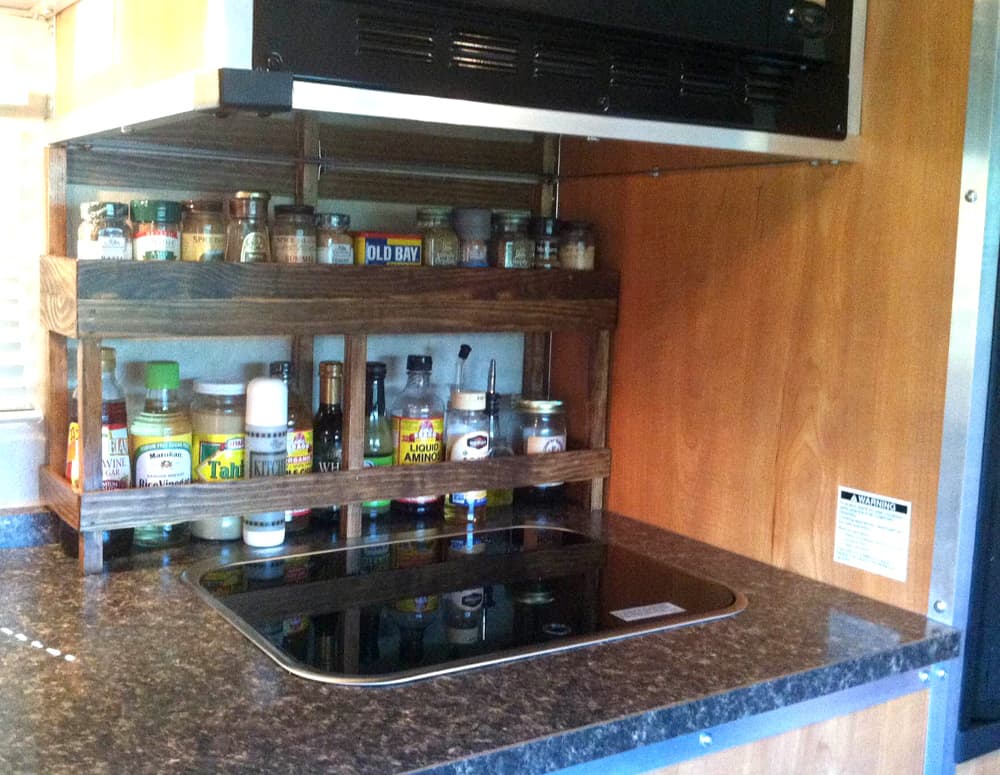
This mod improves storage and accessibility of spices and other cooking ingredients. I made use of dead counter space behind the stove top. Click to enlarge the photos throughout Don’s modification.
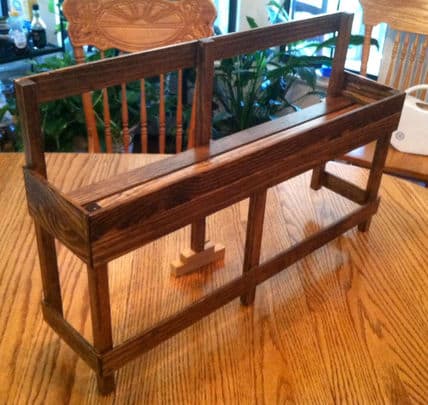
This organizer/spice rack was made from pieces of ¾ inch by ¾ inch pine trim (vertical legs) and ¼ inch by 1 ½ inch pine (horizontal parts).
There are no complex joinery, only straight cuts. All joints were glued and clamped and after drying and brads were added for additional strength. A clip was made from found aluminum that secures the center back leg to an existing trim screw.
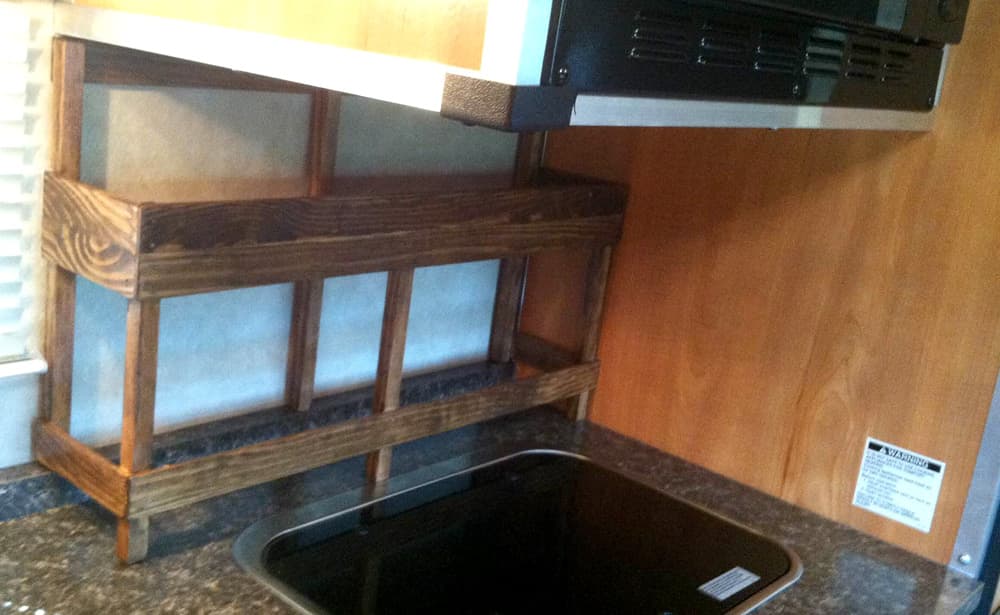
We have eliminated the shoe box storage method for these items. Everything stays securely in place and we now have some space back in our cupboards.
It took me eight to twelve hours to complete and cost $20. In my opinion, the skill level of this mod is easy.
#10 – Jack Purdy, Mojave, California
1969 Ford F-250 Camper Special
1970 Roll-A-Long Sportster 9.5
When I purchased our truck camper in 1976, the tie-downs were simply turnbuckles with chain attached to hooks on the sides of the truck bed. Early on I installed heavy duty front and rear sway bars to improve stability and handling. Later I added Rancho RS9000XL shocks.
I knew the tie-downs were a weak point. I needed frame mounted tie-downs for better stability, but couldn’t find anything adequate for the front and rear of my older 1969 Ford F-250 truck and rear step bumper setup. Torklift International had adjustable tie-downs, model F4000, that would work in the front, but not the rear. Eventually, I decided to fabricate my own rear tie-downs.
Click to enlarge the photos throughout Jack’s modification.
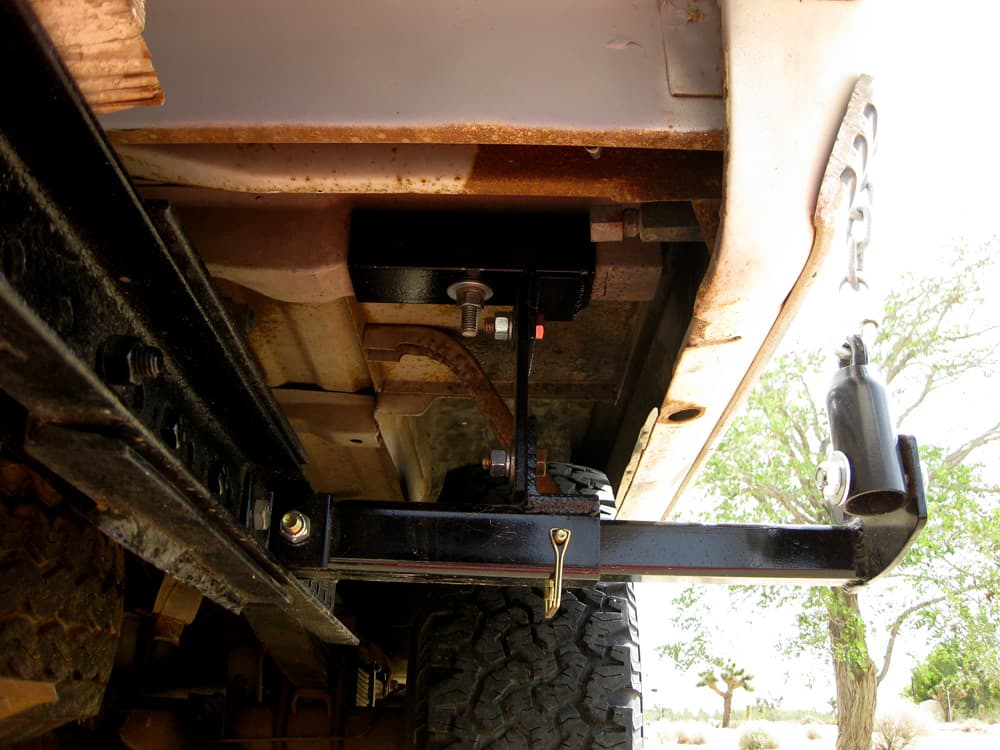
The rear step bumper supports attached to the rear of the truck frame, which provided a place for the tie-downs to attach to the frame. Directly above was a bed frame which provided a place to attach the vertical support. I added two rear bed-to-frame bolts for extra support.
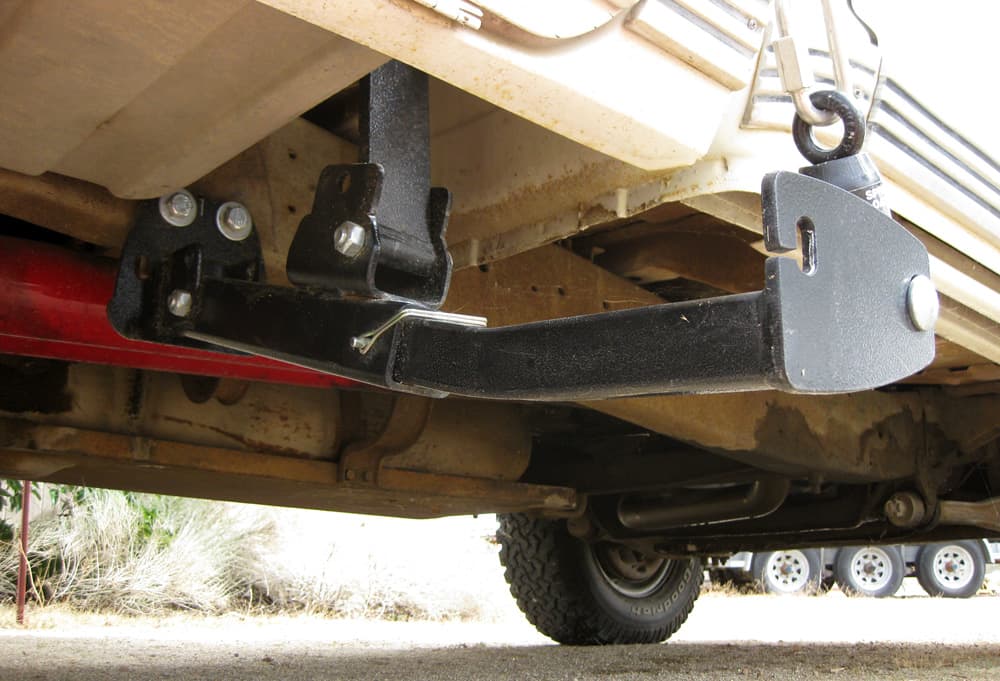
I special ordered square tubing and a flat plate in the proper thickness and cut the square tubing the to length and size needed. I drilled all the bolt holes needed on a drill press. My neighbor is a welder and did the welding. For the tie downs I used two Torklift S9000 Basic SpringLoad Kits. Each kit includes two SpringLoad units with springs, two heavy duty forged steel turnbuckles, and two lengths of chain which were cut to the length needed.
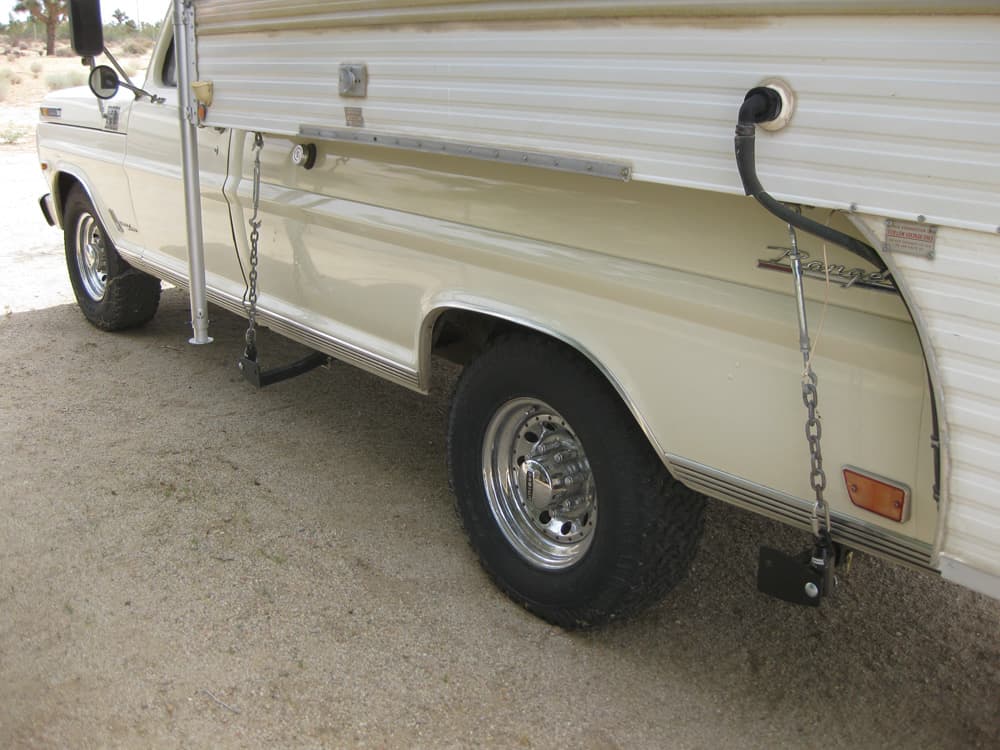
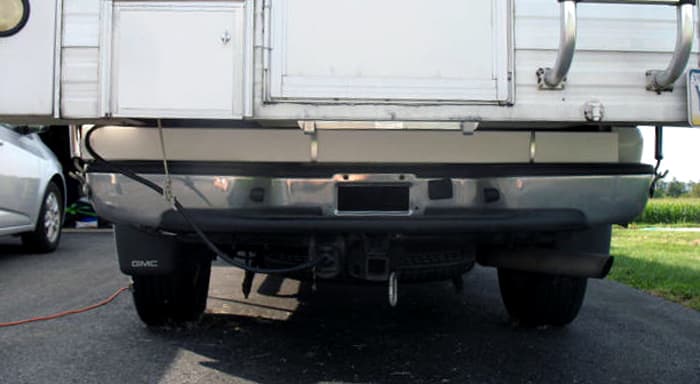
Above: The new system on Jack’s truck – click to enlarge
The new tie-down and turnbuckle system has worked great so far. I haven’t taken any long trips yet, but I can tell the camper is much more stable.
It took me approximately 80 hours to complete and cost $530 (not including the exhaust work). In my opinion, the skill level of this mod is hard due to the welding. In addition, you need be able to remove and replace the factory tool box and the auxilary fuel tank shield. I also had to get a muffler shop to re-route the dual exhaust muffler and tailpipe from the left to the right side.
CLICK HERE TO SEE WHO WON OUT OF THIS GROUP.
Disclaimer: The modifications above are submitted by Truck Camper Magazine readers. It is your responsibility to make sure that any do-it-yourself modification project you undertake is safe, effective, and legal for your situation.


