Steps have been built, aluminum handrails added, decks constructed, spare tires relocated, and laser beams pointed. Check out the Mega Mods, pick your favorite, and vote.

Welcome to the February 2016 Monthly Mod Contest. Please review the following six Mega Mods and vote for your favorite. We will announce the February 2016 Mod Contest winner next week. For more information about the Monthly Mod Contest, including how to enter, click here.
Click here to see the winner of this Mega Mod contest.
February 2016 Mod Contest Entries:
#1 – Eddie Henry, Sacramento, California
2014 Ram 2500
2014 Northstar 850SC
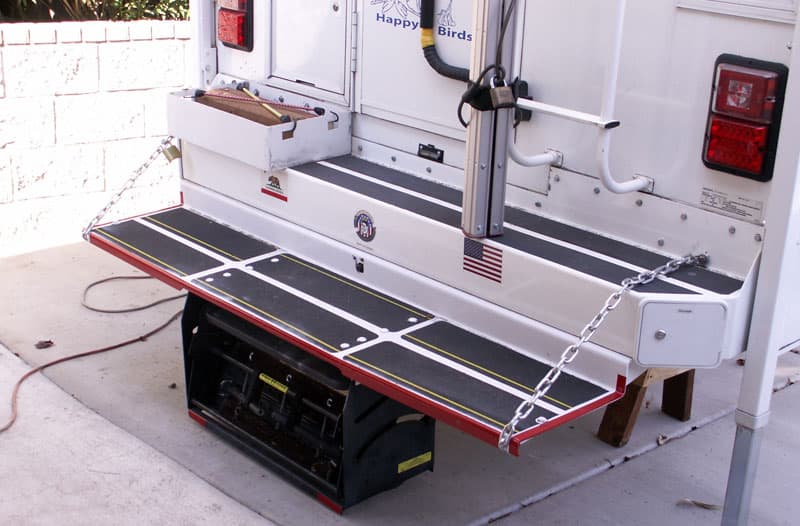
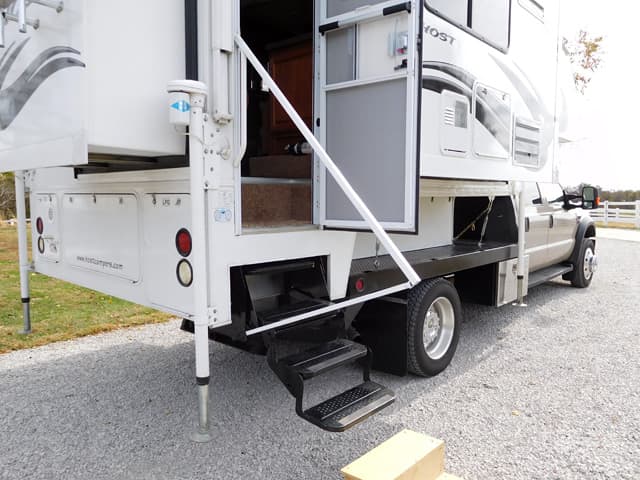
When our camper was mounted onto our 2014 Ram 2500 four-wheel drive truck, it was difficult getting in and out of our camper. We had a 5-inch wide by 5-inch high bumper-step, and the single 5-inch wide by 8-inch drop down step that came with it.
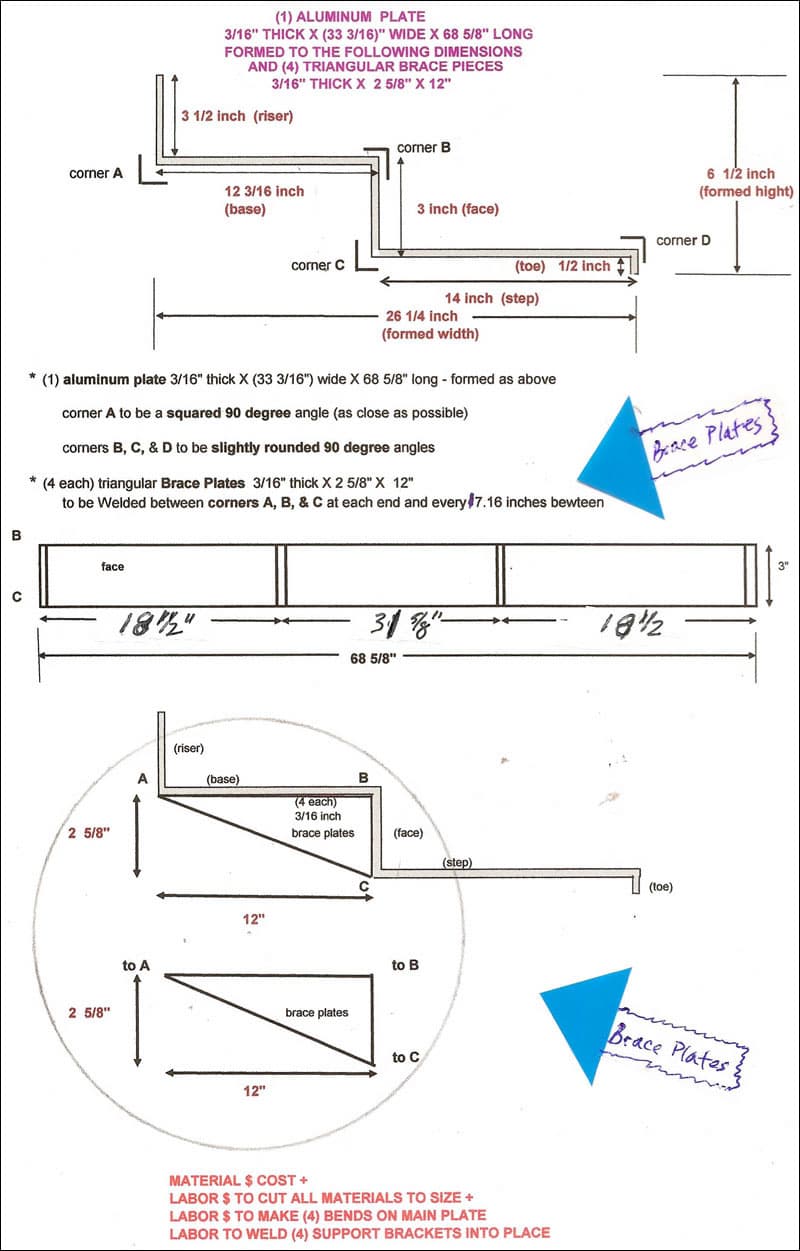
I designed and installed a 3/16-inch plate-aluminum landing-step and added a RV retractable 3-step system to that.
My landing step wraps under and behind the camper bumper. I secured it to the camper’s frame with bolts, nuts, and lag bolts. The steps drop down an additional 3-inches from the 5-inch bumper step, making for an 8-inch step. It extends out 16-inches to make for a nice landing that seconds as a bench seat, and extends the width of the bumper-step.
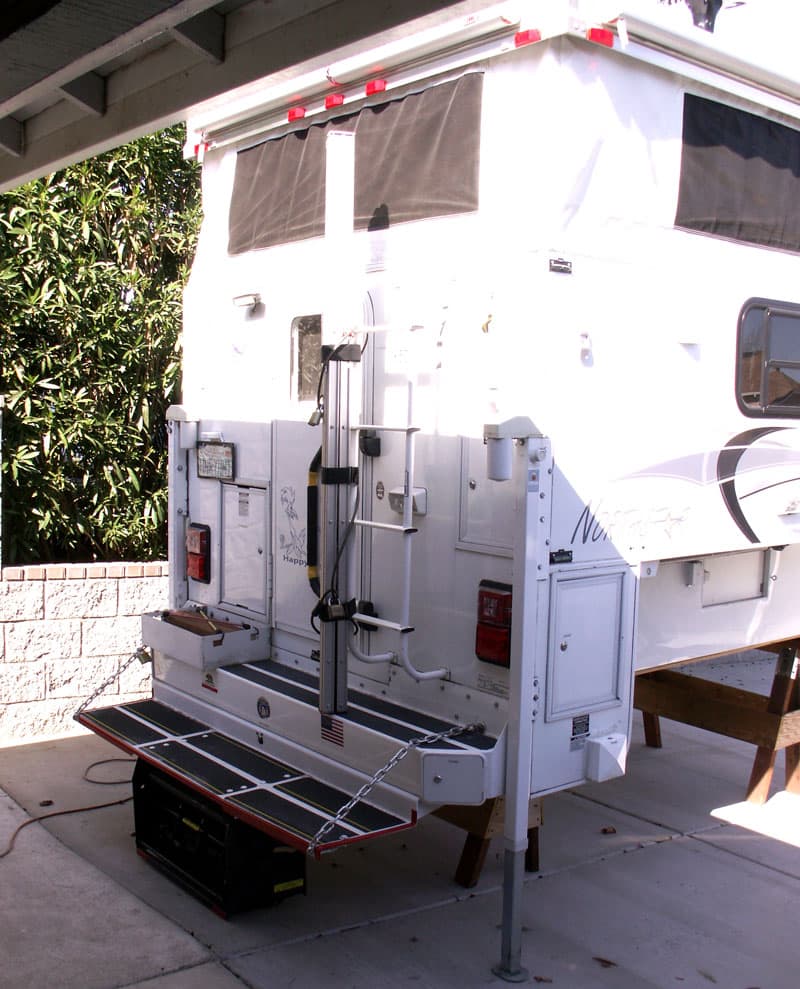
I also added one ¾-inch chain on each end to the landing, the bumper-step, and the camper’s wall. It’s an additional secure attachment so it doesn’t tend to bend down when stepped on. It provides the needed landing to stand on while opening the camper’s door (especially when it’s up in the air on a four-wheel drive truck) and getting in and out of the camper. Then I added a collapsible, fold-down RV three step and added adjustable legs to level it on any ground.
We have only made one two week trip with our camper since installing the new landing step. It worked great! It is so much easier getting in and out now.
It took me five hours to complete. It took a couple hours to design to spec, an hour welding, and a couple installation hours to complete. It cost $300. In my opinion, the skill level of this mod is hard because the materials need to be cut and shaped to spec with braces heliarc welded on each end.
#2 – David Thompson, Kansas City, Missouri
2008 Ford 450
2014 Host Mammoth 11.5
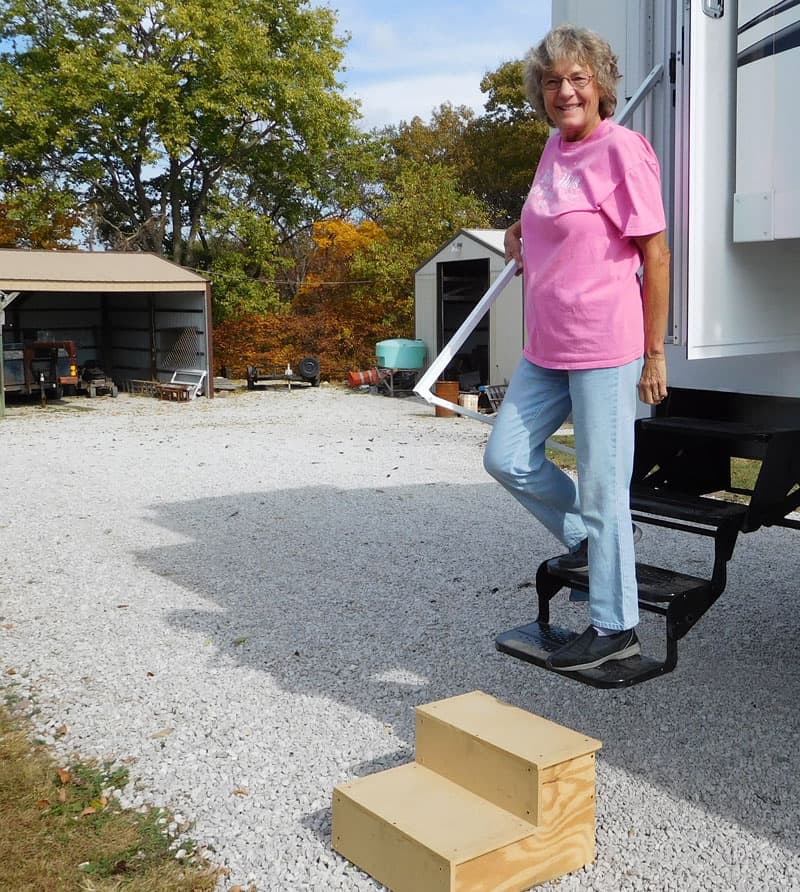
I had a little difficulty going up and down the steps of my camper. Having a tall camper and a tall truck bed – my flatbed is 31-inches off the ground – I was kinda looking down from the door. I was thinking that there should be a hand rail.
 |
 |
After a few different ideas, I came up with this configuration. I first started with a piece of 1-inch square tubing, and cut out enough of one side to allow me to put the tubing over the existing handle. Then I drilled a ¼-inch hole through both pieces.
I measured the distance I needed to the bottom and cut it off. I used a piece of ¾-inch square tubing to make the bottom support and a short piece of the 1-inch square tubing to make the lower support piece, and bolted it to the outside of the step frame. I welded a small tab of steel for a hinge for the lower support.
 |
 |
I used a ¼-inch bolt with a wing nut for the top, and a ¼-inch pull pin for the lower attachment point. The pictures show what it looks like after a paint job. The railing has given us security when going up or down the camper steps.
It took me four to five hours hours to complete and cost $10. This modification required metal working tools, a welder, and a drill. In my opinion, the skill level of this mod is hard.
#3 – Joe Ferraro, Pinon Hills, California
GMC Sierra 3500
2010 Outfitter
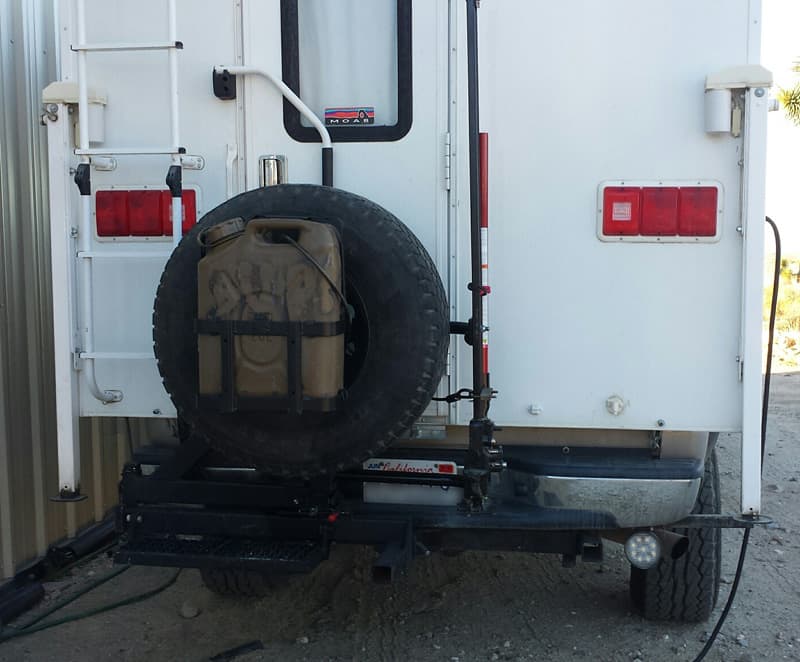
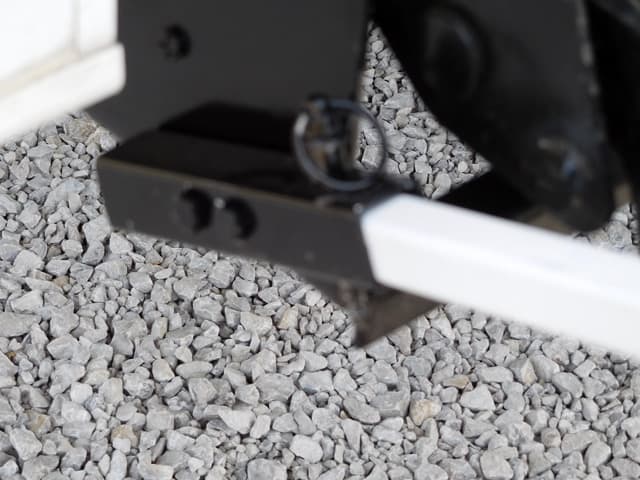
I wanted to move the spare tire out from under the truck. I plan on going with 35-inch tires and the larger tire will not fit under the bed. By moving the spare out onto a rack, it also gives me a great place to mount an air compressor. The rack provides a place to carry a fuel can and my Hi-Lift jack.
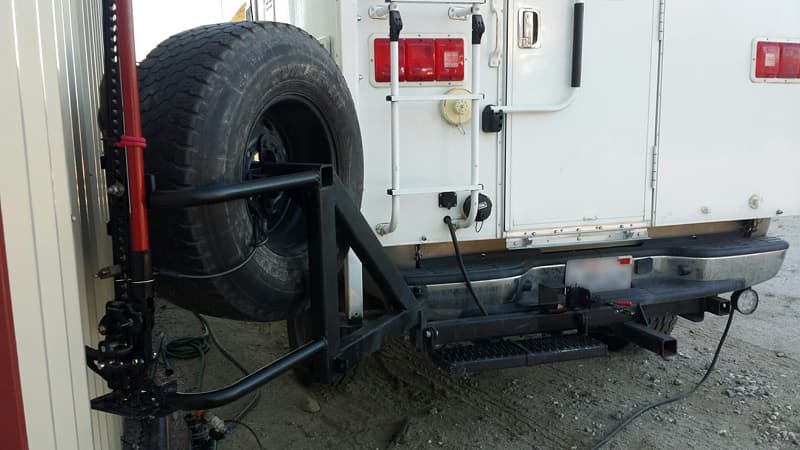
I used the receiver hitch to carry most of the weight, and I added a second receiver to the driver’s side of the hitch to stabilize the rack. I designed the rack and had a fabricator build it. The rack is removable. It has worked out better than I thought it would.
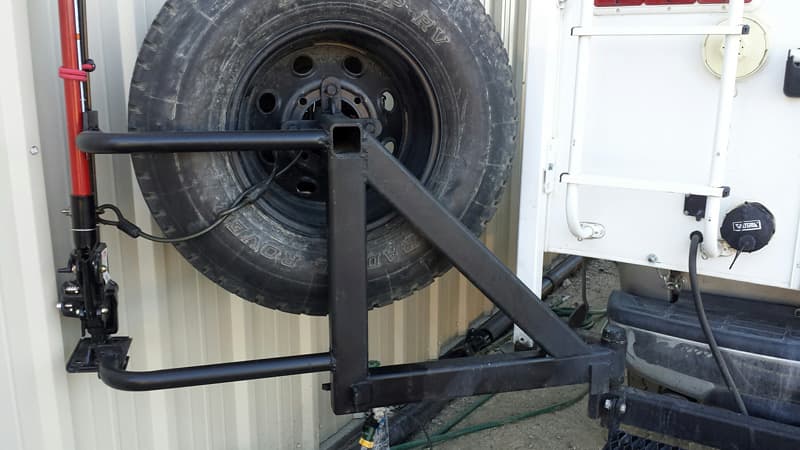
It took me 20 hours to complete and cost $1,000. In my opinion, the skill level of this mod is hard.
#4 – Dan and Susan Knapp, Albany, New York
2001 Chevy 2500HD
1999 Coachman Ranger 115RB
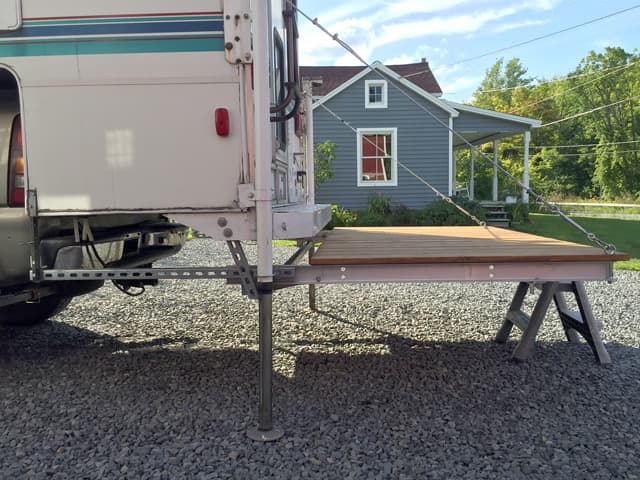
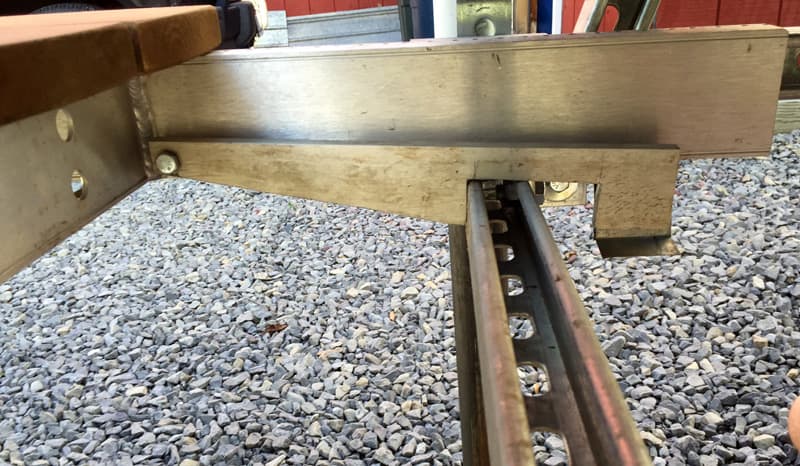
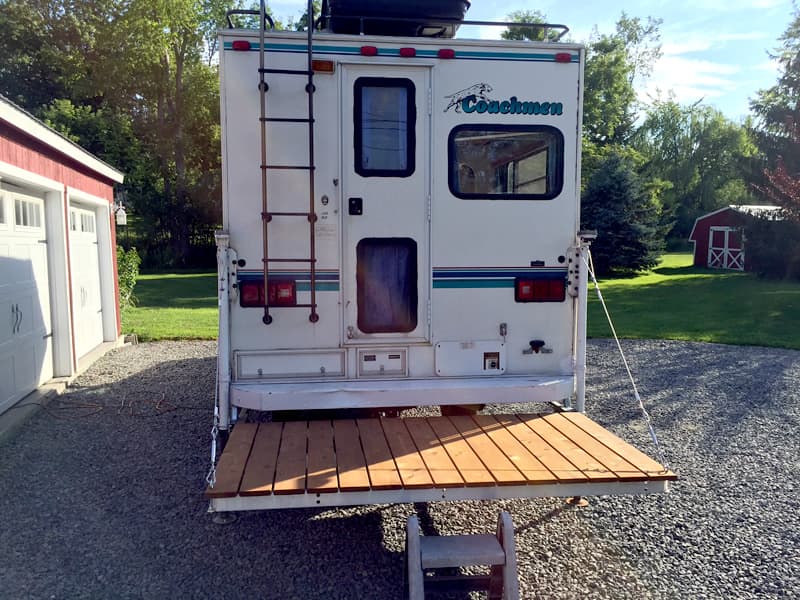
We didn’t like the 4-foot drop right out the door and we wanted an easy to clean place to help keep sand and dirt out of the camper. We didn’t like how other fold-up deck designs block the door when up.
 |
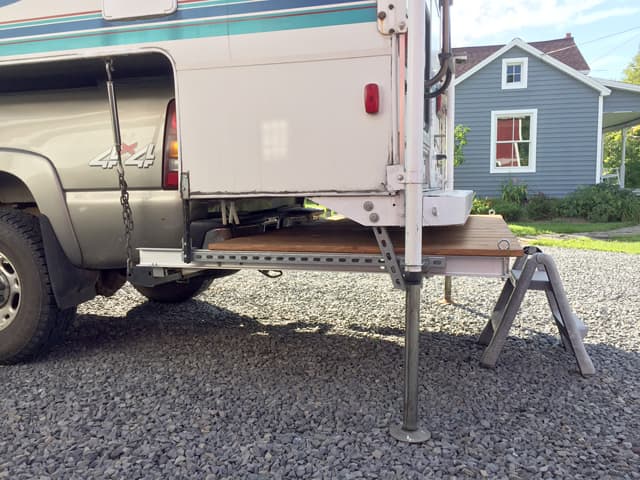 |
Above: The deck can slide under the back overhang of the camper
We added a rear deck to the camper that slides underneath. It is completely suspended from the camper and automatically locks in place when pulled out. We used aluminum and cedar to keep it light. It weighs about 100 pounds. The cables are rated at 800 pounds each. I have had five people sitting on it while tailgating without a problem.
It turned out better then expected. We don’t know how we lived without it. It feels very secure with almost no flex. It adds a little length but we use it as a step when retracted. The jacks are still the lowest point and hit first when on uneven ground.
It took me 10 hours to complete and cost $150. The aluminum was dumpster sourced. In my opinion, the skill level of this mod is hard.
#5 – William Cooke, Anderson, South Carolina
2002 Dodge Ram 2500
1966 Avion C-10
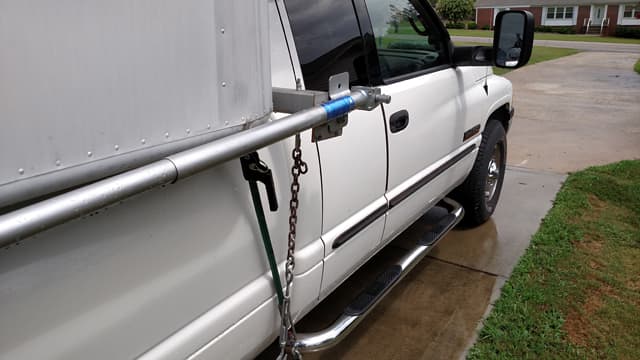
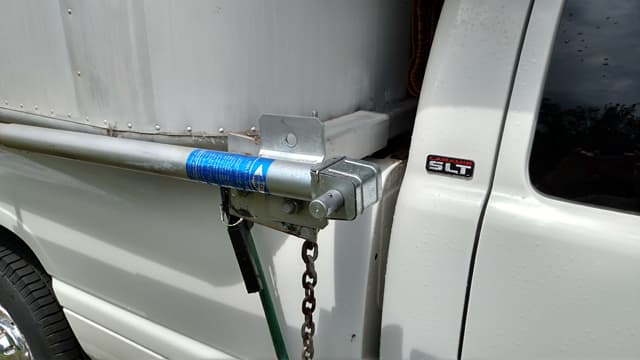
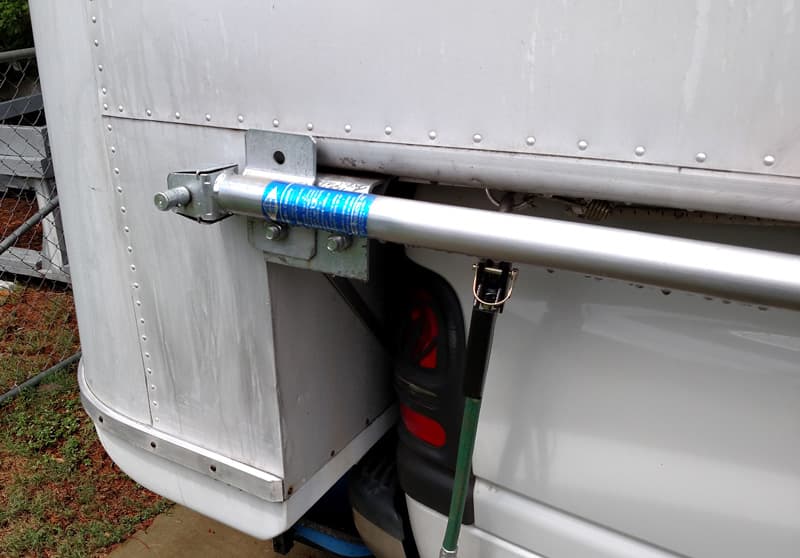
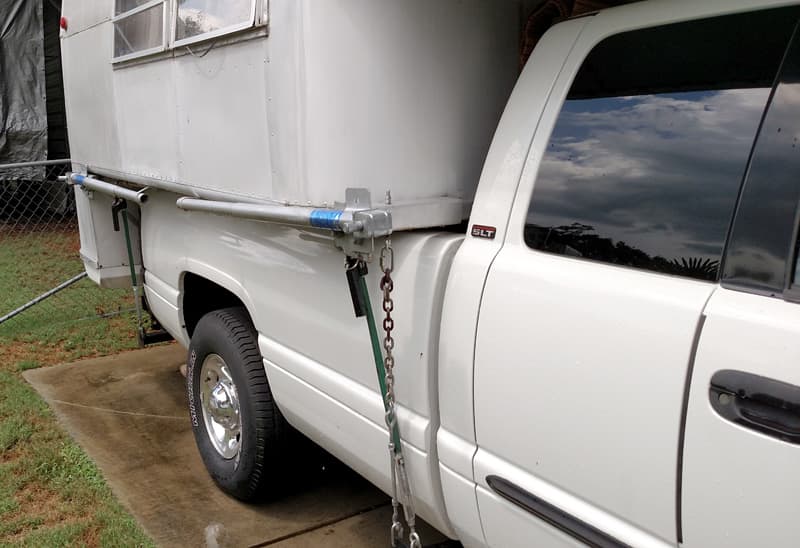
My 1966 Avion C-10 truck camper came with only three lift jacks. I wanted four jacks for increased safety. Due to some wing repair and less strength for jack placement I devised a different system for jack location.
 |
 |
Above: The passenger’s front of the camper
In the front I fabricated a cross bar just under the cab window made of 1½-inch square tubing. The 4×24-inch plates were placed downward and flat against the front end of the bed box. They were turned at a 90 degree bend backward and welded to the back side of the tube to distribute the weight.
There was also 1½-inch angle iron welded to the cross tube and screwed into the top of the side under the wing. On the ends of the tube, I welded back plates to match the jacks. These plates were actually welded to be removable and adjustable by 2-inches for the length necessary for extra width of a dually truck.
Above: The passenger’s rear of the camper
The same type of system was used in the rear, except it was designed and fabricated like a cradle or sling. The back plates are welded to the end of the tube to match backs of the jacks. The total weight added to the unit was approximately 80 pounds. It all works well and there is no more worry about the strength of the wood. It is much stronger and safer.
It took me at least six to eight hours to complete and cost approximately $100. In my opinion, the skill level of this mod is hard because it required much cutting and welding.
#6 – Donald Fox, Chesapeake, Virginia
2015 Ford F450
2016 Lance 1172
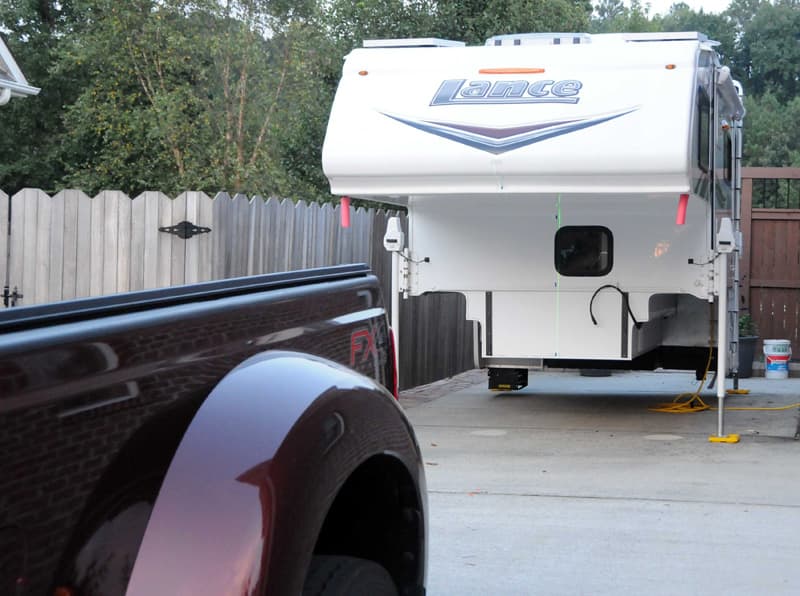
I am new to truck camper ownership and was having to spend over one hour getting the truck and camper to load with appropriate space on each side. This is the first of two or three steps I will take to make loading extremely easy, even for a newbie.
I wanted assistance in loading my truck camper, a 2016 Lance 1172 onto a Ford F450. I have 2½-inches on each side at the cab area and only 1-inch each side at the tailgate once the camper is loaded. That’s not much room for error.
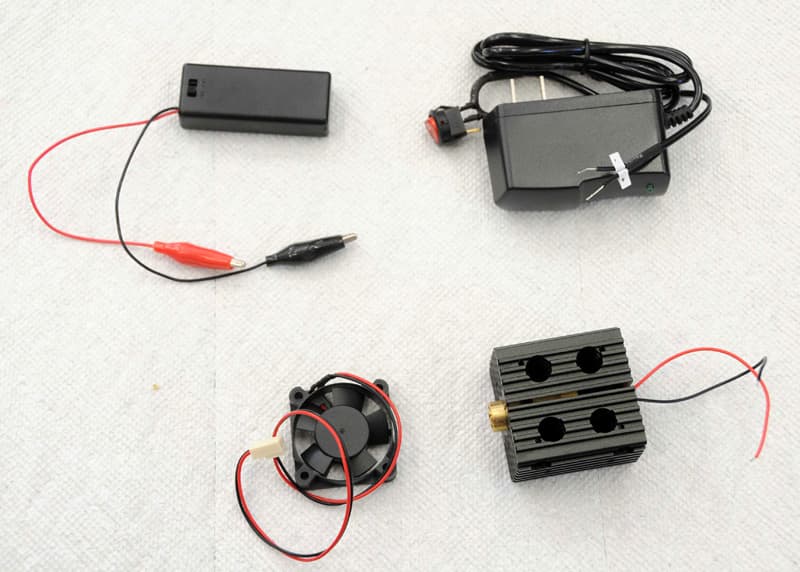
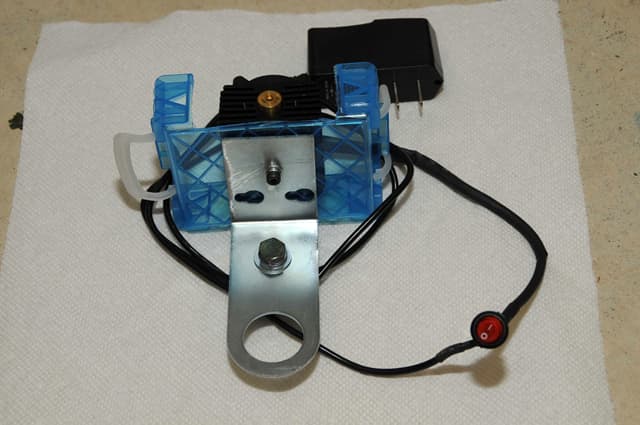
I purchased a 12mm Laser Line Green Generator (5mW) because they show up better than red. As part of the laser light, I also purchased a 12mm heat sink module (helps cool the laser), a cooling fan, and a 3V power supply AC plug and toggle switch actuator. This allowed me to plug into the truck’s power source and reach the open rear window of the truck.
 |
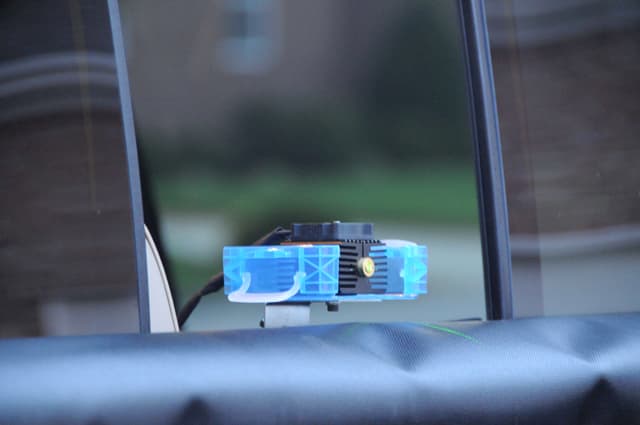 |
Above: Laser with support bracket and electric and close up of laser attached to the truck’s sliding rear window
I tried several ways to temporary attach the laser so that it was level. Finally, I found that I could fold down the rear seat backs. Behind that location was a place to screw a metal support bracket permanently. When needed, I could attach the laser line to the support bracket. I made a 45-degree metal frame for the laser light to be attached to the support.
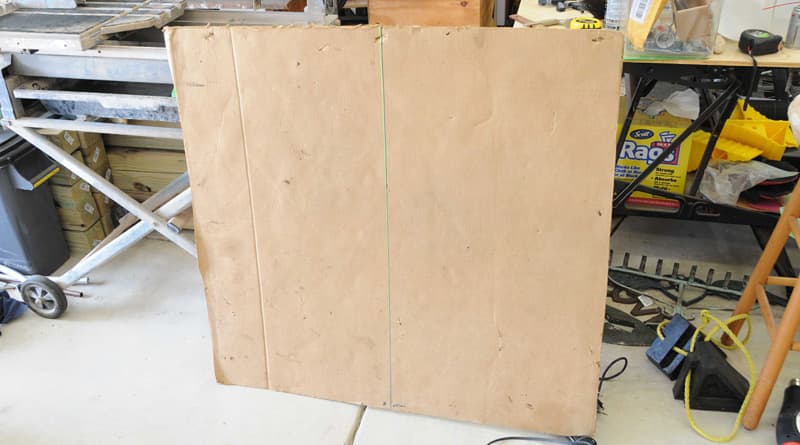
Above: Level line sample with cardboard
After installation, which now takes about one minute, I check that the laser is level north, south, east, and west with the tailgate and make minor adjustments.
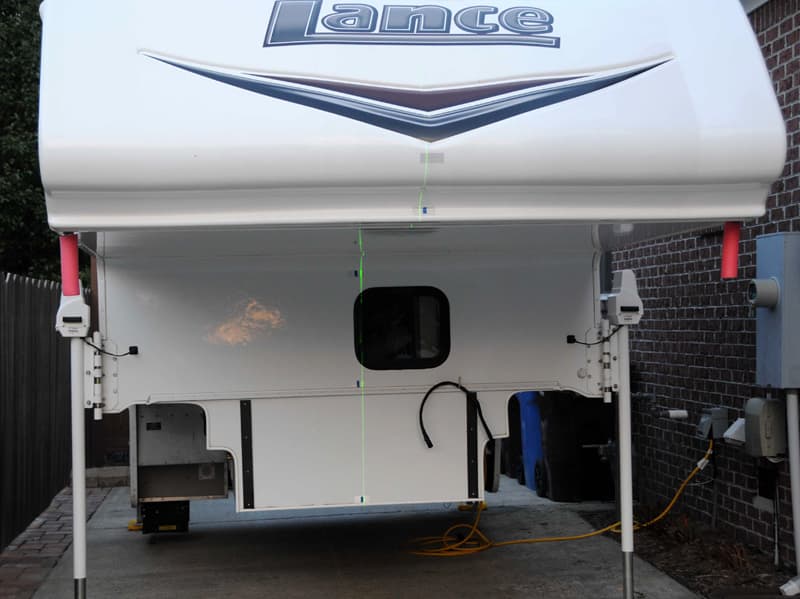
Above: The important process for loading using a laser line is to make certain that the truck bed and truck camper are level with each other. That is why Donald has to have one side of my truck camper up higher than the other; also note the reflective tape.
I also place reflective tape on the camper in three to four places. One is at the camper’s front, one at the center near the window, and one at the bottom.
I back up the truck under the camper’s front and take measurements left and right. Then, I raise or lower the camper to be the same height on both sides of the truck. In my case I have to raise the camper 1½-inches on the passenger’s side so all is level. If you don’t do this, your line level light will not really allow you to back into the camper as it will give you a false indication that you are level. This took me about two hours to figure out, but now it is done prior to attempting to load.
The light then sends its beam toward the truck camper and at the three reflectors. If all three are in the path of the laser line I know that I am exactly square with the truck for loading. I then backup and keep the three reflectors in the laser light. If any one of them is not in the light, I am no longer level.
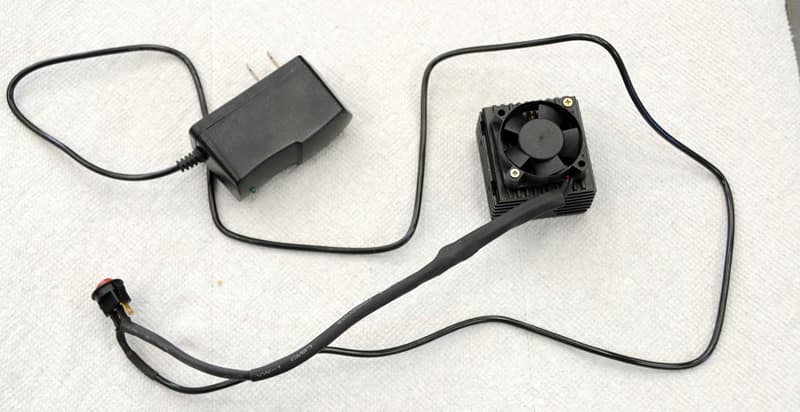
Above: Plug-in laser with small cooling fan
Because I was experimenting; I came up with four ways to complete the making of a laser light system.
1. The one described above, which cost about $75.
2. Doing everything described above, but not including the cooling fan. That cost about $65.
3. Use of a AAA battery rather than plugging into 120 volt system. That cost about $55.
4. I purchased a really cheap laser dot light designed to be attached to a circular saw. I gutted and threw away the original dot light as it was not able to cast a light over one foot. Then I installed the 5mW green laser generator into the skeleton. This system is the easiest, as it has a small magnet at its base and can easily attach without damaging truck paint. It can be moved around to become completely level. It does not have any means to keep the light cool which will be okay once someone learns how to use it. That cost about $55.
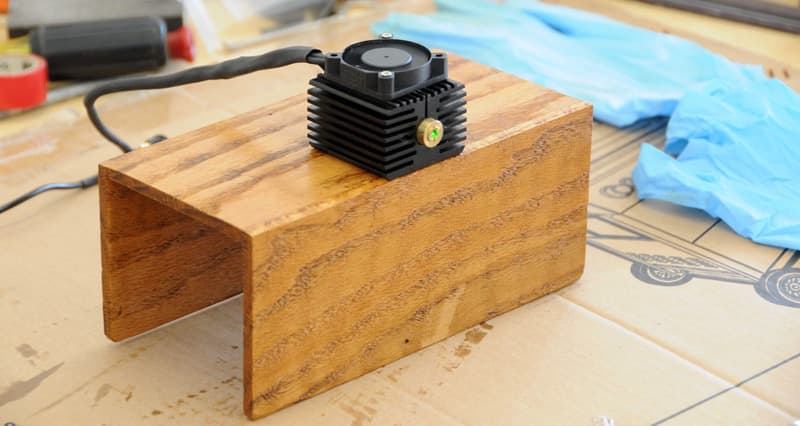
Above: Another way for the laser to be attached; a wooden support that will hang on the truck’s rear seat
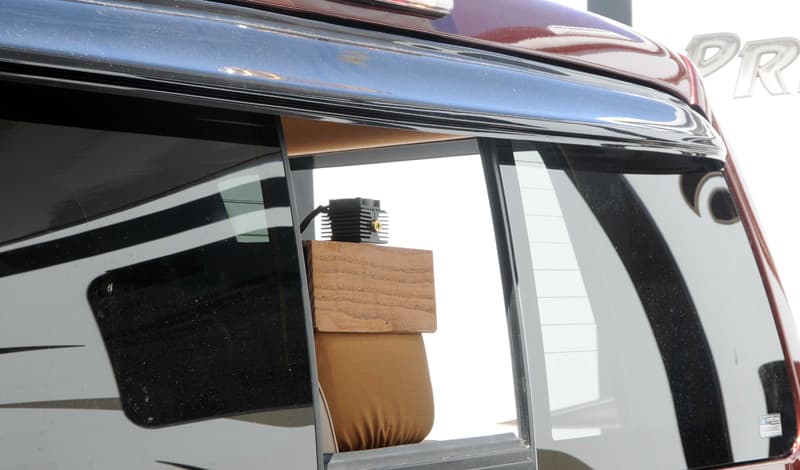
Above: The laser attached to wooden support hanging on the truck’s rear seat
I went from one hour to only fifteen minutes loading time. I can also load without a spotter in that fifteen minutes. That said, I always recommend a spotter no matter how good you are at loading your truck camper.
It took me three days to complete this modification, but only two hours once I figured out how to make an effective support system. It cost $75. I have made six of them and will sell at a later truck camper meet. In my opinion, the skill level of this mod is hard.
Click here to see the winner of this Mega Mod contest.
Disclaimer: The modifications above are submitted by Truck Camper Magazine readers. It is your responsibility to make sure that any do-it-yourself modification project you undertake is safe, effective, and legal for your situation.
Enter Your Mods Now!
If you’d like to enter mods into TCM’s Monthly Mod Contest, click here. You can enter as many mods as you want, at any time. Good luck mod makers!


