For Level 2 Part 2 we reveal more medium mods including hidden interior spaces, clever battery gauges, marine window installations, storage solutions, and more. And the Level 2 Medium Mod winner is…

By this point in the annual Top Mod Contest reveal process, many of you are starting to show signs of MAMS. Known more commonly as Mad About Mods Syndrome, the main symptom is talking endlessly about truck camper mods to your less than interested spouse long after they have passed out cold from a near fatal overdose of boredom and exhaustion. Don’t laugh, it could happen to you.
With that precaution, allow us to present the second installment of Level 2.
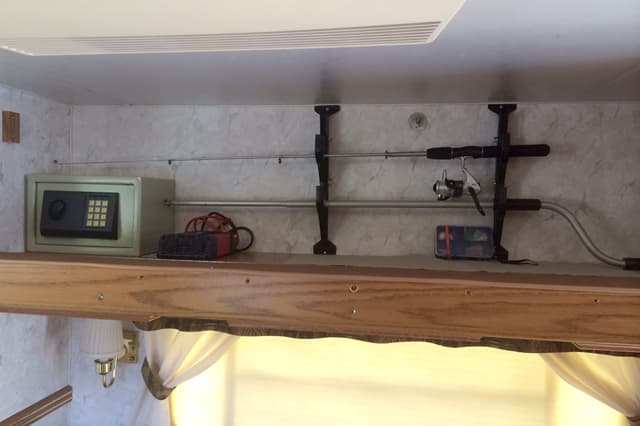
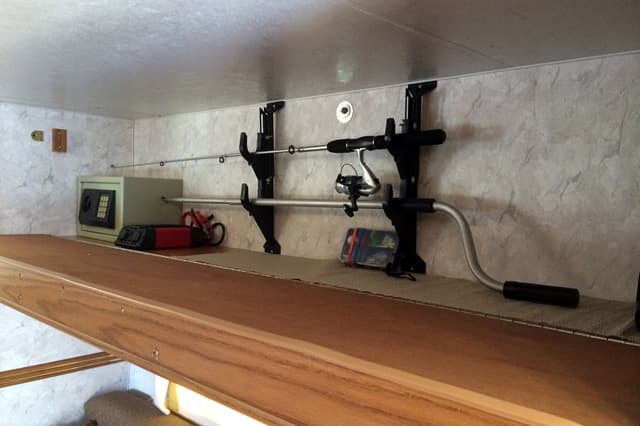
Level 2 Medium Mod Winner: Jeff Dieter, New York
2013 Chevy Silverado 2500
1999 StarCraft 952
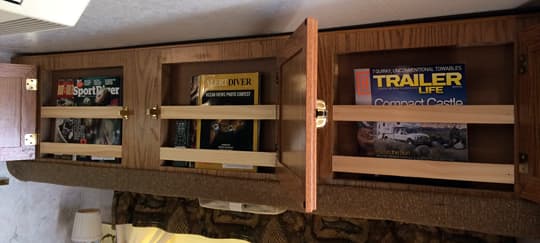
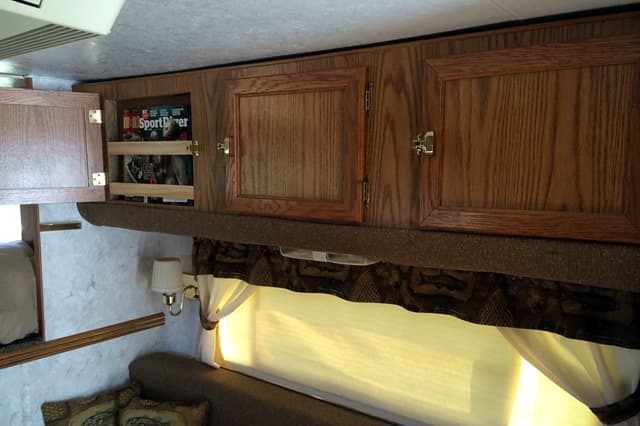
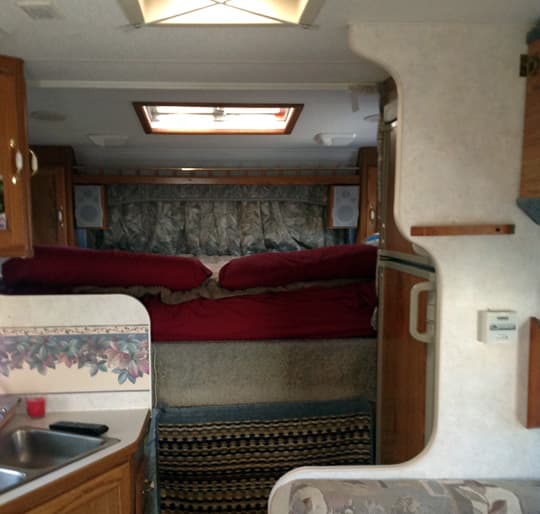
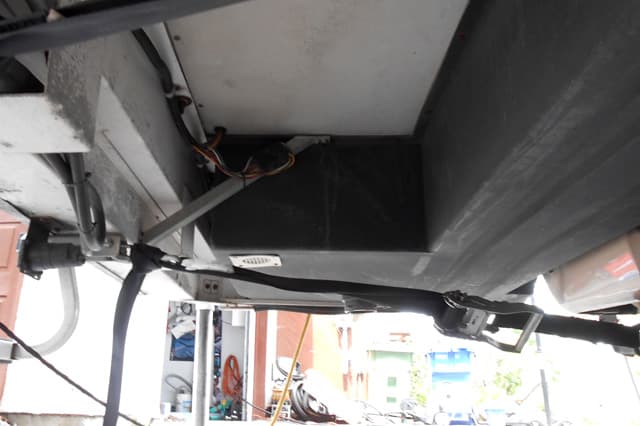
We are empty nesters and don’t usually have guests staying with us in our camper.
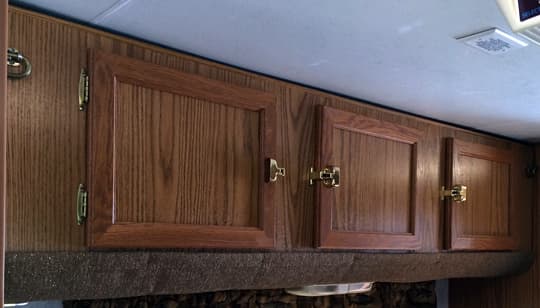
So, in our quest for storage that could be neat and organized, we converted the upper bunk of the camper.
 |
 |
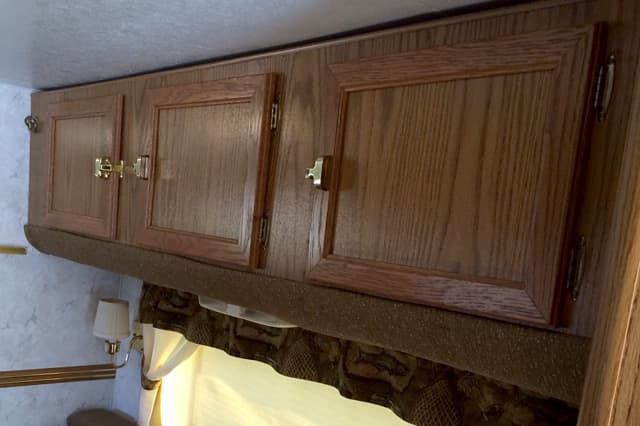 |
We removed the mattress and created three magazine racks that can be used when the bunk is closed. When the bunk is open, we have a 16-inch by 14-inch by 6-foot storage cupboard.
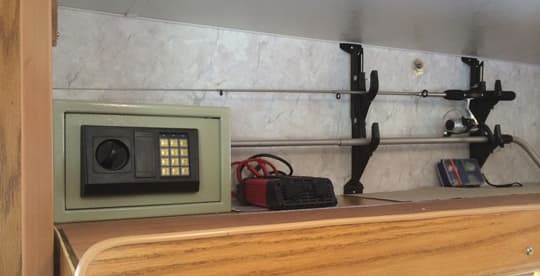
We installed a gun rack that can can also be used for my fishing pole, awning crank, and other long items.
 |
 |
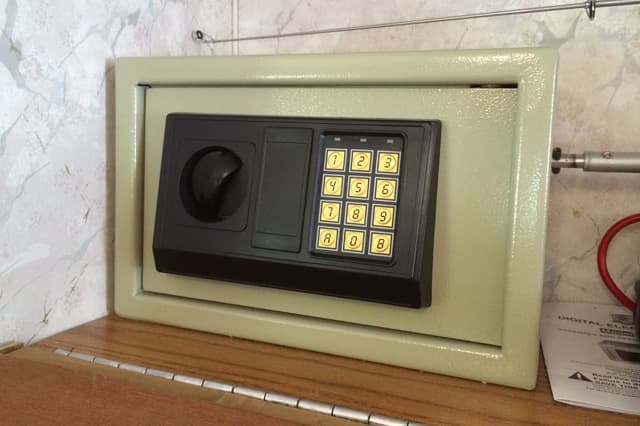 |
We also installed a small safe to store small valuables. Click thumbnails to enlarge.
Level 2 Medium Mod Runner-Up: Lucien F Langlois, New Hampshire
2012 Ford F250
2004 Lance 1025
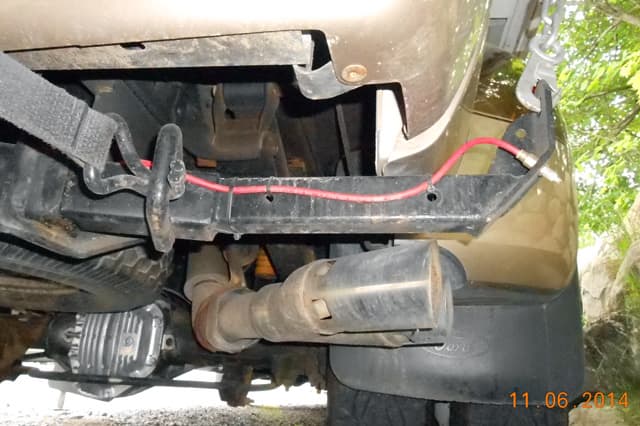
This next modification is a direct idea from nearly 250 RV campers who winter in Key West, Florida. The Navy RV campground at the Coast Guard Base on Trumbo Point has all of the amenities except shore power. Nearly everyone there has a generator and ninety percent of these are Hondas. They all have this neat modification installed on them.
This is the situation. It’s night time and time to shut down the generator, but you’re all comfortable and nearly ready to hit the sack! A remote generator shutoff switch would be just the thing.
I’ve looked at many of these mods and very few are well installed. Wires are running out of covers or snaked out of the bottom don’t look good, or for that matter, look safe.
The photos below show how I tackled this modification. Some of you might say that Honda won’t honor the factory warranty. That might be the case. What I can tell you is that those 200 plus RV campers have done it with no problems with the Honda ei2000 generators. In all cases, I was extremely careful not to drill into an area that would harm any component or gas tank on the generator.
Some of the connectors I used were purchased from a giant yard sale in Big Pine Key, Florida. I purchased two female and four male connectors. I hardwired one line from the front bumper, generator location, to the camper. This works well when we’re on the road. The other is a thirty foot extension that can be plugged in when the camper is off the truck and the generator is sitting locked up on the ground some distance away.
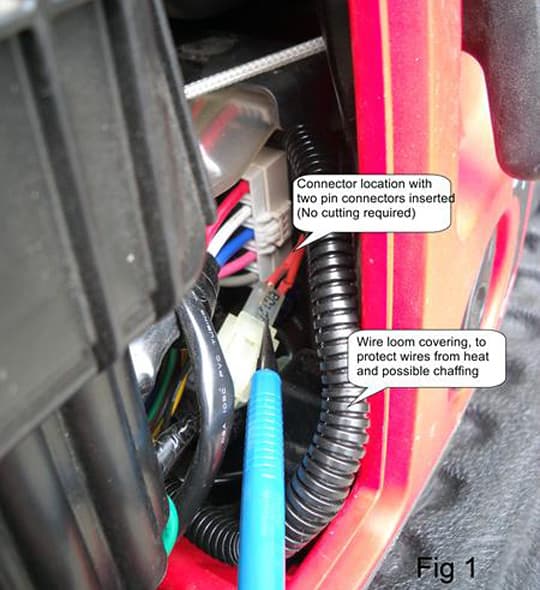
This shows the factory connector (green wire with black stripe). Notice how I inserted the pin connector into the end factory connector. No cutting was required! All connections have been soldered along with two layers of heat shrink tubing.
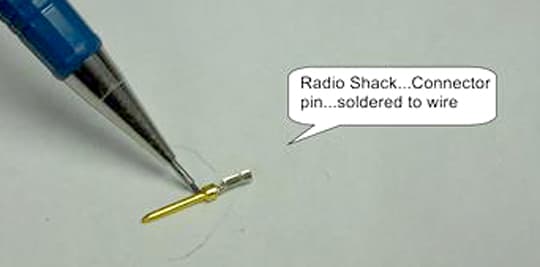
The Radio Shack computer pin terminal connector is small enough to fit snugly into the existing factory connector. The wire gauge of factory wire is 20 to 24 gauge. I used 18 gauge.
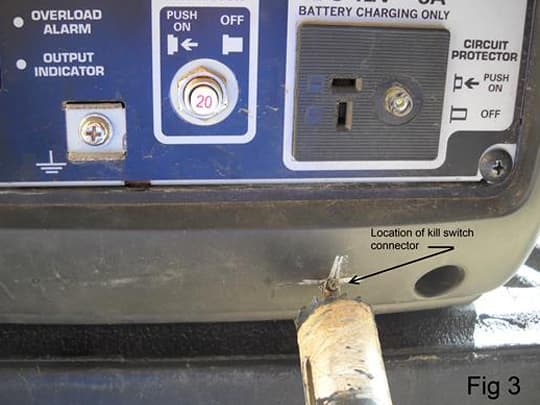
After looking at several locations for the connector, I determined that this was the best and safest place (no wires or gas tank in the way).
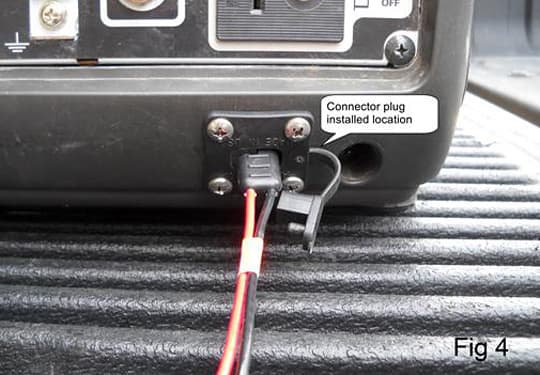
I installed male plug with bare pigtail temporarily installed for the photo.
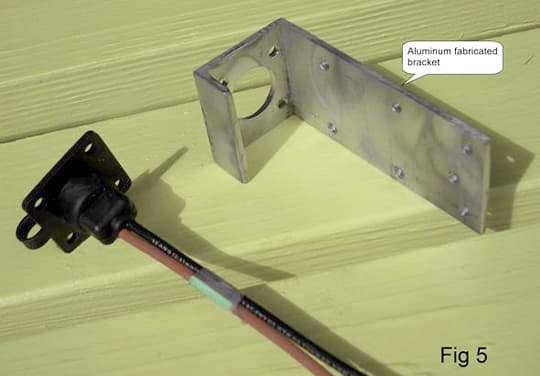
I fabricated an aluminum bracket. I made it from a scrap store front door frame.
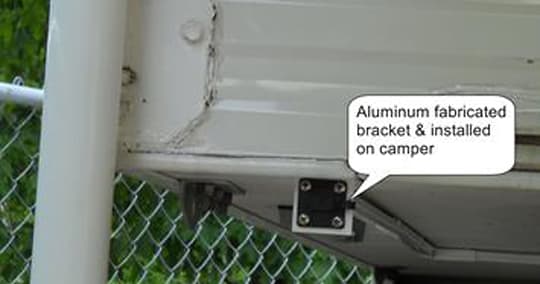
Then I installed a bracket on the camper. The location doesn’t interfere with loading my camper onto my truck.
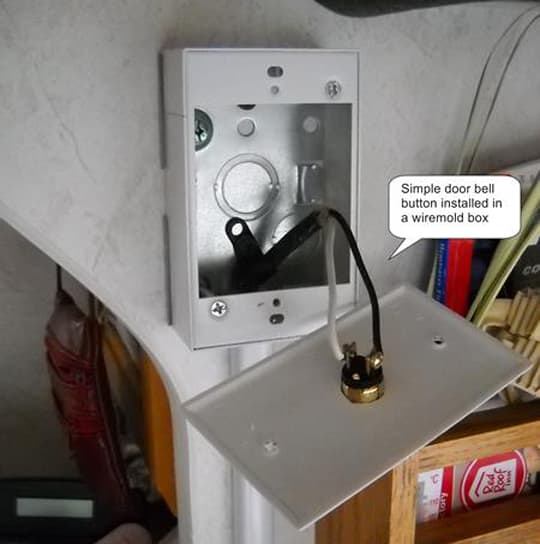
Inside the camper, I mounted a wiremold box and conduit. An ordinary doorbell switch is used to complete the circuit shutdown.
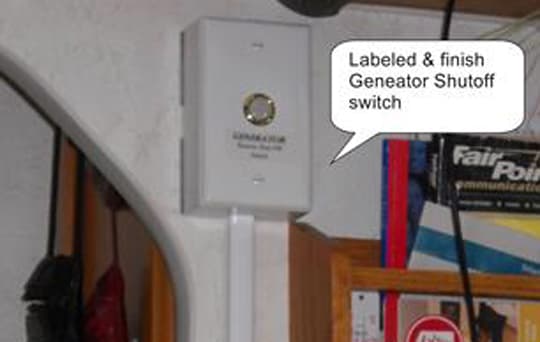
A finish switch mounted along with labeling.
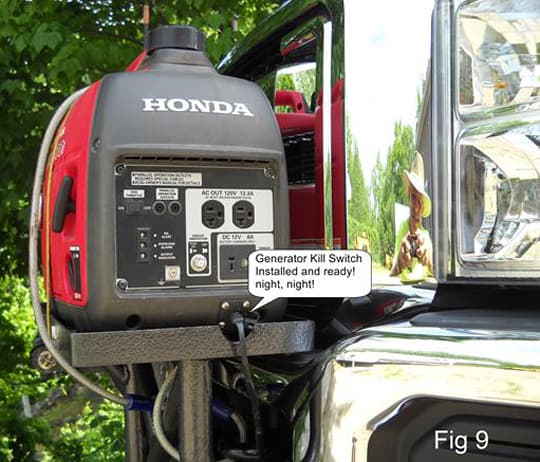
The generator side shown with the hook-up to the remote kill switch.
Level 2 Medium Mod Runner-Up: Rudy Drexler, Vermont
2006 Chevy Silverado 3500
2012 Arctic Fox 1150
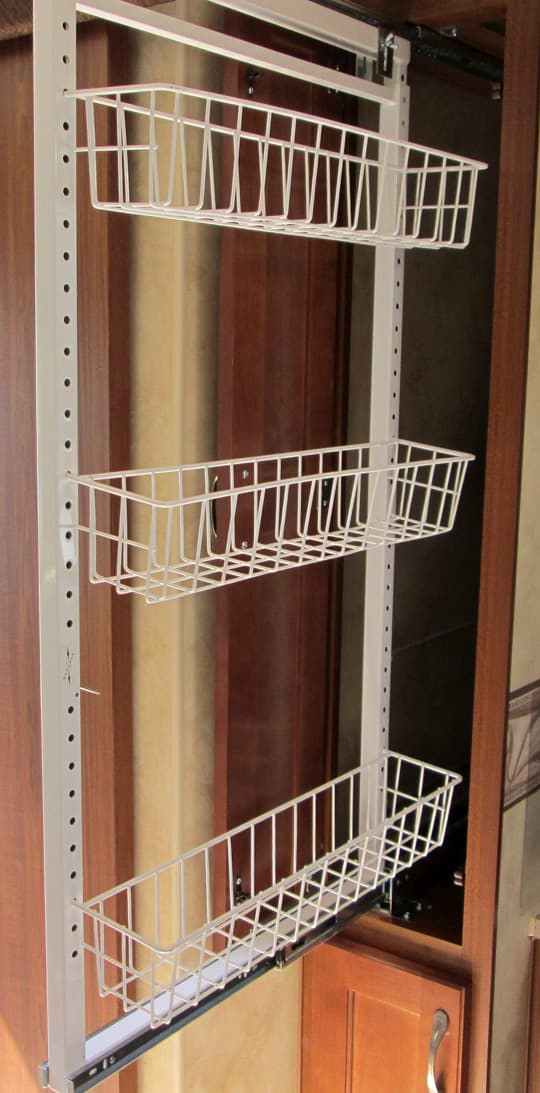
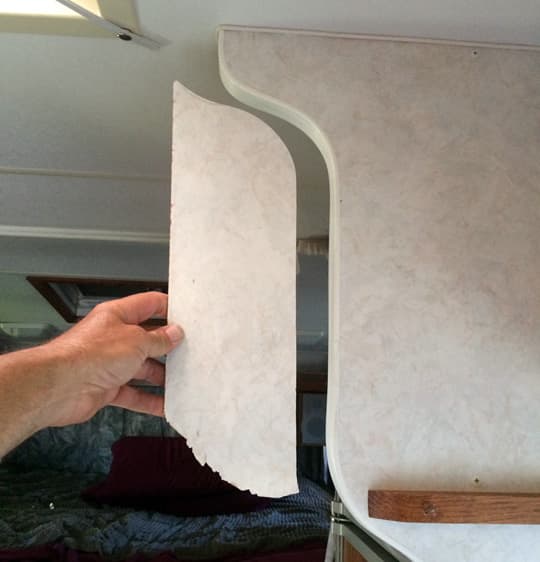
Above: This is the original Arctic Fox 1150 pantry
Here we have a wasted space issue. The Arctic Fox 1150 truck camper has a built-in pantry on slides. As standard equipment a huge white shiny metal frame on slides holding three wire baskets is included.
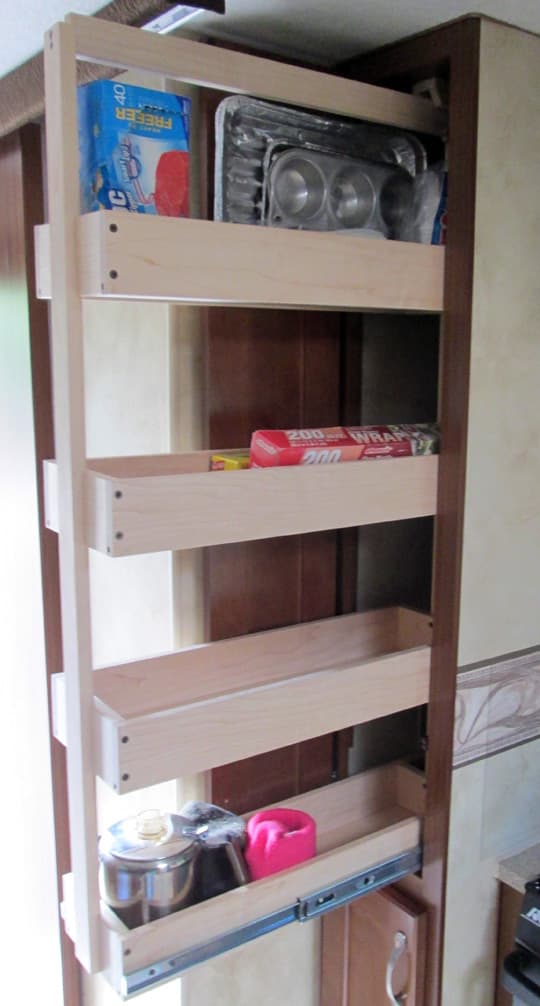
Above: The modified pantry made from home grown hard maple
With a bit of Yankee ingenuity, and some home grown hard maple, I built four shelf pockets and reused the original 100 pound slides. One shelf pocket holds more than three wire baskets. The pantry capacity has more than doubled, plus my wife is very happy.
The Level 2 Medium Mod Contest Winner Is Jeff Dieter and the runners up are Lucien F Langlois and Rudy Drexler.
Simon Carlton, Colorado
2004 Ford F350
2008 Snowriver 9’6″
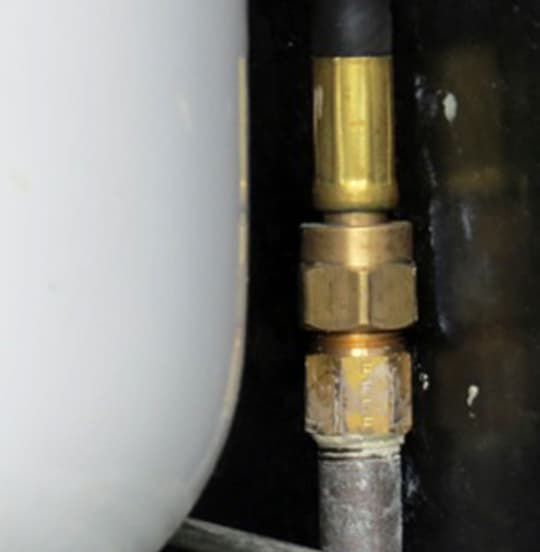
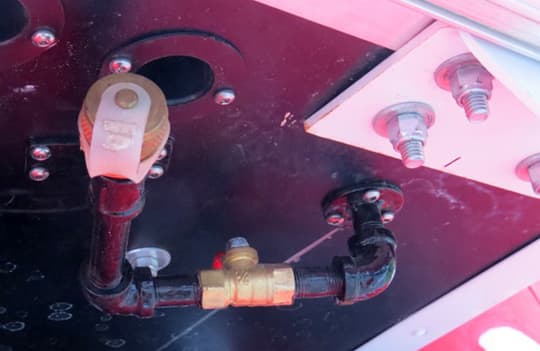
My mod was to divert the shower drain to empty into the grey water tank instead of the black.
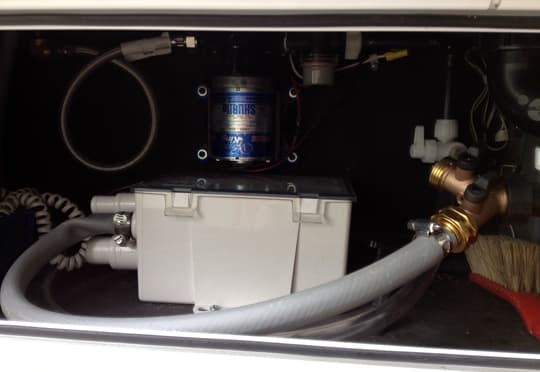
I purchased an Atwood Sahara-Powered Shower Pump, #4141, a three-quarter inch hose drain adaptor, and a Valterra T01-0091VP one and a half inch by three-quarter inch ninety degree drain connector from Amazon. The P-trap inspection cover on the Snowriver U-bend (made by CanPlus) is a smaller size, so I modified the Valterra drain to fit. I did email CanPlus who has their US base in Denver, but no reply as of now.
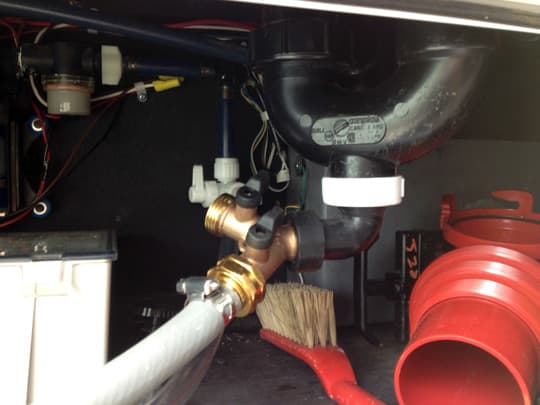
Then, I bought fifty foot grey garden hose, but needed less than four feet of it for the mod. The rest became a spare grey tank or shower waste-hose that we can use when boondocking. You can see a second brass tap leading from the shower drain. I used Clamp-It Saddle Tees for the PVC Pipe #421507 that is one and one half inches by three-quarter inches, FPT.
When the shower is running, the drain fills the sump and the pump empties into the handbasin waste which drains to the grey tank. I can revert to filling into the black tank by turning the waste drain off. All in all, it went easier than I expected.
Mark Siminoff, California
2005 Dodge Ram 3500
2004 Alpenlite Saratoga 935
My Suburban water heater did not come with an electric heating element. I wanted a way to have hot water without consuming propane at times when 110V AC power was available from shore power or generator. In addition, because I have a fairly large solar array, I wanted to be able to put my excess solar energy to good use** and save propane in the process.
** Note: This kind of solar use, using the solar for some additional purpose after the batteries are fully charged, is typically called a diversion load.
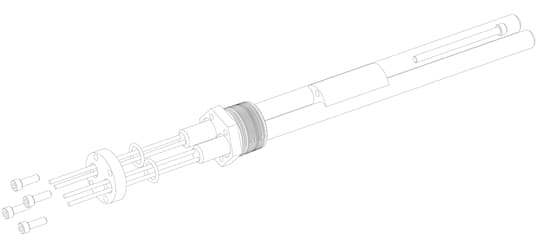
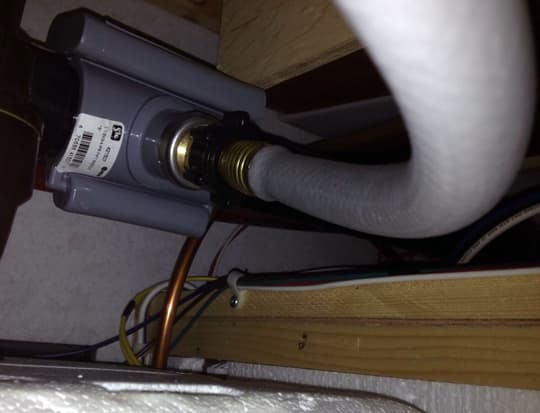
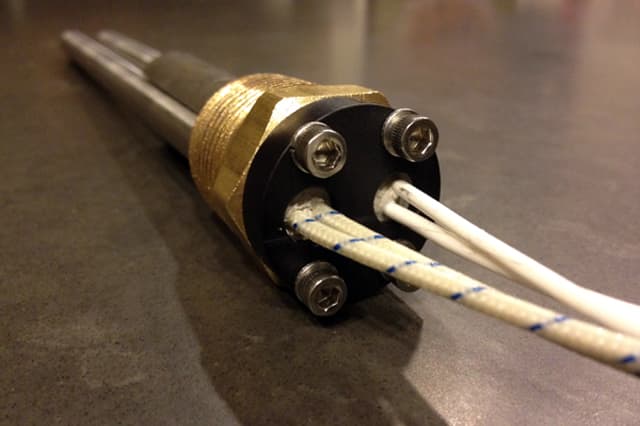
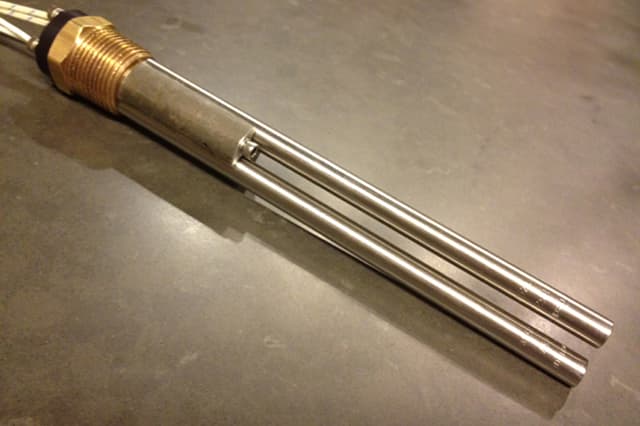
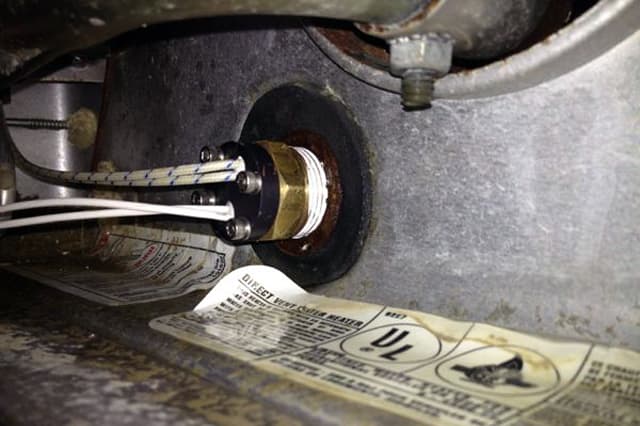
I designed and fabricated a dual voltage water heater which fits into the three-quarter inch NPT port where the stock Suburban anode rod would go.

The 110V AC heating element draws 500 watts and the 12V DC element draws 150 watts. Each heating element has its own dedicated and adjustable thermostat which is mounted to the exterior wall of the water tank.
 |
 |
 |
Of course my design also includes a sacrificial anode which is made from solid magnesium bar. The anode is replaced annually.
The 12V DC element can be powered by the diversion load output of my two MorningStar SunSaver MPPT solar charge controllers (SS-MPPT-15L). In this mode it only operates when the battery voltage is above 13.3V.
There is also the option to bypass the charge controllers and run the heater directly from my battery bank. In times of high hot water use (like several people needing showers) any combination of the three heating sources (Propane/12Vdc/110V AC) can be used in tandem to improve the recovery rate of the water heater.
Many people have asked if it’s even worth the effort and expense to have the small 12V/150W heating element at all. The answer is, “Yes!”. I conducted an empirical test and the 12V element heats my six gallon water tank at a rate of exactly 10ºF per hour. When dry camping in sunny conditions, I seldom use anything other than the 12V heater. Note that the thermostat is set to 115ºF.
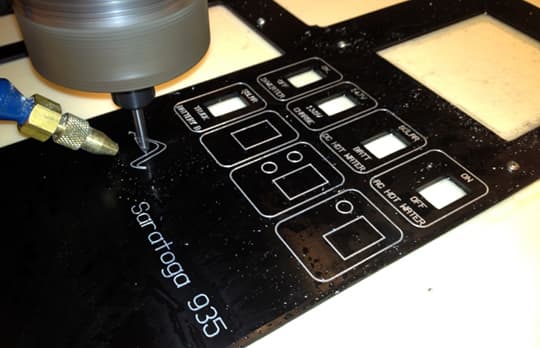
Above: Aluminum panel that was fabricated to hold all the switches
While in the process of installing the water heater, I realized that I needed a place for the switches to control the various electric water heating options, so I fabricated an aluminum panel which holds all the switches in addition to my camper control panel and the control panels for the TriMetric battery monitor and ProSine 2.0 inverter/charger.
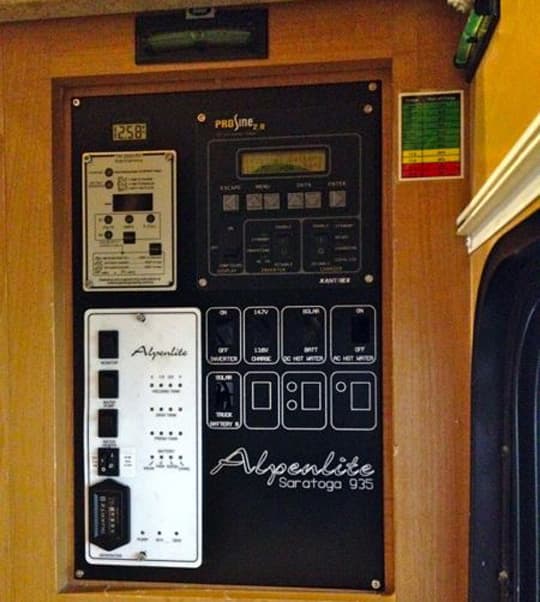
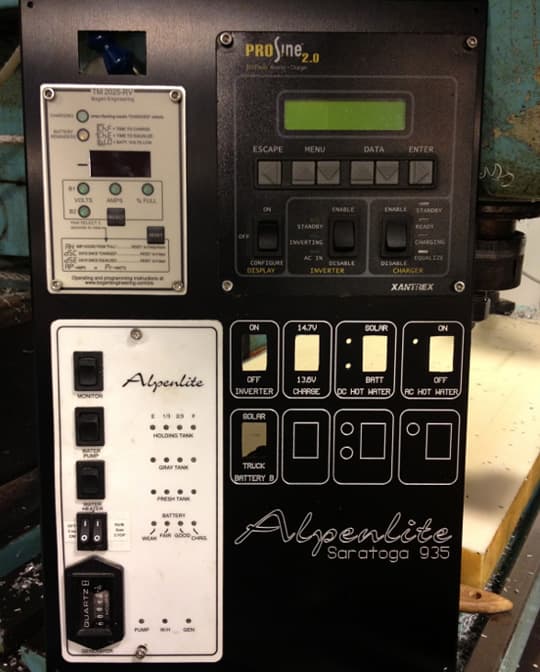
Above: Panel installed in the camper
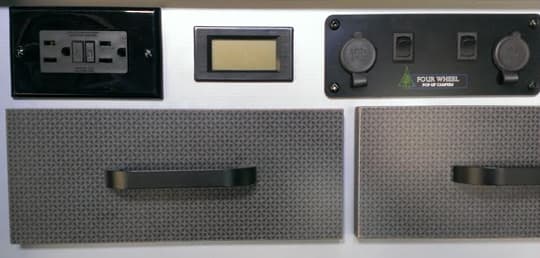
Pete Weigman, Oregon
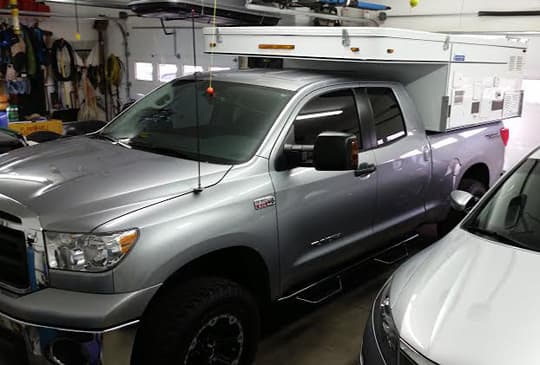
2012 Toyota Tundra
2013 Four Wheel, Silver Spur Hawk
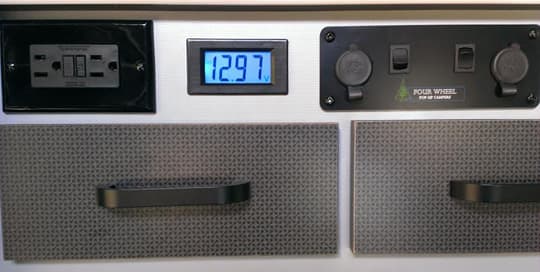
Using my Four Wheel Camper pop-up camper off-the-grid, it’s important to know exactly how much battery power I have. I purchased this gauge from Amazon.com for around $6, shipped to the door. I’m quite happy with the results. It’s an easy, cheap, and quite useful modification that I find myself using more than any other option when I’m out on the trail camping.
Although I’ve seen some solar controllers installed on Truck Camper Magazine articles before, some folks can’t afford to install expensive solar panels with the required controllers and meters, or they choose to have a simple solution like this one.
I installed it by cutting the main power to the camper using the power cut-off switch. Then, I removed the factory installed standard 12-volt socket switch panel. Put the access to the front panel somewhere of your choosing.
Then I made a crate paper template of the gauge device. I recommend making it a tad smaller so you can gradually file out the wood opening. That way the switch fits right into the hole perfectly. It’s easier to remove material than to put it back in!
I used the template to draw a box on the cupboard panel, making sure the gauge will fit with the proper depth. Then I used a drill to cut one hole in each of the four corners of the template drawing, being careful not to go outside of the lines.
Once the holes were properly drilled, I took a saw blade and cut out the opening. I recommend doing this by hand to avoid making a big mistake in your nice wood fascia. Take your time, and do it right the first time! Using a wood file, I carefully cut the remaining wood out of the hole, up to the edge of my template lines.
I ran the wires from the switch over to the existing factory wires on the 12-volt socket. I was sure to wire them on the down-stream side of the switch, so my new digital voltage gauge would be switchable and it wouldn’t be on all the time.
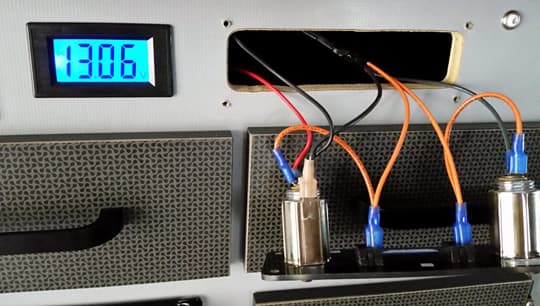
I do not recommend using scotch locks or any similar devices. You should remove the wires from the plug and crimp or solder them with the existing wires for an exact and permanent fit. Red goes to positive, and black to negative. It’s that simple!
When the wires have been run, I simply cleaned up the mess, popped the gauge into the hole, and tested it. Then I re-installed all panels and was ready to go.
In the photos I supplied, notice the position of the 12-volt socket power switches versus the gauge being powered up. When the left socket is turned on (switch up), the gauge will light up and provide accurate power readings directly from the batteries.
I hope this helps others who really want to know how much power you have, rather than trust four red lights that the manufacturer supplies with most truck campers. It’s simple, easy to install, inexpensive and handy to visually look at. As a bonus, the gauge is back lit with a very nice large blue colored light that uses very little power consumption.
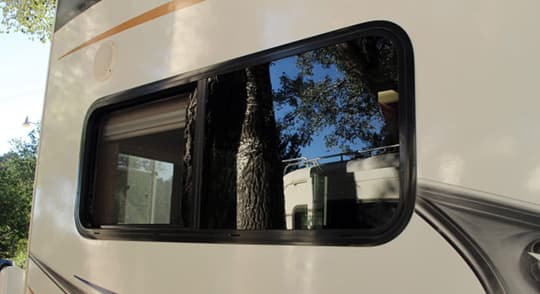
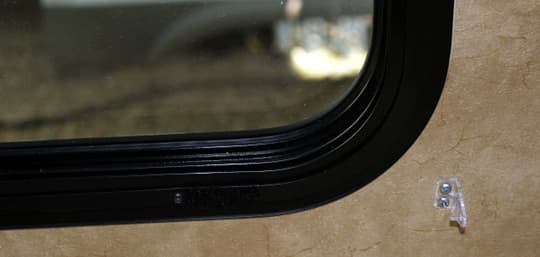
Douglas M. Packer, Western Australia
2012 Dodge Ram 3500
2013 Eagle Cap 1160
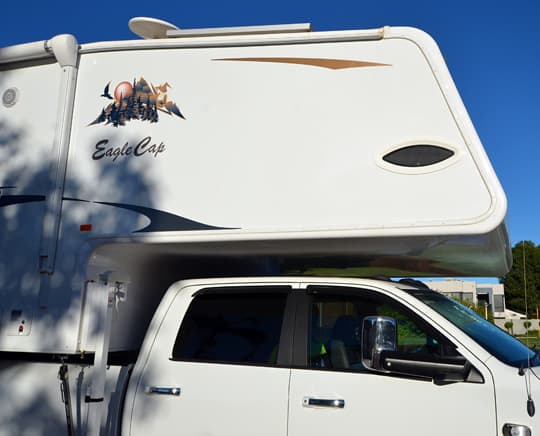
I installed an additional window because there was a lack of ventilation on the passenger’s side of cabover bed area. This my major modification to my 2013 Eagle Cap 1160. It’s a waterproof White Bomar Marine Port Hole window that measures seventeen inches by seven inches and includes a fly screen.
I purchased the window on eBay from Great Lakes Marine. It is the same window that I have on my Cruisers thirty-eight foot boat. The window comes in two pieces. The boat hull is thinner than truck camper walls.

I got the aluminum frame plan from Adventurer, and there was no obstruction for the window. I marked the hole position with a marking pen, drilled four pilot holes, and cut it with a Jigsaw. I used a hard flexible plastic membrane with Sikaflex white sealant that I lined around the hole on the inside and outside wall. I inserted both sides of the window and screwed it gently together, wiping it clean with a cloth.
The job took about three and a half hours to complete. The resulting airflow is amazing. As soon as the hole was cut, the airflow was fantastic.
Glenn and Caite Blount, Texas
2012 Ford F350
2004 Lance 1010
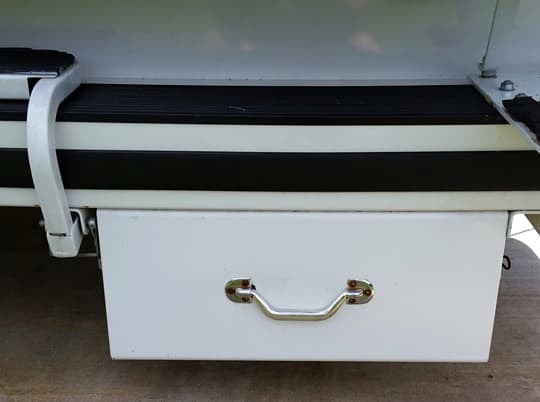
The tool box is a Sears metal tool box that we pop riveted to the bottom of the Lance bumper. The box can be locked if needed.
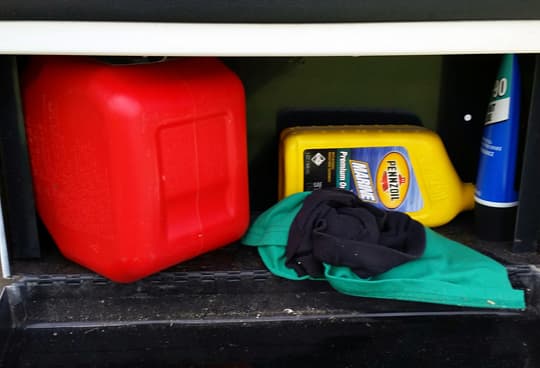
It gives us a space to store our gas can and oil for our boat, and a few other small items. It is nice because the odors of the gas and oil don’t get into the truck or the camper. Above is a picture of the exterior of the box and a picture of the box opened with the storage items showing.
Rick Bauman
2003 Ford F350
2000 Fleetwood Elkhorn
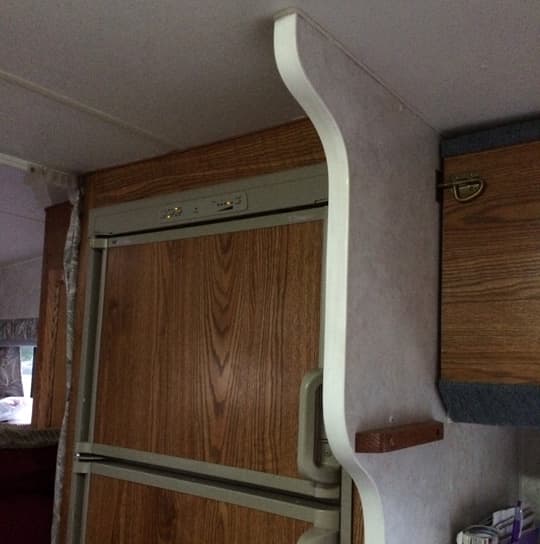
I removed part of the wall to open up the space so that the wall is not in my face when I get into the refrigerator.
Cindi Goodrich, California
2006 Chevy Silverado 3500
2008 Lance 1191
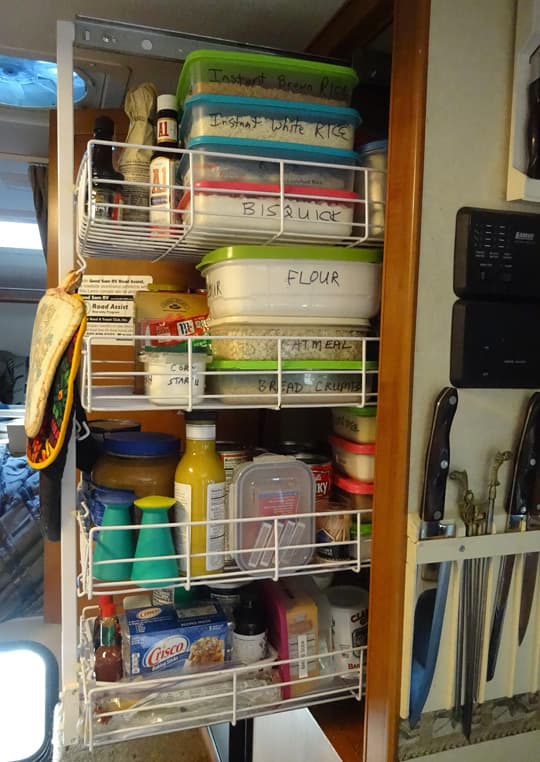
Our Lance Camper came with three narrow shelves in the pantry. The newer models have the wider shelves, which I purchased. I installed the three new shelves, but kept one of the narrower shelves at the bottom. This way I have four shelves, and the narrow shelf allows for cereal boxes, boxed soups, and cake mixes to slide in on the sides.
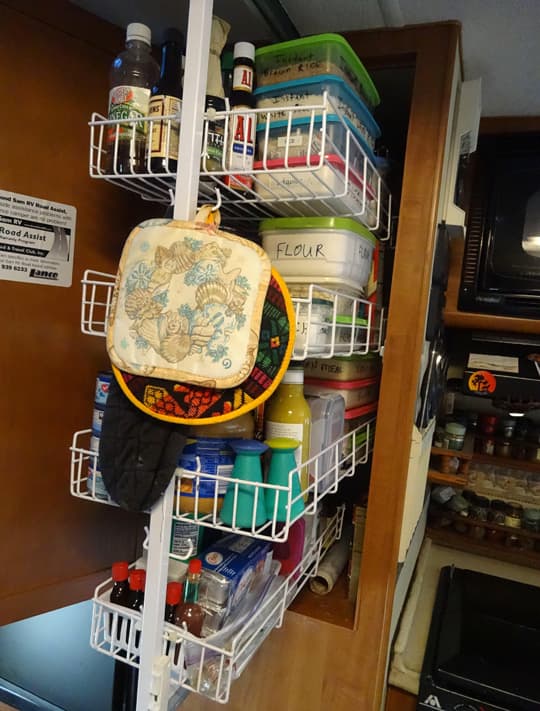
I also bought lots of rectangular Rubbermaid containers to store my dry goods (flour, sugar, rice, oatmeal, etc.). I used a Sharpie to label the sides of these containers and they stack four high on the shelves. This keeps them safe from critters and moisture.
Jim Pippin, Florida
2007 Dodge Ram 2500
2008 Lance 825
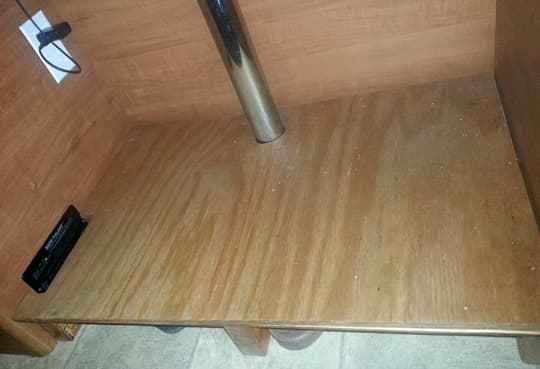
We built a false floor under our dining table. Even my six foot husband found the distance to the floor under the table to be excessive, so we created inches of extra space under the new floor for storing shoes and such.
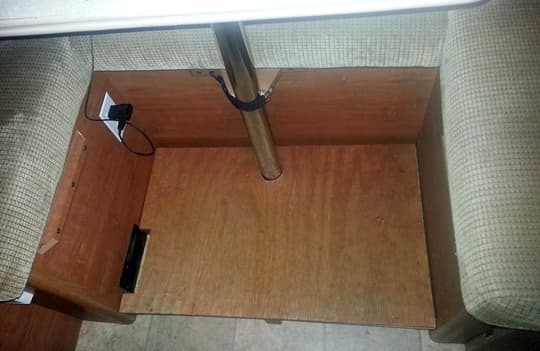
The plywood was cut to match the floor shape under the dinette and a circle was cut out for the table poles. Then two-by-fours or two-by-sixes (depending on how high you want your storage space to be) were cut and attached to hold the plywood off the floor and create the storage space.
Last, we stained and sealed the plywood. This is not a permanently installed modification and it can be removed.
JoJo and Alain Larose, Quebec
2011 Ford F450
2005 Lance 1181
 |
 |
 |
This is a double strapping system between the truck’s rear hitch and the bumper of the Lance Camper. The idea is to prevent backward slipping of the rig due to my slippery plastic box liner. We go boondocking on rough and steep mountain roads, and it’s happened often to us.
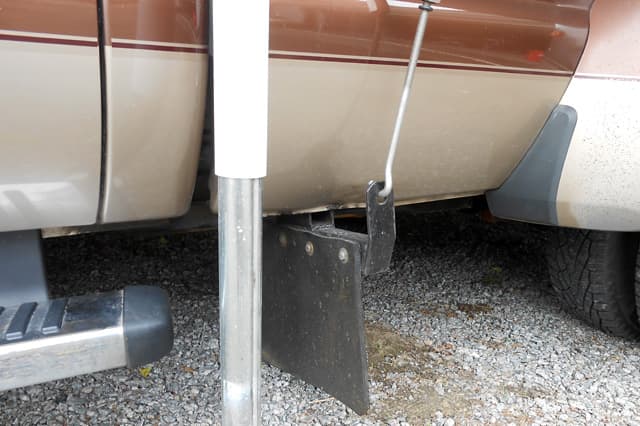
Jim and Anne Beach, Alberta
2009 GMC Sierra 3500HD
2013 Arctic Fox 865
Most later model truck campers come with a low pressure propane line to run a barbecue and other appliances requiring after regulator propane. Some appliances require high pressure propane and the appliance is equipped with a regulator to bring the pressure down to the appropriate level.
The one pound throw away bottles have a one inch by twenty thread fitting which fits lots of appliances we want to run outdoors. We have an old camp stove which was given to us by my wife’s mother when were first married thirty-five years ago. We used that all the time when we tented and used the Land Cruiser as our only support vehicle.
We became very attached to this small two burner propane stove. We like to take it with us in the truck camper, however it required that we haul along one pound disposable bottles for fuel. We have two thirty pound bottles in the truck camper, so all that was needed was a way to tap the high pressure propane for the camp stove.
We acquired the necessary fittings from our local propane supplier and a bit of advice about the hose that was the required type for high pressure propane. I installed a one quarter inch brass pipe T in the propane supply line and three-eighths inch male flared fittings for the hose ends. The fitting for the attachment connection outside of the camper was constructed with a one-quarter inch pipe threaded steel fitting for mechanical strength and ease of welding on the support brackets.
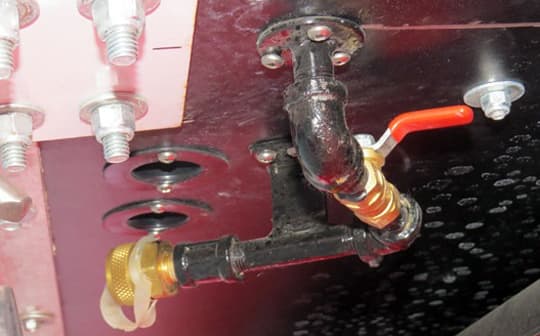
A large washer welded onto the eight inch long nipple takes the connection through the bottom of the camper floor into the propane storage compartment (for connection to the hose connected to the T in the supply line). Three S/S screws attach the washer to the camper floor. Once you have the one-quarter inch pipe connection outside of the camper, then you can connect a ball valve and the one inch by twenty connection (which is found on most appliances requiring high pressure propane).
The capped end of the one inch by twenty fitting and the one-quarter inch ball valve add extra security to the internal valve in most one inch by twenty fittings. It is tucked up under the camper over hang and very inconspicuous.
We can now use our beloved camp stove outside for cooking breakfast and making coffee. Everything seems to taste better when its cooked outside.
David Carvalho, Massachusetts
2006 Dodge Ram 3500
2013 Alaskan 8’
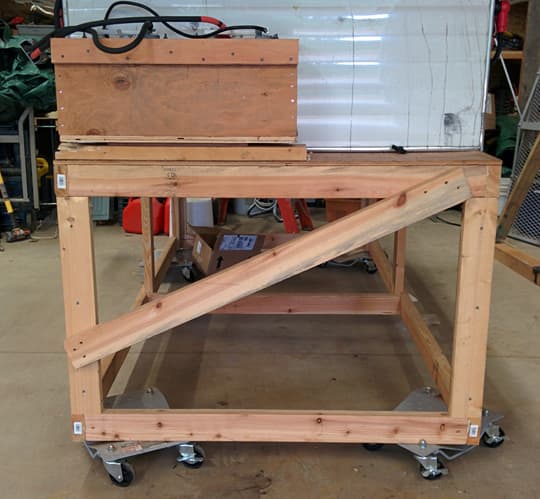
This simple wooden frame is the same height as the bed of the truck. Once the camper is taken off the truck, the platform is slid under the camper and the camper is lowered. The platform sits on four car dollies and can be moved around the garage. When the camper is on the truck, the platform becomes a mobile work bench.
Pete Weigman, Oregon
2012 Toyota Tundra
2013 Four Wheel Camper, Silver Spur Hawk
Although I’ve seen only one other article about installing Schrader valves for their truck suspension air bags, this one is quite simple and requires zero extra parts other than what they supply you in the factory install baggy. I wanted an option to fill each side of my air bags independently due to the camper being a little heavier on one side. I understand this is quite common throughout the industry.
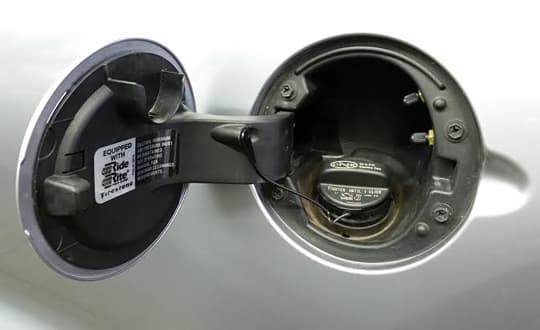
I also wanted to have easy access to the valves and install them on one side of the pickup. What I came up with for a solution was to mount them behind the fuel fill door so they are protected from the elements like mud and snow, as well as have them easily accessible while standing upright to fill instead of bending over to fill near the license plate like the instructions recommend.
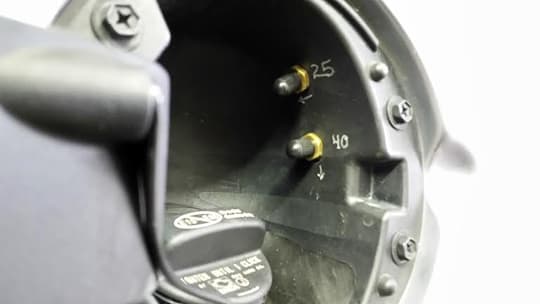
I’ve done this on two separate trucks with two different makes of air bags, and each factory supplies just the right pieces (and length of air line) to make this happen. All you have to do is run your lines up to this location and install. Quite simple and an effective way to solve a couple of issues at once.
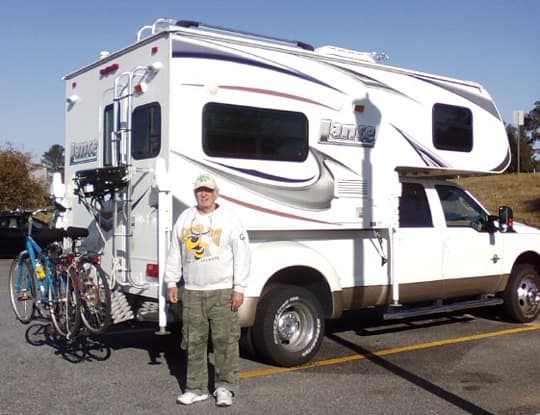
I also wanted to brag a little and show you a nice photo of my truck and camper, inside of the garage where I park it. I’ve owned several truck campers and I can say that for everything you miss having on a smaller pop-up camper, there is easily a benefit to actually owning one. For me, I won’t go back to a full size truck camper because I tend to avoid the hordes at improved campgrounds and generally camp off the beaten path.
Bob Morrissey, Georgia
2011 Ford F350
2012 Lance 850
We like to pull a boat with our Lance 850 truck camper, which creates a dilemma as to where to carry our bikes.
I cut a piece of pine lumber about twenty-two inches by eight inches by one inch and attached it to the sturdy rear ladder at about eye level with some stainless steel U bolts. To the board I attached two front wheel holders similar to Delta Cycle Original Bike Hitch. They were about $17 each.
I usually put a cable through the frames and ladder just in case the bikes decide to go on an adventure all by themselves. It hasn’t happened yet, but it’s good insurance and it keeps would be thieves honest. Also, this method is superior in my opinion to the Ladder Rack in which the bike(s) are carried horizontally and sometimes extend out beyond the side of the truck camper.
I don’t have a picture of this modification because we went to another modification in order to carry our bikes and keep the rear hitch available to pull our boat. The board I used that holds my back up camera is the same board I use to mount the two Delta Cycle Bike hitch! That modification is a little more expensive in that it involves buying a Curt Front Mounted Receiver ($160) and a Swagman XTC Cross-Country two-bike hitch mount rack. I highly recommend the two inch receiver mount.
Other brands of front mounted receiver hitches and hitch mounted bike racks are available and can even carry four bikes. The big advantage of this method versus the ladder mount above is that the bikes are available to ride immediately after dismounting. You do not have to store the wheels and reattach them before pedaling off on an adventure while getting excellent exercise.
The picture is without the Ford air dam being installed, which I did reinstall after cutting a square hole in it. I also bought a motorcycle or Scooter hitch carrier from Harbor Freight in order to carry my 1975 Honda CT 90 trail bike! Now I am going to have to reinstall my ladder carry method above.
Richard Hoppe, California
2002 Dodge 2500
2006 Four Wheel Camper Grandby
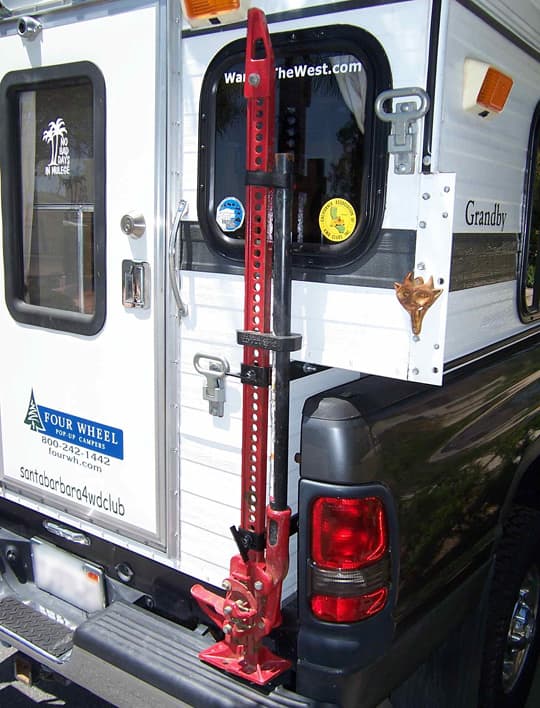
I was looking for a way to carry my Hi-Lift jack. My requirements were that the jack had to be easy to get to, did not require tools to mount or remove, and did not attach to the aluminum rear camper wall.
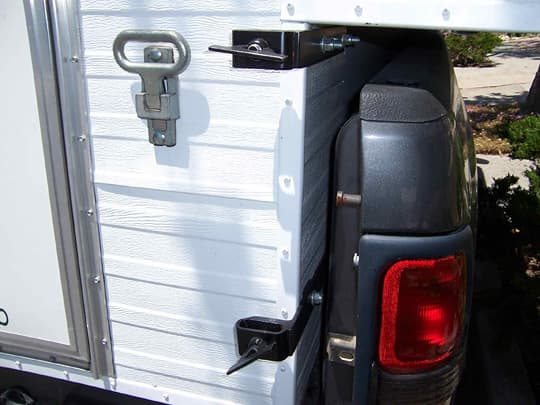
I designed and built brackets that bolt to the solid plywood camper floor pack. They use modified wing nuts to secure the jack with hand tightening. They have survived Baja and the Mojave Desert without loosening.
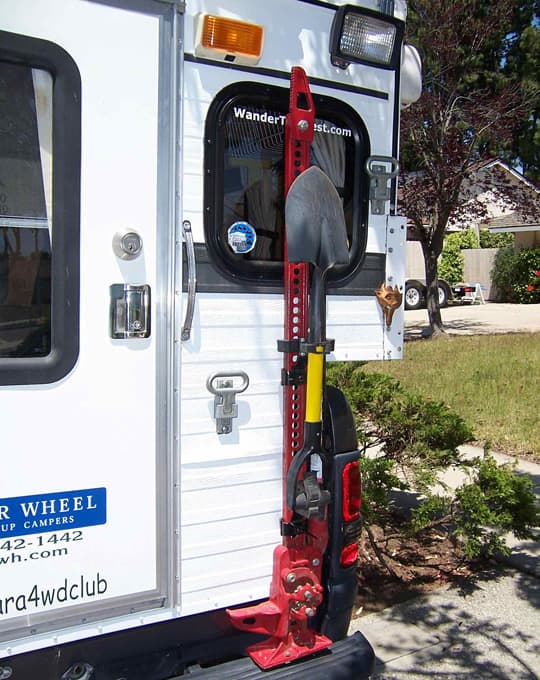
I have also added a locking device and a set of Quick Fists to hold a shovel. I have shared this modification with the Wander The West forum and the built them for several members.
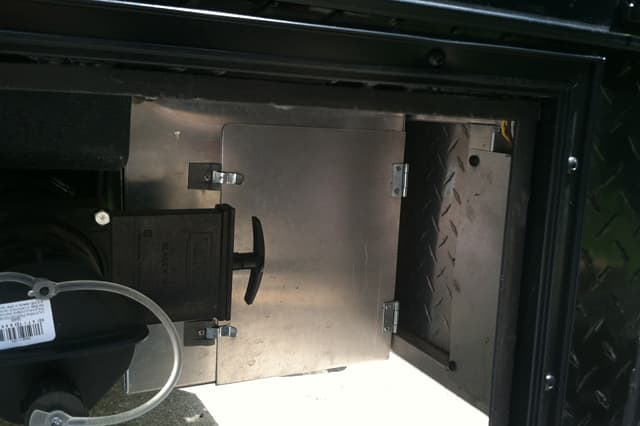
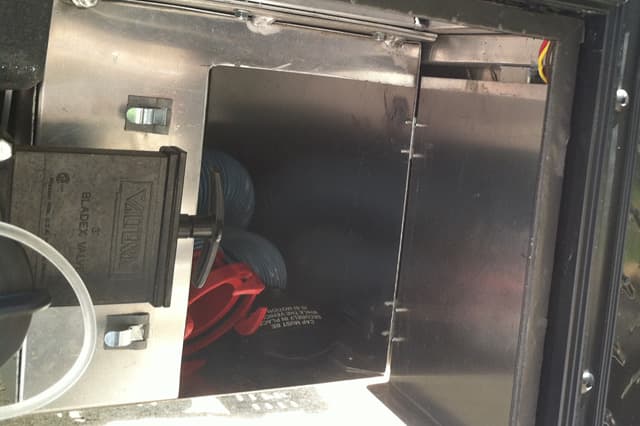
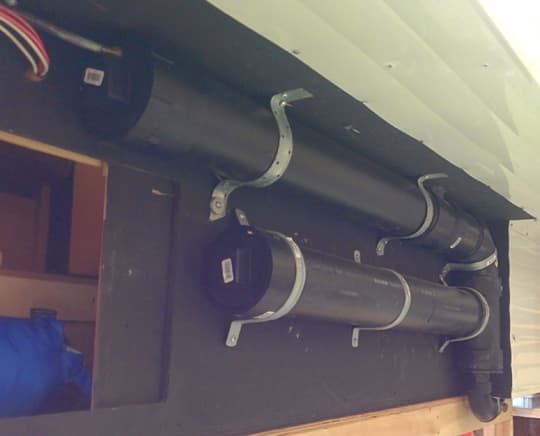
Don Crafts, Tennessee
2004 Dodge Ram 3500
2012 Camplite TC8.5
 |
 |
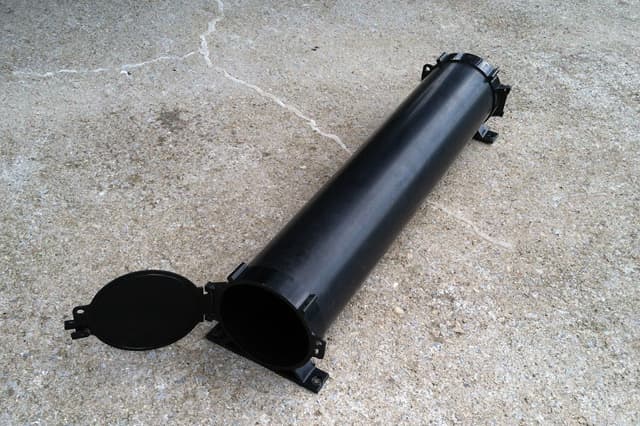 |
Our truck camper came with a four and a half inch diameter storage tube twenty-five inches long. Our sewer hose with end fittings would not fit into the storage tube. After removing the storage tube, we had a space available of twelve inches by twelve inches by twenty-four inches. We had a box fabricated from 16 gauge aluminum with a door that is accessible from our sewer valve access door. Our new storage box weighs ten pounds versus the storage tube around seven pounds.
Eldon Rhodes, Texas
2008 Chevy Silverado 3500
2011 Lance 1050
In an attempt to make my Lance Camper more all-weather comfortable, I replaced all of the windows with dual pane windows. This was the only option not installed on the camper that kept it from being considered a four season camper. So far I am very pleased with the results as it is quieter and seems to be more comfortable.
I have a Lance 1050 and I ordered the replacement windows from Lance Campers. I was able to get all of the windows with the exception of the emergency escape window in the overcab section and the pass through window in the front wall below the overcab section. Those are not available.
The windows are installed with a trim ring on the inside with screws going into the metal window flange on the outside; in effect sandwiching the wall between the trim ring and the window. Lance uses a D shaped foam weather strip with an adhesive on the flat part of the D that attaches to the window flange.
In essence, the process entailed removing the screws from the inside and having someone outside to catch the window when the person inside pushes it out. Once that was done, I installed the weather stripping onto the window, and had the person outside hold the window in place while the person inside installed the screws through the trim ring, and into the window flange. The overcab side windows are installed the same as the rest of them.
David Carvalho, Massachusetts
2006 Dodge Ram 3500
2013 Alaskan 8’
I attached a six gallon gray water tank to the camper. It has a drain that can be used to drain or transfer fluid to portable container.

Some places require gray water tank permanently installed, so this was my solution.
Up Next: Level 3 Decorative Mods! Stay tuned.
Disclaimer: The modifications above are submitted by Truck Camper Magazine readers. It is your responsibility to make sure that any do-it-yourself modification project you undertake is safe, effective, and legal for your situation.


