Mod lovers will think they went to truck camping heaven this week and next as we debut over sixty incredible truck camper modifications in a four-part mod-rageous contest series.

What is it about truck camper mods that makes so many of us head over heels crazy? Whatever it is, our readership always spikes whenever we mention mods. If we even suggest something in TCM features a mod, half the readership snaps to attention like a dog who just saw a squirrel.
Think we’re kidding? Try this:
1. Go to a truck camper rally.
2. Find a pack of truck camper owners talking.
3. Say, “You guys want to see my latest camper mod?”
They’ll be looking at you like Wile E. Coyote just saw an oven roaster turkey, with stuffing. In fact, you better actually have a modification to show them or they might wire your camper jacks in reverse when you’re not looking. In the truck camper community, we take our camper mods seriously.
This is the first of a four part series spanning this week and next. The first three installments include runner-up $25 Lowes Gift Card prizes. In the last and final installment next week, we’ll name the the winner of the $100 Fuel Card Grand Prize, aka the 2013 Top Modder.
Since we have now mentioned “mods” about a dozen times to a rather large crowd of mod-hungry truck camper owners, it’s time to show you the first installment of 2013’s Top Mod Contest entries. Let’s get to it.
Runner-Up Winner #1: Art Davidson, New York
2007 Chevrolet 3500
2003 Bigfoot 30C10.11SL
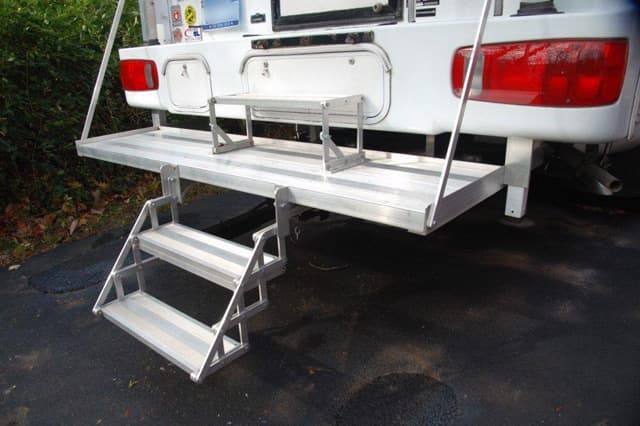
“Ouch! I did it again, slipped and bruised my leg on those shaky fold up stairs. How many times has that happened to you? There’s got to be a better way.
I looked at having a deck and stairs built, but most of the ones I looked at were over a thousand dollars. Time to do some research and planning.
I found a company, Markstaar, that would supply me with the same aluminum planking used for stadium seating. I bought two lengths for about $145 including hold down clamps. Next I needed several different types and sizes of aluminum.
I found another company on line, Speedy Metals, that offered some very competitive pricing. The cost of the aluminum came to about $200. This will vary, based on the sizes and lengths you may need.
The step treads and some of the folding arms were salvaged from the folding steps. This project did not require any welding since everything is bolted together.
To determine the rise height of each step and the height of the deck, you need to measure the height from the ground to the entrance step of the camper. Ideally, each step should be between eight inches and nine and a half inches.
The deck is made from two pieces of two inch by ten inch Mill Finish Aluminum Plank. The planks can be cut to length with a cutoff blade in a circular saw or miter saw.
 |
 |
 |
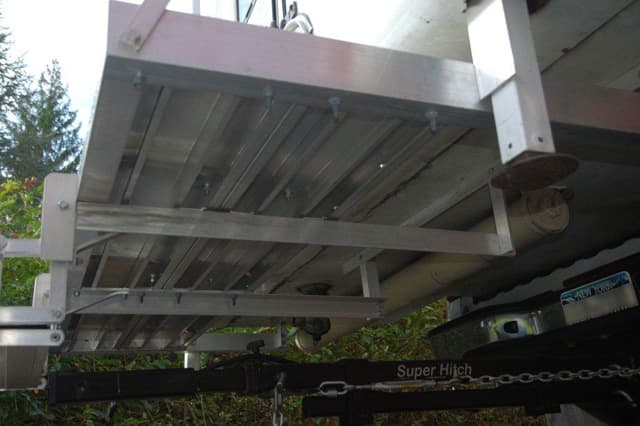
Above Left: Underside deck framing, Middle: Canter lever supports, and Right: Jack support
The deck frame is made from quarter inch aluminum angel extended under the camper to provide additional canter lever support. The frame is mounted to two quarter inch angles fastened to the two lower bolts on the jack support brackets. Additional support is provided by two and a quarter inch by one inch arms connected to the top jack support bolts.
 |
 |
 |
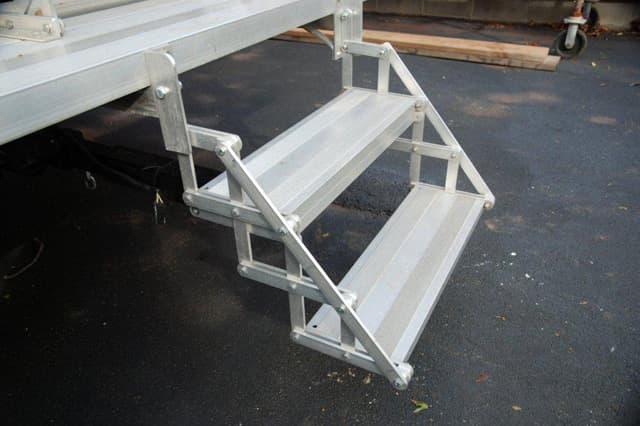
Above Left: Step hanger supports and Middle: Folded steps
I salvaged the old step treads and some of the arms from the old steps. My camper required a nine and a half inch rise. In order to attain that height, I remade all the vertical arms from one quarter inch by one inch stock. I adjusted the mounting brackets so that the when the steps are folded up, they rest on the deck step. A quarter inch by one foot bar is fastened to each side to support and lock the steps in place.
 |
 |
 |
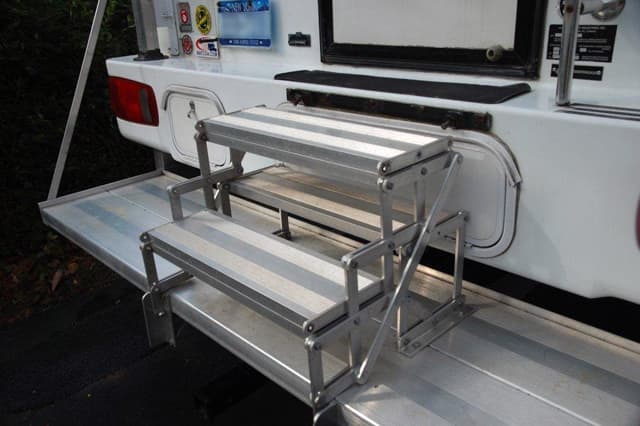
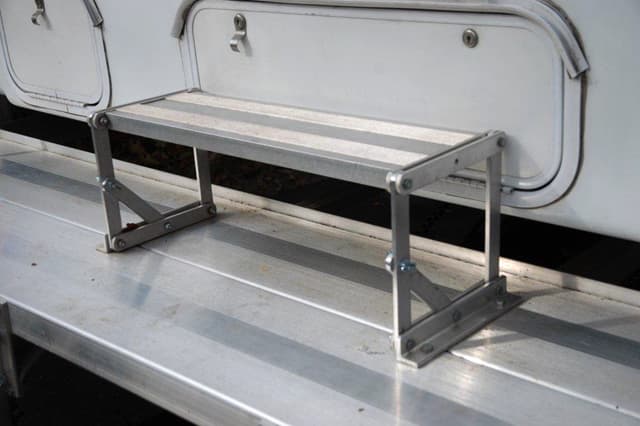
Above Left: Folded deck step, Middle: Deck step, and Right: Completed step project
The deck step brackets were made to provide a nine and a half inch rise. It is bolted to the deck and has two arms with bolts and wing nuts to hold it in place. Removing the bolts allows the step to be folded down for access to the basement compartment.” – Art Davidson
2013 Top Mod Contest Entries Part 1
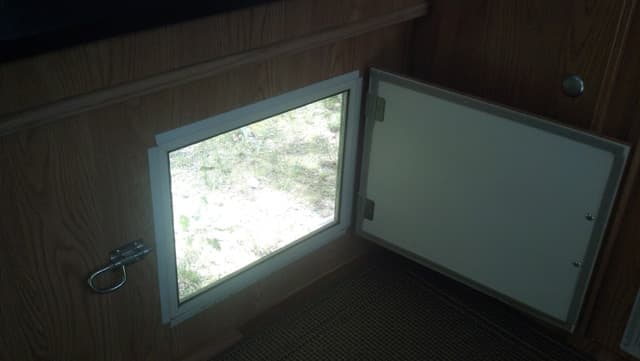
Joe and Nina Mac Donald, New York
2013 Chevrolet Silverado 3500
2013 Northstar Igloo U
 |
 |
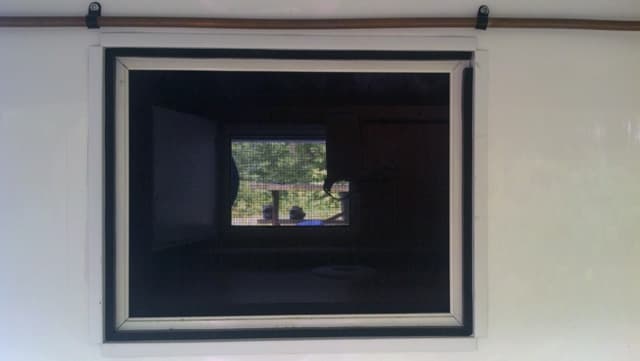 |
“After a couple of years of never using the wheel well access doors on our previous camper, we decided to experiment with the idea of putting screens in that slot so that we could open the access doors and have good cross ventilation. They are fantastic and, if needed, can be popped out. We leave them on and use them all the time.” – Joe and Nina Mac Donald
Jim and Anne Beach, Alberta
2009 GMC 3500 HD Dually
2012 Arctic Fox 865
 |
 |
|
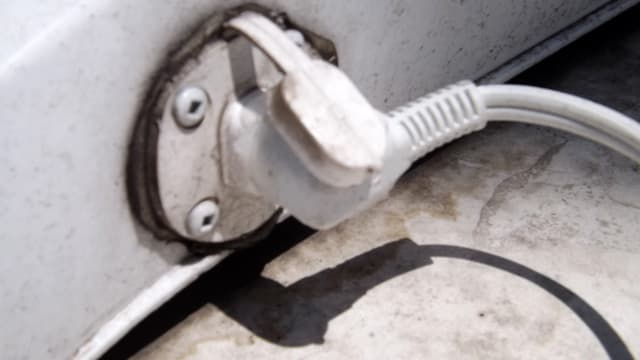
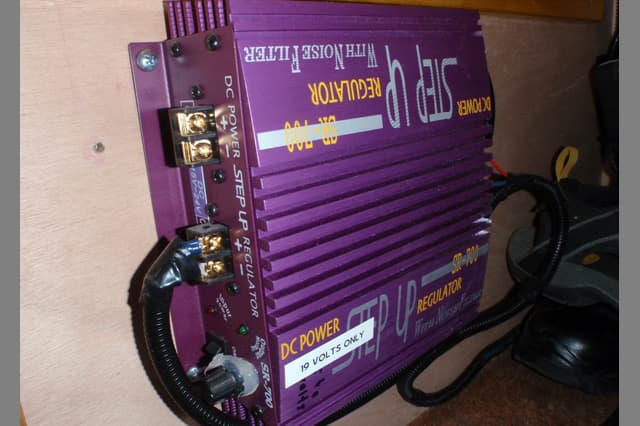
“We installed a fifteen amp power inlet to make it easier to hook-up a fifteen amp cable without having to screw in the connector for the heavy thirty amp Marinco (30-amp detachable power cord) on the side of the camper.
We had bought the screw-on convertor which goes from the thirty amp screw-on to the fifteen amp plug, but we still found this a bit of a pain to screw on and attach the cord.
The fifteen amp inlet plug is from Marinco and of good quality. It is available in black or white for about $20. It installs easily through a one and three-quarter inch diameter hole drilled into the side of your camper. I put it in the front wall so it wouldn’t be beside the other thirty amp plug connection.
The fifteen amp connection can be made directly to the main input circuit breaker panel with 12-2 or 14-2 wire. The route to the circuit panel is easy on the Arctic Fox 865. If you lift out the floor panel in the compartment under the sink plumbing, it is accessed from outside.
Anyone who has doubts about their electrical knowledge or skill should ask for competent help before performing this mod. If you do this, keep the cover over the thirty amp plug as the terminals are live if you have the fifteen amp cable installed. The reverse is also true if you have the thirty amp cable installed and connected to power.
It is now a very simple matter to plug in the camper for a few hours before we leave. This makes the refrigerator cold while we’re loading. I would say this one of the simplest and best mods we have done.” – Jim and Anne Beach
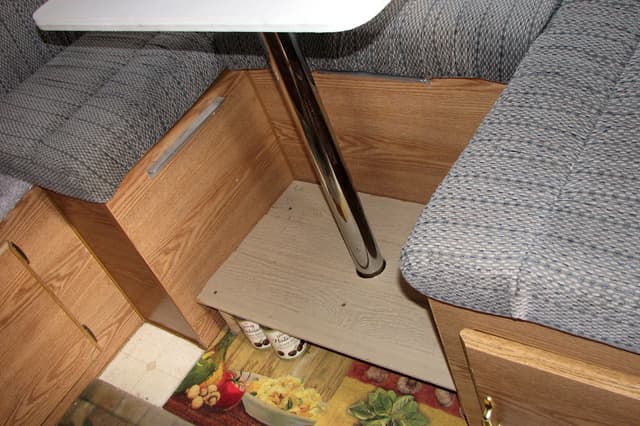
John Cook, Colorado
2006 Ford F250
1994 Lance Squire 150 Lite
 |
 |
|
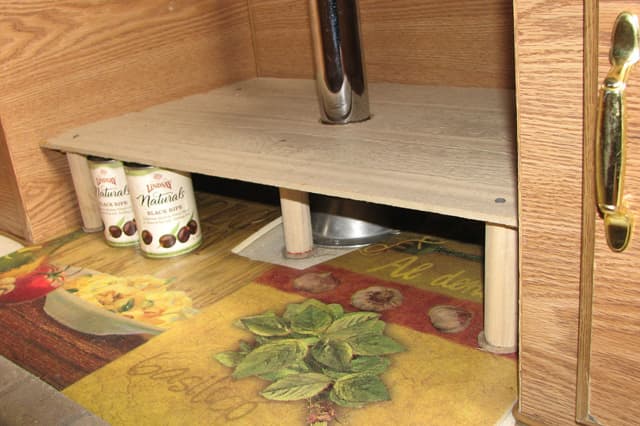
“Ergonomists generally agree that our feet should be flat on either the floor or the foot rest. If you have short legs, this can be a problem when trying to relax at your camper dinette. Here is a solution that also provides some extra storage for can goods, pet bowls, etc. Just find some scrap wood pieces, and fashion something like the photo above. We also used cushion comfort kitchen anti-fatigue floor mats from Costco over the cold linoleum.” – John Cook
Alan Bryant, Montana
2002 Ford F250
1995 Shadow Cruiser 851

“In the process of installing the winterizing valve, I discovered that I did not have enough space to connect the valve to the water tank. Therefore, I devised these loops on either side of the pump to gain the necessary space. However, the unexpected benefit was that the vibration noise was reduced considerably.” – Alan Bryant
Gary Raymond, Florida
2012 Dodge Ram 3500
2006 Lance 1191

“I installed an ice maker in the hanging closet. We always travel with a boat, so the ice sure is handy. It was a little tough getting the water line to it, but it worked out well and I have never missed the closet.” – Gary Raymond
Jim Finck, Texas
2001 Chevy Silverado 2500HD
2004 Lance 1010
 |
 |
 |
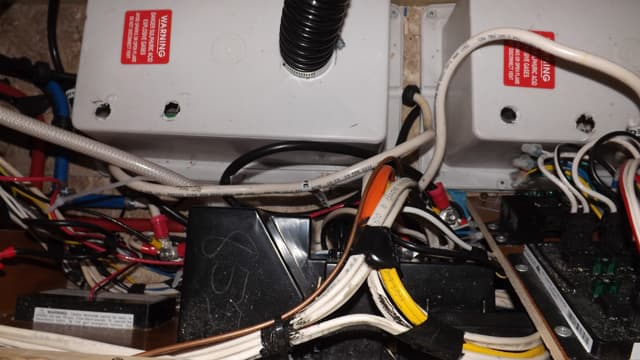
“I was having problems with my refrigerator and wanted a method to monitor the refrigerator power status while we were traveling down the road. This is a mod that requires some technical expertise, but one that should be possible for most truck camper people because we are some of the most adventurous types around.
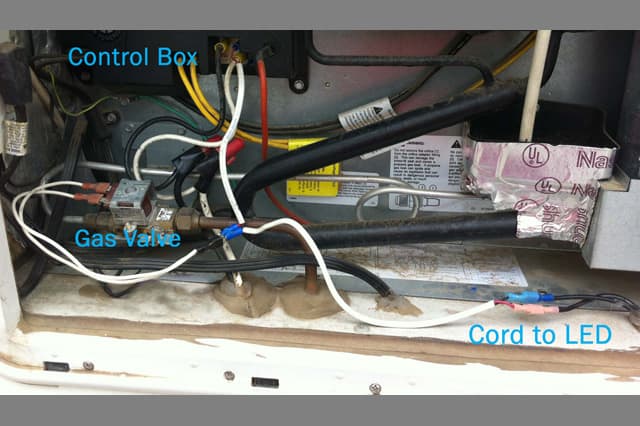
Our Norcold refrigerator senses when its flame is lit. If the flame fails to light within a minute or so, it turns off the gas and stops attempting to light.
My modification was to add a LED to the refrigerator that is turned on by the 12 volt DC fridge gas valve power. The LED light is mounted where I can see it while driving.
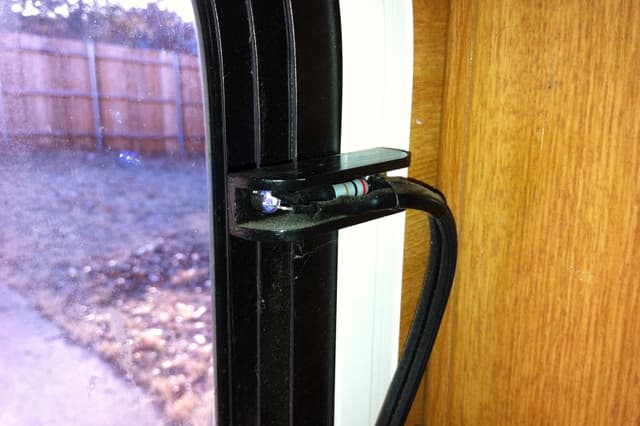
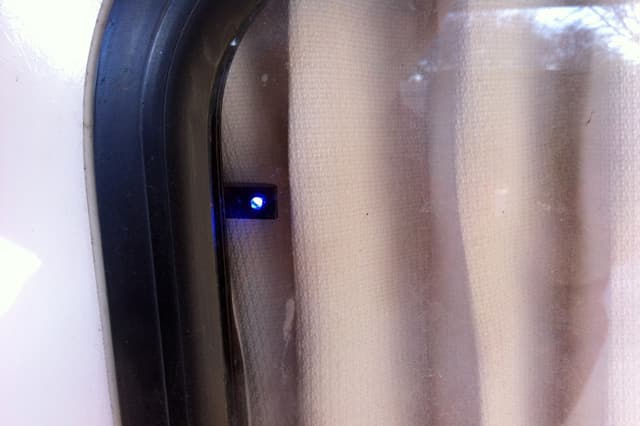
I built a LED light assembly and mounted it inside the camper in the upper right corner (passenger’s side) of the pass-through window utilizing one of the existing window mount screws. The LED is visible in my truck rear view mirror day or night whenever the fridge flame is on. No LED light equals no gas, which equals no flame, which equals warm milk and beer.
I bought a standard output blue LED and a couple of different size resistors from Radio Shack. I chose blue because it seemed like a soothing color, but any color will work. A 2000 ohm resistor was chosen after I experimented and found that the LED had enough current to illuminate, but was not too bright to be annoying while traveling at night. The bracket is a piece of aluminum channel that I found in my junk drawer.
The LED was mounted in the channel along with the resistor and a length of small black AC cord I found in another junk drawer. The lamp cord was routed through the camper to the refrigerator where I tapped into the two wires that supply 12 volt DC power to the gas valve. Be aware most LEDs require the correct DC voltage polarity in order to illuminate, but there are units available that are dual polarity. If the LED does not light when the gas valve is on, reversing the polarity should do the trick.
After installing the LED I was able to track down the cause of my refrigerator problem, but that is a topic for another discussion. Now, whenever the refrigerator flame is on, so is the light, giving us piece of mind that the milk will be still be good and the beer cold when we arrive at the campground.” – Jim Finck
Thomas and Lori Ferreira, California
2008 Dodge 2500
2013 Lance 855S
 |
 |
 |
 |
 |
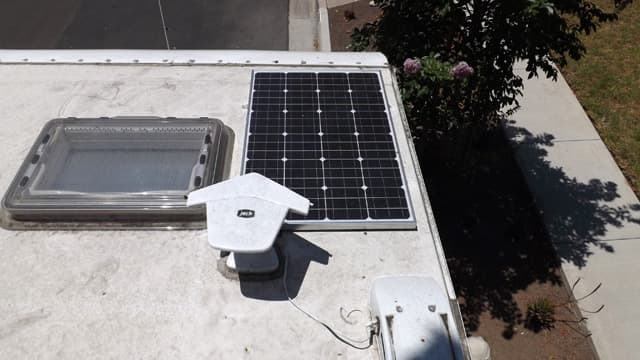 |
“We opted not to order the solar panel on our 2013 Lance 855S only to regret it a few trips later. Running the generator to charge the two on-board batteries is not the way to go for us. We have never had any battery issues, but running the generator is noisy and burns up a lot of propane.
All Lance Campers come pre-wired for solar. The incoming power plug is located on the refrigerator vent and the power plug that attaches to the solar panel itself came with our owners packet.
When I began my search for an affordable solar kit, I found that most aftermarket kits started out around $500 and go up to about $1,200. These were complete kits and included wiring and other things we didn’t need.
Being a long time eBay user, I began looking there. I found the perfect kit for our needs on eBay. The kit included one 100 watt solar panel and control panel all for the affordable price of $172 shipped to our front door. When the kit showed up, I began making a list of items needed to complete the installation including Z bend brackets, twenty bolts with nuts, four sheet metal bolts, two crimp wire connectors, two crimp on connectors, one red ten gage wire, and one black ten gage wire. The total cost from our local Lowe’s was less than $12 for everything.
Lance mounts their solar control panels just under the systems control box. Knowing this, I removed the wiring cover from underneath the kitchen sink and, sure enough, there were the wires I needed to perform this modification. Everything was prewired and ready to go for a perfect installation.
Next, I used the factory location for the solar panel, attached the Z brackets and mounted the solar panel to the roof making sure to use plenty of sealer. Don’t be cheap with the sealer as a leak in the roof would be a costly mistake.
I useed wire crimps to attach the plug that came in our owner’s packet to the solar panel leads and plug the lead into the pre-existing plug (a factory installed plug) on the front edge of the refrigerator vent on the roof. I also sealed this plug so water couldn’t enter the connection. That finished up everything on the outside of the camper.
It was a very warm day and inside the camper was eighty-five degrees. I fired up the generator and turned on the air conditioner. May as well be comfortable right?
I needed to mount the charging control panel to the cabinet face. I mounted it just under the generator control box. Next I made up the two leads needed to charge the batteries, red for positive, and black for negative. I then attached the wires from the batteries to the control panel. When the batteries are attached to the control panel, it comes to life and shows the amount of charge via LEDs.
Then I hooked up the negative and positive wires to the control panel coming from the solar panel. That’s it. It’s just that easy. The entire job took less than two hours.
Over the next three days I monitored the charge rate and voltage of the batteries. The new solar panel is keeping the battery voltage at 12.8 volts. I am a happy camper and, for less than $200, we now have a perfectly working solar charging system.” – Thomas and Lori Ferreira
Carl Isner, Colorado
2012 Dodge Ram 5500
2012 Alaskan 14.3 foot camper
 |
 |
 |
 |
 |
 |
Above: Click to enlarge the photos and to read the captions
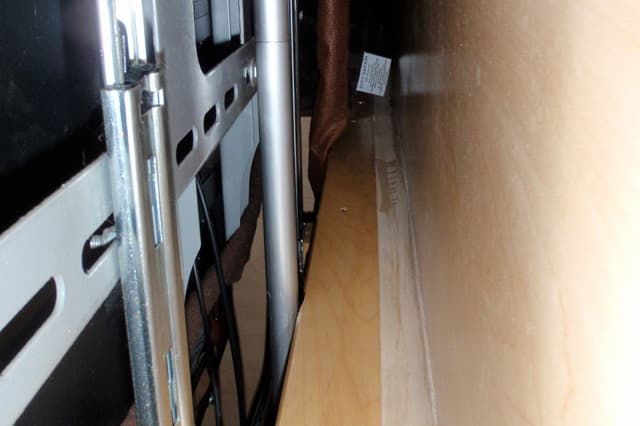
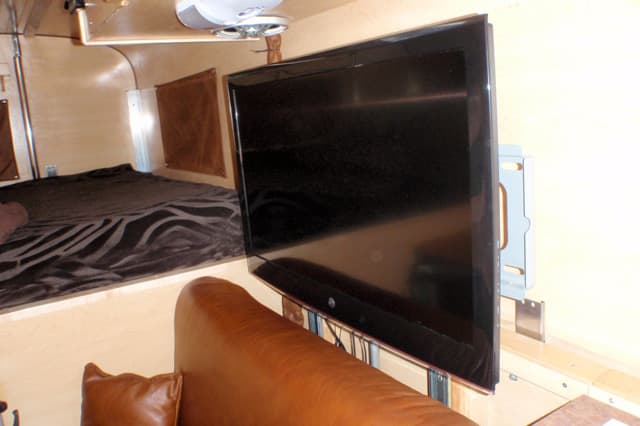
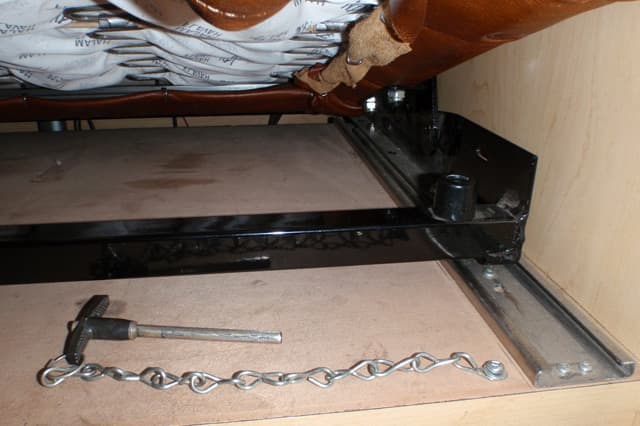
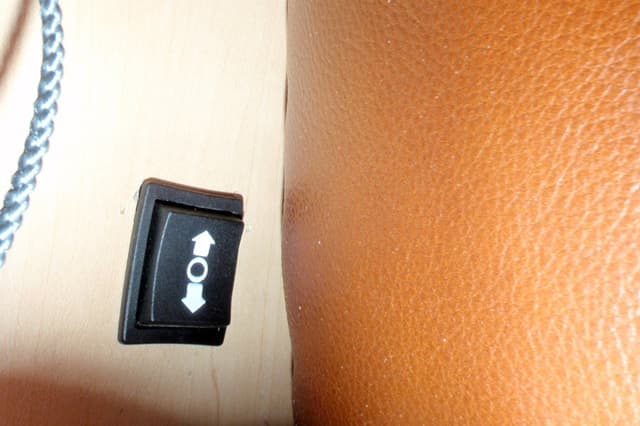
“Photos above show how a thirty-two inch backlit LED television can fit behind the settee in an Alaskan camper, or any truck camper for that matter.
The first picture shows the screen mounted on two glides and then a Firgelli linear actuator (twelve volt) that moves the screen up and down with the push of a button.
As an added bonus, the screen was already running off nineteen volts DC (almost all televisions run between thirteen to nineteen volts). I cut the AC converter off and wired the power directly to a variable volt upverter set at nineteen volts. Now the screen runs completely off of batteries without powering up the inverter and we can watch movies without ever being plugged in.

The screen is run either by a car DVD player mounted in an overhead cabinet, or from our laptop plugged into a HDMI and audio port on the screen. The whole system runs off our batteries, draws minimal power, and is extremely space conscious.” – Carl Isner
Terry Rey, Utah
2007 GMC 2500HD
Outfitter Apex 8

“Our Outfitter Apex 8 was delivered with 125 watts of solar (one panel) which, with good solar conditions, kept our house batteries charged when off-the-grid. 99% of our camping is off-the-grid, in warm weather.
In less than good solar conditions, and/or when the furnace had to run, 125 watts of solar was marginal for keeping the batteries (two 6 volt GC, 217 AH) fully charged.
Since our camper has a 7.5 CF Nova Kool compressor refrigerator (the best thing since sliced bread) we must have adequate battery capacity at all times, even when we don’t drive the truck (charging the batteries from the 7 pin receptacle), and/or don’t want to run the Honda 2000i generator.
Therefore, I upgraded our camper solar from one panel to three giving us a total of 375 watts of solar. Since doing so, we have never run low on battery capacity and have not had use our Honda generator to recharge.” – Terry Rey
Dave and Dora Donovan, Idaho
2007 Chevy 3500
2012 Chalet TS116

“I have a Chalet TS116. The cabinet in the bath had a door on it that was so big you had to lean over backwards to open it. It was also too low to the sink top. You could not stand any tall bottles, like my wife’s hairspray, underneath it.
I pulled the cabinet out, made a cut below the second shelf, and removed about four or five inches of height. Then I glued the bottom back on. You can see the cut line, but you really have to look for it.
I placed vertical partitions in the remaining shelves and then built a new door to cover what was left. Matching the finish was the hard part, but it’s much more convenient now. The cabinet fit right back in its original position. I just had to fill in a couple of screw holes on the bottom of the wall and woodwork. It looks like it was made that way. “ – Dave and Dora Donovan
Paul Foster, Maryland
2005 Ford F250
2008 Lance 845
 |
 |
|
“The original range top was made out of coated/painted sheet metal. When using the range the lid, which was a bifold lid design, it denied us of any storage behind the range.
We replaced the bifold lid with a wooden piece that required it not to warp. If it warped, it wouldn’t stay put while driving down a bumpy road. I inlaid two oak strips on each side that kept the pine from warping. This range top can now be used as a cutting board and adds storage space between the wall and the back edge of the range top.
The new range top stores at the foot of the oven without getting in the way. We treat the wooden top with butcher block and cutting board oil to keep it looking good.” – Paul Foster
Andy Smith, Michigan
2002 Chevy Silverado 2500
1991 Sportsman 9.5

“I made a safety and space saver shelf. I have a Red-Cross emergency radio with a clock, alarm, light, cell phone charger, solar charged, FM-AM radio, and weather radio. It’s like a Swiss knife. While out in the sticks deer hunting in November in the Upper Peninsula of Michigan, it is good to know a little more than the local radio station’s report.” – Andy Smith
R.W. Johnson, California
2008 Ford F350
2007 Lance 851
 |
 |
|
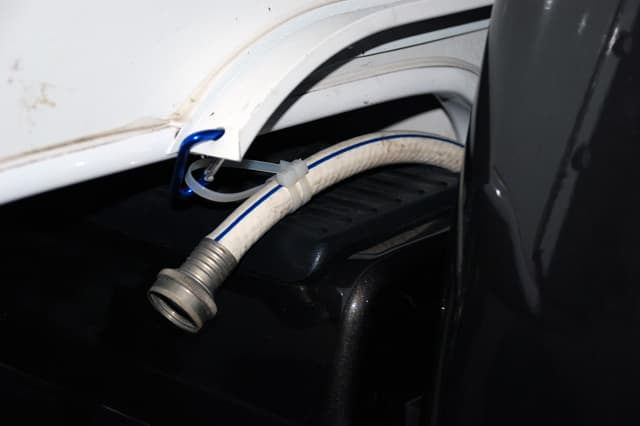
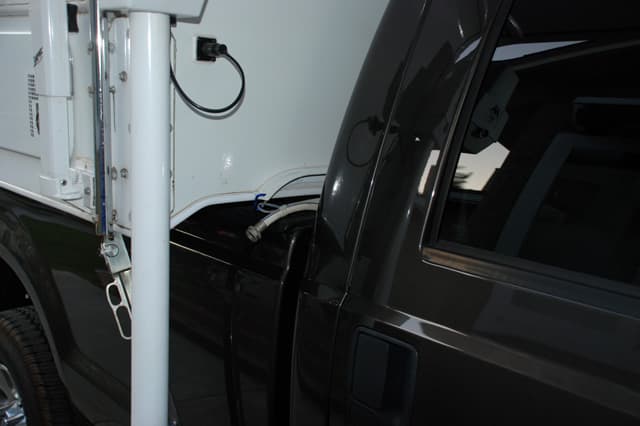
“My modification is not really a big deal, but one that helps solve the eternal truck camper problem of not enough storage space.
In our camper there is a void between the exterior wall of the slide in portion of the camper and the inside wall of the truck bed. In most campers this space is inaccessible. However, we have found this space is ideal for storing wet, dripping water hoses. We stuff the fresh water hose down one side and the gray water hose down the other. We have attached plugs to the fresh water hose on each end to keep critters out of the hose. We attached clips to one end that are clipped to holes we have drilled in the drip rail at the front of the camper. It’s been a good use of formally unused, inaccessible space.” – R.W. Johnson
Ken and Lynn Gillespie, Texas
2008 Ford F250
1988 Lance Squire

“We are full timing in our truck camper and we need as much storage space as we can find. The wall in our wet bath was wasted space until we decided to build a bathroom cabinet for it. We made it deep enough to hold a roll of toilet paper and we found a couple of containers that also fit perfectly. We added a clear acrylic door to the front of the cabinet to keep any water out when we shower. We painted the cabinet the same color as the walls so it looks built in.” – Ken and Lynn Gillespie
Doug Baughman, Iowa
2008 Ford F350
2013 Northstar Arrow 8.5

“I added a grill/one burner that swings up behind the steps. DOT regulations require a length limit of no more than forty-eight inches behind the camper. With the grill swinging up behind the step, it falls under the forty-eight inches.
I save a lot of storage space having the grill/burning outside the truck. The grill/burner swings out of the way so we can use the steps for our truck camper. There are two stability points for the grill/burner to rest on.” – Doug Baughman
Disclaimer: It is your responsibility to make sure that any do-it-yourself modification project you undertake is safe, effective, and legal for your situation.


