A wine rack has been added, motion sensor lights wired, battery isolator upgraded, hidden tool tray created, four backup camera systems installed, and more. Pick your favorite mod, and vote.

Welcome to the July 2016 Medium Mod Contest. Please review the following eleven Medium Mods and vote for your favorite. We will announce the July 2016 Mod Contest winner next week. For more information about the Monthly Mod Contest, including how to enter, click here.
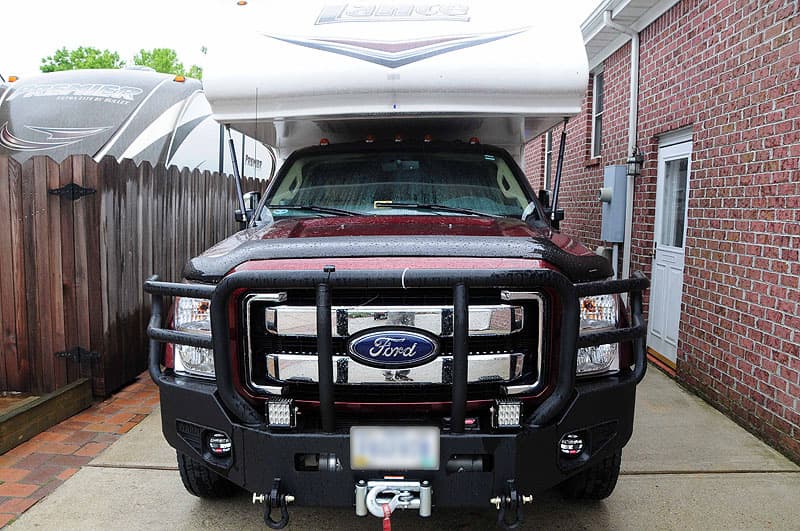
1. Jim Kauffman, Fernandina Beach, Florida
2015 Dodge 5500
2014 Eagle Cap 1160
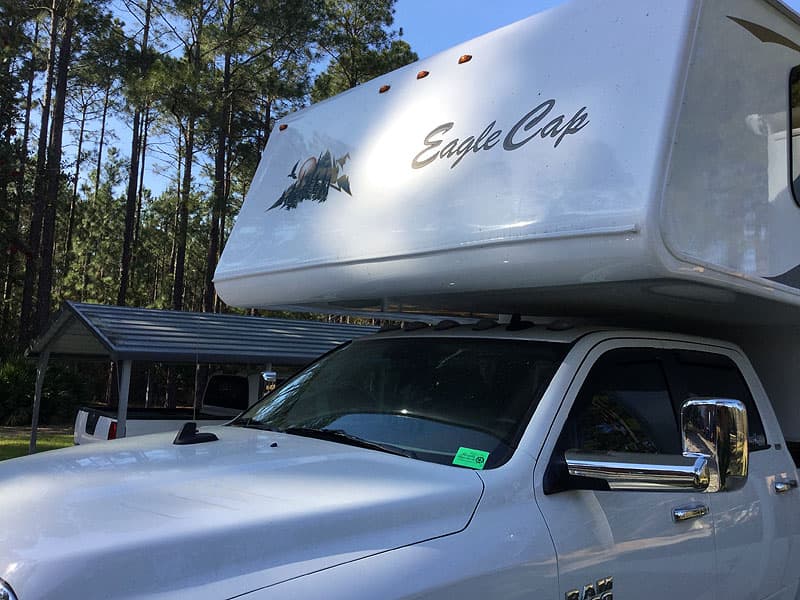
I had problems with camper wax and bug juice on the truck windshield after night dew or light rain. The stuff would mess up the windshield and required a degreaser to get it clean. To solve the problem I used a EZE Gutter sold on Amazon.com and at Camping World for around $26.
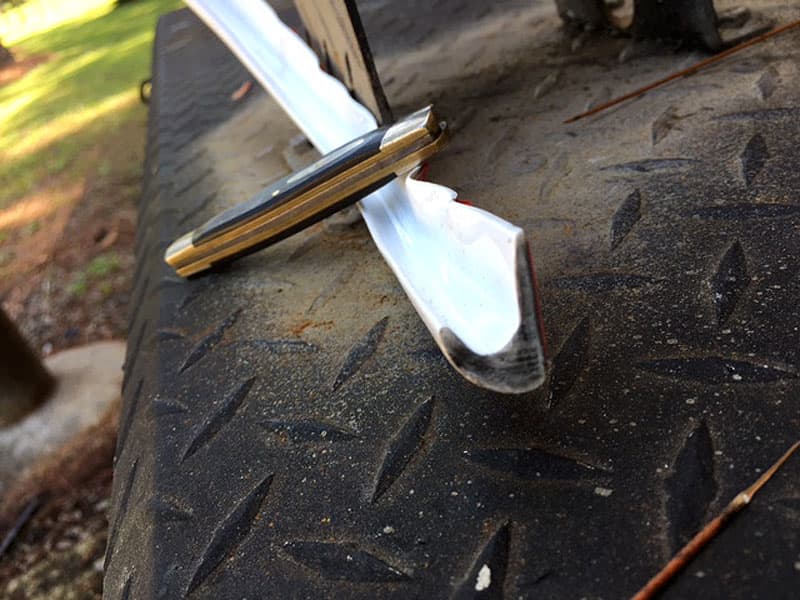
The piece above I had left after I cut it to length. I installed it with a little bit of slope so that the water will run out the trough as shown in the photograph.
The EZE Gutter works fine and was easy to install with the self packing tape that came with the gutter. It works great. Even in a hard rain, water is diverted off to the side of the camper rather then down on the windshield. There is no more mess on the windshield.
It took me two hours to complete this modification and cost me $26. In my opinion, the skill level of this modification is easy.
2. Mike and Kellie Nyholm, Forestville, California
2008 GMC 3500
2015 Host Mammoth
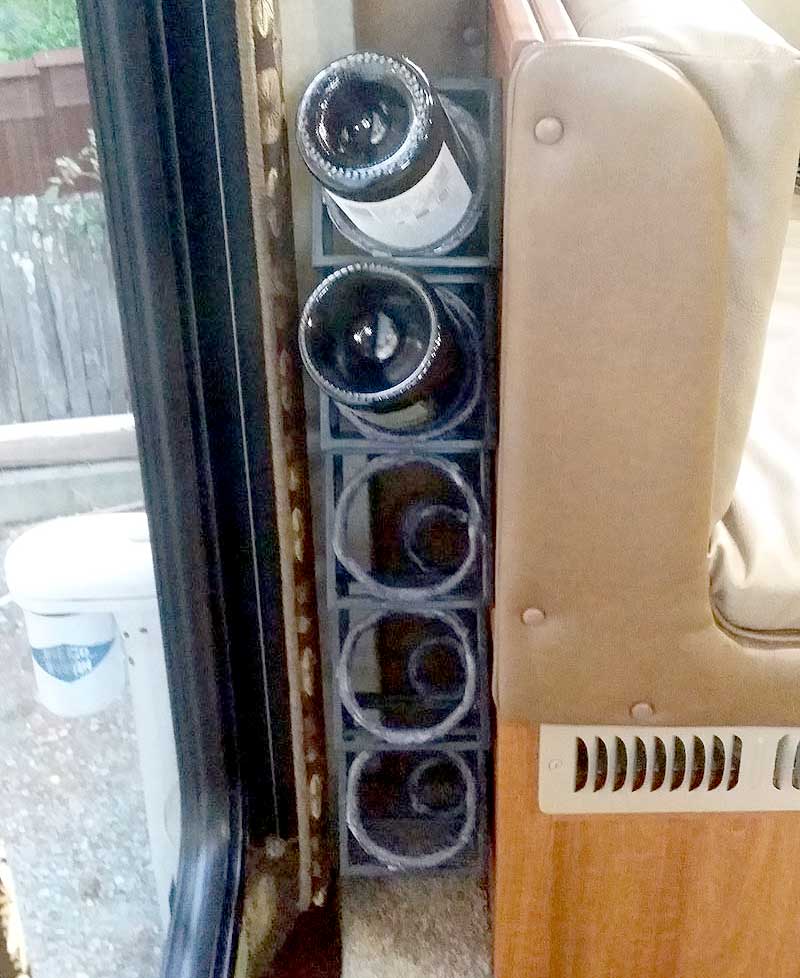
I made a wine rack for our truck camper. I found a six bottle vertical metal wine rack that slants nose down. I wrapped each ring with dark foam to match the metal. That protects shock from metal hitting glass and fits each bottle tight.
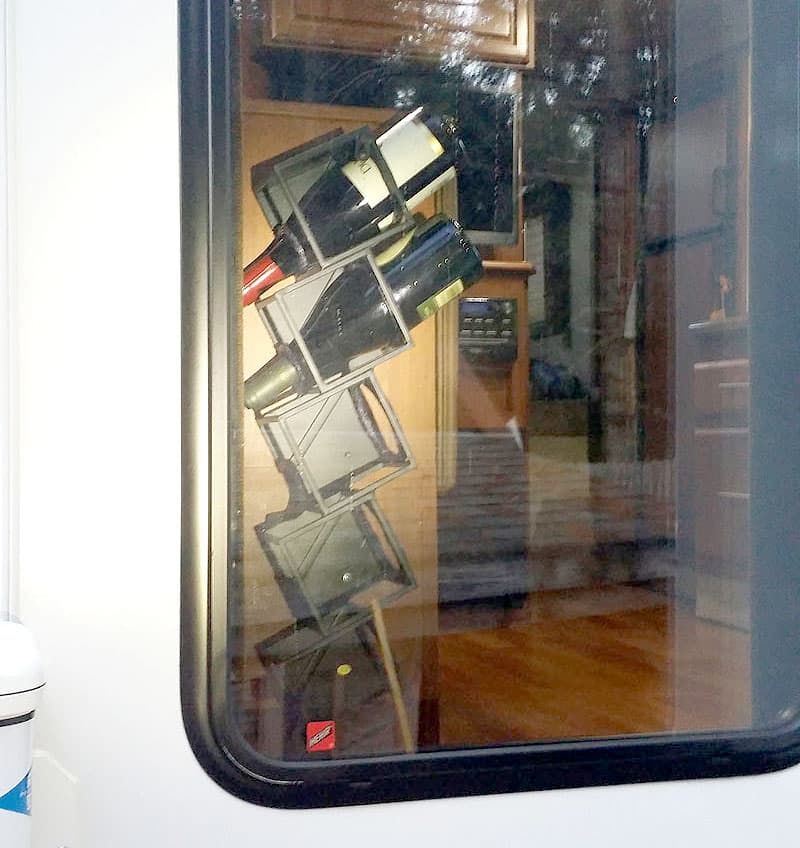
I get snarky comments from my Bud Light friend like, “they have a wine cellar too!” I have never lost a bottle!
It took an hour to complete. My wife made dinner while I wrapped the wire rings with foam backer rod. The wine rack was $60. The skill level of this modification is easy.
3. Stephen O’Neal, Miami, Florida
2013 Chevy 3500 HD flatbed
2011 Alaskan 11-foot
I had concerns about animals or people in the vicinity of my camper at night. That led me to install two LED side lights and a new porch light. They all have motion sensors which can be adjusted for a 10 to 25 foot range.
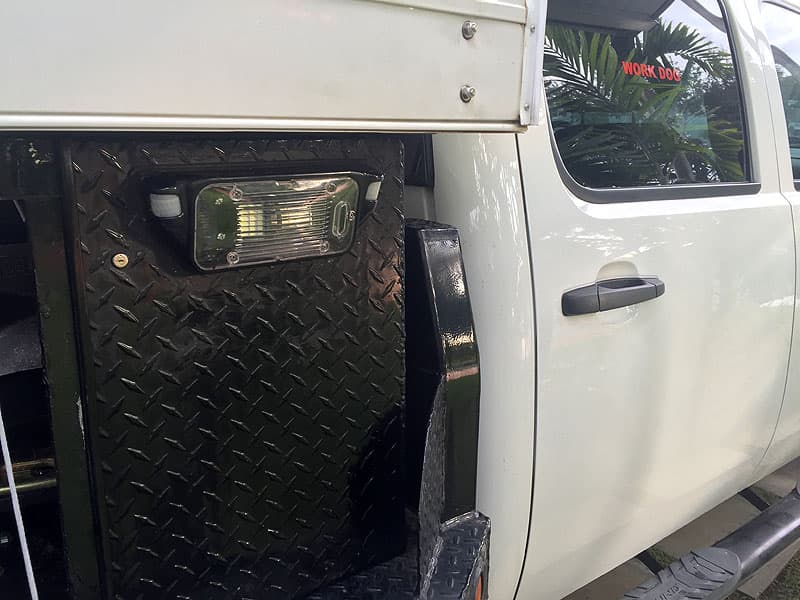
I elected to install a individual keyed on/off switch on each light so it does not illuminate when I am driving at night. There is also a flashing status green LED light at night which I use as a beacon. I called the manufacturer and they sent me cover sleeves at no charge so it cannot be seen. Finally, I plan to put a master switch inside my camper that will allow me to control the lights.
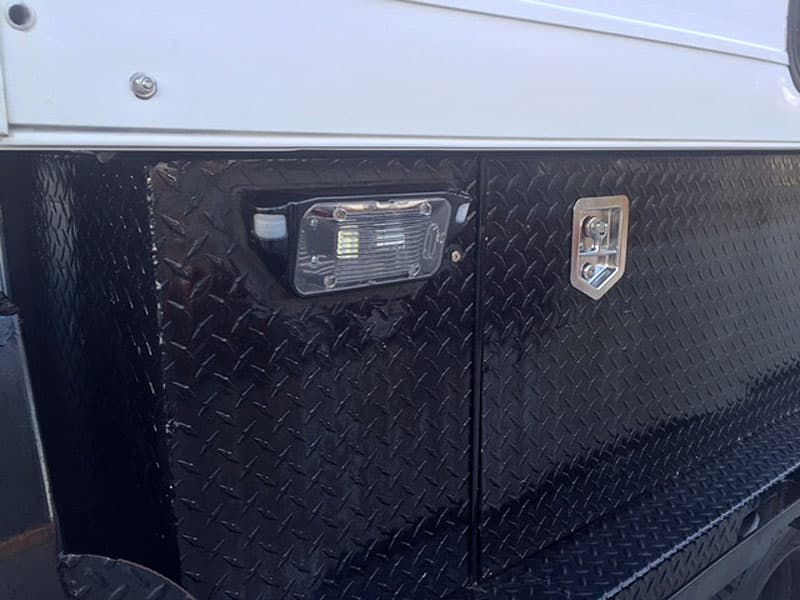
The cost was $175 and it took me 2.5 hours to install all three lights. The level of skill in my opinion is easy.
4. Dan Walinsky, Sunnyvale, California
2012 Ford F350
2015 Arctic Fox 990
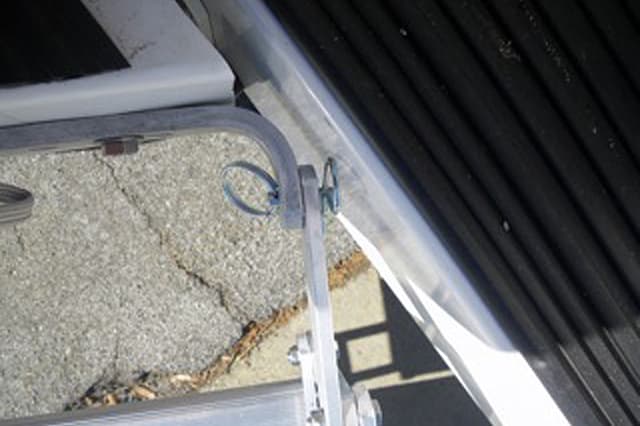
Here’s a picture before my modification, where the entry was high up off the ground.
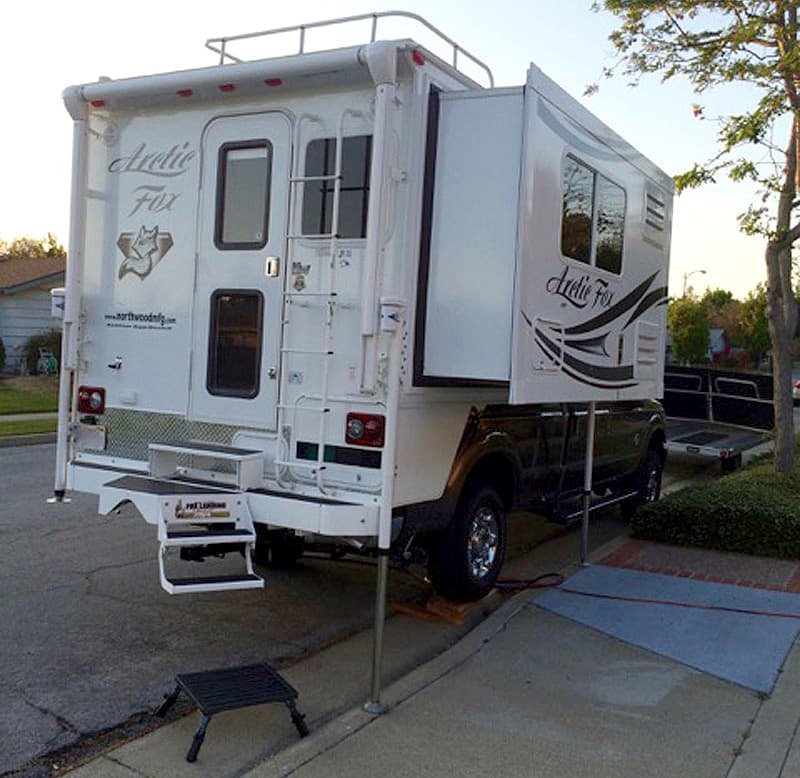
I wanted a safer way to enter and exit my camper while it’s on the truck.
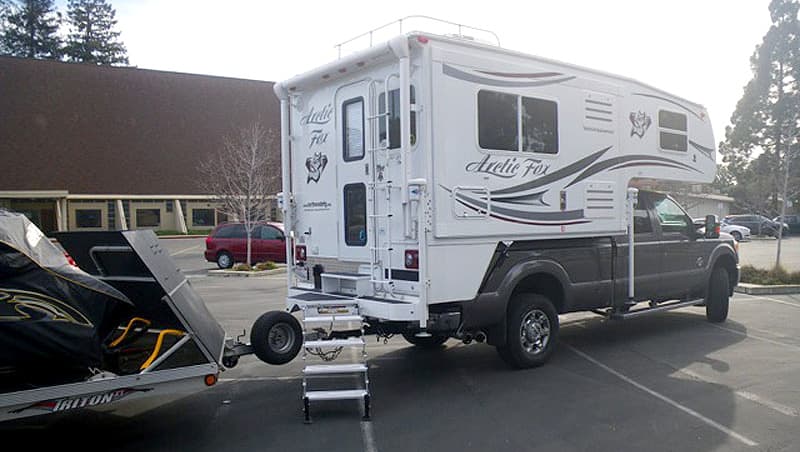
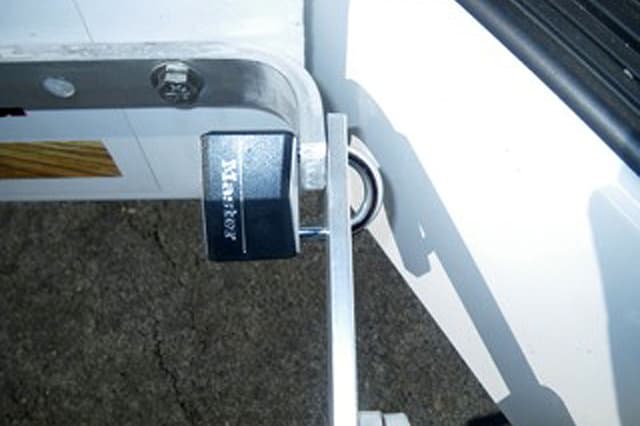
I added the Torklift A7804 Glow Steps, and Torklift All-Terrain Landing Legs to my Fox Landing on my 2015 Arctic Fox 990.
What a difference! It is so much safer to enter and exit the camper.
 |  |
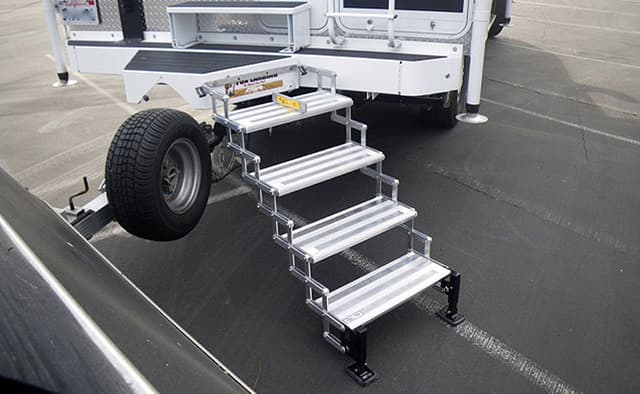 | 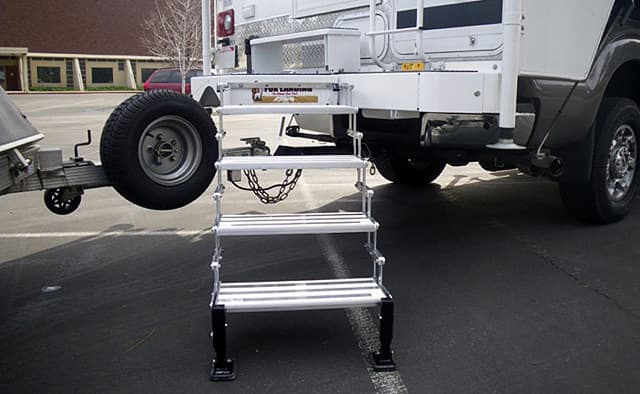 |
The steps are very solid. I’m so glad I added this to my camper. It is less likely that I’ll end up on my keister.
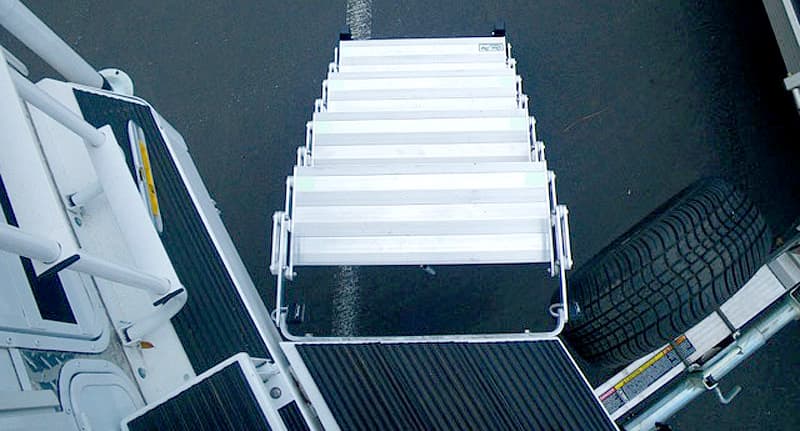
It took me one and a half hours to complete this modification and cost me approximately $500. In my opinion, the skill level of this modification is medium.
5. Jeremy Haymore, Burley, Idaho
2015 Chevy Silverado 3500
2015 FWC Grandby
My Four Wheel Camper had been ordered with a compressor refrigerator that uses a fair amount of power. One of the sources to replenish the camper’s batteries is charging directly from the truck’s alternator.
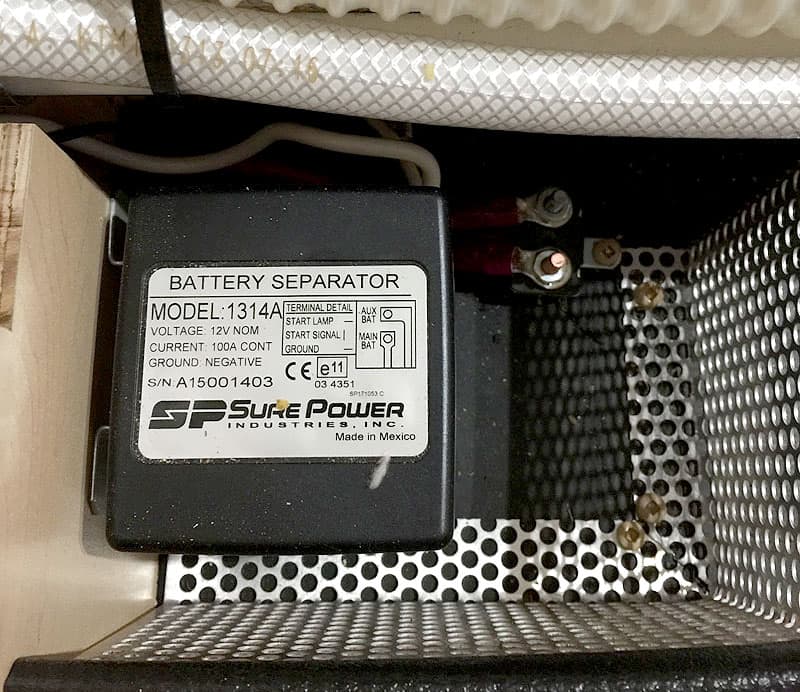
The stock system charges through a Sure Power 1314a battery isolator. This provides power to the camper but, as a battery isolator, has three main drawbacks:
1. Loss of voltage to heat through the isolator.
2. The isolator will not turn on if your voltage in the camper is too low (like 12.5 volts or lower). When you need the power the very most from your truck, you cannot get it.
3. No power can be transferred from the camper to the truck batteries in an emergency.
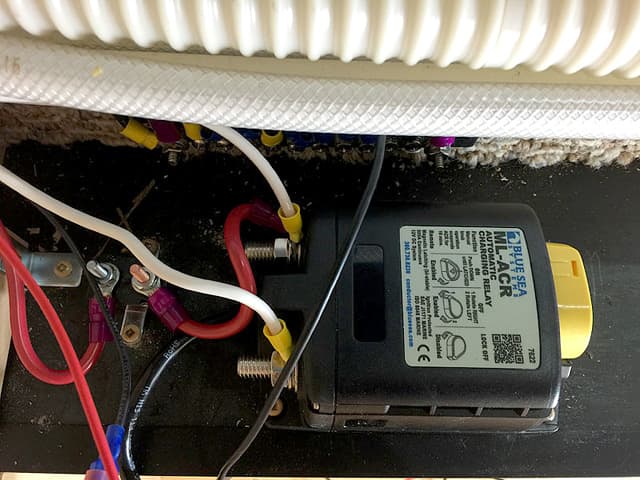 |  |
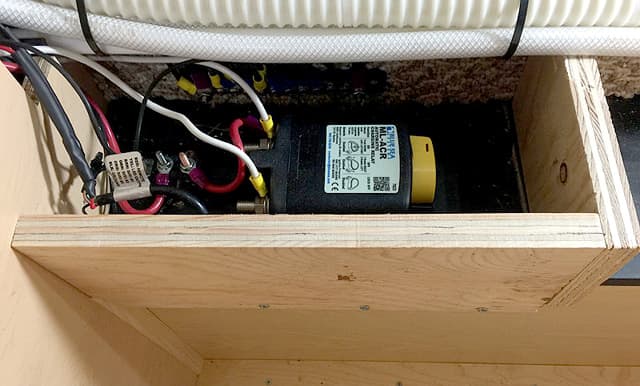
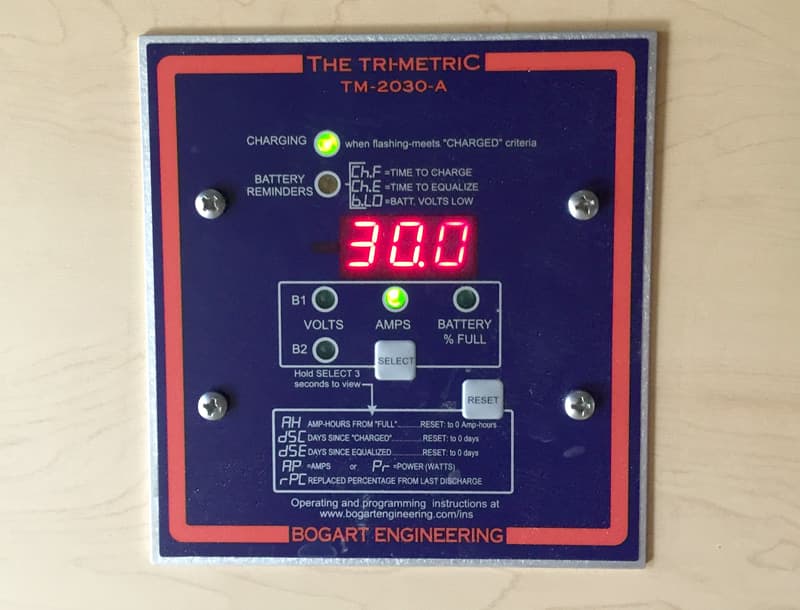
I replaced the Sure Power 1314a battery isolator with a Blue Sea ML-ACR with manual control. First, I had to remove the old battery isolator and label the connections for the new system.
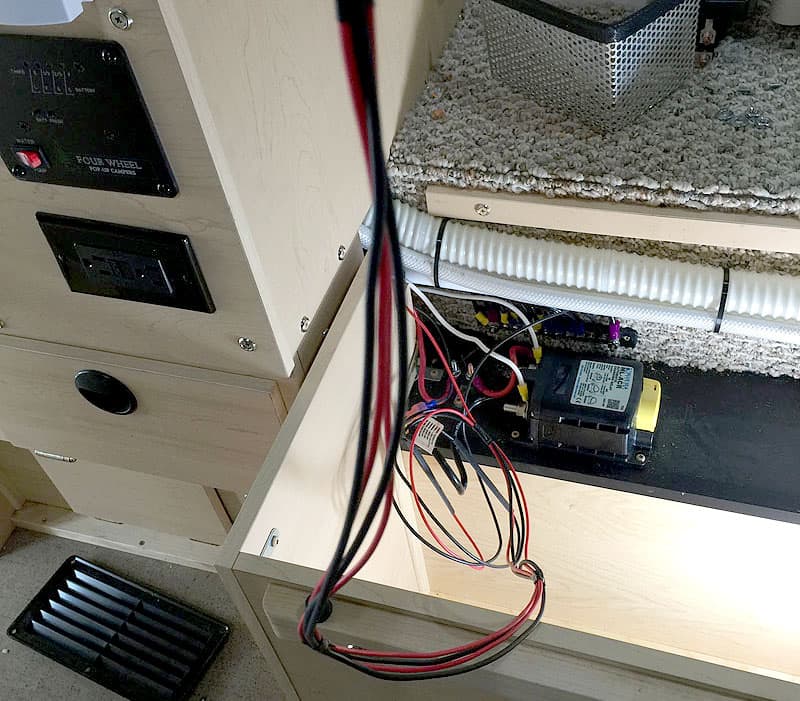
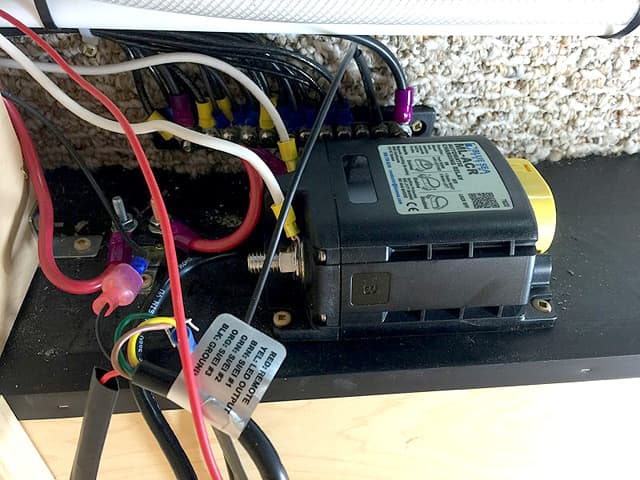
The Blue Sea ML-ACR was installed in the same position as the Sure Power isolator. It has an addition manual control that needed to be wired to the ML-ACR along with the negative and positive terminals of the camper’s battery. The wiring did require custom lengths of wire, modifying the wire ends, and shrink wrapping the ends for protection.
 |  |
Then I had to pull the wiring and cut a hole for the switch into my camper’s power center. Finally, since my Blue Sea ML-ACR was much larger than the prior Sure Power, I had to build a wood box around it to protect it while it was in a storage area of my camper.
 | 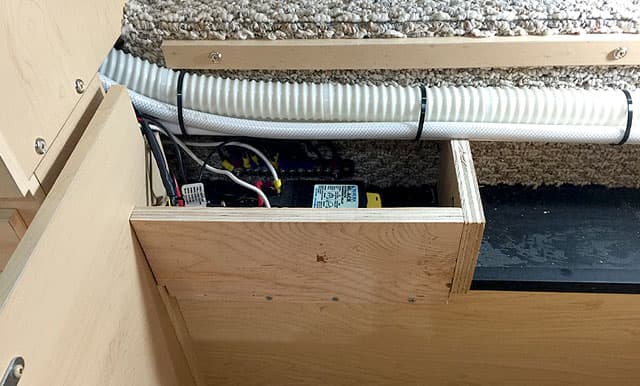 |
The new system is a big improvement from the prior setup. Overall, I am very happy with the Blue Sea ML-ACR.
Here are some of the benefits of the system:
1. Enhanced charging capacity from the truck. I am able to charge three to four amps/hour faster with the new Blue Sea equipment. There is very little loss of energy to heat.
2. I am aware and in control of charging from my truck to camper. I can override the automatic system and connect the batteries to allow charge no matter how low my camper batteries are. The monitor switch always lets me know when the systems are connected.
3. My camper’s solar system can charge my camper’s batteries and truck’s batteries if I want it to. If I only want to charge the camper, I can do just that as well.
4. If my truck’s batteries were ever too low to start the truck, I could charge them from the camper’s batteries. This is a great safety feature.
5. A manual switch on the ACR allows me to work on the camper’s electronics without any power source from the truck if I need to do repairs.
6. In the automatic mode, the system functions just like the stock FWC system functioned. It allows charging of the truck camper’s batteries from the truck without discharging the truck’s batteries – unless you override the system.
It took me three to four hours to complete this modification and cost me $230 ($210 for the Blue Sea ACR and $20 in wiring and connections). In my opinion, the skill level of this modification is medium.
6. Paul Gathany, Springfield, Ohio
2009 Chevy Silverado
2007 Sun Valley SunLite
It seems there is often a need to tighten a screw, replace a bulb, or do one of many other little maintenance issues that come with camping. For most of the time we have owned our truck camper, I’ve stored the screw drivers and other miscellaneous items in one of the drawers where the kitchen utensils are kept.
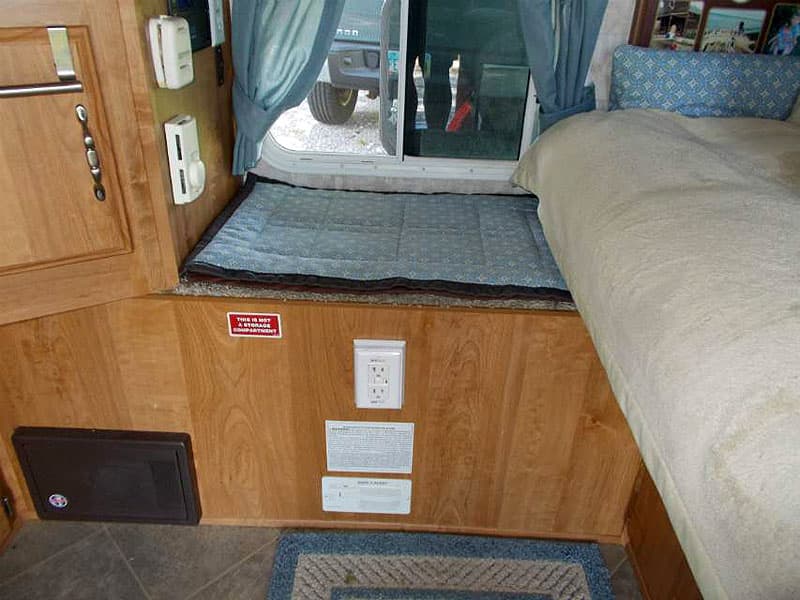
One day as I was turning the valve to empty the fresh water tank, I noticed there was about two inches clearance between the top of the tank and the bottom of the the lid that covered the step-up to the overcab bed. The exposed area was 6-inches by 16-inches, which is perfect for a tray to fit.
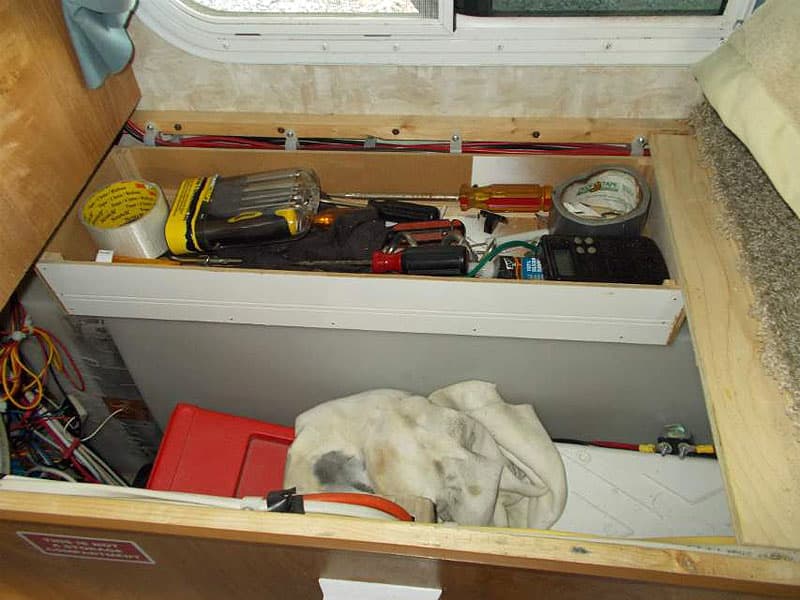
Not finding a tray to the dimensions of 2” x 6” x 16”, constructing one seemed to be the best option. My wood shop yielded all the small pieces of Masonite hardboard needed for construction of a tray. Once all the pieces were cut to size and glued, we had a tray. It sits neatly on top of the tank, using up space that was only air before. I drilled a hole on the back edge of the tray, which permitted fastening it to the wall with a screw.
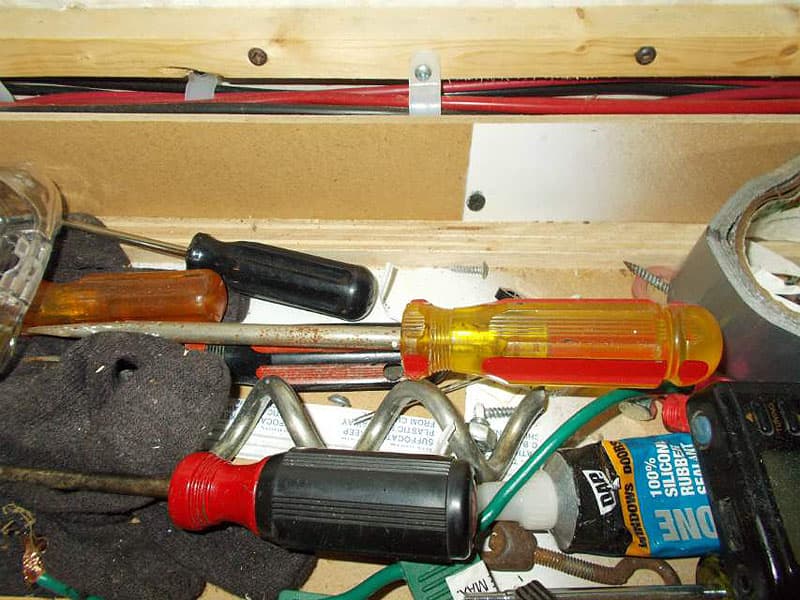
As might be expected, I have found more than a screw driver to place in the tray. It really has been handy for small things that otherwise rattle around the camper in sundry places.
It took me two hours to complete and cost $5. In my opinion, the skill level of this mod is easy.
Editor’s Note: You’re not seeing double, twice. We have not one, not two, not three, but four truck camper backup camera solutions for July medium mods. Here are the backup camera entries:
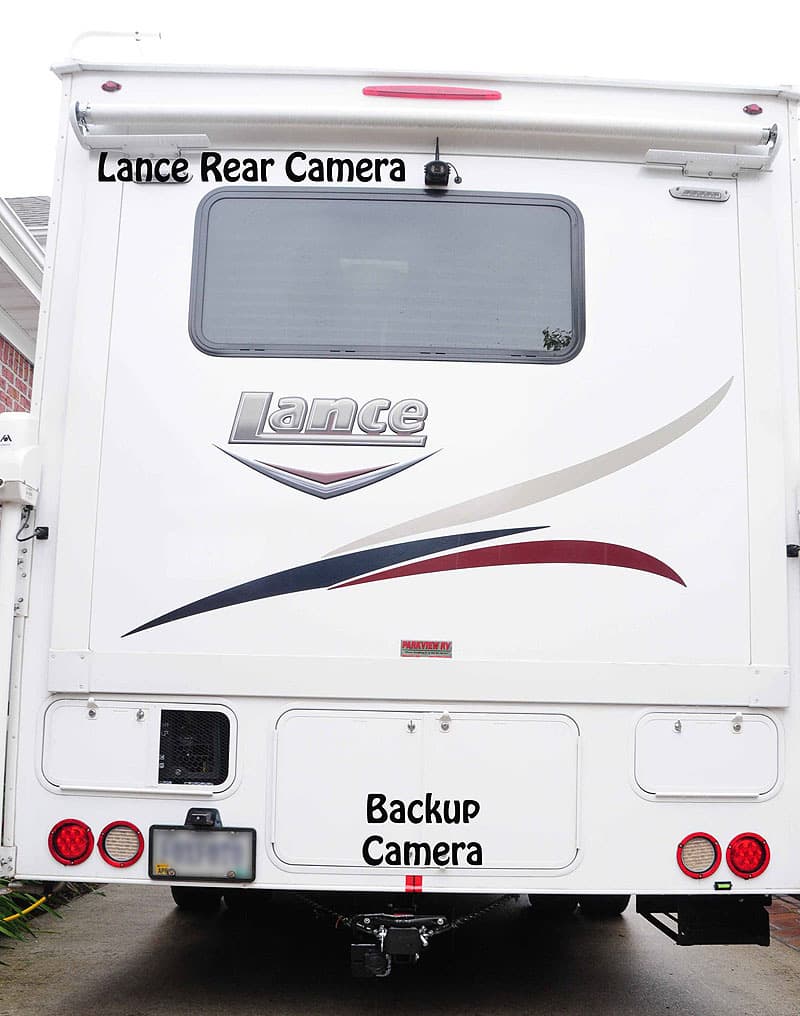
7. Robert and June Morrissey, Savannah, Georgia
2011 Ford F350
2012 Lance 850
I wanted to be able to see what was behind us while traveling down the road or when stopped anywhere. A boat full of gear presents a good target for a thief.
I also wanted to keep track of our boat, which we seem always to pull behind us, and make sure that it remains attached to our truck camper when towing. Fortunately, we have not had a flat on our boat trailer, so I cannot say for sure that this mod would alert us to that mishap. It does help in backing up, but I have to remember that the image is reversed.
Above: Used this way when loading the truck and camper
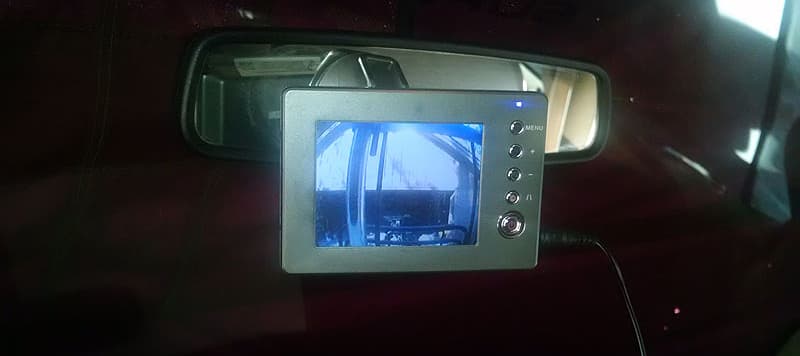
I bought and installed a license plate mounted camera. The camera system transmits live color video to a monitor affixed to the rear view mirror in the truck.
Both the camera and the monitor require 12-volt outlets. We chose to install the camera inside the camper positioned to look out of the rear facing window rather than attaching it to the license plate holder.
This keeps everything shielded from the weather and theft. It stays in position all of the time ready to be plugged in to a nearby cigarette lighter receptacle.
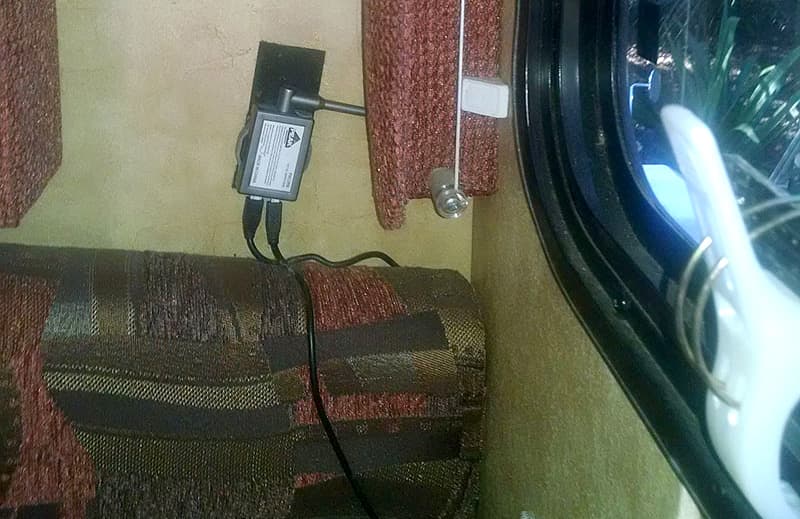
The backup camera system works fantastic. The screen on the monitor could be a little larger but, for the price, it is acceptable. The first one I bought at Pep Boys did not work and I had to return to a Chicago address due to store policy. The replacement has been working for about six years without incident. I’m a happy camper!
It took me one hour to complete and cost $125. In my opinion, the skill level of this mod is easy.
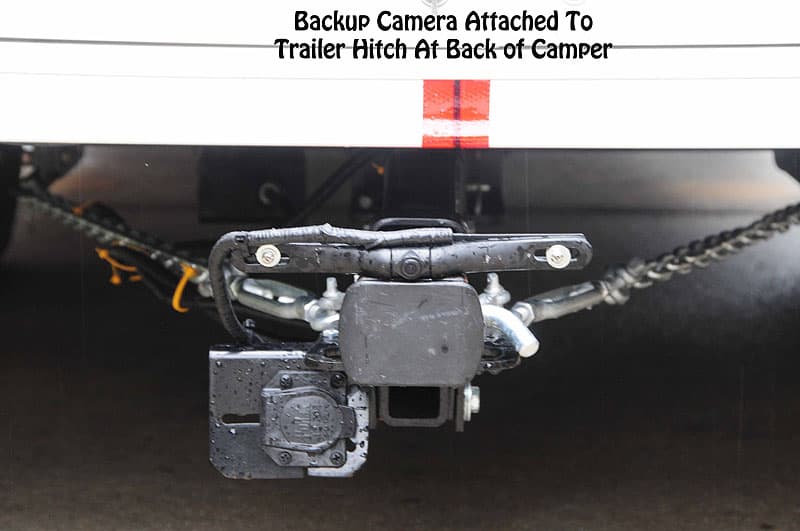
8. Dave Pracht, Nevada City, California
2015 GMC Sierra K3500
1987 Lance LC900
We recently bought a new 2015 GMC crew cab dually truck. It came equipped with a backup camera in the tailgate. Having to remove the tailgate when using our camper meant no camera. The monitor also kept telling me there was a problem with the camera system. Not wanting to see that on the monitor and at the same-time wanting the use of the camera system, I devised a way to solve both issues.
Since the new truck came with a plug-in backup camera, rather than try and remove it from the tailgate, I ordered a replacement camera from the GMC dealer.
When it arrived I first plugged it in to be sure it worked. It did, but the length of the attached wire work wasn’t long enough to reach the back of the camper.
So, I made an extension.
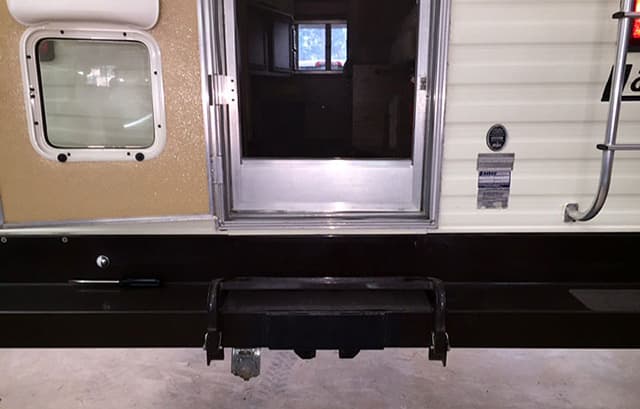 |  |
To get started, I first removed the bracket for mounting it to the tailgate. This left me with just camera housing and three small screws, which I used later. I had decided to mount the camera under the camper using the bracket I used as a hitch extension. I seldom tow. The bracket has two holes that the hitch pin goes through.
I then decided to make the camera mount using a block of wood and some aluminum from a sign I had. The block was cut to fit the bracket and holes were drilled both lengthwise for the wire and crosswise for the hitch pin.
I cut the aluminum to fit the end of the block, drilled holes for the camera, and three small holes for the three screws. I painted the block and aluminum black to match the camera, mounted the camera to the plate, and the plate to the block.
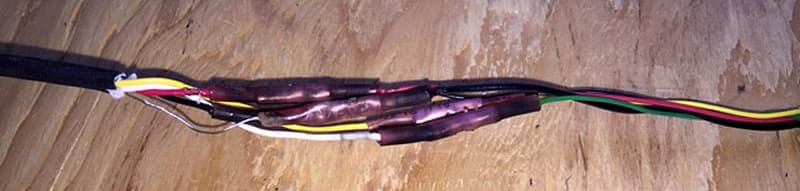
I had some CAT 5 phone wire. This gave me just enough leads to match the camera. I cut the camera wire work and spliced in 6-feet of new wire using tubular splices surrounded with heat shrink tubing purchased from a local auto parts store. I wrapped the whole length with waterproof tape and fit all that in a long flexible sheath.
Once again, I tested the system to make sure that it worked, and it did.
I then mounted it in place, coiled the excess under the truck, and was set for our next camping adventure.
So far we’ve been on a three day trial run a couple hours from our northern California home and a two week trip up the Oregon coast. The camera works great.
I made the length of the wire work longer than needed just in case I want to tow and need to relocate the camera. I’m now looking into the possibility of installing some sort of switch to enable me to use the camera while driving. I’m not sure how, but I’ll give it a try.
I’d like to give credit to my son, Curt, who did all the measuring, cutting, and drilling of the wooden blocks that we used to mount the camera.
Including going to the store, it took me approximately four hours to complete and cost $210 for the new camera and splices. In my opinion, the skill level of this mod is medium.
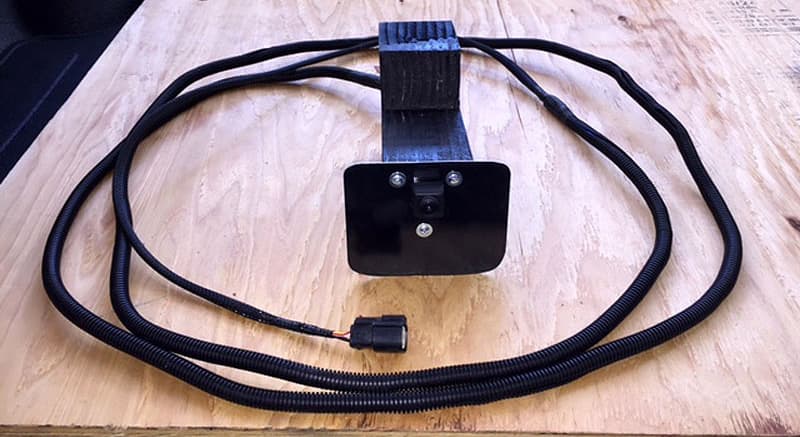
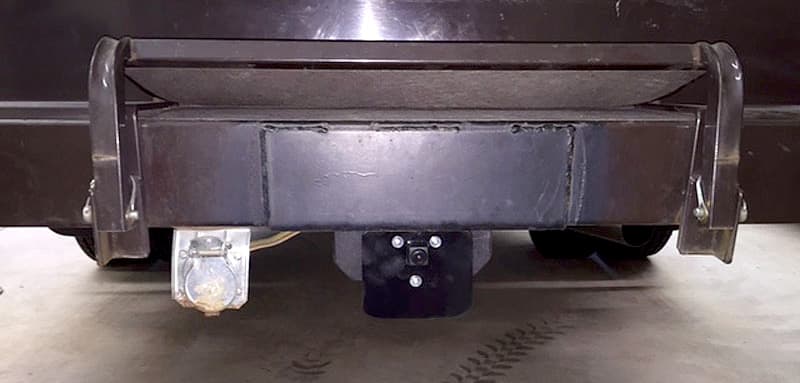
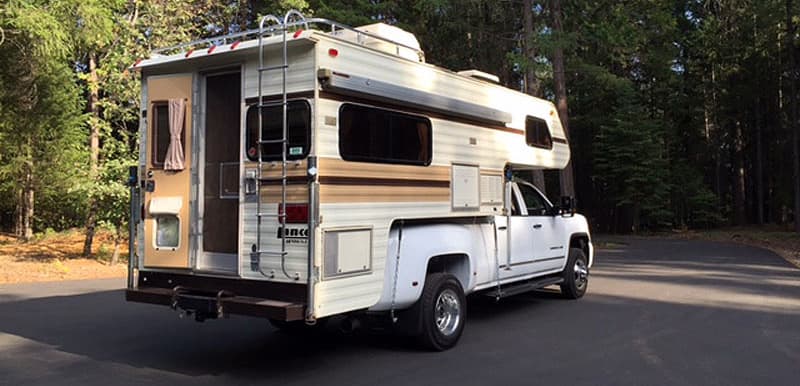
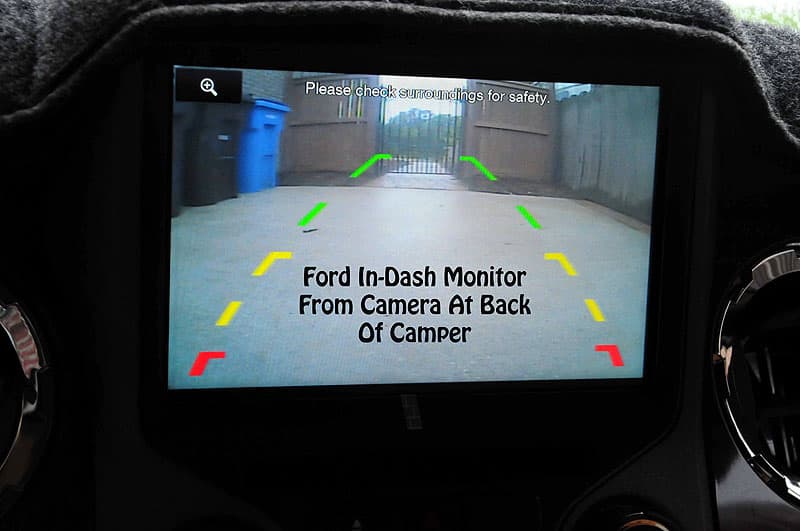
9. Donald Fox, Chesapeake, Virginia
2015 Ford F-450
2016 Lance 1172
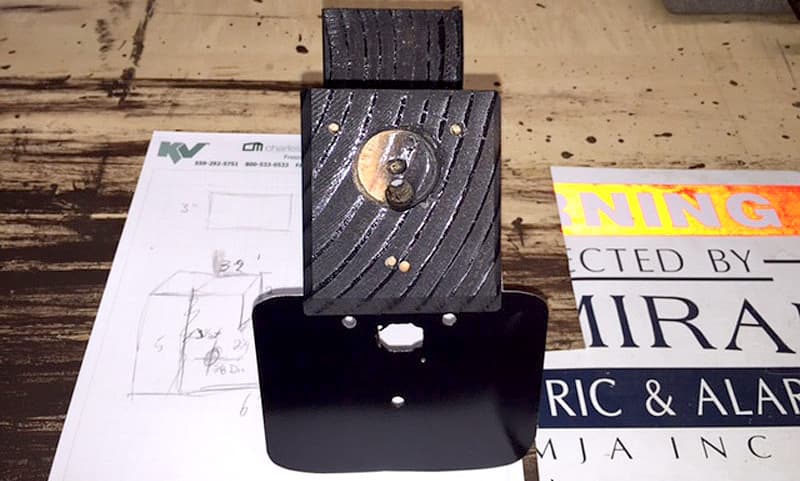
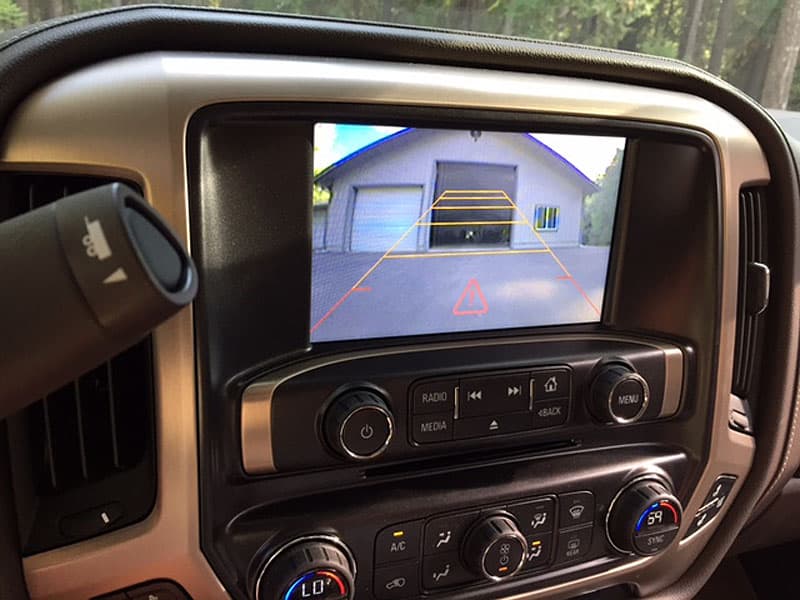
I have designed a backup camera for Ford in-dash truck systems. When I took off my Ford F450 tailgate, I lost the backup camera installed in the tailgate below the Ford decal. How could I continue to use the built-in monitor in the dash? Here is my solution.
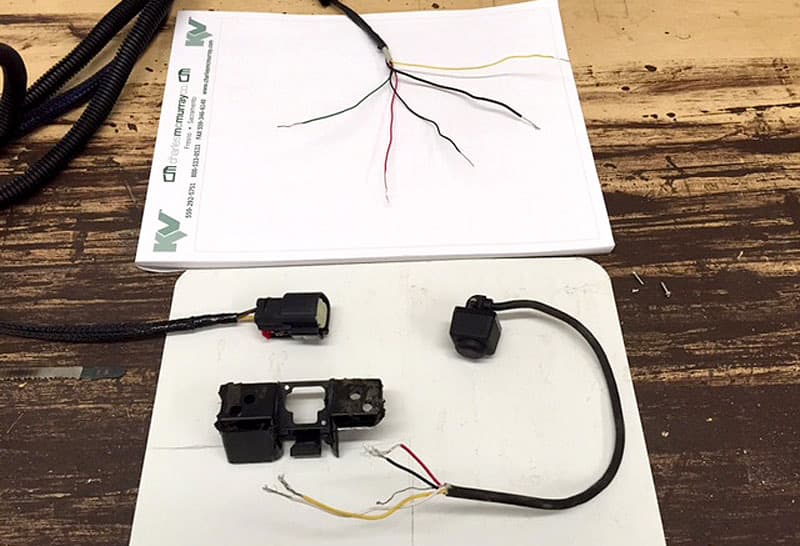
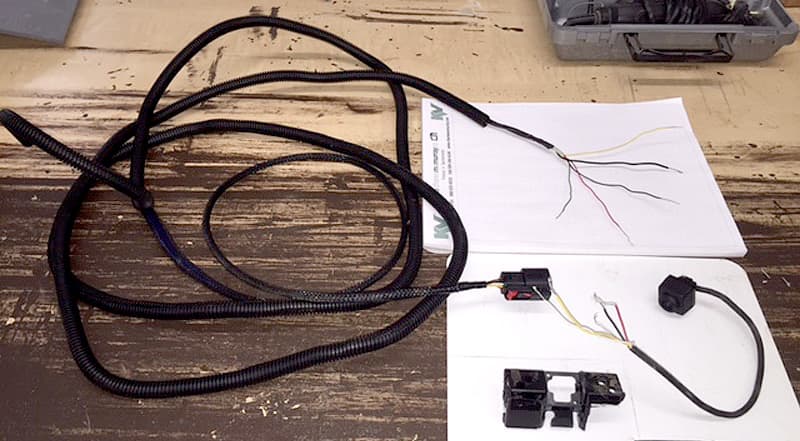
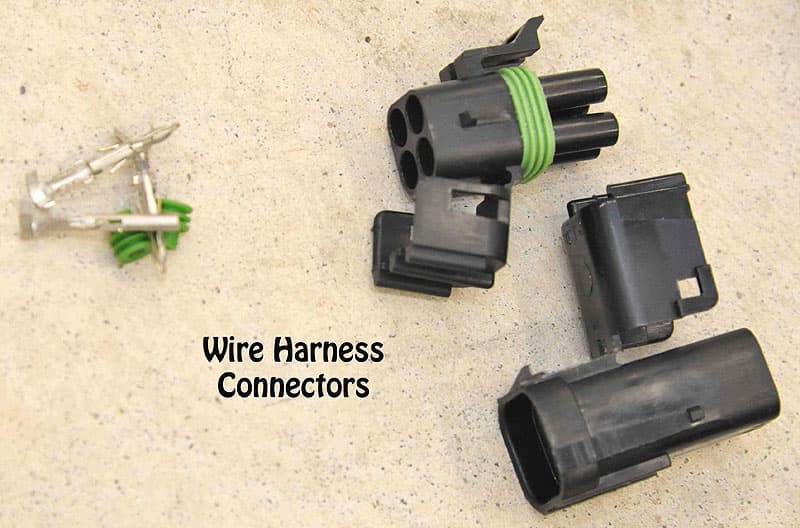
First, purchase from Ford a duplicate camera wire harness. This harness is the same as the harness that you disconnect when you remove the tailgate.
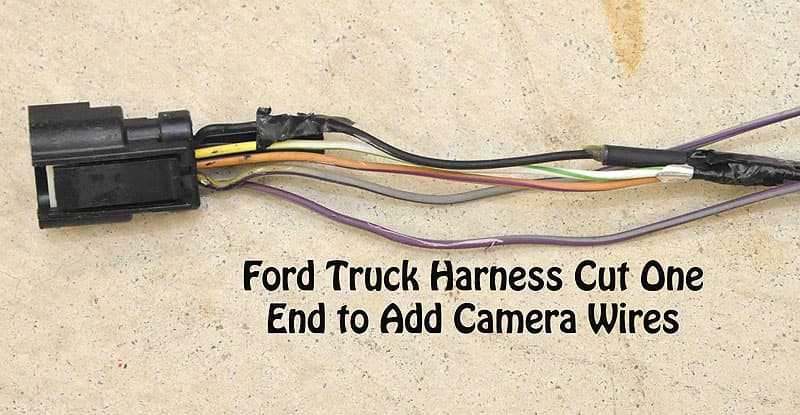
Every truck will have a different wire harness configuration. Mine had a six plug system at one end and only five of the six wires came to the other end of the harness. From research, some trucks may have 10 to 15 plug spots. The cost for my Ford camera wire harness was $17.
Second, find out what each of the five wire colors represent. This is the connection where the camera would have been attached. The five wires may be different colors than what I have on a 2015 Ford F-450.
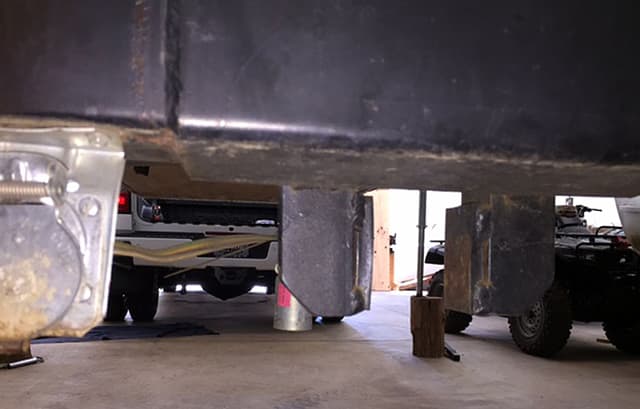
With the Ford camera wire harness, I now have the ability of using the Ford in-dash monitor to assist me in backing up my truck without the original camera attached to the tailgate. The second camera is used just for loading the camper. This way the backup camera attached to the rear of the camper can remain attached, except when unplugging the harness.
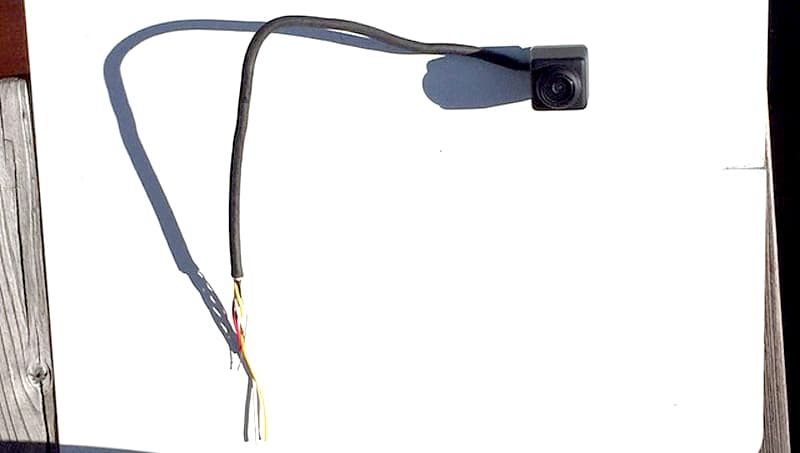
If I only made one camera purchase I would buy the Universal Mount for $39. This camera has a flat area which helps when you set it on the truck while backing into the camper. It could also be attached to the license plate at the rear of the camper. Again, one camera is all that is necessary.
Both work the same and both were installed using a separate Ford wire harness. Yes, I know I could have used the same harness for both cameras. I didn’t think about that until after I built the second camera and installed it to the second Ford harness.
I now have a ten foot camera attached to the rear of my camper and a second camera with a 15-foot long harness that I use exclusively while loading the camper onto the truck.
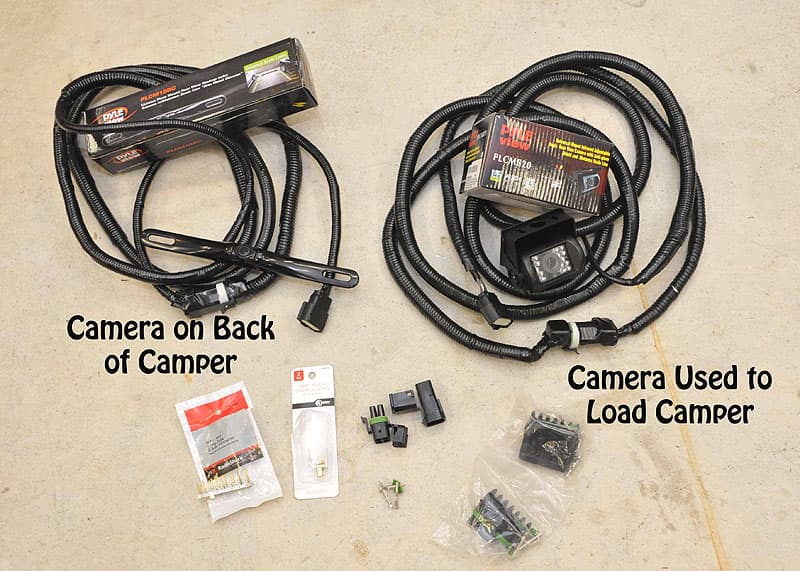
I place the loading camera right under the back window of the truck. I can see down both sides of the camper and the truck bed frame is very visible.
I also have a built-in camera on my Lance truck camper, but it is up high and it does not let me see clearly what is close to me while backing. The camper’s camera and monitor also do not help in any way with loading the camper onto the truck.
The only negative is, with a camper installed, the Ford system does not give the audible warnings.
It does allow me to view the Ford in-dash monitor while backing up and it provides the warning markings (green, yellow, red) as you get closer to things behind you.
I use a green laser line loading system in conjunction with the camera. Again, it’s overkill. I load my camper in five minutes with the laser line and camera system.
It took me six hours to complete and cost $68.40. In my opinion, the skill level of this mod is extremely hard.
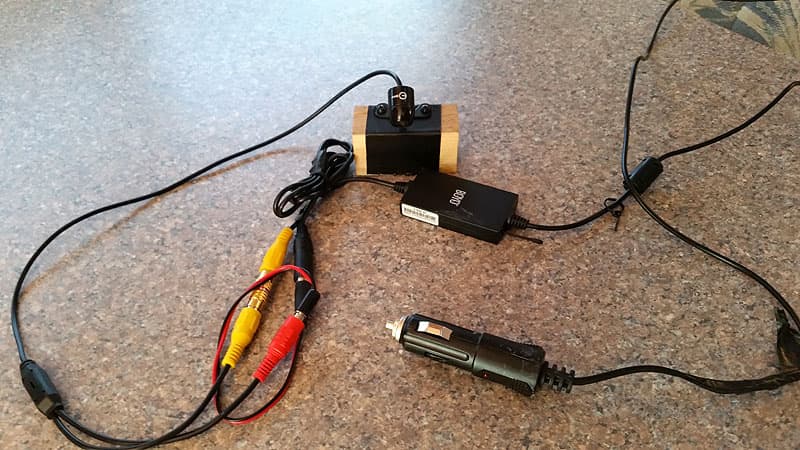
10. Tom Strock, Waunakee, Wisconsin
2003 Silverado 2500 HD
2000 Bigfoot 9.6
For many years, we had a Coachman truck camper with a lower window in the door that allowed us to use the rear view mirror to see behind us. We recently replaced it with a Bigfoot 9.6 that does not have the lower window in the door. Also loading a truck camper is often difficult for one and trying for two. After attending the Midwest Truck Camper Rally last summer where they did a presentation on backup cameras, I decided to do some more research on my own.
Searching on Amazon, I found a Boyo VTX3600 3.6-Inch Digital Wireless Monitor and Transmitter for $45.78. This does not include a camera, so I was free to select any that fit my needs. For the camera, I selected a Esky® EC170-11, proclaimed the world’s smallest HD color CCD waterproof rear view camera, for $20.99.
Since I wanted to multi-task, I chose a camera without the superimposed backup lines which is available on an other model. Being wireless only means that there are no wires between the camera and monitor, however both the the camera and monitor need 12-volt power.

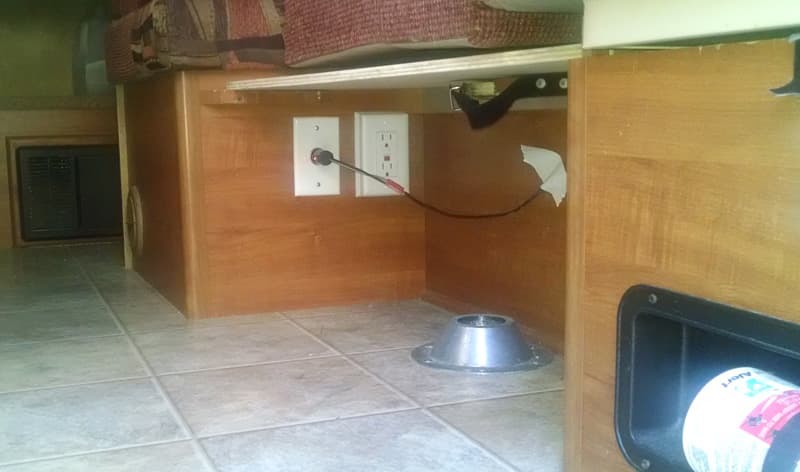
The monitor is provided with a power cord that plugs into a cigarette lighter. The backup cameras are typically wired in to the back up lights which provides power only when in reverse. However, I wanted the system to multi-task as a full-time rear view and security camera as well as be able to move the camera into the truck to load the camper. To accomplish this, I added an additional cigarette outlet to the camper and a cigarette plug to the camera transmitter.
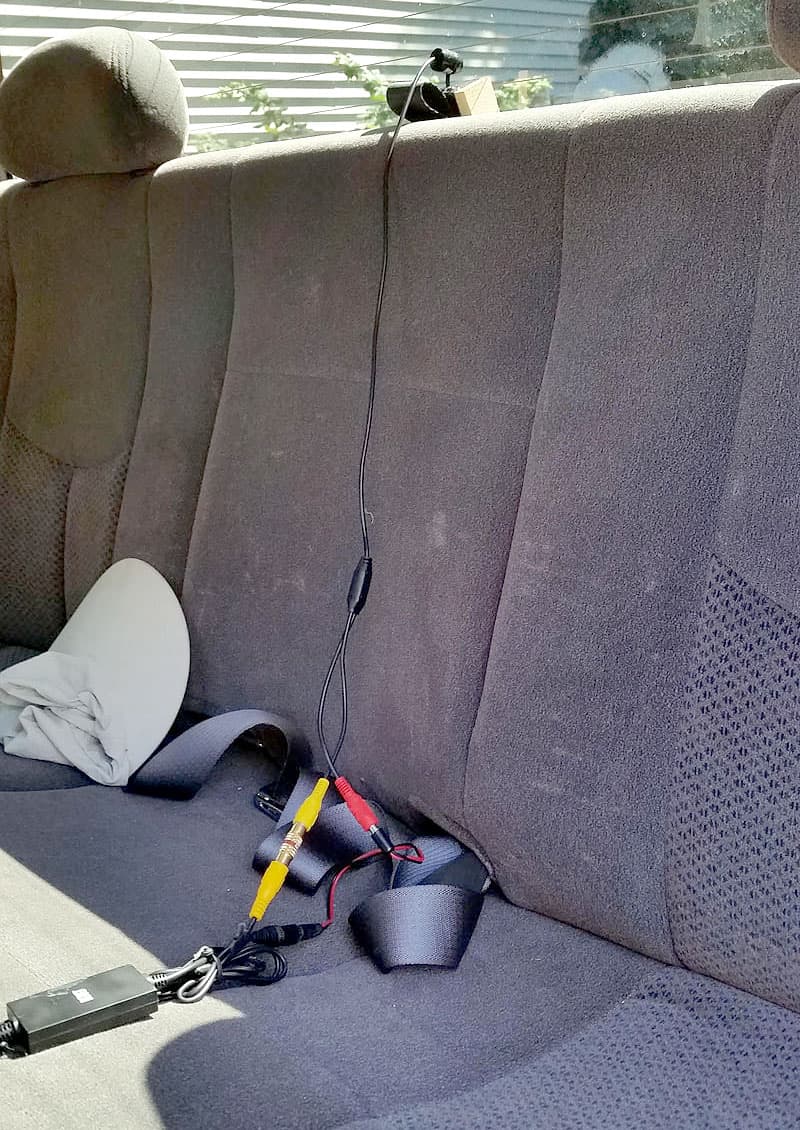
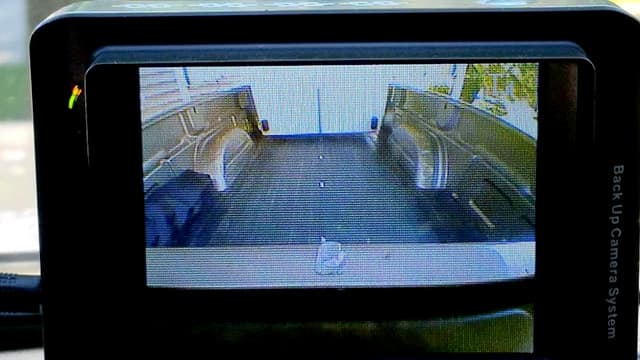
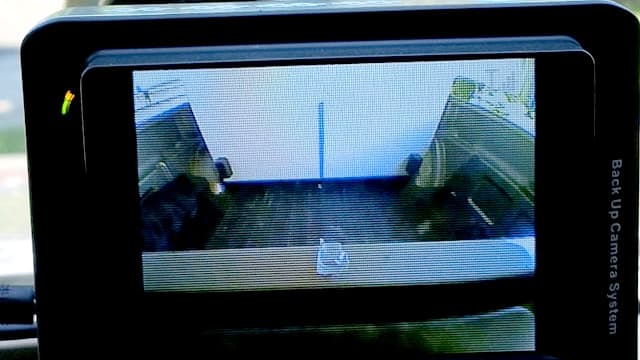
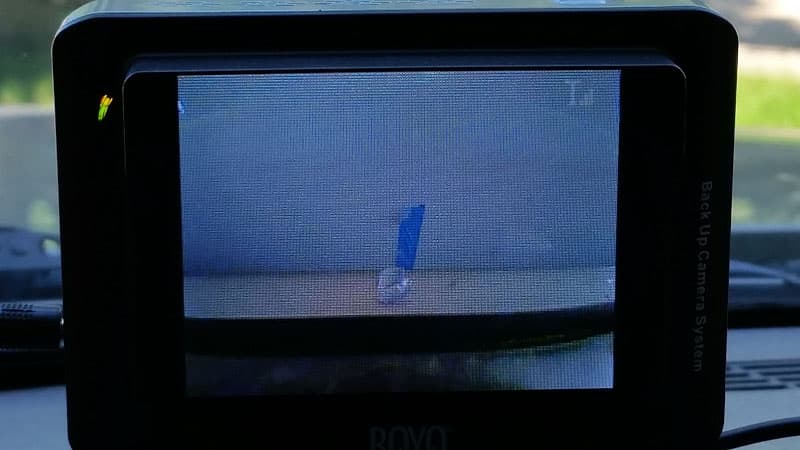
The camera is mounted to a small wood block that fits inside the rear camper window frame or can be placed between the back seat and the center of the rear window of the truck for camper loading. I placed blue painters tape on the center line on the front camper wall and white masking tape down the center of my truck bed mat. Keeping the two lined up while loading is a cinch.
When I ordered it, I was afraid that the monitor may be too small but, in fact, it works very well mounted to the windshield. It is about the same size as my GPS which sits next to it. Neither block any view from the truck.
I can now see cars approaching and passing me on my left. When the rear fender of the passing car disappears from the monitor, the front bumper of the car is in the window to my left. There are no blind spots what so ever.
 |  |
The best part was when I loaded the camper without telling my wife. When I came in the house she said, “I don’t remember what you paid for that camera, but it was worth at least a hundred times more.”
The digital transmitter has been flawless with no drop outs or interference as some analog transmitters have been reported to do. I plugged the monitor into a battery pack and walked at least a hundred yards from the camper and still had good signal strength and picture. Such performance opens this camera up to other uses such as tow vehicle or security monitor.
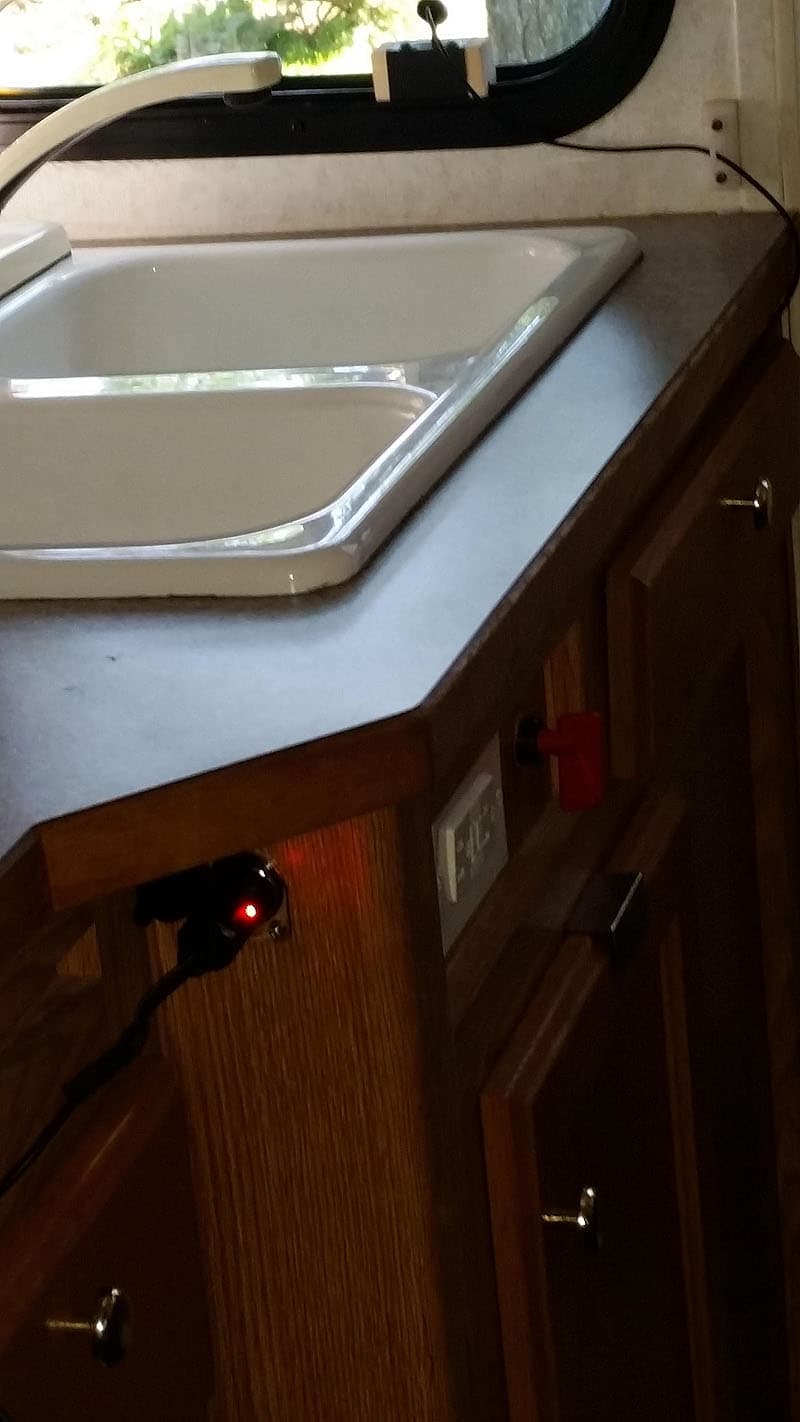
The only down side is remembering to plug it in when needed. The current draw is so low that there is little danger in forgetting to unplug it. The red LED light on the plug will let you know that it is on. I often drive ten to twelve hours of continuous use with no problems.
It took me less than a hour to complete including the addition of another 12-volt outlet. The total cost was about $80 including outlet plugs and barrel video connectors. In my opinion, the skill level of this mod is easy.
Disclaimer: The modifications above are submitted by Truck Camper Magazine readers. It is your responsibility to make sure that any do-it-yourself modification project you undertake is safe, effective, and legal for your situation.
Enter Your Mods Now!
If you’d like to enter mods into TCM’s Monthly Mod Contest, click here. You can enter as many mods as you want, at any time. Good luck mod makers!