Ten medium mods give you more including more lounge-able space, more reliable tank sensors, more usable kitchen counter, and more flexible truck cab storage. But wait, there’s more mods with more!

Welcome to the eighth 10X10 Mod Tournament. Please review the following ten medium mods and vote for your favorite.
We will announce the winner next week. Click here for more information about the 10X10 Mod Tournament, including how to enter.
1. Karen and John Dorman, Strathroy, Ontario
Dinette Table Size Change
2012 Ford F150
2017 Palomino SS-550
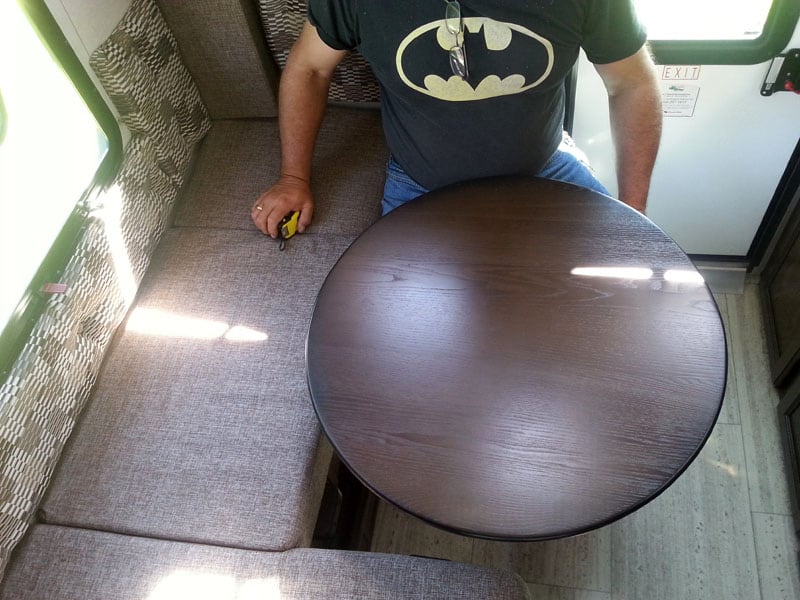
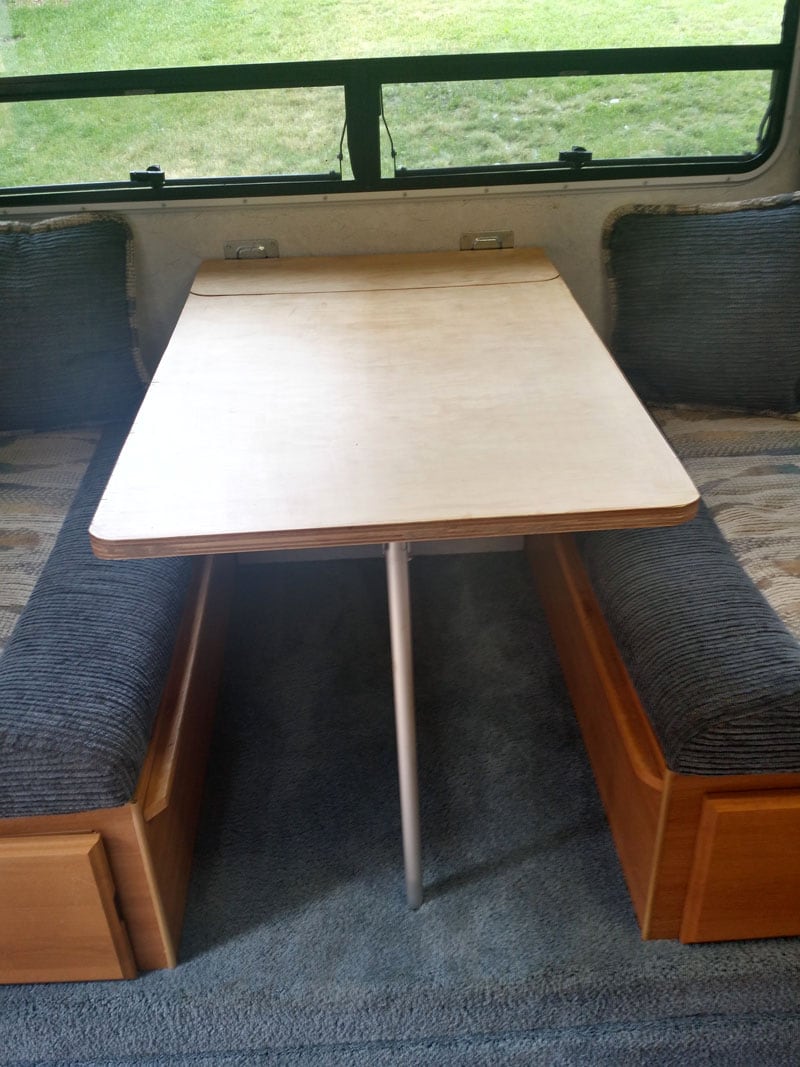
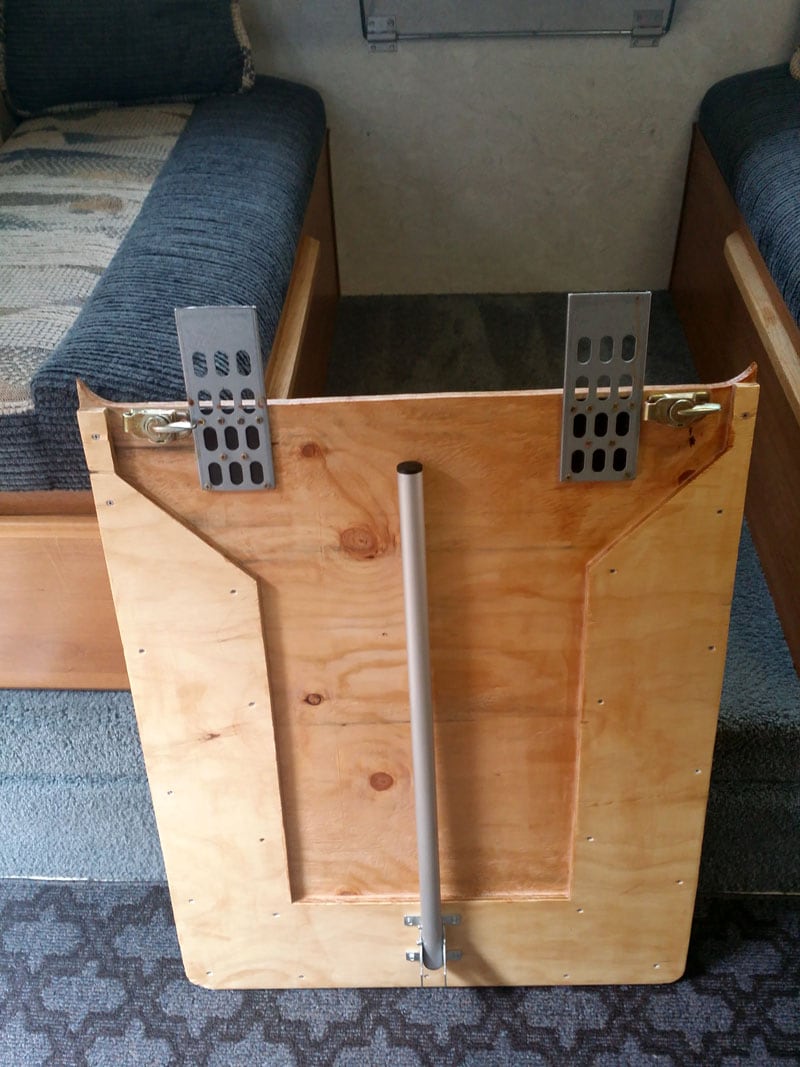
The dinette table that came with the camper was a tight squeeze to sit at. It also stuck out into the kitchen area a bit far and was too low for our liking.
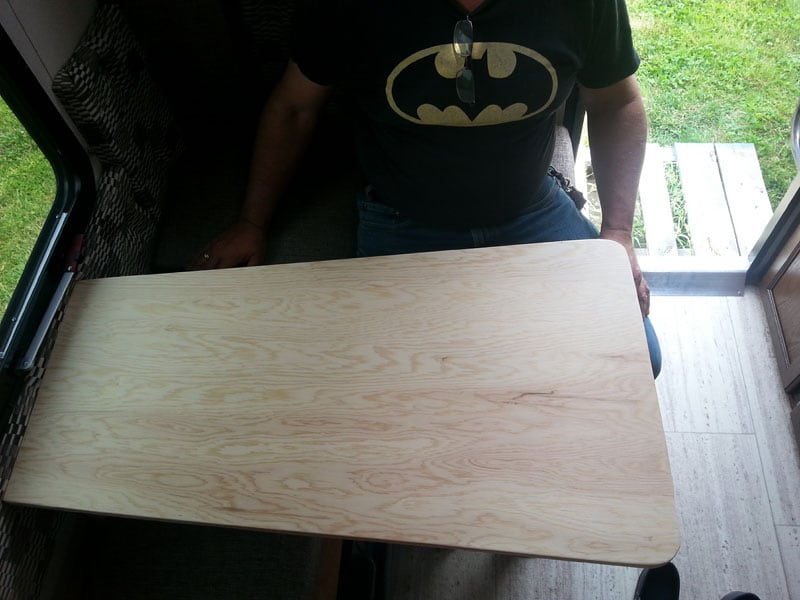
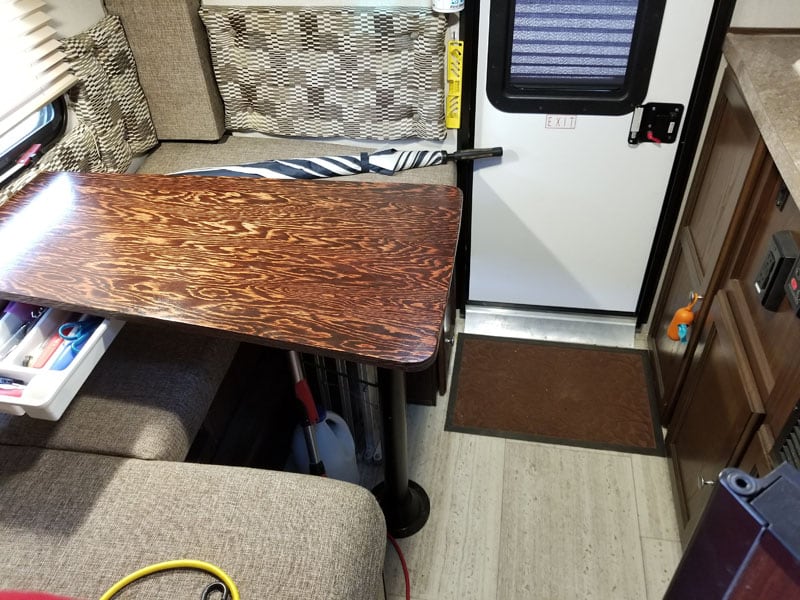
To address these issues, we removed the factory tabletop and replaced it with one that extended to the wall and not into the kitchen.
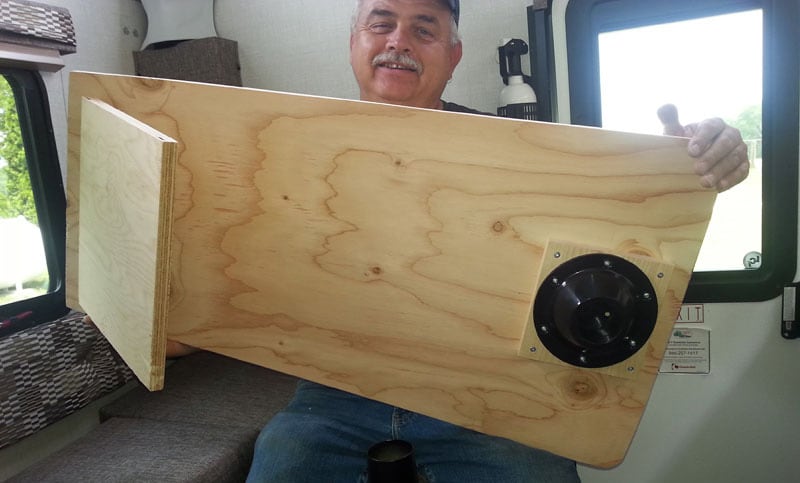
The new table utilized the existing table post and socket-mount attached it to the new tabletop.
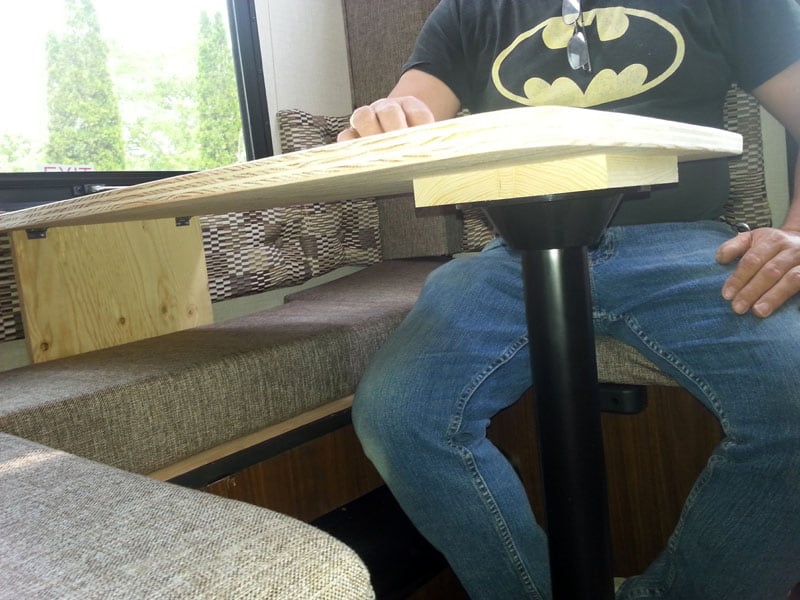
We added a lift to the table to improve the height. We used a plywood board to support the tabletop on the far side. The plywood slides between the cushion and the wall and is hinged to the wood seat.
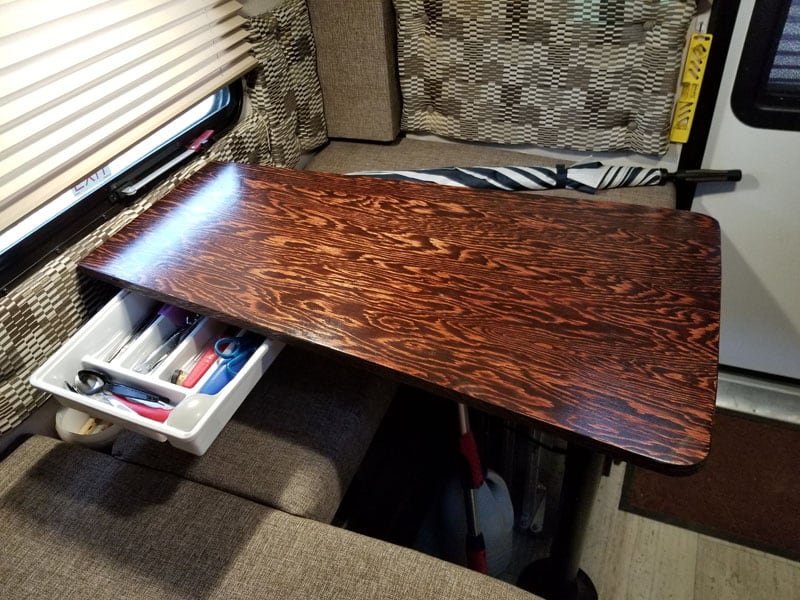
With the new tabletop installed, there’s now lots of room to pass by the dinette table and use the kitchen counter area. The new tabletop has the same amount of table surface area as the old tabletop and adds a cutlery drawer.
This modification took under two hours, plus the required drying time for stain/urethane. The mod cost me nothing because we had the materials, which would be approximately $20 to $30 to purchase. In my opinion, the skill level of this modification is easy if you have the tools and you know how to use them.
2. Ray and Brenda Fair, Hopkinton, Massachusetts
Holding Tank Sensor Upgrade
2018 Silverado 3500
2015 Eagle Cap 850
Our truck camper was plagued with false grey and black tank level readings. The industry commonly uses probes that are just long enough to penetrate the wall of the tanks and sense liquid. When the black and grey tanks invariably accumulate a coating of sludge, the probes present false tank level readings.
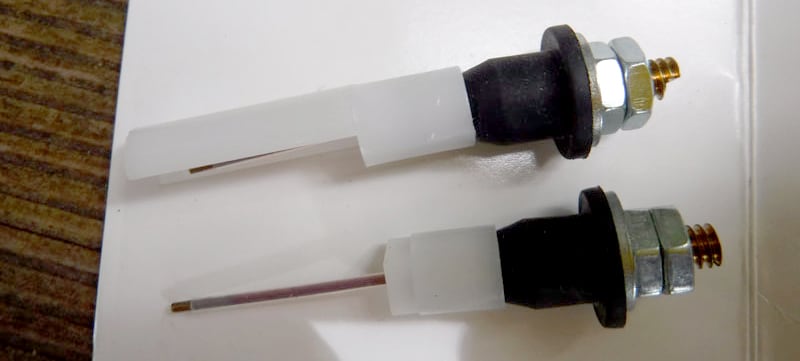
To address this problem, I found and purchased Horst Miracle Probes. I bought a package of four probes for the grey tank (part number T21302VP), and a package of four probes for the black tank (part number T21301VP).
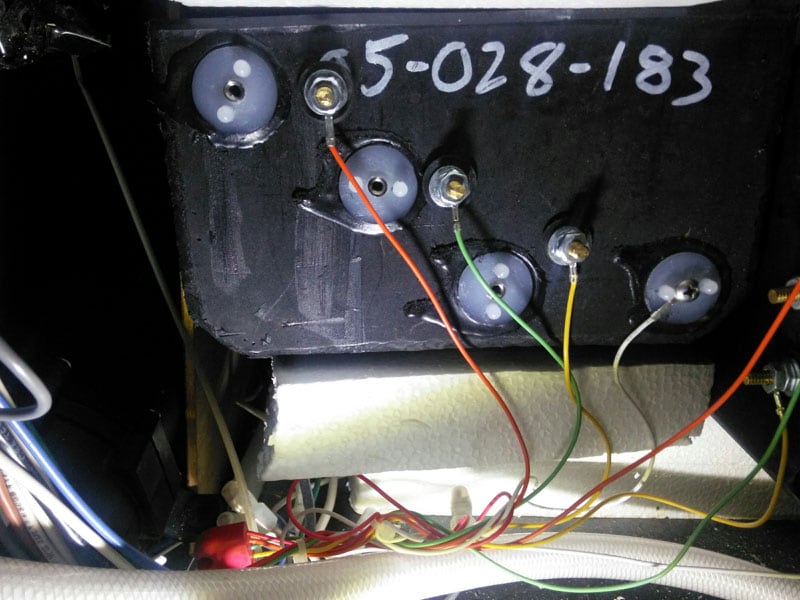
Unable to remove the existing probes, I drilled three 3/8-inch diameter holes next to each of the existing probes. After installing the new Horst Miracle Probes, I tightened the first nut to make a good leak-proof seal. I then reinstalled the wiring and checked the tank monitor panel.
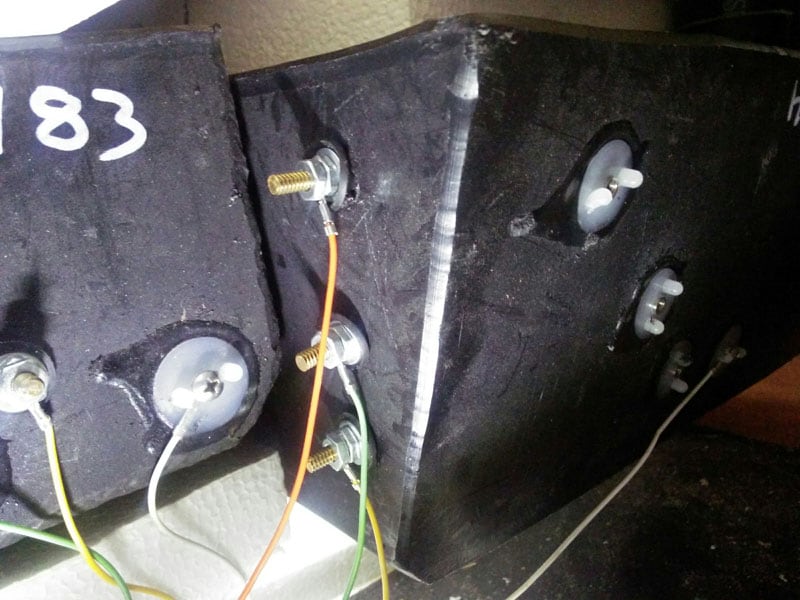
The Horst Miracle black tank probes are longer in length and have a plastic cover above the probe to prevent toilet paper from connecting with the probe sensor. To orient the plastic cover in the correct position, the end of the threaded electrical stud has been milled flat on the end. As the nut was being tightened, it took some effort to keep the probe orientated in the correct position without damaging the threads.
Now I can trust the grey and black tank level indications on our tank monitor panel.
It took me two hours to complete this modification and cost me $50. In my opinion, the skill level of this modification is medium.
3. Darci Kroes, Kelowna, British Columbia
Back Porch Storage Deck
2000 Chevy Silverado
1994 Somerset Camper
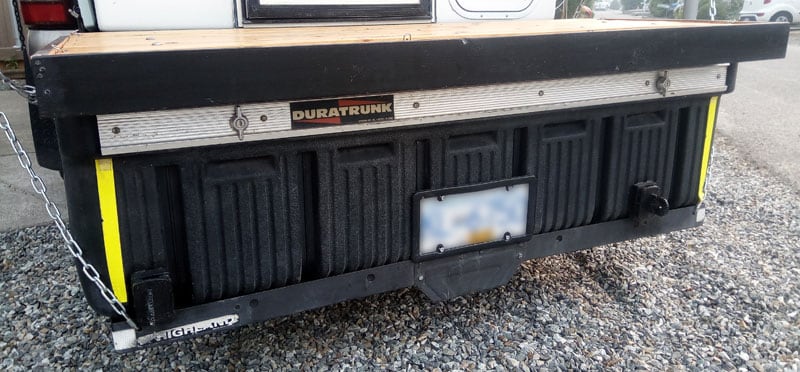
What I really needed for my camper was more exterior storage for things I didn’t want in the camper. To create more exterior storage, I took an old 60 by 20-inch utility toolbox and mounted it onto a 60-inch cargo carrier.
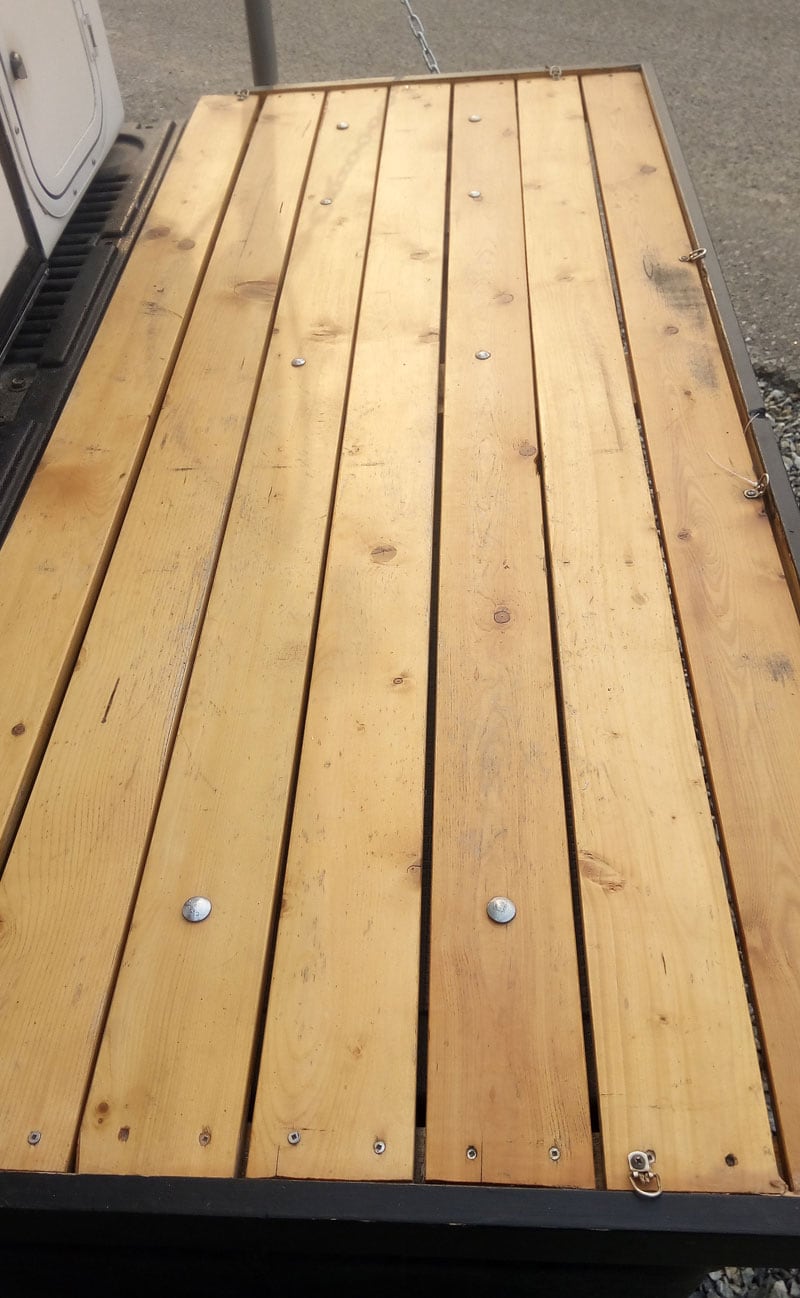
Then I built a frame out of 3x1s and set 4×1 strips onto it. I bolted it with carriage bolts to the top of the utility box. In order for the utility box to open wide, I put a hinge connecting the strip closest to the camper door. That way it flexes as I lift the deck.

The deck top is bolted to the top of the storage box so it can be easily lifted for access.
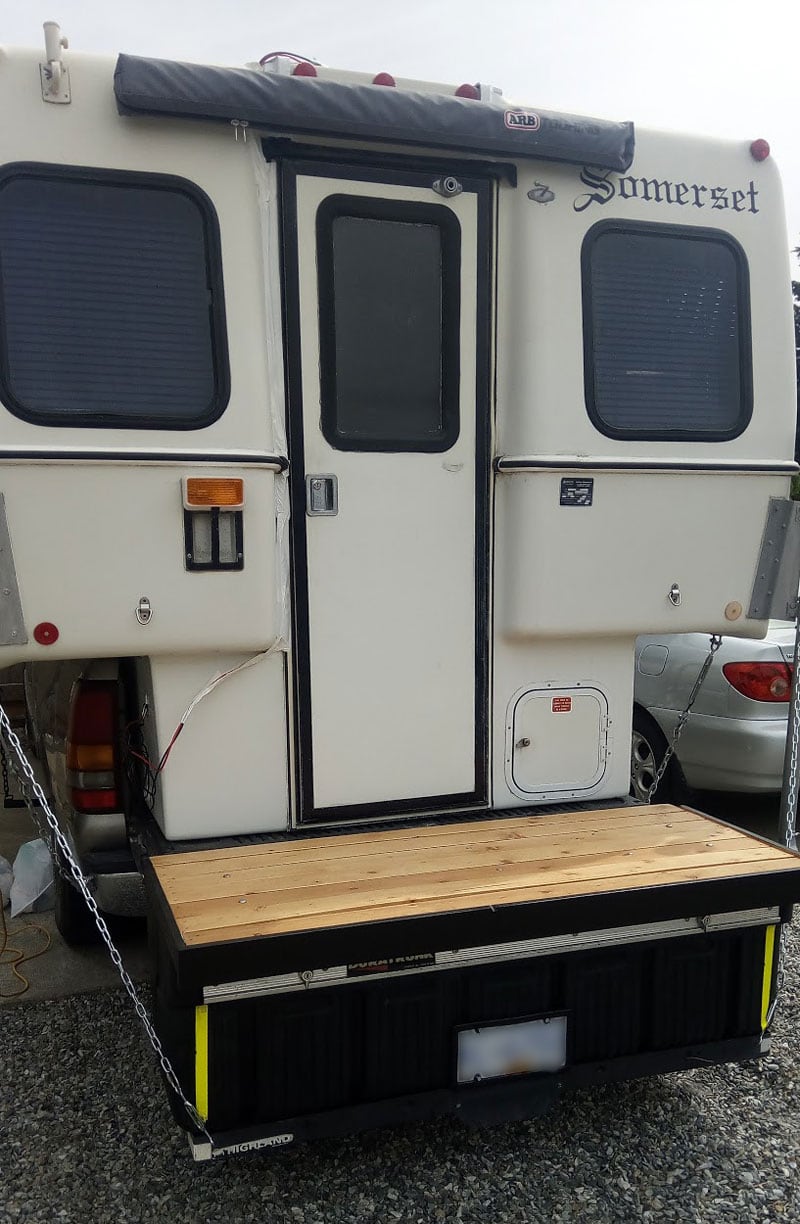
In order to use my awning on hard surfaces, I attached flagpole holders on the lower part of the box on each side so the awning poles can rest in them. I unscrew the holder and keep it in the box while traveling. Finally, I use a small light aluminum ladder. It’s the same ladder I set on the deck in order to check my solar panels.
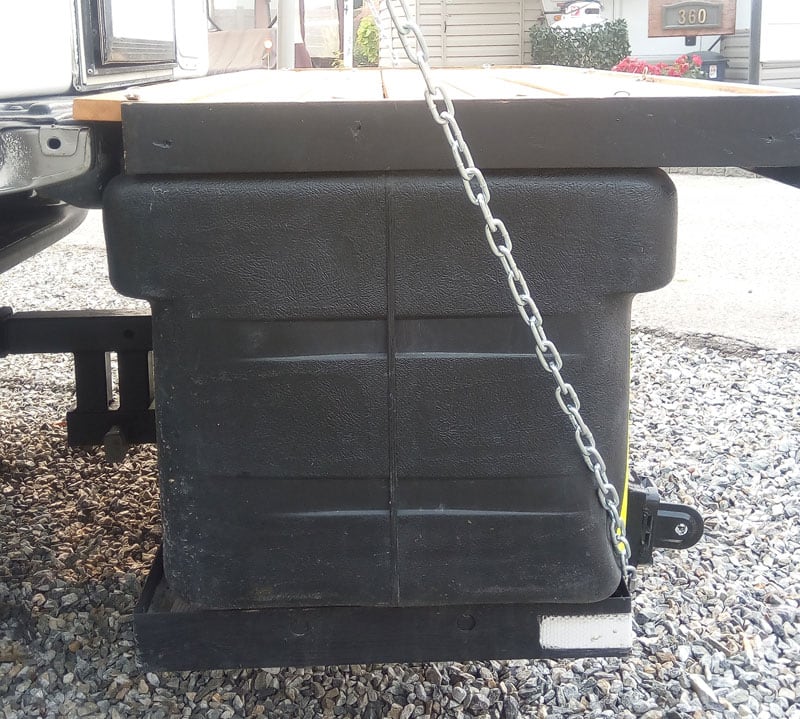
This has been a wonderful mod. There is lots of storage and the camper is not stuffed full.
It took me three hours to complete this modification and cost me $200. In my opinion, the skill level of this modification is moderate because you have to be able to glue and screw wood together and then cut it to size.
4. Marc Cuslidge, Napa, California
Truck Bed Camper Guides
2006 Chevy 3500HD
1994 Weekender 1010
When loading my truck camper, I sometimes hit the wheel wells inside the truck bed and dent or scratch the bed liner.
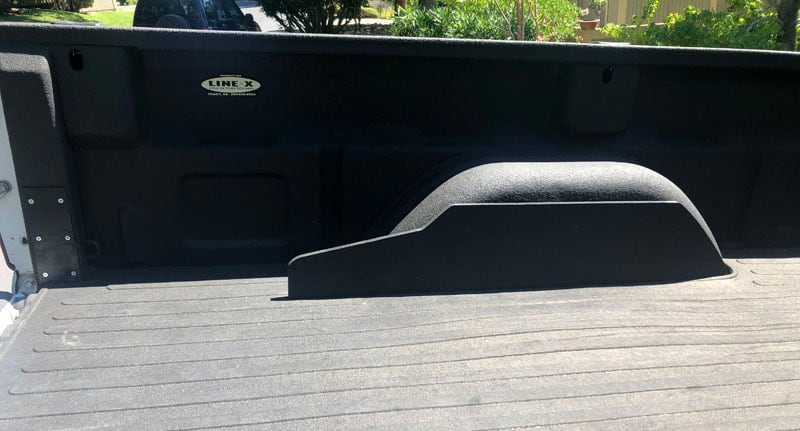
To prevent this from happening, I made guides to engage the camper earlier and act as skid plates for the wheel wells and bed liner. I also installed a skid at the rear of the truck bed where the camper frame was scraping off an additional bed liner.
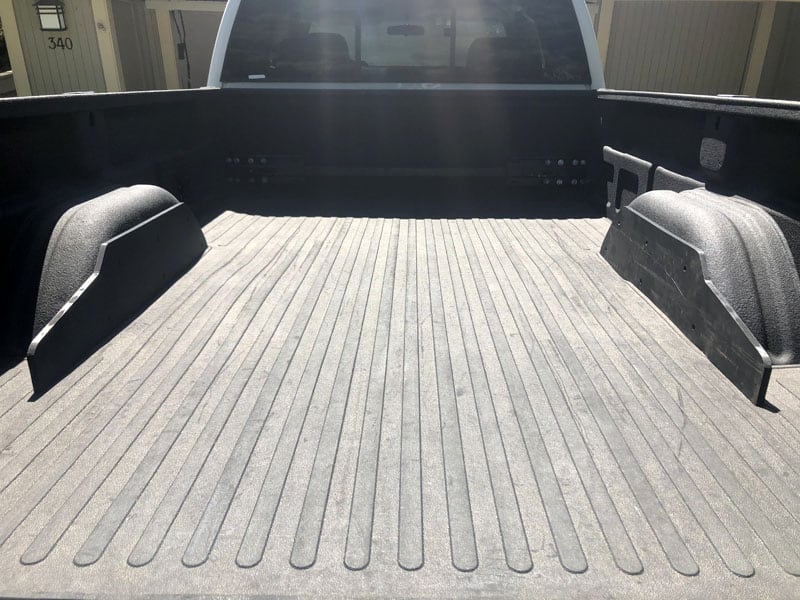
For this modification, I purchased a marine-grade composite material called Starboard and cut it to shape with a skill and jigsaw. Then I drilled and counter-sunk flat-head bolts and bolted them to the wheel wells. I also drilled and inserted nutserts at the rear for the small skid located there.
The modification has worked great. The camper starts in between the guides before driving over my Stable-Lift bar. Once I’m between the guides, I just back up until the camper is completely in. The guides also keep the camper centered.
It took me three hours to complete this modification and cost me $80. In my opinion, the skill level of this modification is hard.
5. Gaston Belanger, Peoria, Arizona
Kitchen Counter Space Optimizations
2017 Ram 3500
2017 Northern Lite 9-6-Q SE
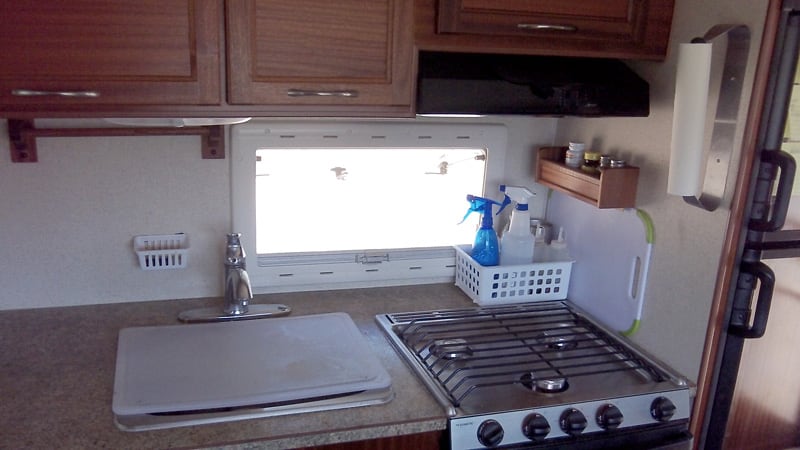
I wanted more counter space to make my camper kitchen more friendly for cooking and meal preparation. To start I removed the black glass stovetop cover. I now have more light from the kitchen window, more ventilation, and more countertop storage space. Plus, it’s one less thing to clean.
Next, I relocated the factory spice rack. It was too low making it difficult to clean underneath. I moved it to the right side and higher up on the sidewall. Then I glued a strip of wood under the rack to hold an extra cutting board.
With that completed, I took a large cutting board and screwed on rubber grommets in all four corners to hold it in place. The cutting board goes in and over the sink for cutting vegetables and meal prep. There is a one-inch gap to easily drop in any preparation tailings or wipe liquid into the sink.
Finally, I screwed a paper towel holder in easy reach above the stove.
These easy mods exposed more user-friendly countertop space – exactly what I needed. Now I have more time to ride my off-road motorcycle because of quick and easy user-friendly food prep space and clean up time.
It took me three hours to complete this modification and cost me a few bucks. In my opinion, the skill level of this modification is easy. They are all easy screwdriver and glue modifications.
6. Michael Hoppe, Shakopee, Minnesota
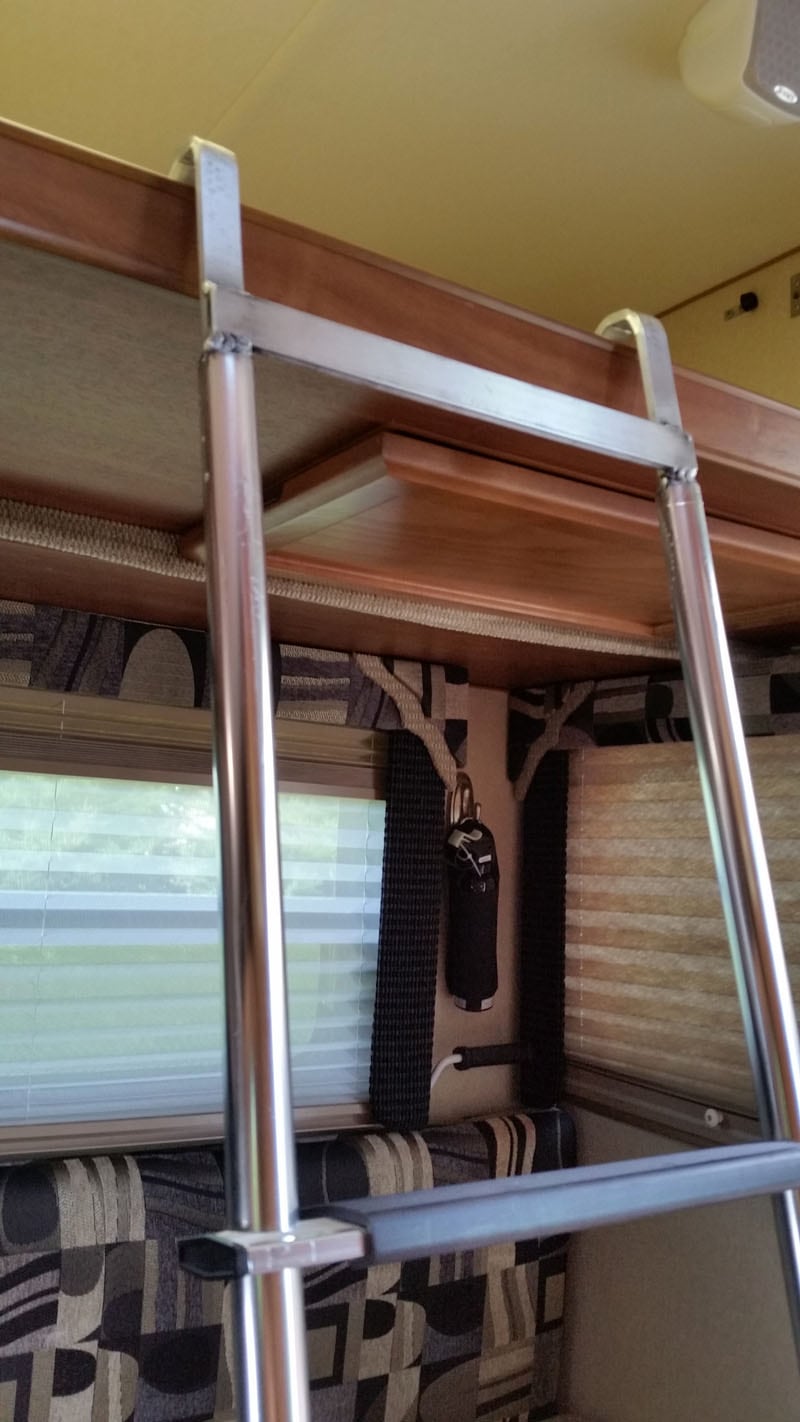
Bunk Bed Reinforcements
2014 Chevy 2500 HD
2009 Lance 845
My wife and I planned a trip to Glacier National Park with our adult college-aged daughters. I was not comfortable serving up “Bear Burritos” by having them sleep outside in their hammocks in bear country.
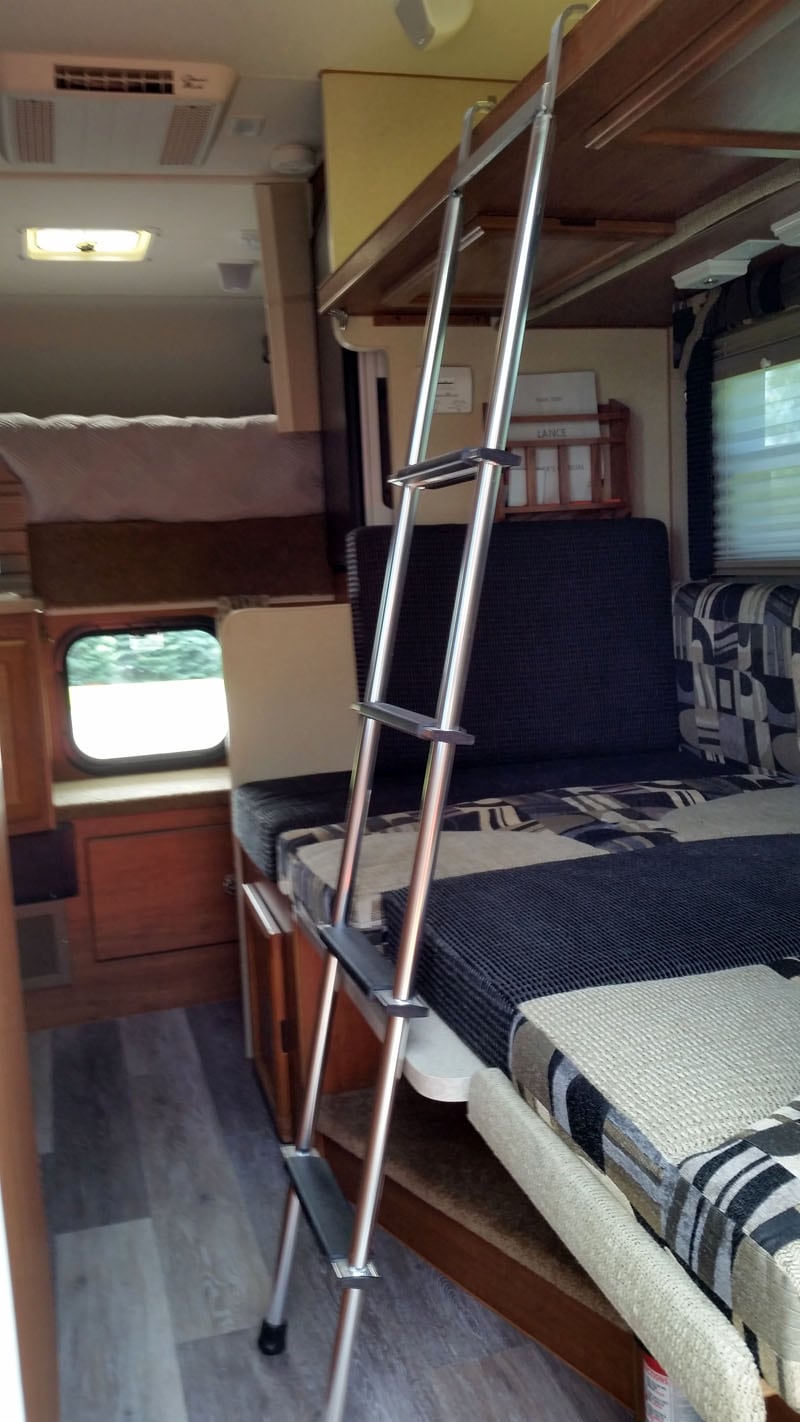
I was determined to find a workable solution to sleep four comfortably inside my 2009 Lance 845. The overhead bunk is rated for 150 pounds, but I was not confident it would hold up to the weight of my daughter weighing 135 pounds. Getting up and in this bunk area was yet another challenge.
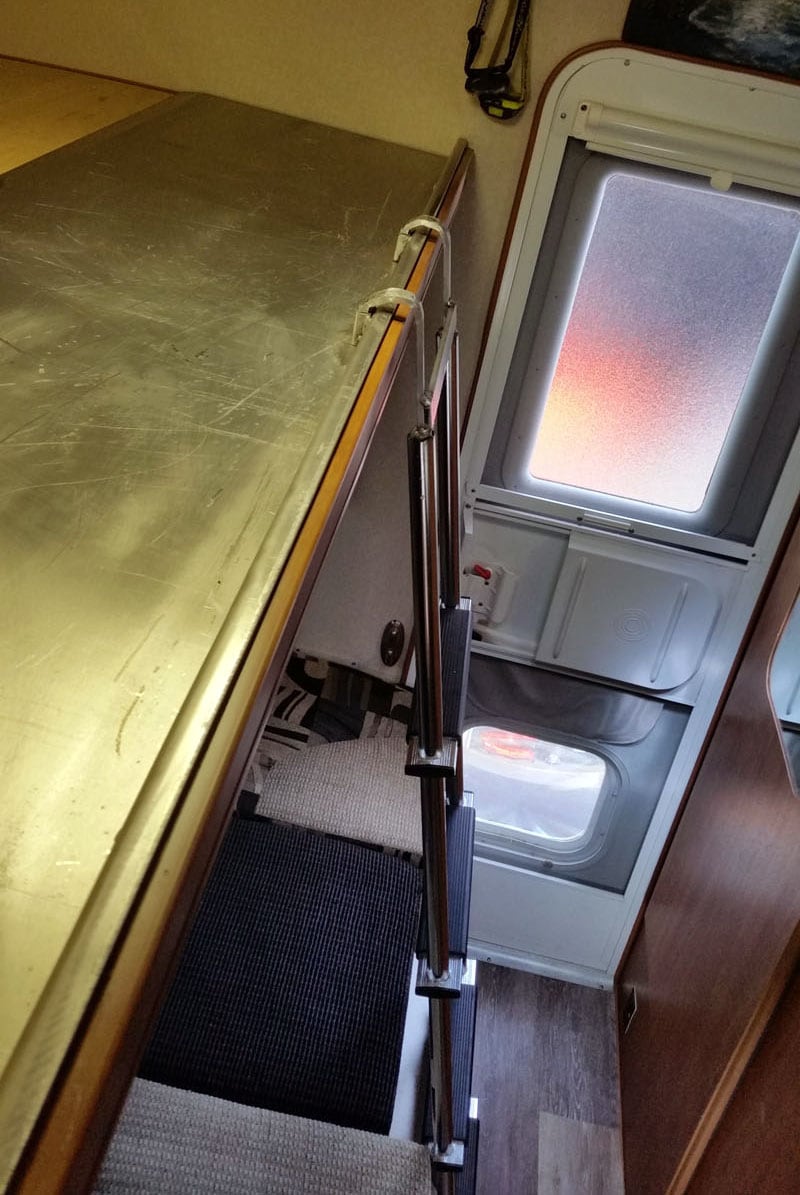
I went to my aluminum sheet metal supplier and purchased a sheet of 1/8-inch thick aluminum. The sheet was put into a large break to place bends for strength. There is also a weld for the ladder holds.
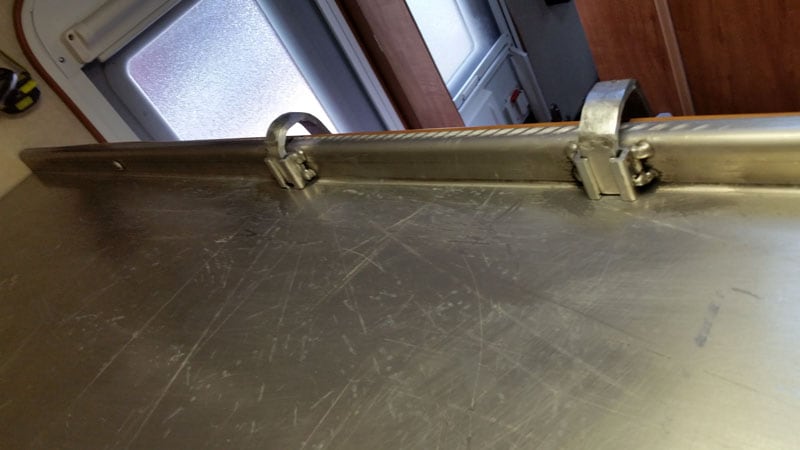
The aluminum ladder was purchased at a garage sale and worked out perfectly. I then was able to find a foam sheet for the bunk area.
The mod worked out very well during our trip. I don’t worry about the bunk area collapsing and it made it easy to get in and out of bed.
It took me about three hours of actual work, but many more hours finding all the component parts. It cost me about $60 for the aluminum sheet and $25 for the foam.
In my opinion, the skill level of this modification is moderate. You need to know how to weld aluminum and have access to a large break.
7. Mark Joslin, Parker, Colorado
More Lounge-able Dinette
2006 Ram 3500
2005 Lance 1181
We wanted more lounge-ability in our truck camper dinette, but we still wanted to keep our standard dinette. Our 2005 Lance 1181 had a couch option, but we use the dinette as a bed for our kids.
Our modification is fairly simple. We cut the dinette table and made brackets to allow the dinette table to separate – like a table leaf. The pictured table was meant to be a prototype, but it worked so well that we kept it.
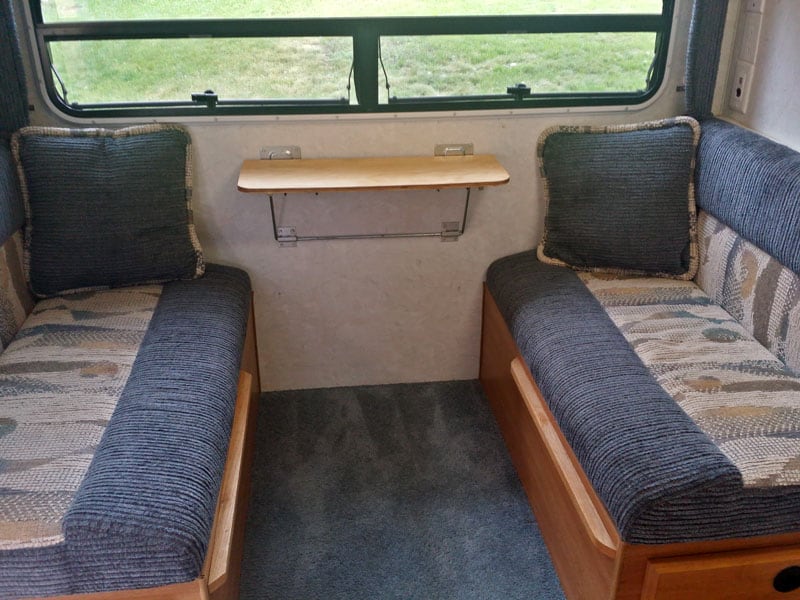
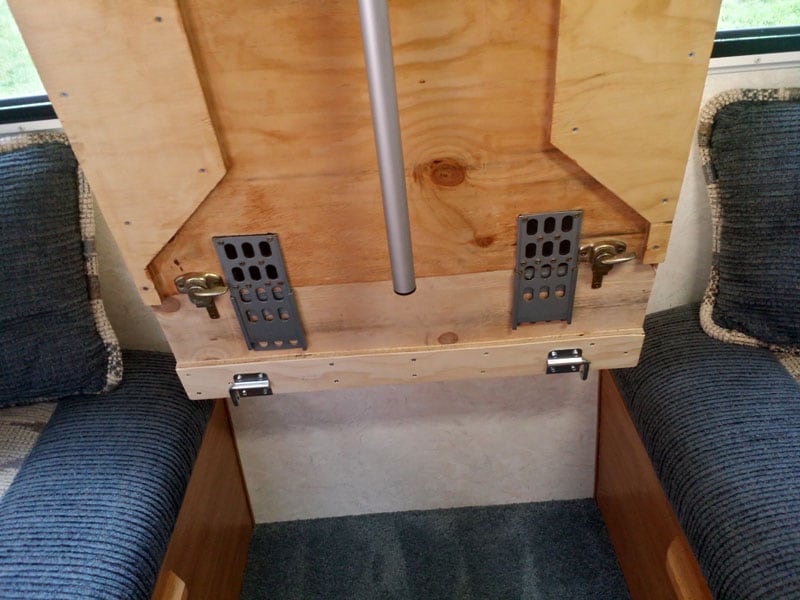
I bought a sheet of plywood and cut it to the same dimensions as the original table. I then cut the new table “shelf” to be 8-inches from the wall side. I used a jigsaw so the ends of the permanent piece (against the wall) have rounded edges.
Next I transferred the hardware from the original table to my plywood prototype. I used computer server rack mounting rails (throw aways from work) to be the slides. Finally, I used a pair of table locks that I had left over from a previous project.
The resulting table can be used fully assembled, or just the shelf. With just the shelf, the dinette opens into a lounge-able area with a convenient shelf for beverages, magazines, books, or whatever.
Removing the table is extremely easy. Release the two table locks and slide the table off. The table can be stored in the closet when not needed. The plywood prototype worked so well that I’ve polyurethaned it and we’ve kept it as a final solution.
With the table removed, the dinette area becomes much more comfortable to hang out and relax. It’s also very easy to put the back into its regular configuration.
This mod has been great! It took me six hours to complete this modification and cost me $40. In my opinion, the skill level of this modification is medium.
8. Kevin Mooney, Nimpo Lake, British Columbia
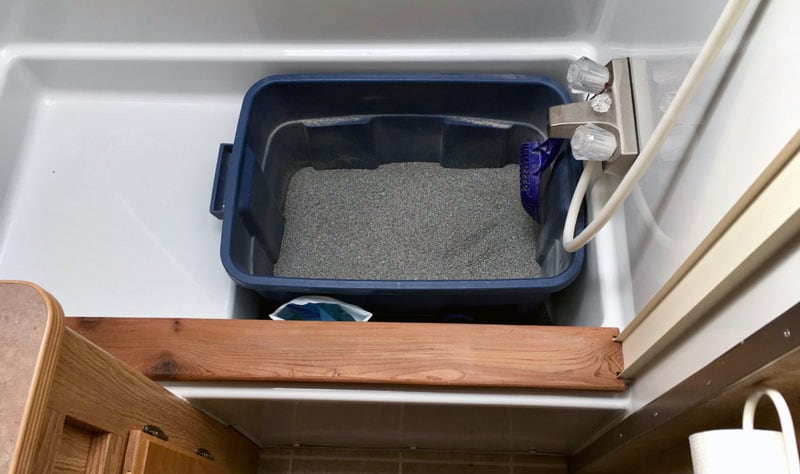
Cat Door and Litter Box Solution
2014 Ford F350
2006 Okanagan 106UDB
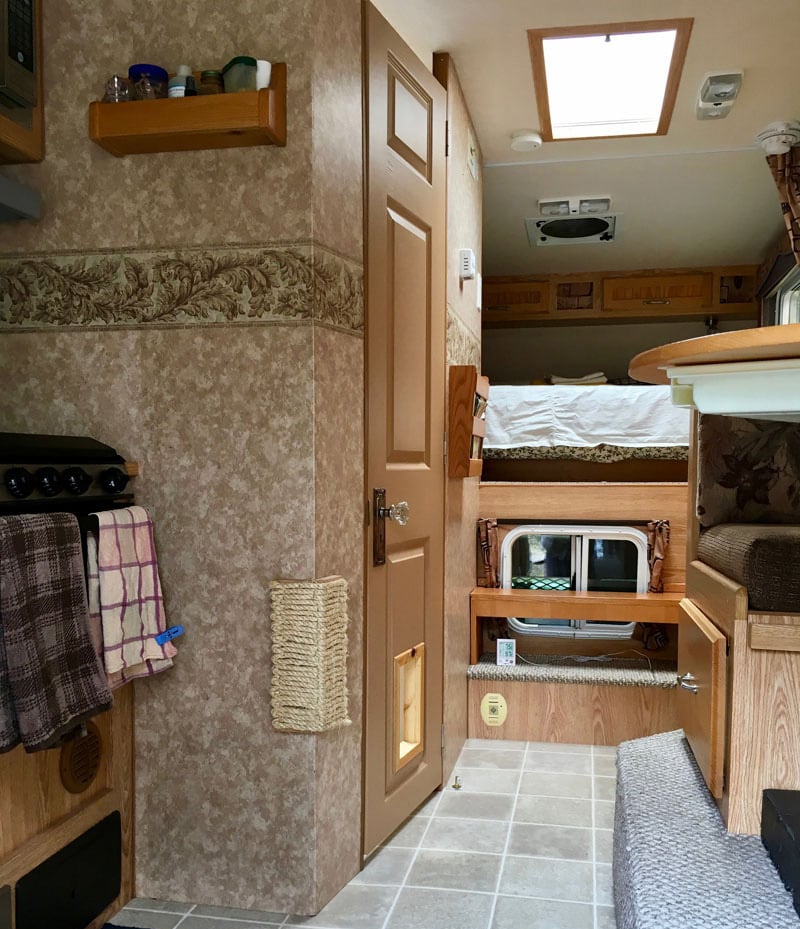
Lori and I travel with Tia, our indoor cat, and needed a place for a litter box.
When we stopped for the night in our previous camper, I would inflate a motorcycle inner tube between the truck window and the camper window, and then use that as a bug-free way of giving Tia access to his litter box in the back seat of the truck.
With our newer camper and flatbed truck, using the truck and camper pass-through windows is no longer an option. Nothing lines up. With one litter box in the truck, I had to find a place in the camper for a second litter box.
After much thought, I realized that we don’t use our shower very often and putting his litter box in there would be ideal. It is the bathroom after all.
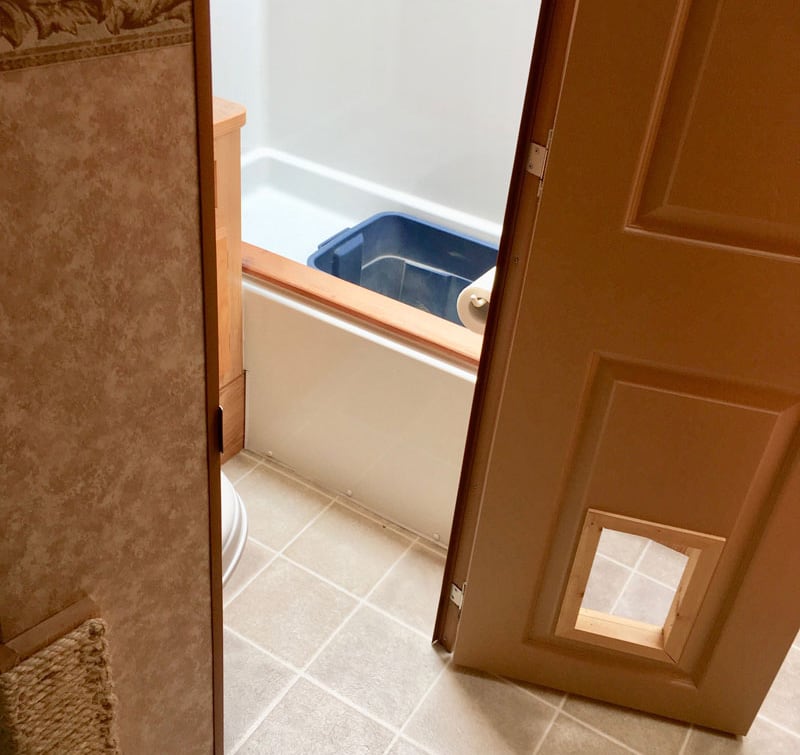
It turns out that by cutting the handle off of one side of a Rubbermaid tub, it fits perfectly in the shower. I taped some of that non-skid shelf paper onto the bottom of the tub so as not to scratch the finish in the shower stall.
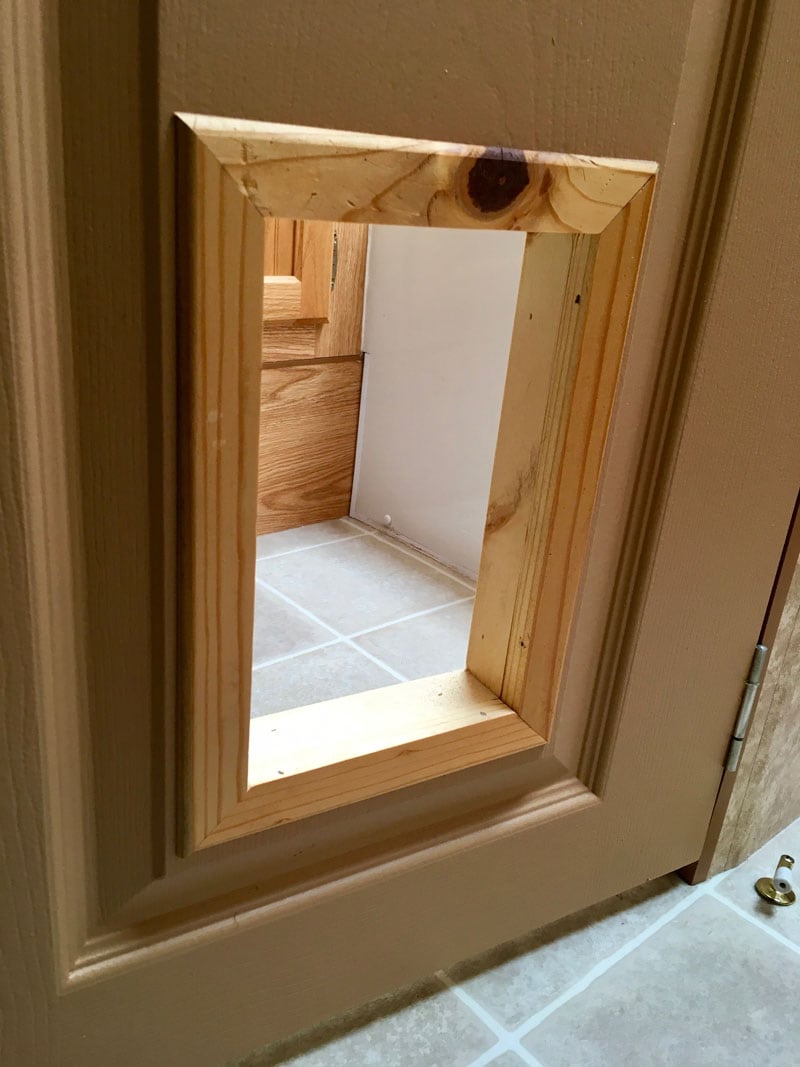
Next, I took the huge and heavy mirror off the door and sanded, painted, and cut a hole for cat access. The door is hollow, so I infilled around the perimeter of the cut with some scrap wood to give it some rigidity.
After that, I made up some moldings to size. Basically, I made a picture frame on either side of the door. It didn’t take Tia too long to figure that one out.
I didn’t put a swinging style door on it as I figured it might be obstructed by the toilet on the one side. If nothing else, it provides an extra bit of ventilation when the fan is on.
It is a bit odd using the toilet yourself, and suddenly feeling this furry thing brushing against your leg. Tia seems to think it is a group activity!
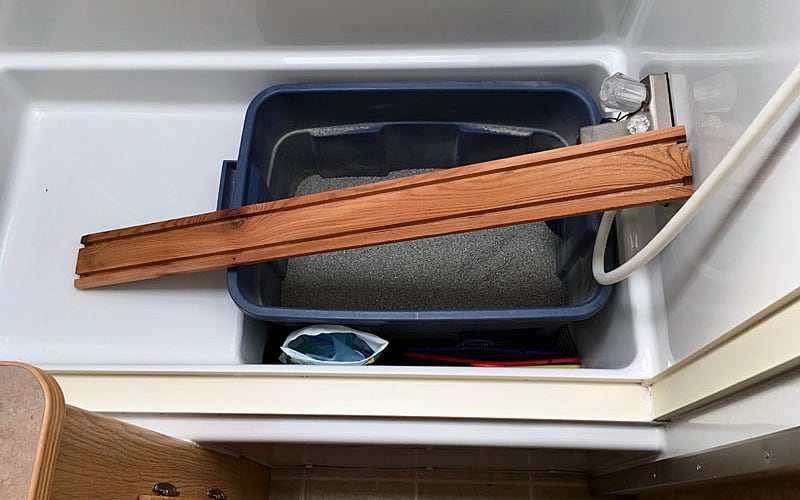
After some time, I found that litter was accumulating in the sill of the shower curtain trough. Getting that soaking wet was not going to be a good idea, so I cut some slots in the back of a chunk of cedar and notched it at one end to fit in the other groves. This has eliminated litter getting into the sill.
Lastly was a fancy old door knob set for Lori to finish it off. While I was cutting wood, I slapped together a wall-mounted, rope style scratching post for just outside the door. Tia took to that pretty quickly as well, and it saves the furniture.
This mod was one of my better ideas. We no longer have to get out of bed to open a window in the middle of the night so our little man can go have a pee. If either of us wants to have a shower, we just lift the box out and place it in the other room temporarily, which is no big deal.
Any odors are contained where they should be. Leaving the vent open on a nice day never hurts either. I couldn’t have hoped for anything more. I don’t think Tia could care less but, then again, he’s a cat!
It took me a couple of hours to complete this modification and cost me one Rubbermaid tub and some molding. In my opinion, the skill level of this modification is medium.
9. Jay McClellan, Saranac, Michigan
Flexible Truck Cab Storage
2018 Ford F-350
2018 Wolf Creek 840
We use the rear cab of our F-350 for hauling gear, not passengers, so the rear bench seat was just taking up space. Once we had the cab loaded full of stuff, it was a major chore to access anything on the bottom without removing lots of other stuff first.
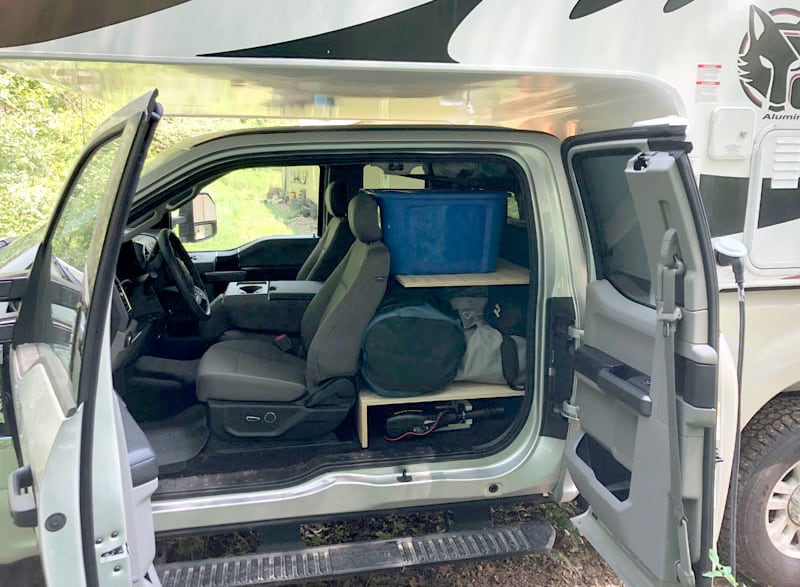
I wanted a way to use all of the available back seat space and to be able to access any piece of gear with minimal effort. I also wanted to be able to reconfigure the space easily and to accommodate different kinds of gear on different trips. Finally it had to be simple, inexpensive, and not require any permanent modifications to the truck.
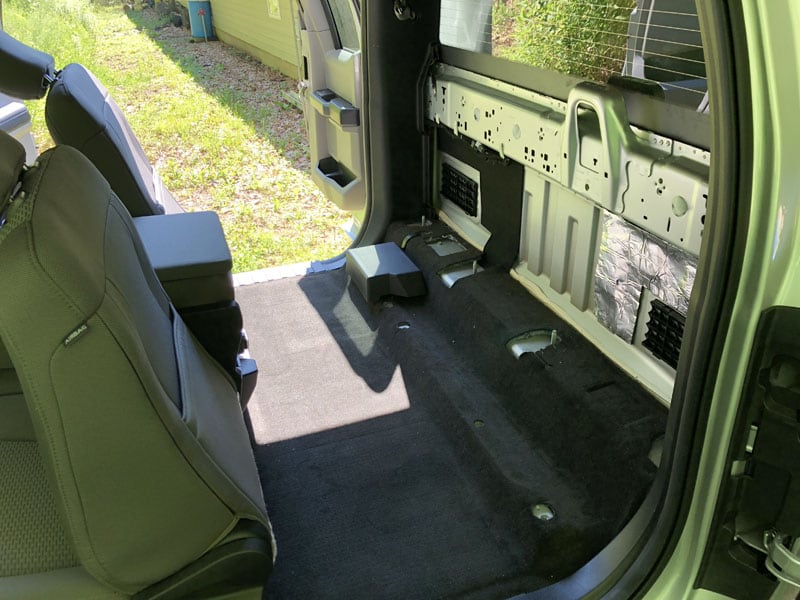
I started by removing the rear seat and all the associated hardware. Everything just unbolts so this is completely reversible if I ever want to put the seat back in. There were three M8-threaded attachment points conveniently located across the back wall, so I decided to use those to attach shelf supports.
The original carpet on the back wall had lots of openings and contours for the seat hardware. After removing the hardware, I cut a piece of black carpet to cover the wall. It’s not sealed around the edges so there’s enough openings to allow air to exit the air conditioner exhaust vents on the back wall.
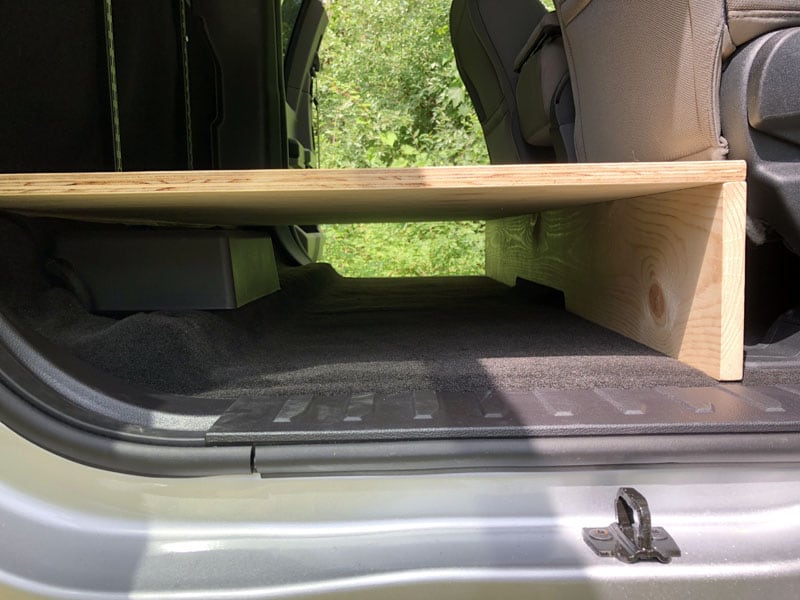
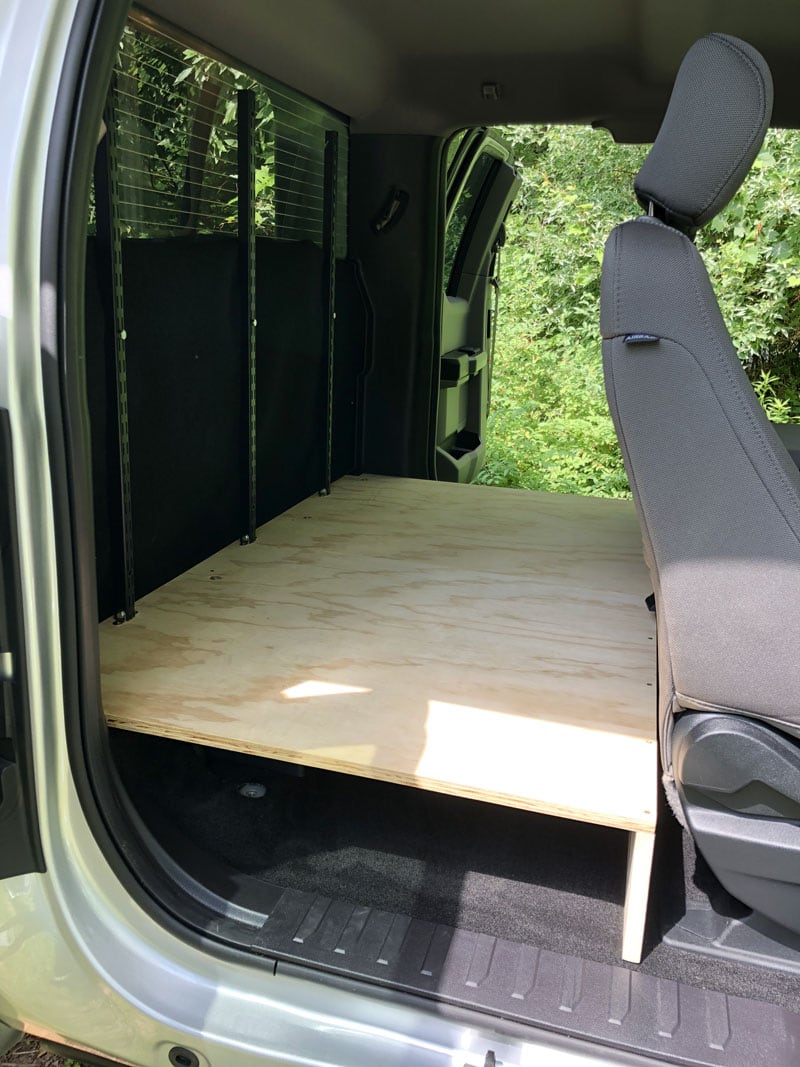
I made a 3/4-inch plywood floor that is secured to the seat attachment studs at the back and screwed into a 3/4-inch board that supports it at the front. The new floor is 59-inches wide and 34.5-inches front-to-back.
I sized it by putting the front seats in comfortable riding positions, and then building the floor to fit the available space. It’s made from two pieces of plywood so the grain of each piece runs front-to-back for rigidity. The space underneath the main section is 6.75-inches inches high.
Above the new floor I attached three heavy-duty shelf rails, using M8 bolts to secure them to the threaded attachment points on the back wall. At the bottom they’re held to the plywood with small angle brackets and screws.
The rails are 34.5-inches high and, although the top half is unsupported, they are very beefy and quite rigid. I plan to put only lightweight loads near the top.
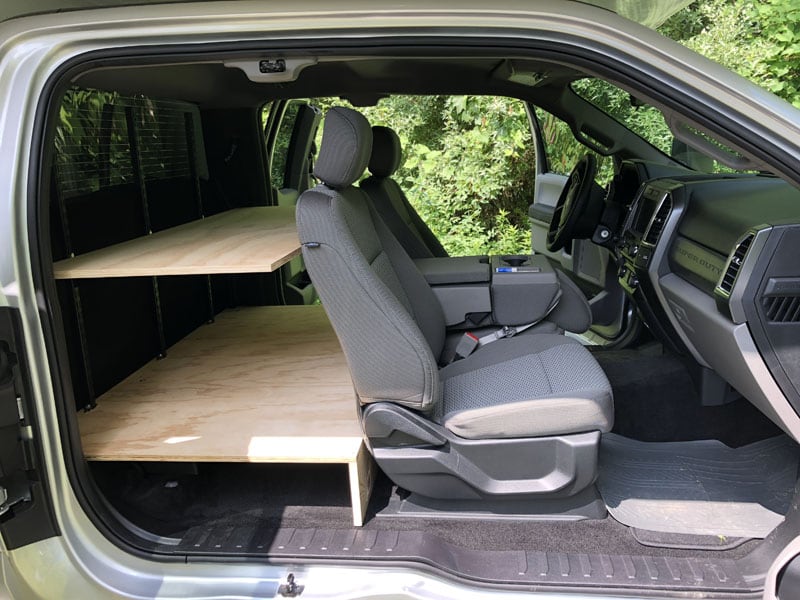
Next I added a shelf 24-inches wide and 59-inches long. It’s also 3/4-inch plywood so it’s very sturdy, and I positioned it just below the attachment bolts on the rails.
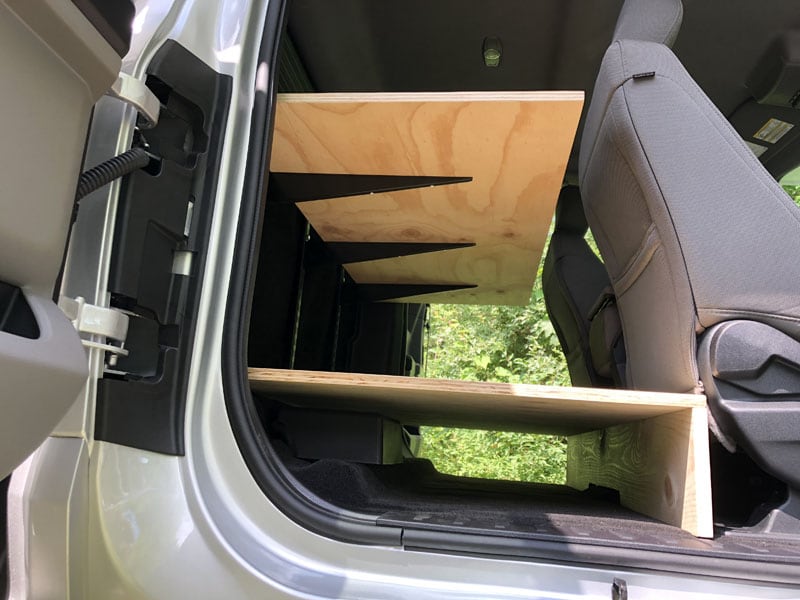
The shelf is attached to the brackets with 2-inches of space between the shelf and the vertical rails behind it. It has enough clearance to be lifted up easily and repositioned to a different height or removed entirely, if desired.
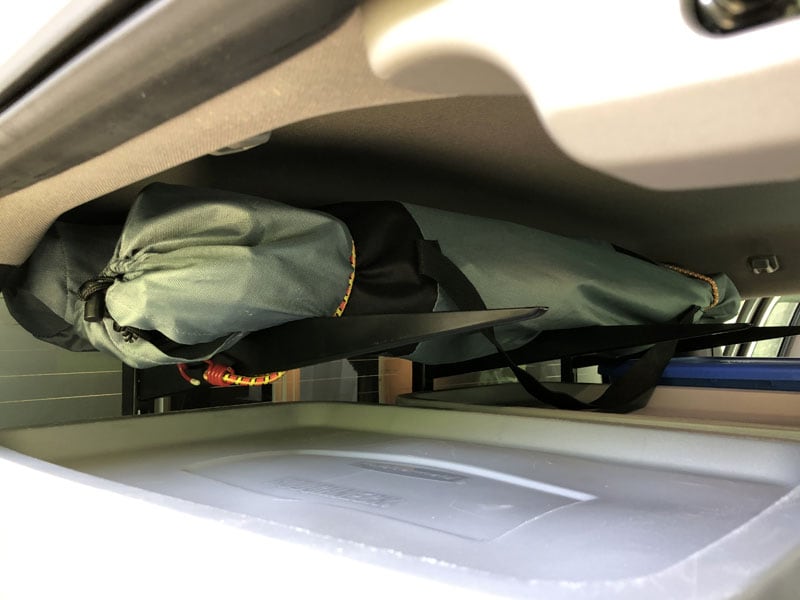
At the top of the rails I attached bungee cords using eye-bolts so they can’t get lost or slide off. Then I added a second set of shelf brackets at the top. I can use the captive bungee cords to secure light loads like our camping chairs.
The shelving takes up minimal volume but it makes the area far more usable. Even when it’s stuffed full I can remove most items without having to move anything else. At most I have to move just one item out of the way. I can reconfigure the space for different sizes of storage containers or quickly convert it into a big open space if needed.
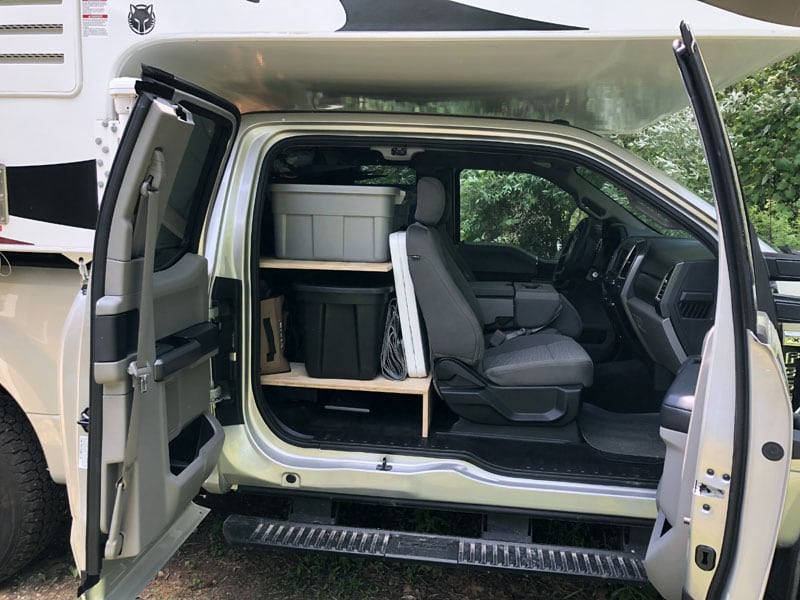
The space underneath the floor proved a great place to store the trolling motor for our inflatable kayak. The kayak itself sits just above with its accessories and inflator pump. I used plastic totes to organize camping gear on the top shelf.
This mod was easy to build and it worked out great! I still have some space left over – even with a boat, trolling motor and battery, all my road safety supplies, camp chairs (see picture below), and several totes full of assorted camping gear.
I was also able to shift quite a bit of stuff from the camper into the truck. That frees up some precious space inside the camper. The best part is how quickly I can now get to any piece of gear, and how the movable shelf brackets let me easily reconfigure the space as needed.
It took me ten hours to complete this modification and cost me $75. In my opinion, the skill level of this modification is medium.
10. Réginald Lafrance, Embrun, Ontario
Generator Compartment Modification
2004 Chevrolet 2500H
2006 Bigfoot 9.4
From the factory, it was not possible to fit a Honda EU2000i portable generator in the generator compartment of my 2006 Bigfoot 9.4. The internal length and width of the generator compartment were good, but the height was insufficient.
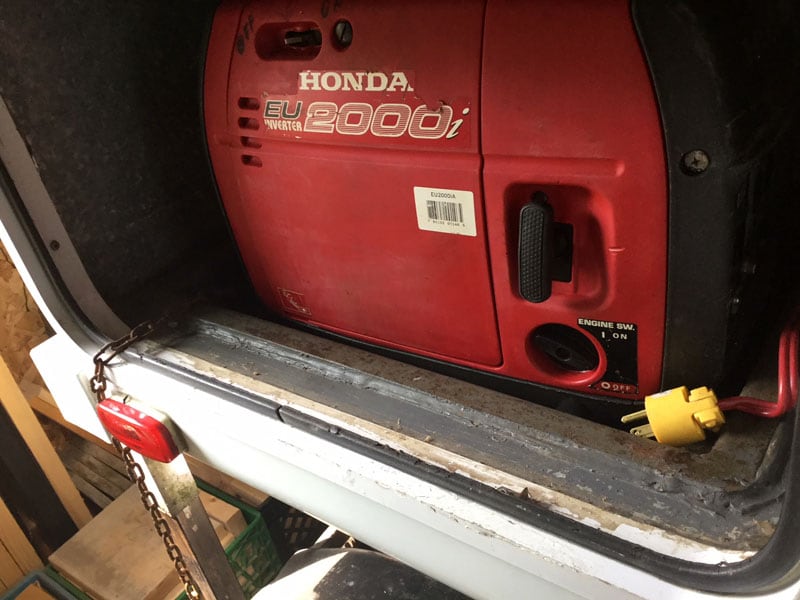
My idea was to make a hole in the compartment floor and install a 3-inch deep metal tray to create the required compartment height. I wanted to make sure this modification didn’t weaken the structure of the camper, so I created a very tight fit for the tray. I also selected a strong tray formed with 3/18-inch metal.
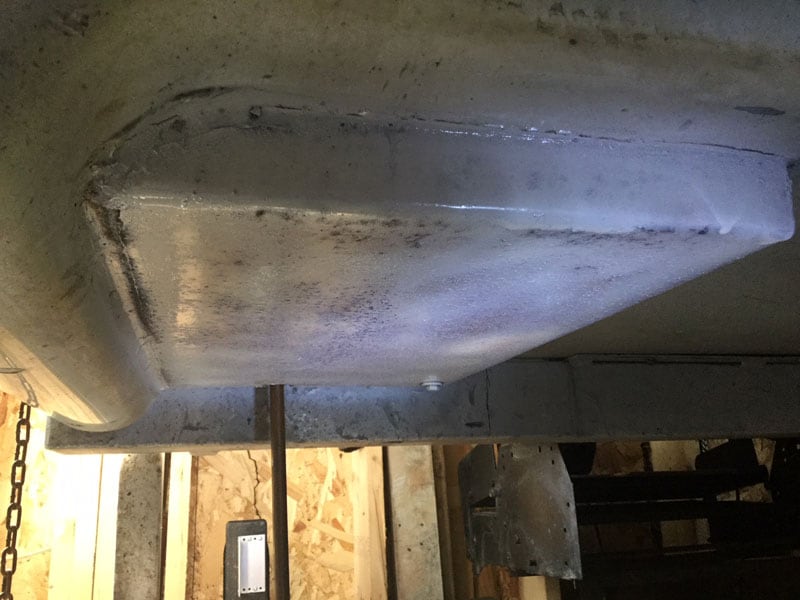
After acquiring the tray, I cut the hole in the compartment floor. I cut the hole a bit small knowing that I could enlarge the hole if needed. Again, I wanted a snug fit so the compartment floor structure would remain strong. I did not use bolt, but plenty of construction adhesive.
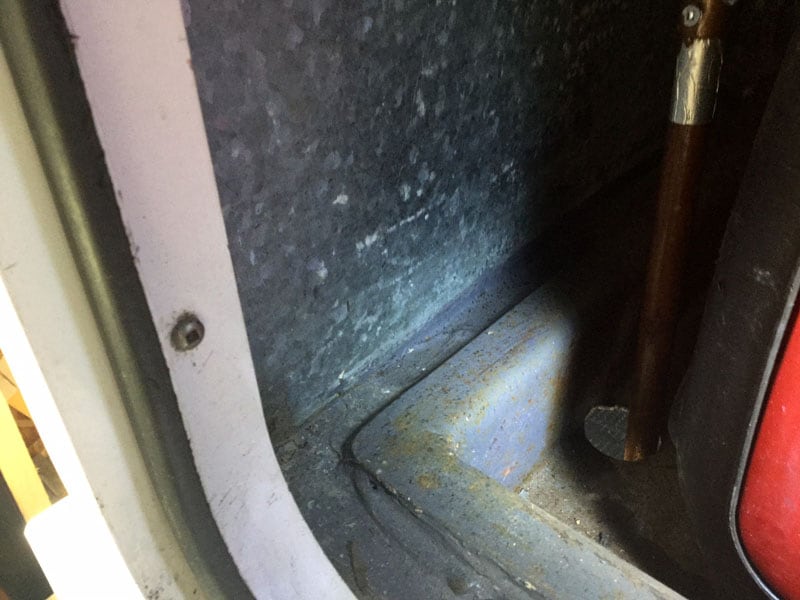
This modification was performed several years ago and has been road tested over at least 25,000 miles. It’s been flawless. It’s also easy to remove the generator for use, maintenance, and gas refilling.
It took three hours to complete this modification and cost me $60. In my opinion, the skill level of this modification is medium.
Click here to vote for your favorite 3 mods from this month’s contest.
Disclaimer: The modifications above are submitted by Truck Camper Magazine readers. It is your responsibility to make sure that any do-it-yourself modification project you undertake is safe, effective, and legal for your situation.
Enter Your Mods Now!
If you’d like to enter a modification you’ve done on your truck camper, click here. You can enter as many mods as you want, at any time. Good luck mod makers!