How do you carry a spare 19.5 wheel and tire? On a hitch! Can you make a cabinet into a pull-out pantry? Yes, you can! Why can’t a truck camper have a built-in dog deck? Now they do! How about mounting a water filter…

Welcome to the seventh 10X10 Mod Tournament. Please review the following ten medium mods and vote for your favorite.
We will announce the winner next week. Click here for more information about the 10X10 Mod Tournament, including how to enter.
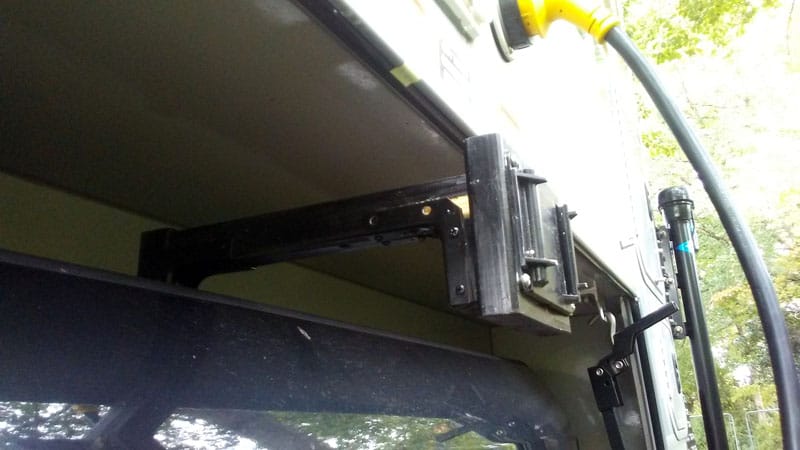
1. Laurel and Howard Wilson, Harrisburg, Missouri
Back Up Camera Installed in Lend-A-Hand Rail
2018 Ford F-350
2016 Four Wheel Camper Grandby
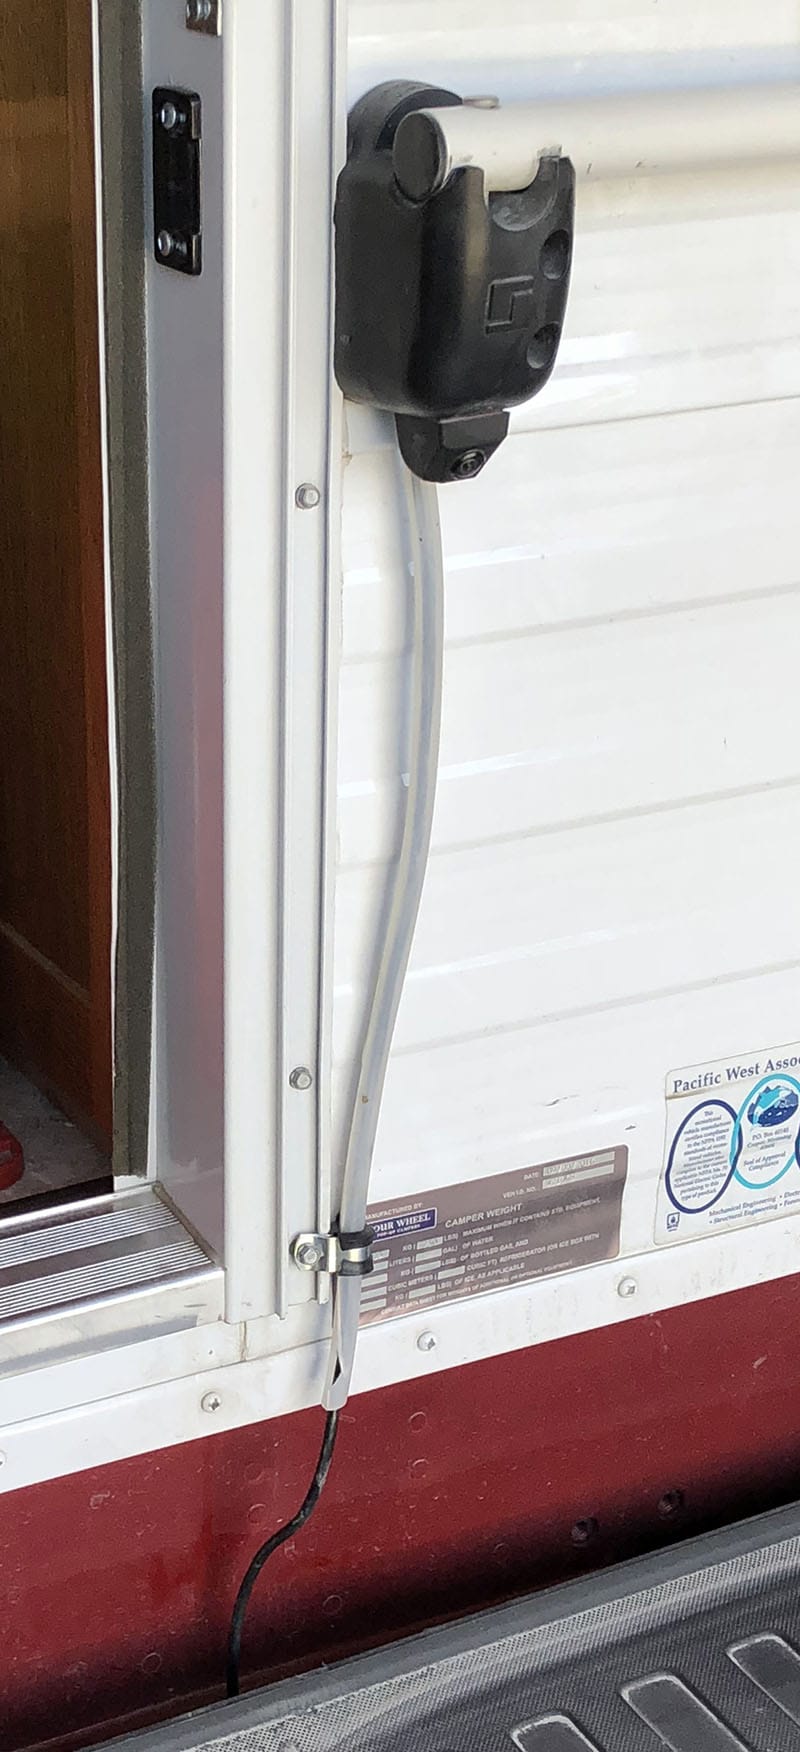
I added a backup camera to my Four Wheel Camper. The factory backup camera on the Ford is removed when the tailgate is taken off. With a backup camera mounted on the camper, I maintain the safety features having a backup camera on the rig.
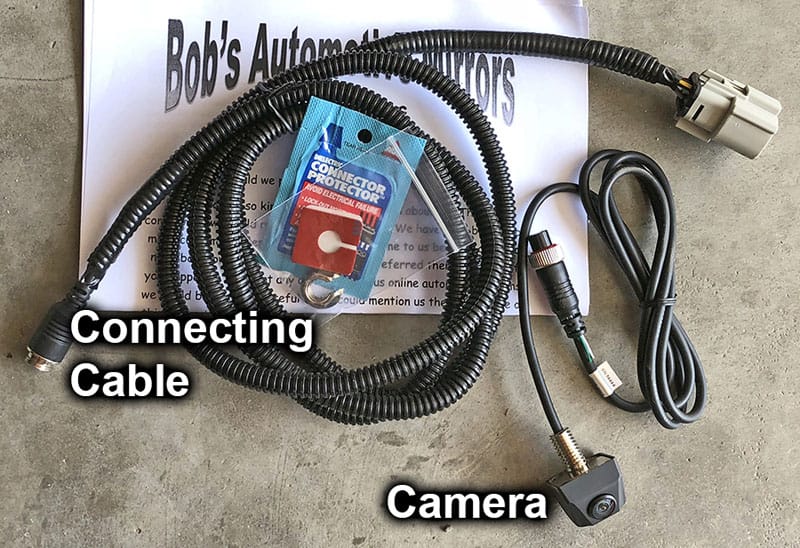
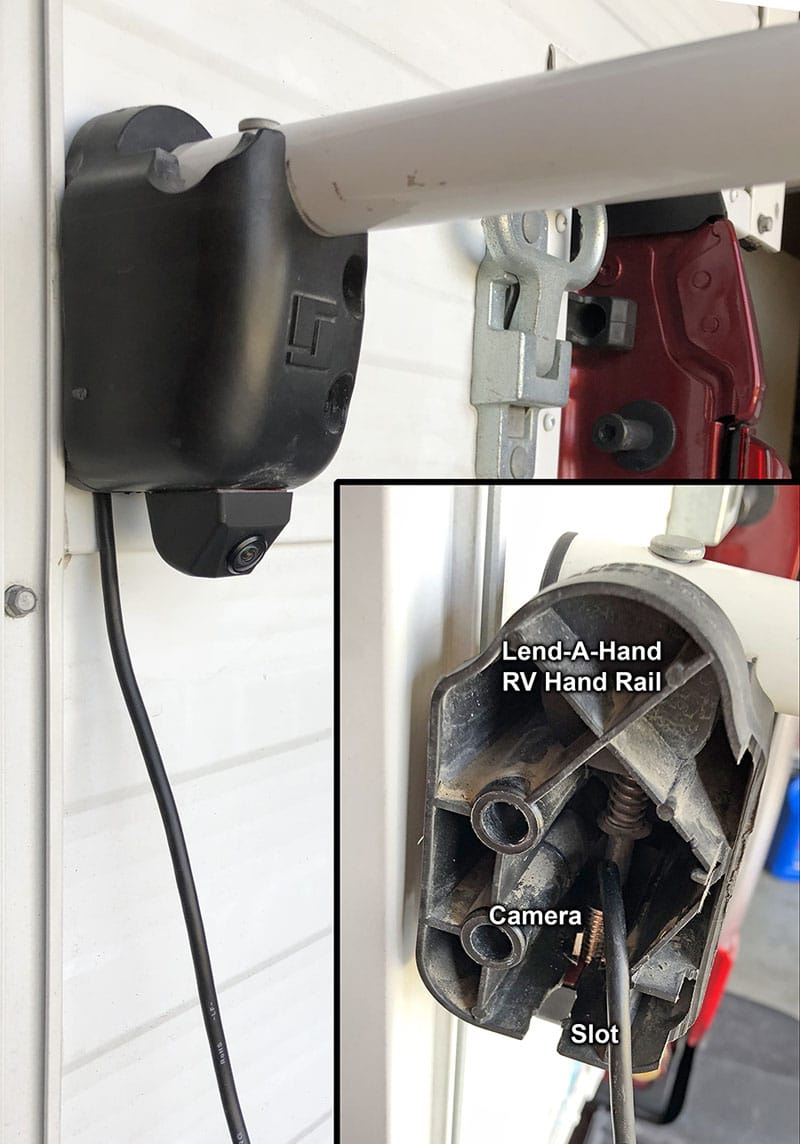
I purchased a backup camera on eBay, and then attached the camera to the bottom mount of a Lend-A-Hand RV hand rail.
Then I drilled a hole in the bottom of the Lend-A-Hand’s bottom mount. I cut a slit to allow the camera cable to extend out of the bottom without getting pinched against the camper wall.

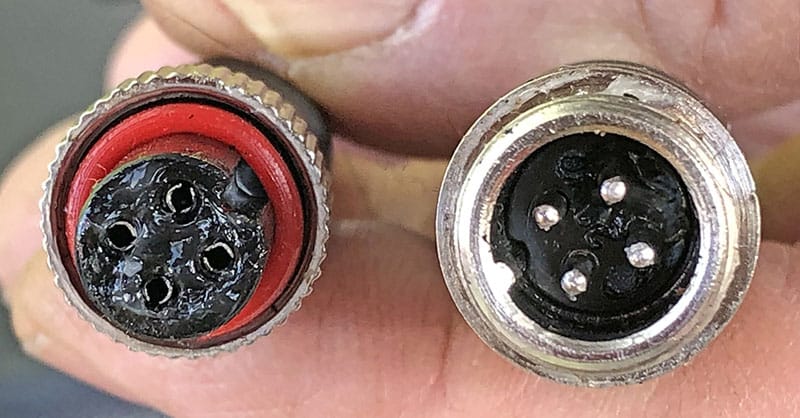
Once that was done, I connected the camera cable on the camper to the truck’s cable plug. This way the camera works with the Ford dash display.
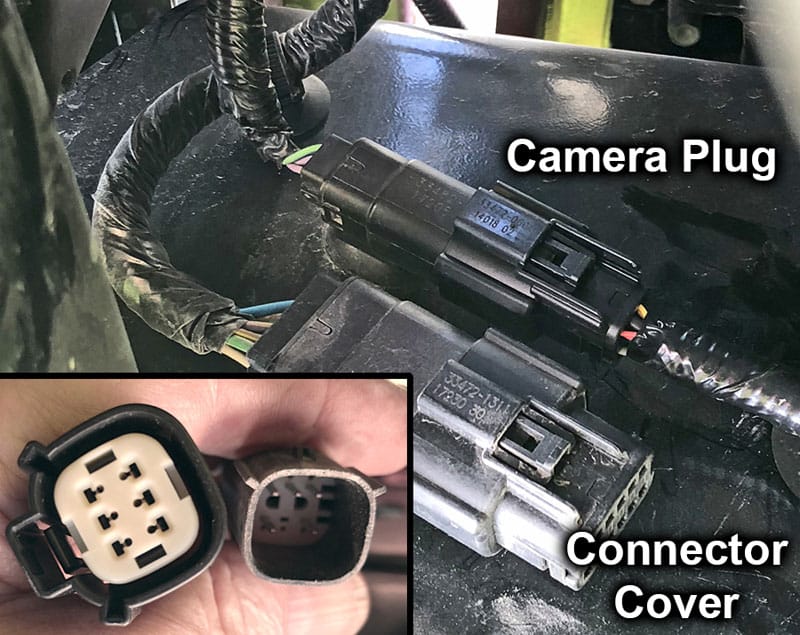
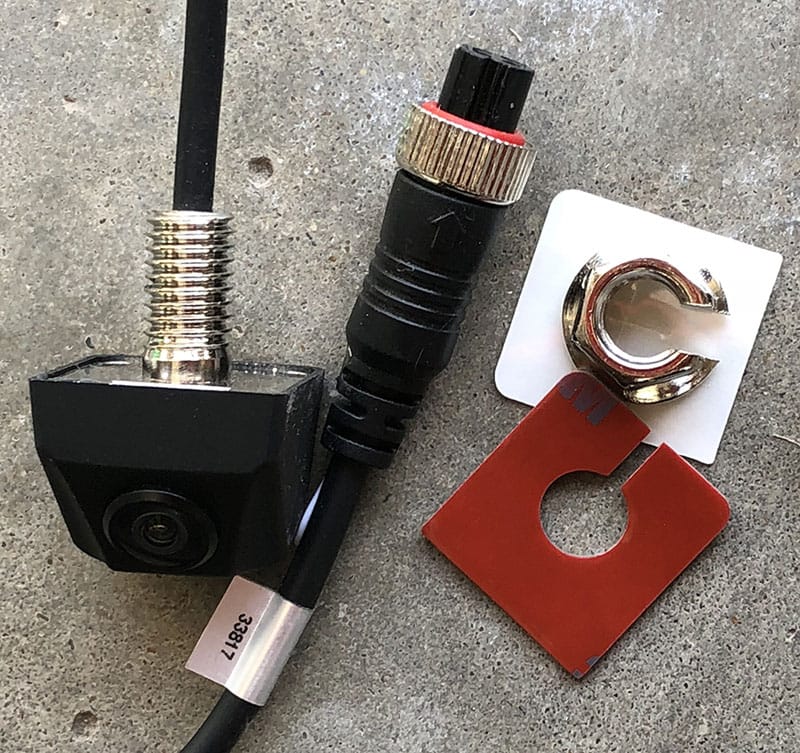
The 2018 Ford F350 has two connectors at the tailgate. The square one is for the camera. The rectangular one is for the tailgate’s latch. I connected the camera cable to the truck and put the dust cover on the tailgate’s latch cable.
The picture below is the connection between the truck and the camera. It shows the silicon grease to make the connection watertight. It was included in the order for the camera, which was a nice added touch. It provides power and also the video signal to the front screen.
The installed backup camera and mount solution works very well. The camera does not have the Ford lines that curve when you turn the steering wheel, but you can clearly see what’s behind you. The camera is mounted off-center so you need to compensate for that when you are backing up.
It took me two hours to complete this modification and cost me $197. In my opinion, the skill level of this modification is medium.
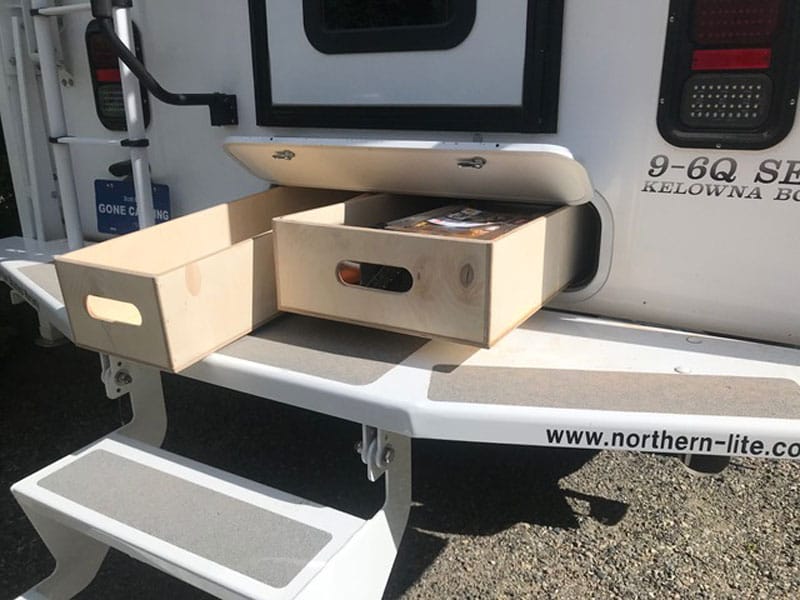
2. Charles Coushaine, Punta Gorda, Florida
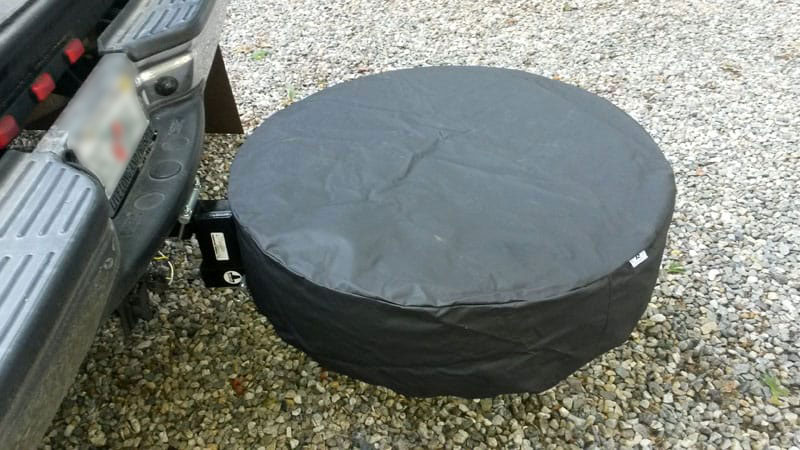
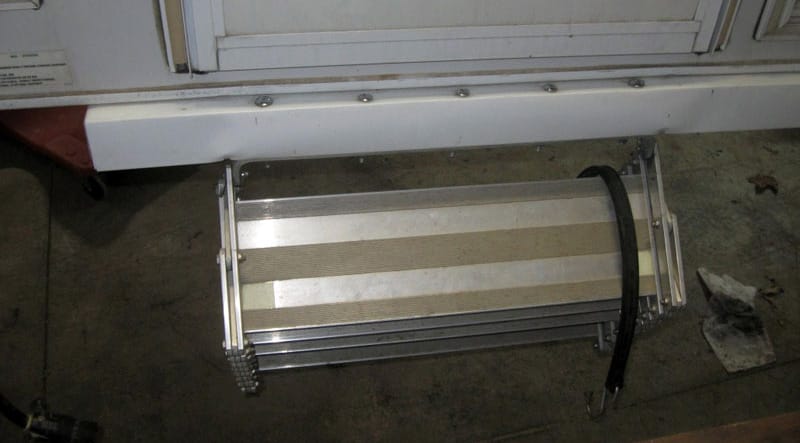
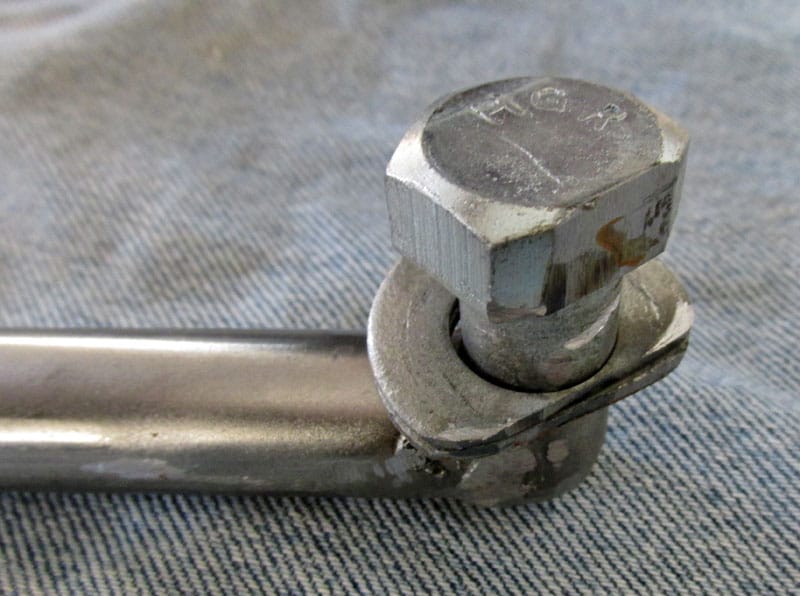
Custom Spare Tire Holder Using Rear Hitch
2001 Ford F350
2012 Chalet DS116RB
We upgraded our Ford F350 tires from the stock 16-inch Load Range E to 19.5-inch Load Range G. We were very excited about the added safety this provided while carrying our heavy Chalet truck camper.
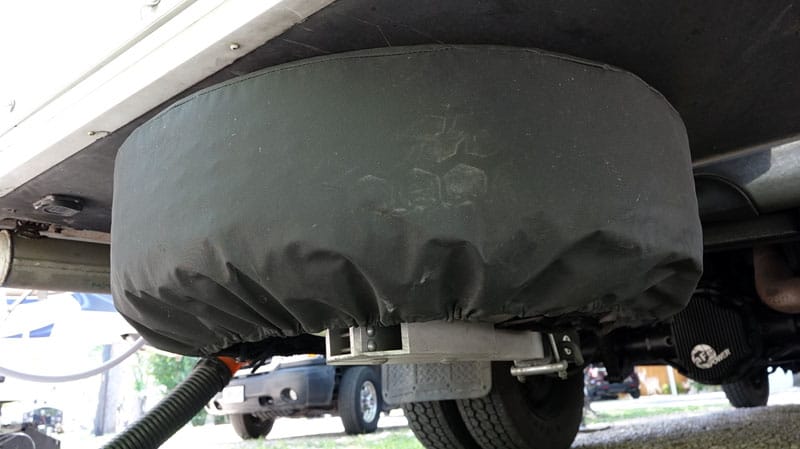
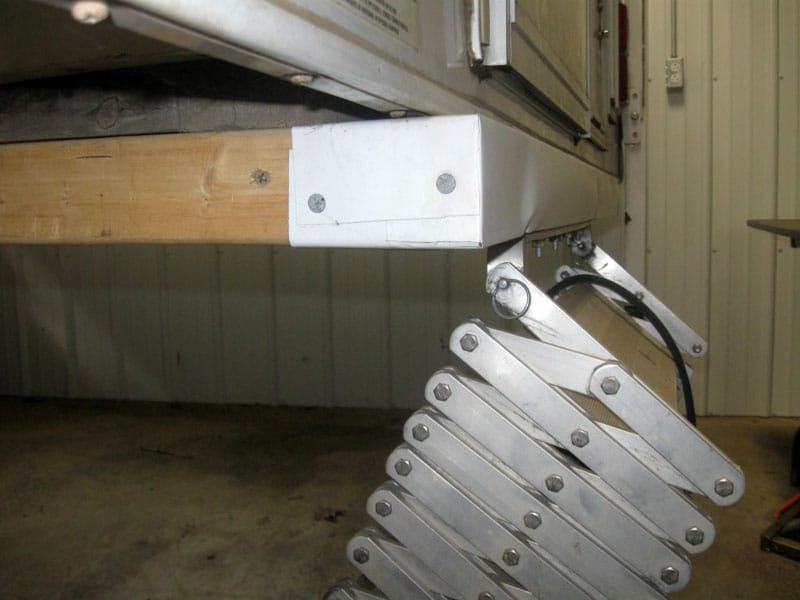
However, the 19.5-inch tires are just large enough to not fit in the standard spare tire spot between the back two wheels. Still wanting to carry a spare, I built a custom rear hitch carrier that fits under the back overhang of our camper.
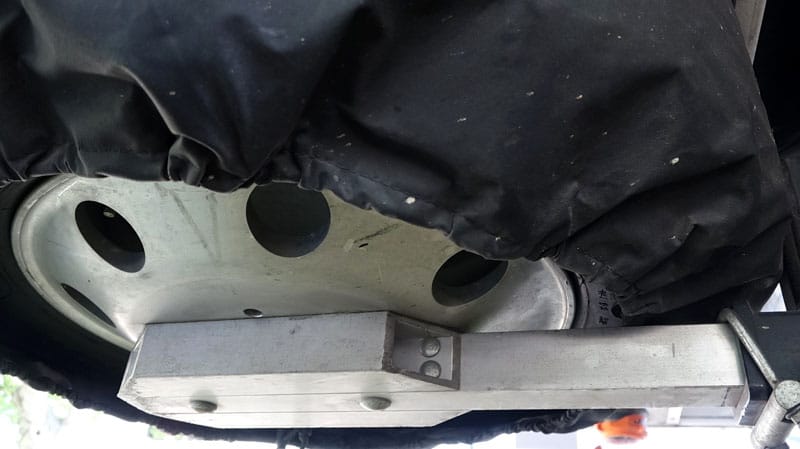
First I did a lot of careful measurements to determine the exact dropdown receiver needed (4-inches for our truck and camper). This, coupled with the thickness of the new 19.5-inch tires, would leave me with a nice 1/2-inch gap between the tire and the underside of the camper.
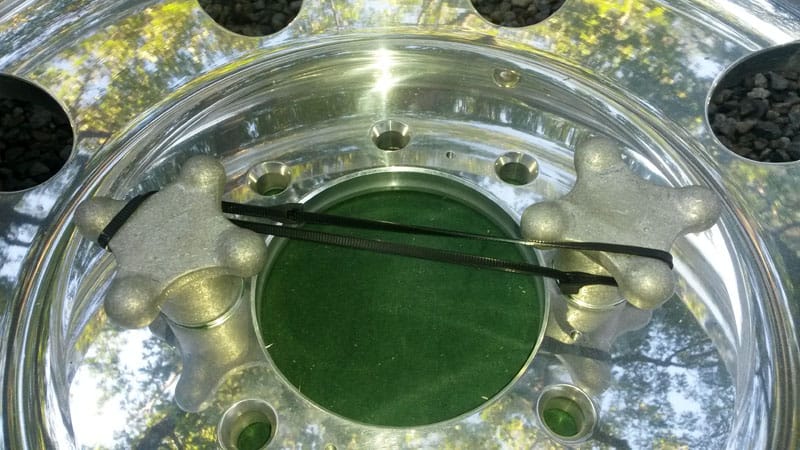
Next, I fabricated the holder out of three pieces of 2-inch by 2-inch by 1/4-inch wall aluminum tubing screwed together. Then I added two holes that lined up with the lug nut holes and attached the rim with the tire using heavy-duty thumb screws.
The spare tire carrier came out great! The tire can be removed with the camper in place, and also allows me to decouple the truck from the camper with ease. Having the tire in an easy to remove location is great because – when you need the spare – you’re usually on the side of the road.
It took me about eight hours to complete this modification and cost me about $200. In my opinion, the skill level of this modification is hard.
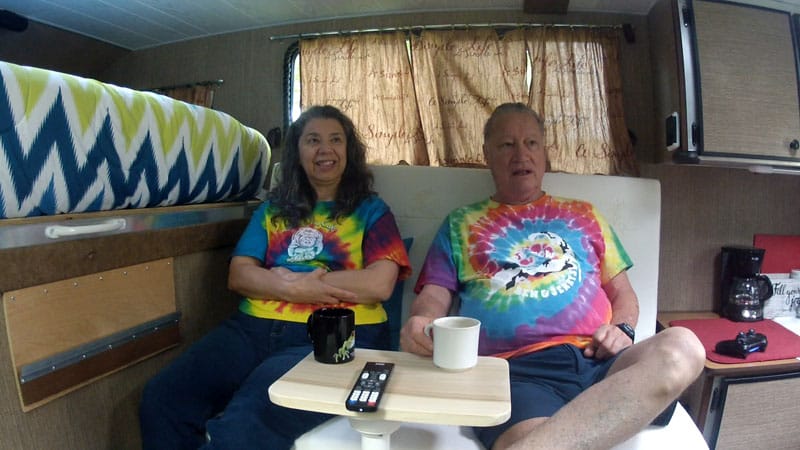
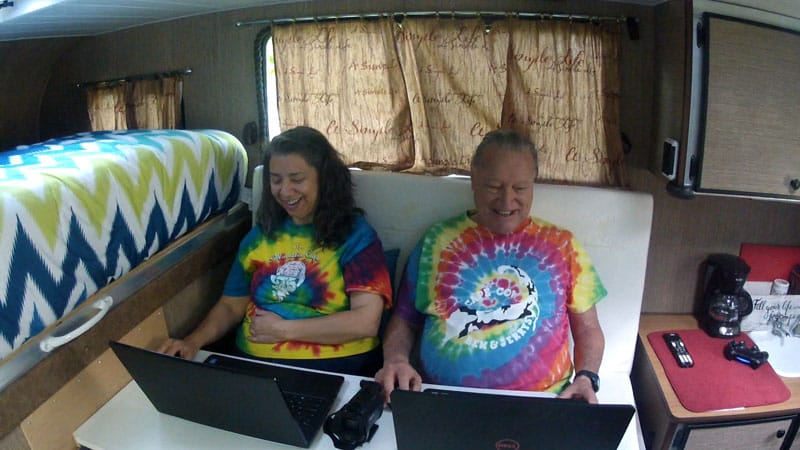
3. Neil and Yoly Mullen, Dawsonville, Georgia
Sofa in Eureka Camper
2016 Ram 2500HD
2018 Eureka Camper
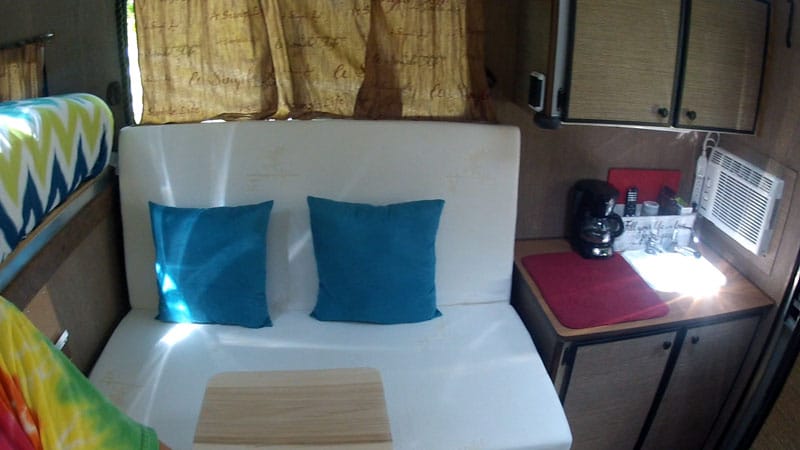
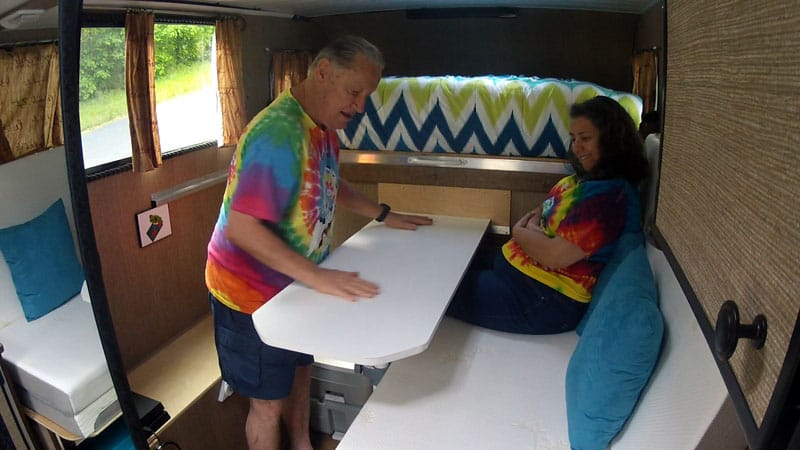
We wanted more comfortable seating in our 6.5-foot wide camper. We also wanted a larger than average dinette table since we both spend a lot of late-night hours on our laptops. Our challenge was how to have a larger table in a small space.
We added our own Milliard tri-fold mattress (full size – 52 inches wide) as a couch. This gives us a 24-inch deep, 8-inch thick seat cushion with a 24-inch tall, 4-inch thick backrest. This is super comfortable.
We wanted a small table for morning coffee that allowed enough room to move about in the cabin. And we needed a place for popcorn while watching a movie from our new couch.
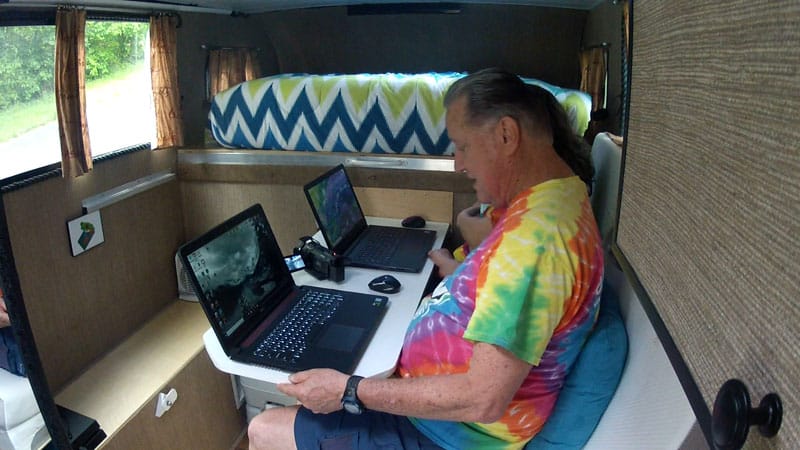
Finally, we also wanted a large table big enough for working laptops and eating meals. So, I built both.
The small coffee table is perfect. The easily removable larger dinette table gives us the working and eating space we need.
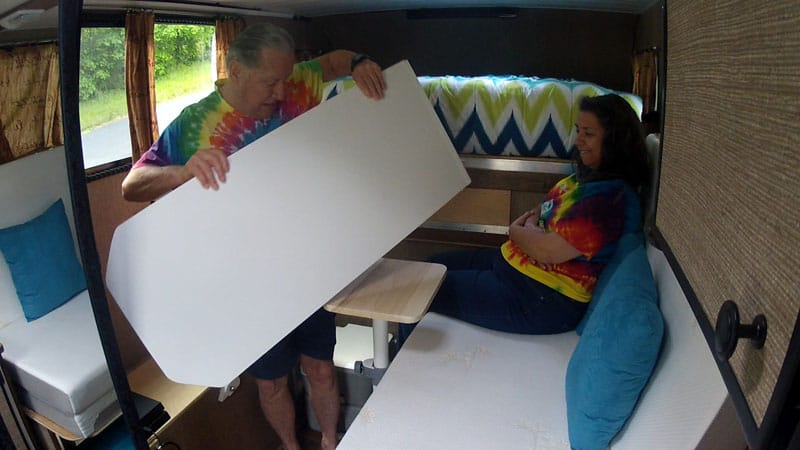
The dinette table can be installed in less than 10-seconds. It simply rests and slides across the coffee table.
The other end is supported by a length of zee channel aluminum fastened to the wall. The end of the table has an end piece that fits snugly in the aluminum channel allowing it to slide back and forth. We adjust the table out for access, and then in for usage.
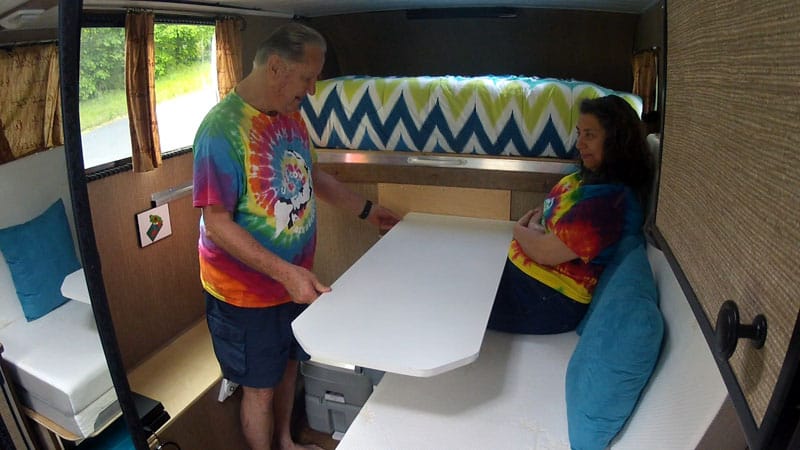
The dinette table can also be lifted out of the slot and moved lengthwise along the coffee table. That allows access to the couch at that end. It can easily be lifted off and placed along the far wall on the floor. A pivot plate holds it in place when it’s not in use.
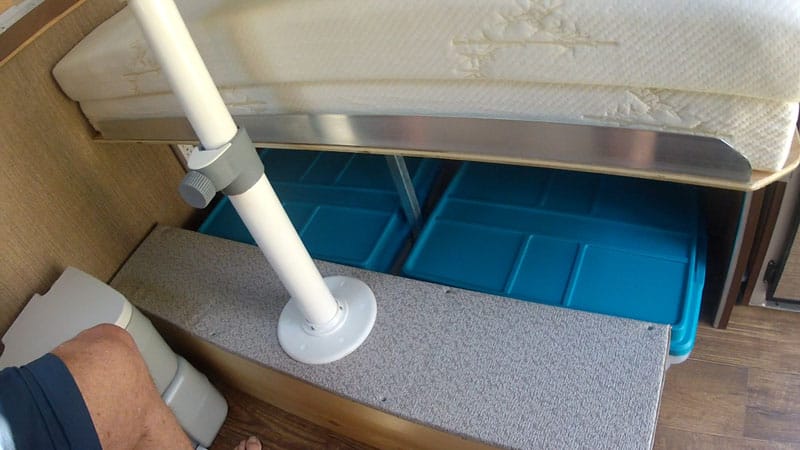
The coffee table support is a white plastic nautical component leftover from our years of boating with our Zodiac RIB. Because the basic seat base is high off the floor, and the additional 8-inches of seat cushion raises our legs so much, I had to build a 10-inch riser as a footrest. The footrest also functions beautifully as a storage compartment for what is otherwise a very bulky fluid damped tripod.
The mods have worked out beautifully especially considering the broad scope of requirements in combination with so little space.
It took me twelve hours to complete this modification and cost me $180 including the cost of the tri-fold mattress. In my opinion, the skill level of this modification is medium.
4. Scott Ellis, Billings, Montana
Better Access To Basement Storage With Drawers
2012 Chevy 3500
2019 Northern Lite 9-6 QCSE
Our Northern Lite came with a single plastic tray for basement storage management. That’s fine, but that tray was a foot shorter and a couple of inches narrower than the available space. There was nothing at all for the other side of the basement. It is a smaller space, but at four feet deep it is not somewhere I just want to pitch stuff, hoping to fish it out again later.
In the future, I am going to add a set of runners under the drawers, so that I don’t have to lift them over the lip around the door.
It took me about three hours to complete this modification and cost me $80. That was for one sheet of 7/16″ Euro ply. In my opinion, the skill level of this modification is medium. If you’re comfortable around a table saw, you can do this.
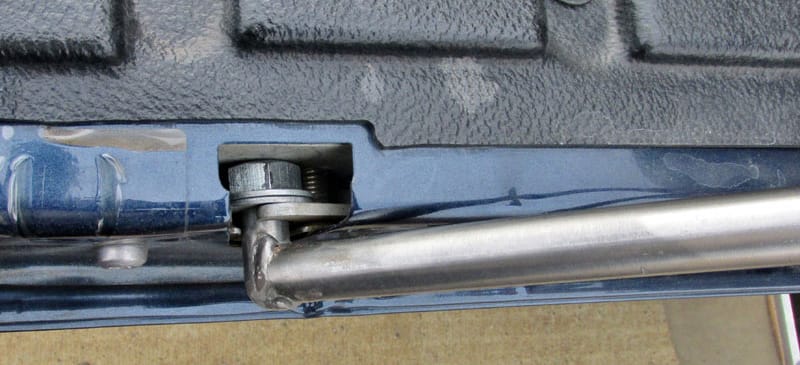
5. Sean Calcote, Fayetteville, North Carolina
Water Filter Mount
2014 Ram 3500
2015 Cirrus 820
Before this modification, I would hang the water filter by a rope off the truck camper tie-down points. I didn’t like this approach, and decided to create a better solution.
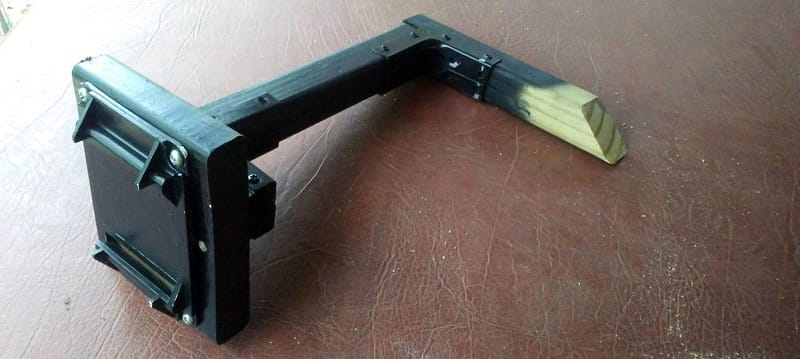
I noticed that holes in the bed were close to the water point. Then I got some metal brackets from the local home fix-it store and some scrap wood.
After careful measuring, I cut the end of the scrap wood at 45-degrees. While it may be simple to just raise and place, that would be a lot of needless wear and tear.
It doesn’t show in the pictures, but I have a piece of wood that I screw into the back that holds it in place – when I remember to attach it before loading. I found the water filter holder and mount at Camping World.
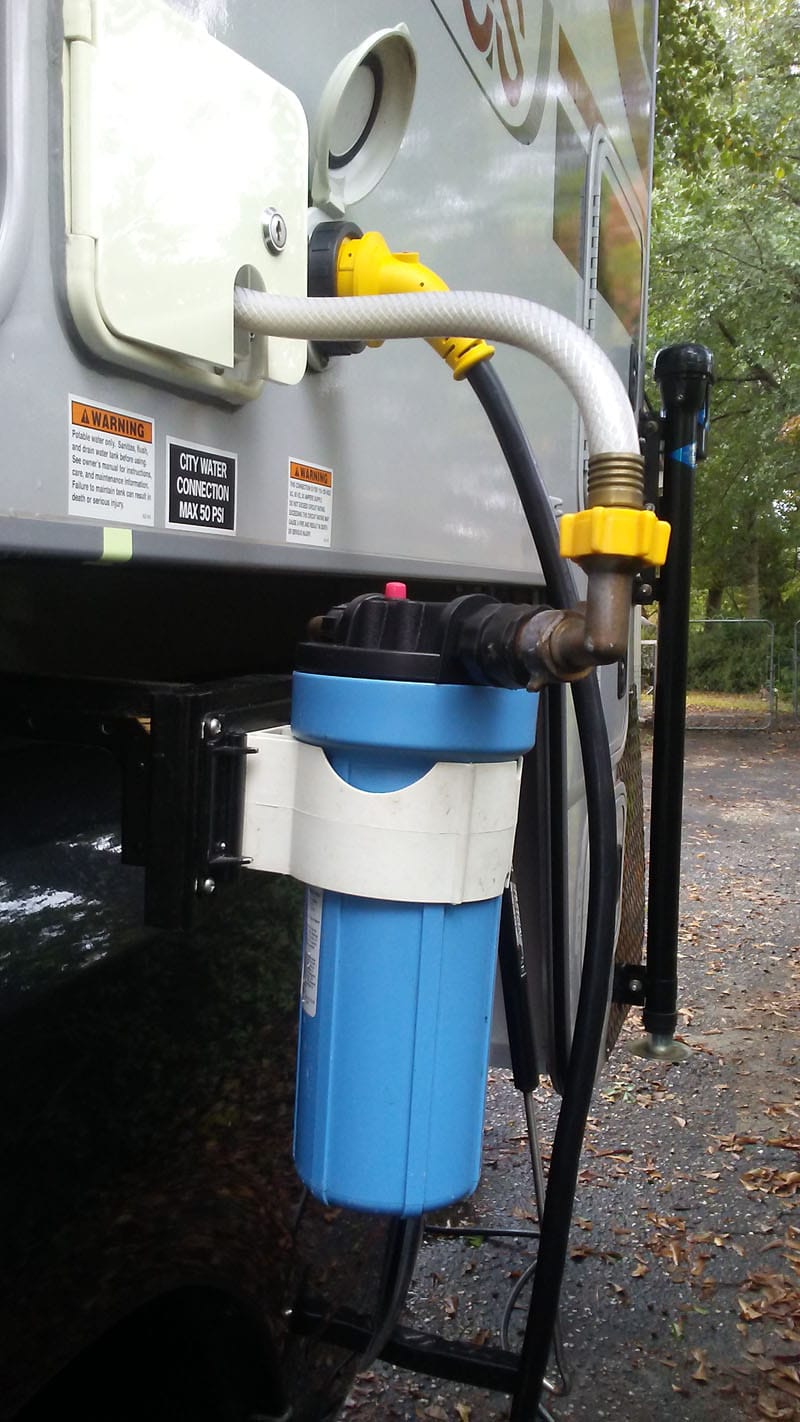
It took about an hour to complete this modification and cost about $20. In my opinion, the skill level of this modification is easy.
6. Lyle Tremblay, Spruce Grove, Alberta
New Black Tank Valve Location
2004 GMC 3500
2006 Bigfoot C9.4
I had a black tank valve that never properly sealed. When I had the step up to the cabover bedroom removed, there was clear access to the black water line.
When I had the step up to the cabover bed off, I realized that I had clear access to the black water line. The location is extremely tight and didn’t allow the cable to work properly. To solve this problem, I relocated the black tank valve. Now I just keep the factory black tank valve open.
With the valve relocated, the black tank cleans out properly because there is plenty of water in the tank. It used to seep further down the line. Now it flushes well.
The bed step is held in place by magnets and works fine. And cleaning and maintaining the black tank is much improved.
The black valve upgrade cost me about $25 for the valve. I had the rest of the things I needed on hand.
In my opinion, the skill level of this modification is medium because you have to be careful about where cut. You also need to plan the placement of the new black tank valve.
7. Matt Reinker, Michigan
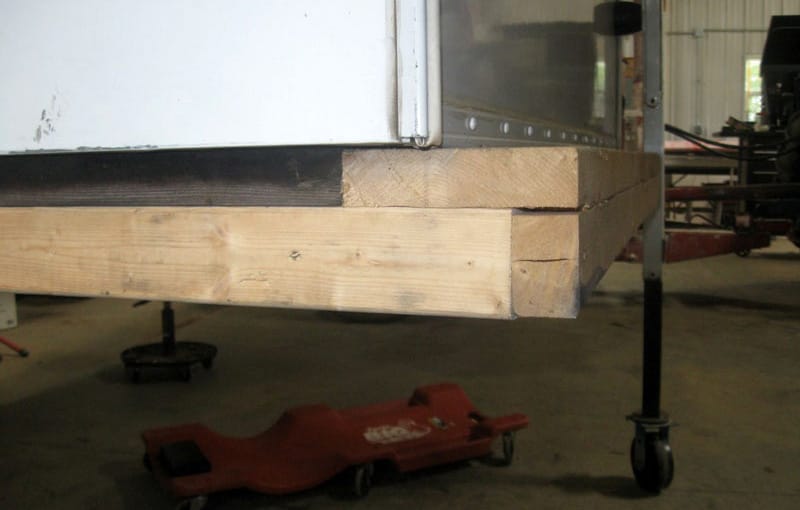
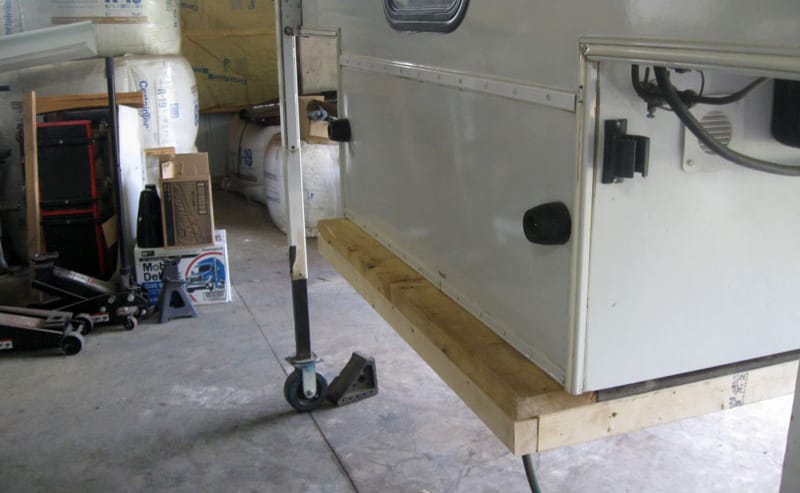
Adding A Base To The Camper
2016 Ford F-150
2007 Northstar TC650
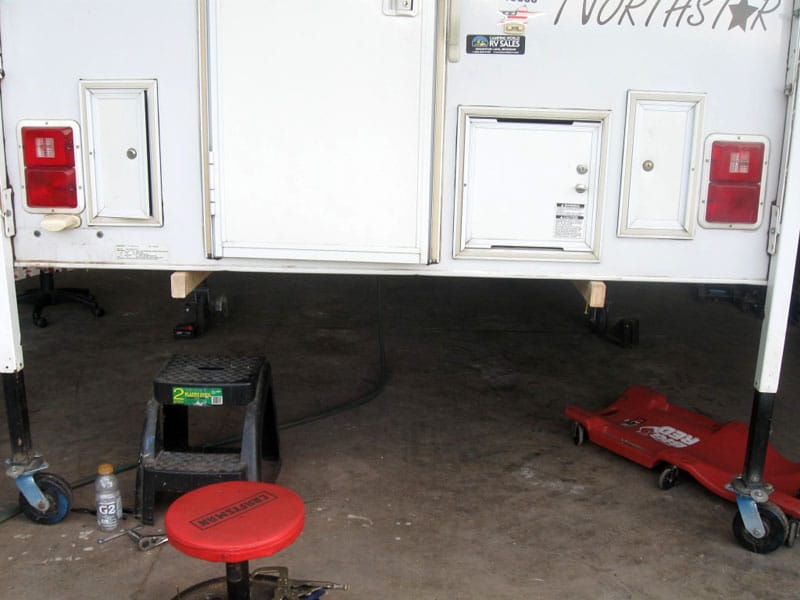
My 2016 Ford F-150 has a 6.5-foot bed, the heavy-duty payload package, and 2,493 pounds of payload capacity. My 2007 Northstar TC650 was too short and not tall enough for the F-150. The following modification allows the TC650 to fit the F-150.
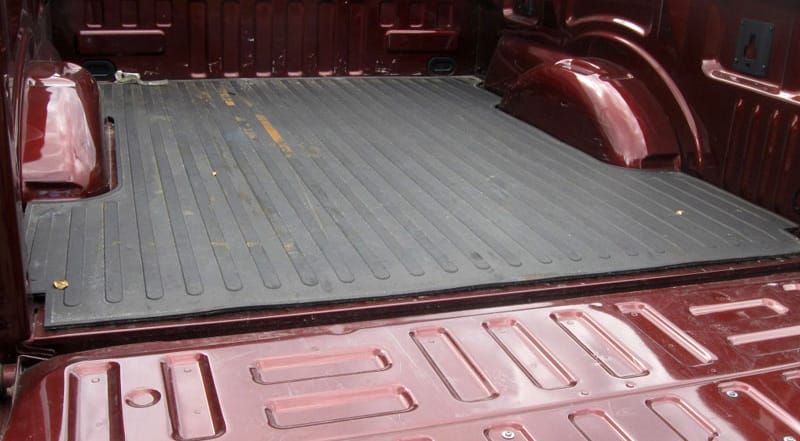
The first thing was I added a half-inch thick rubber mat in the truck bed.
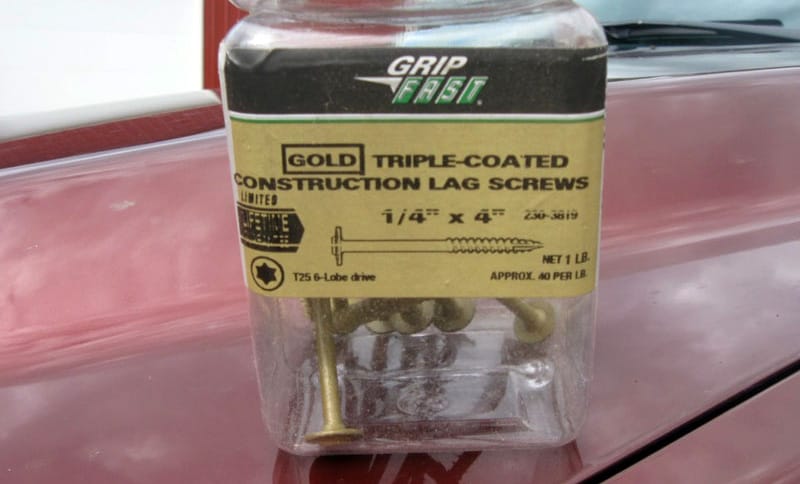
Then a trip to Menards was in order. I picked up some screws and five 8-foot long 2-inch by 3-inch boards.
.
I already had one 8-foot long 2-inch by 6-inch board, some 1/4-inch carriage bolts, and 1/8-inch metal flat stock. Ford recommends a full-width board in front of the camper and not just the two rubber bumpers. I also had to add something to keep the wrap-a-rounds on the camper from hitting the taillights.
The black weather-sealed wood was part of the original camper.
A 2×3 actually measures 1.5-inches by 2.5-inches. By turning the boards on edge, I gained 2.5-inches in height to clear the sides of the pick-up box.
It worked out by putting a 2×6 (measures 1-1/2 inches by 5-1/2 inches) flat in the notch in front of the camper. The wrap-a-rounds just clear.
Note the casters. That’s another TCM mod I copied.
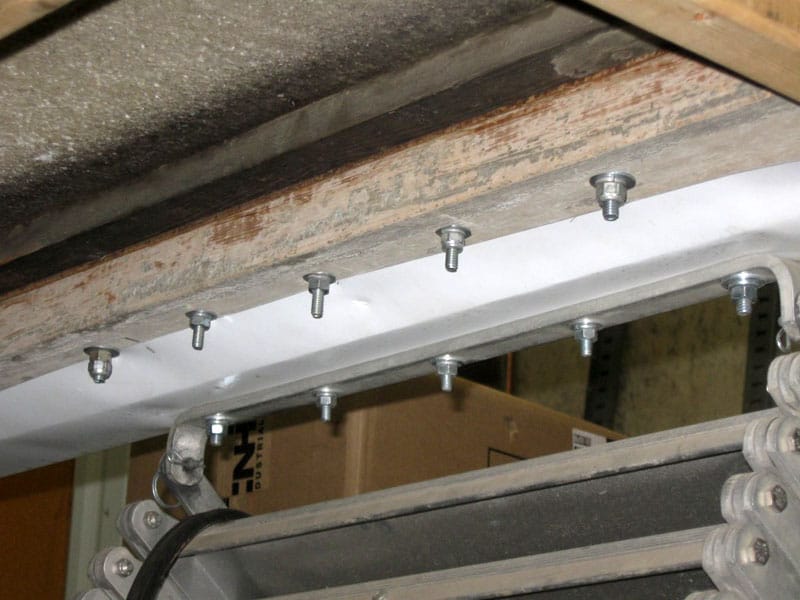
Everywhere Northstar had a board on the bottom I put a 2×3. I found it best to drill a clearance hole in my board so the screws would pull the board tight to the camper.
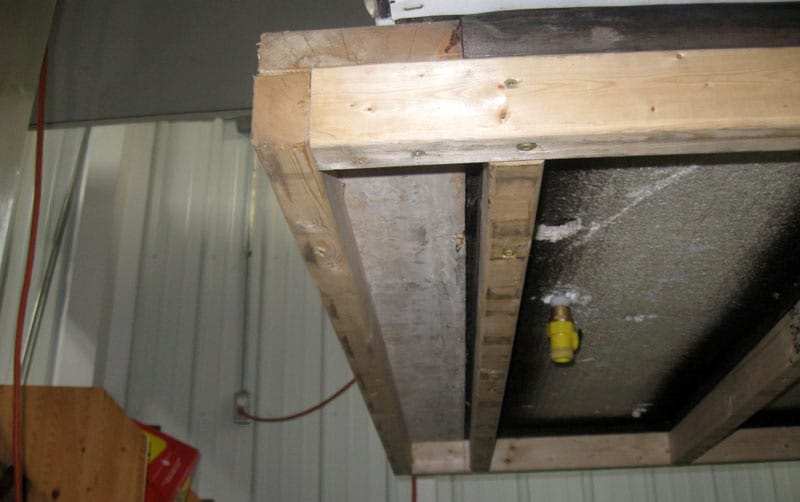
Four screws were put in from the bottom on the cross pieces. Screws were also put in from the sides and into the ends of the cross pieces.
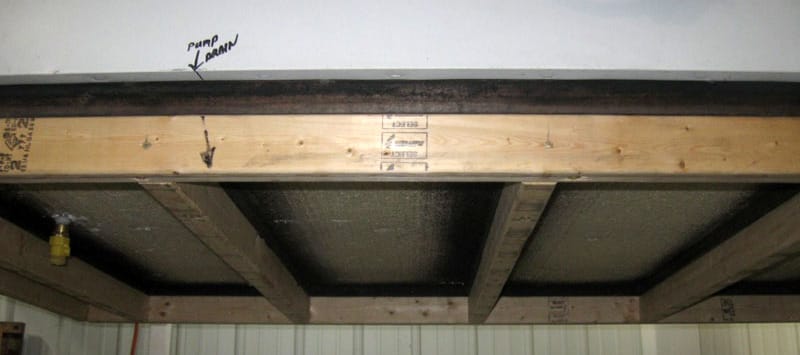
I drew a mark to know where to put the bucket when draining the pump. The yellow valve is the fresh water tank drain. Again, the black weather-sealed wood is original.
I had to leave the boards long to give me somewhere to bolt our steps. I cut my two sideboards 85.5-inches long.
It’s hard to see in the picture, but I put a 1/8-inch piece of flat stock steel (12-gauge sheet metal) on top of the 2×6. It is just under the black weather-sealed wood and all the bolts go through it.
I was worried about the 2×6 splitting. I also added a piece of 1-inch board so the thickness would match the 2×3 on edge. It is under the white tin in the picture. Only the back bolts go through it. Sometimes you just use what you have on hand.
I removed the kick plate inside the camper so I could put the front bolts in.
Once the bolts were in, I reinstalled the kick plate.
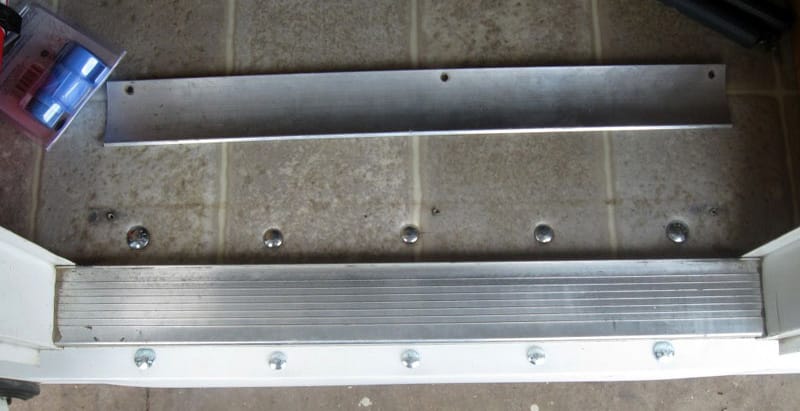
Here are the steps installed. Now they hang over the back of the truck. It’s a wrap!
I wrapped the back part with the flashing I had. I also have my own bender. I have since painted all the new boards.
Since the modification was completed, we have been to Maine and driven the Lake Superior Circle Tour. We have had no problems.
It took me about six hours to complete this modification (not counting trips to the store) and cost me $50. In my opinion, the skill level of this modification is medium.
8. Darrin Pickett, Uxbridge, Ontario
Wardrobe To Custom Pull-Out Pantry
2016 Ram 3500
2016 Lance 855s
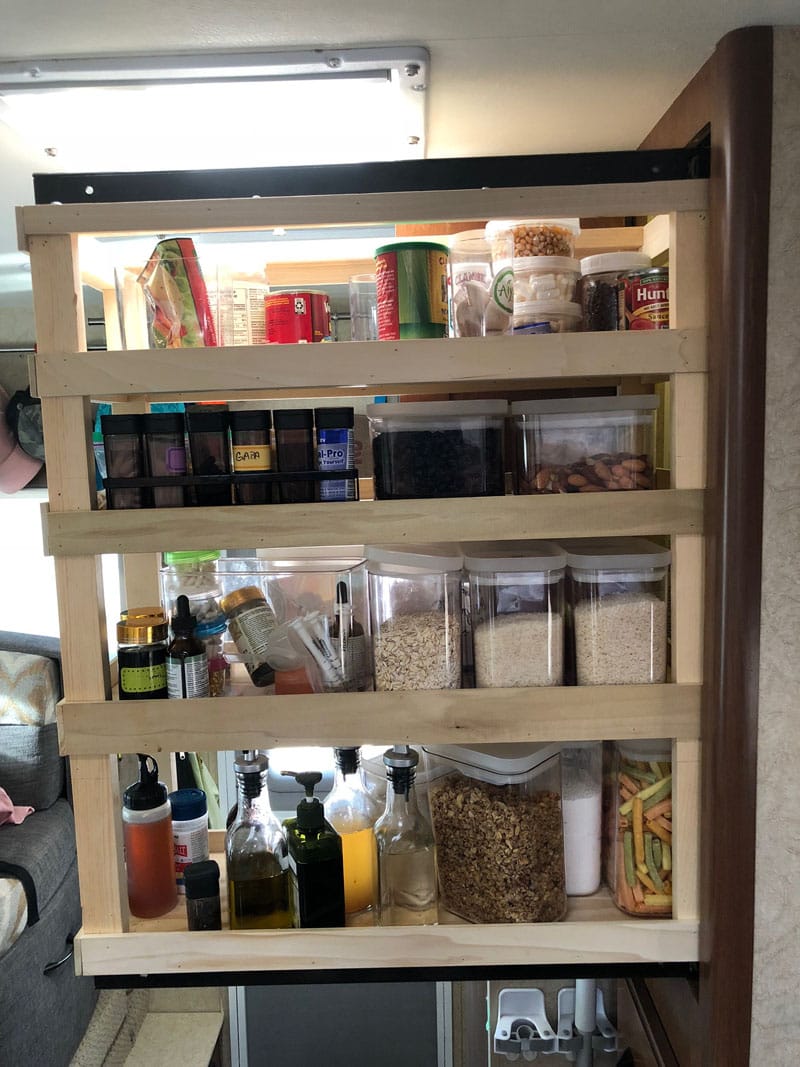
Our Lance camper had limited kitchen storage and my wife really likes to cook. Some models have a pull-out pantry, but ours didn’t have that option. To the left of the kitchen was a small closet that we thought would be better used as a pantry.
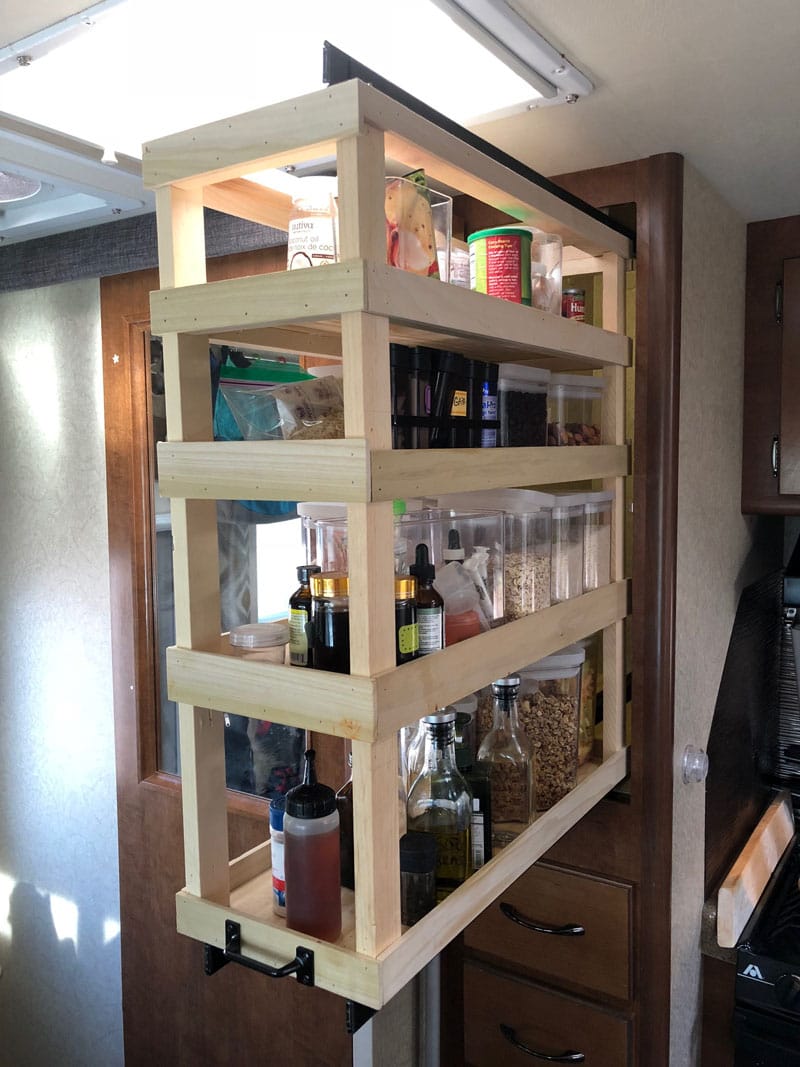
After looking around extensively, I couldn’t find a ready-made pull-out pantry that would fit our closet. I decided that I could make my own pantry that would fit the space exactly without wasting any room.

Using 130-pound, 24-inch entertainment center slides, I built my own pantry. It has four shelves and fully extends from the closet to provide full access from the side. To prevent the top from moving when we travel, I added a third slide on the top and use a small piece of wood in front.
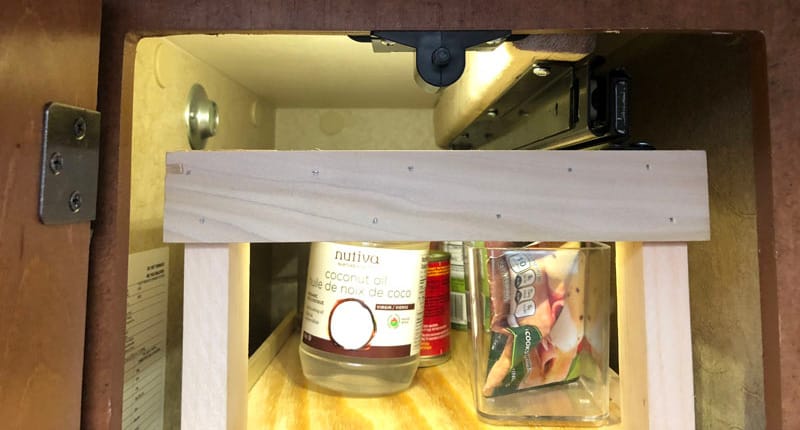
I used small poplar pieces from Home Depot so that I wouldn’t have to rip bigger pieces of wood. While a little more expensive, it made the project way easier. Probably two-thirds of the cost were the three heavy-duty slides.
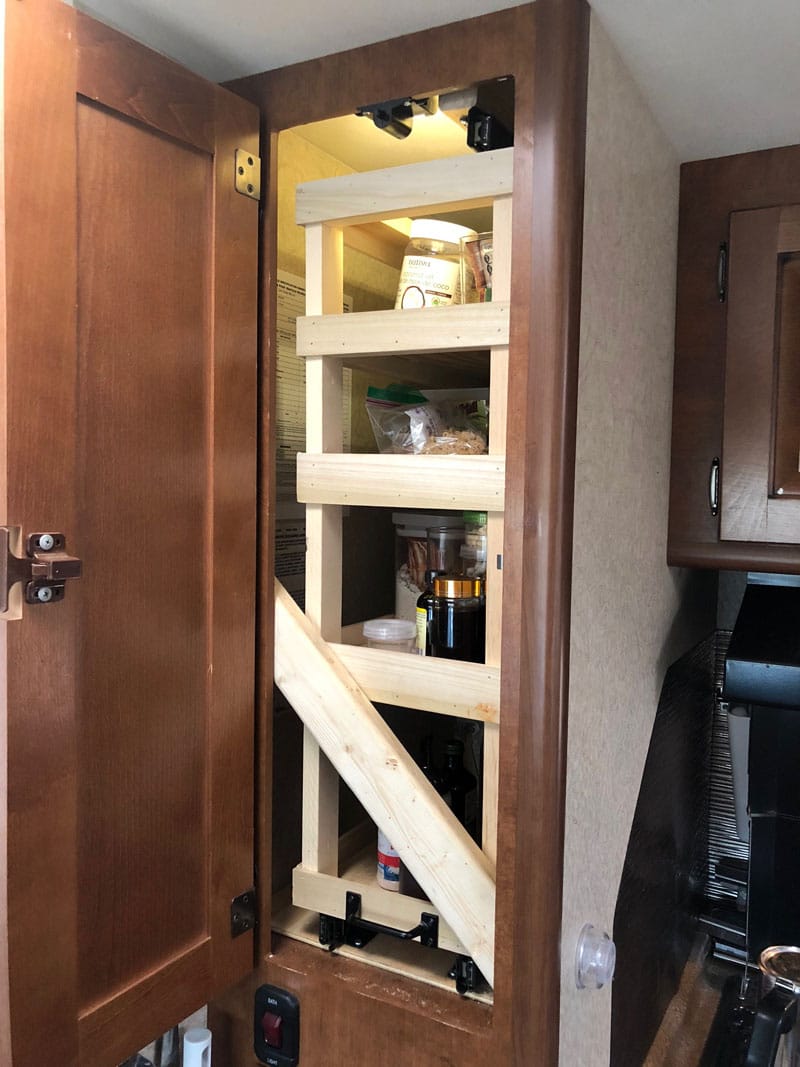
The mod worked amazingly well. We’ve just completed a three month adventure and the extra storage was an absolute must.
It took me eight hours to complete this modification and cost me $150. In my opinion, the skill level of this modification is medium.
9. Peter Oswald, Ellensburg, Washington
Tailgate Struts To Keep Tailgate On Truck
2015 Ford F-150
2015 Northstar 650
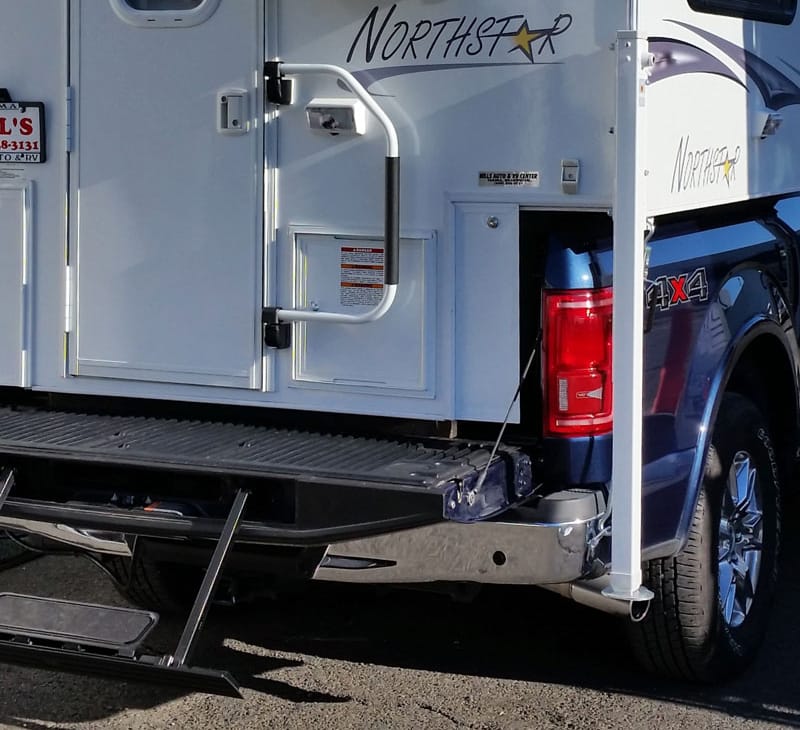
I wanted to use my integral tailgate step and also have a porch sit on. I also needed to keep the tailgate on the truck. Since I have a 6.5-foot truck bed, the camper was too long to close the tailgate. It was also too short to keep the heavy tailgate from harshly bouncing while driving over bumps.
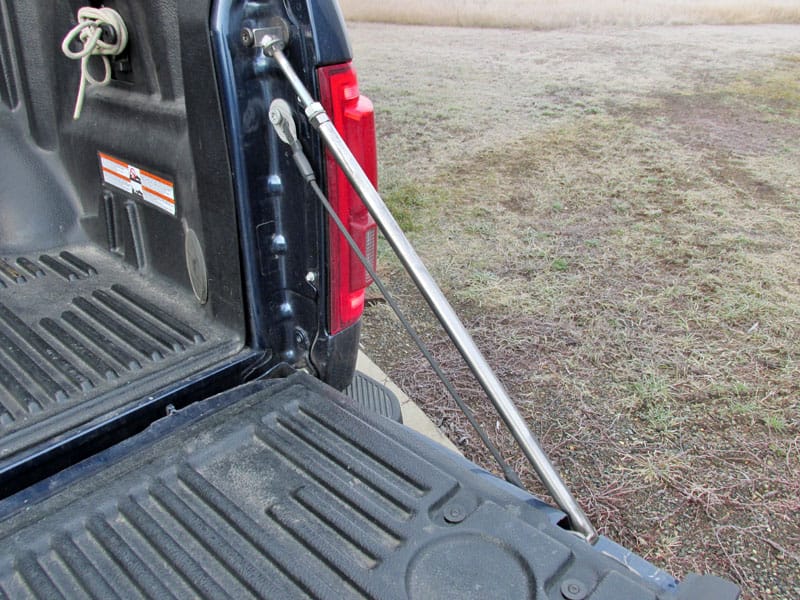
I made two struts. They mount in the latches on each side of the tailgate while it is down and mount against the mating strikers on the sides of the bed. To install and remove the struts, they had to be adjustable.
For each strut, I used some steel tubing that had an inside diameter of 1/2-inch. To the end of the tubing, I welded a length of the head-end of a machine bolt. It had a shank diameter that would fit in the latch of the tailgate.
A portion of the head of the bolt had to be ground off to fit properly in the latch. I installed and ground two flat washers per side to prevent sideways movement in the latch.
I cut two pieces of angle iron to fit on the strikers on the sides of the bed. Those were welded to the heads of two carriage bolts. The bolt diameter was 7/16-inch, which fit nicely inside the tubing. The length was such to allow adjustment. On the bolt, I hand tightened a nut snugly against the tubing and secured it with a lock washer and jam nut.

Before the mod, the tailgate was slamming so hard against the cables that I was afraid they might break. The mod has worked very well at preventing any noticeable bounce of the tailgate. There is just enough clearance between the struts and the doors under the wings. While I use two struts, it is possible that one may work just as well.
It took me three hours to complete this modification and cost me approximately $20 for parts. In my opinion, the skill level of this modification is medium due to the cutting, welding, and grinding required.
10. Darci Kroes, Kelowna, British Columbia
Enclosed Deck For Dogs
2000 Chevy Silverado
1994 Somerset Camper
I travel with two dogs. My camper has only 8-feet of floor length, so I needed extra room for carrying essentials. I also wanted a deck for my dogs that is off the ground. I would use the deck when we are parked overnight in places like Walmart.

I decided to build a deck top that is bolted to the top of the storage box. The deck-top can be easily lifted for access to the storage area.
I used wood slats so that the dogs’ feet don’t get hot in the summer. There is a lip around the top of the deck with clips. A secure pen can be put up when we are camped. It folds up and goes in the box when we’re traveling.
The cargo door on the right side of the deck opens to a doggy door. I inserted it on the inside under the table. Now the dogs pass through at will.
If they have to go to the bathroom at night, they go out to their pee pad on the deck and do their business. It simplifies life for all of us. The cargo box is bolted to a hitch cargo carrier. The chains are there to give extra stability for walking around.
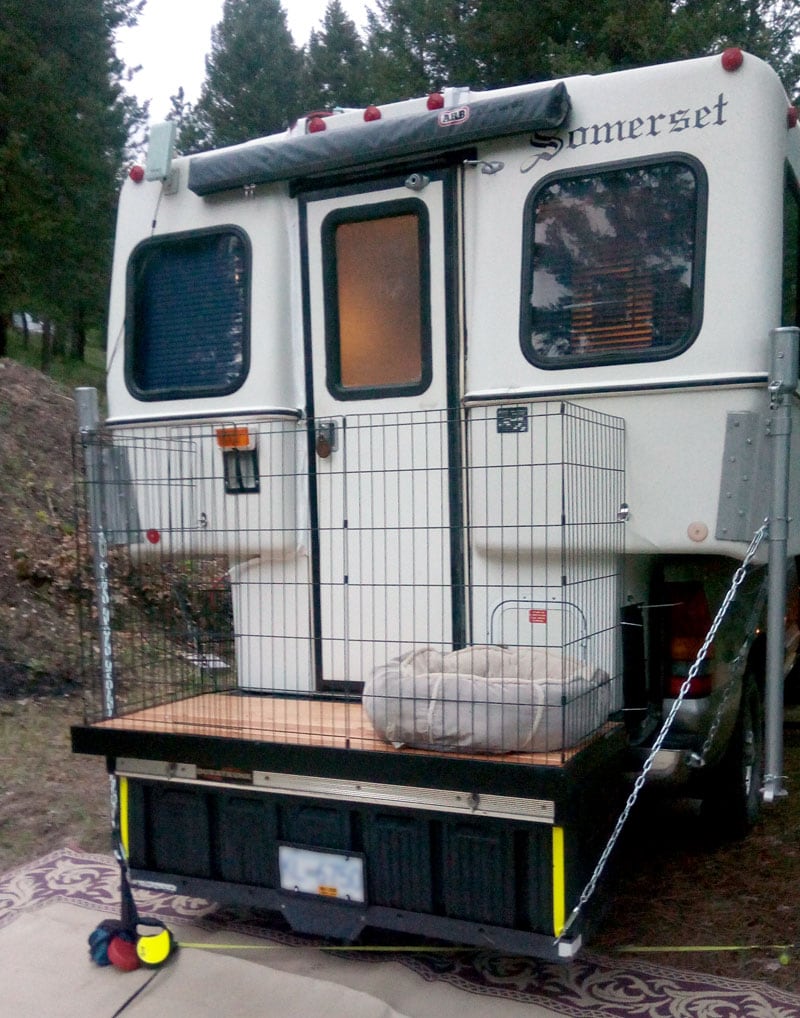
The deck is so wonderful! There is lots of storage. Now the camper is not stuffed full. When we dry camp, our cocker spaniel and chihuahua go in and out at will.
I can go visit friends or do laundry and they sit on their deck and watch things. I know they are secure and safe. I also enjoy not having to get out of bed at night or early morning when they want to go out and pee.
It took me eight hours to complete this modification and cost me $100. In my opinion, the skill level of this modification is easy.
Disclaimer: The modifications above are submitted by Truck Camper Magazine readers. It is your responsibility to make sure that any do-it-yourself modification project you undertake is safe, effective, and legal for your situation.
Enter Your Mods Now!
Click here for more information about the 10X10 Mod Tournament, including how to enter. You can enter as many mods as you want, at any time. Good luck mod makers!