A battery bank has been rebuilt, a truck bed changed, camper interiors remodeled, aluminum bumpers fabricated, and loading itself reinvented. Pick your favorite Mega Mod, and vote.

Welcome to the September 2015 Monthly Mod Contest. This month we are featuring six examples of the biggest and most ambitious mod categories, the Mega Mods.
Please review the following six Mega Mods and vote for your favorite September 2015 mod. We will announce the September 2015 Mod Contest winner next week. For more information about the Monthly Mod Contest, including how to enter, click here.
September 2015 Mod Contest Entries:
#1 – David Reed, Steamboat Springs, Colorado
2006 Ford F350
2005 Lance Lite 815
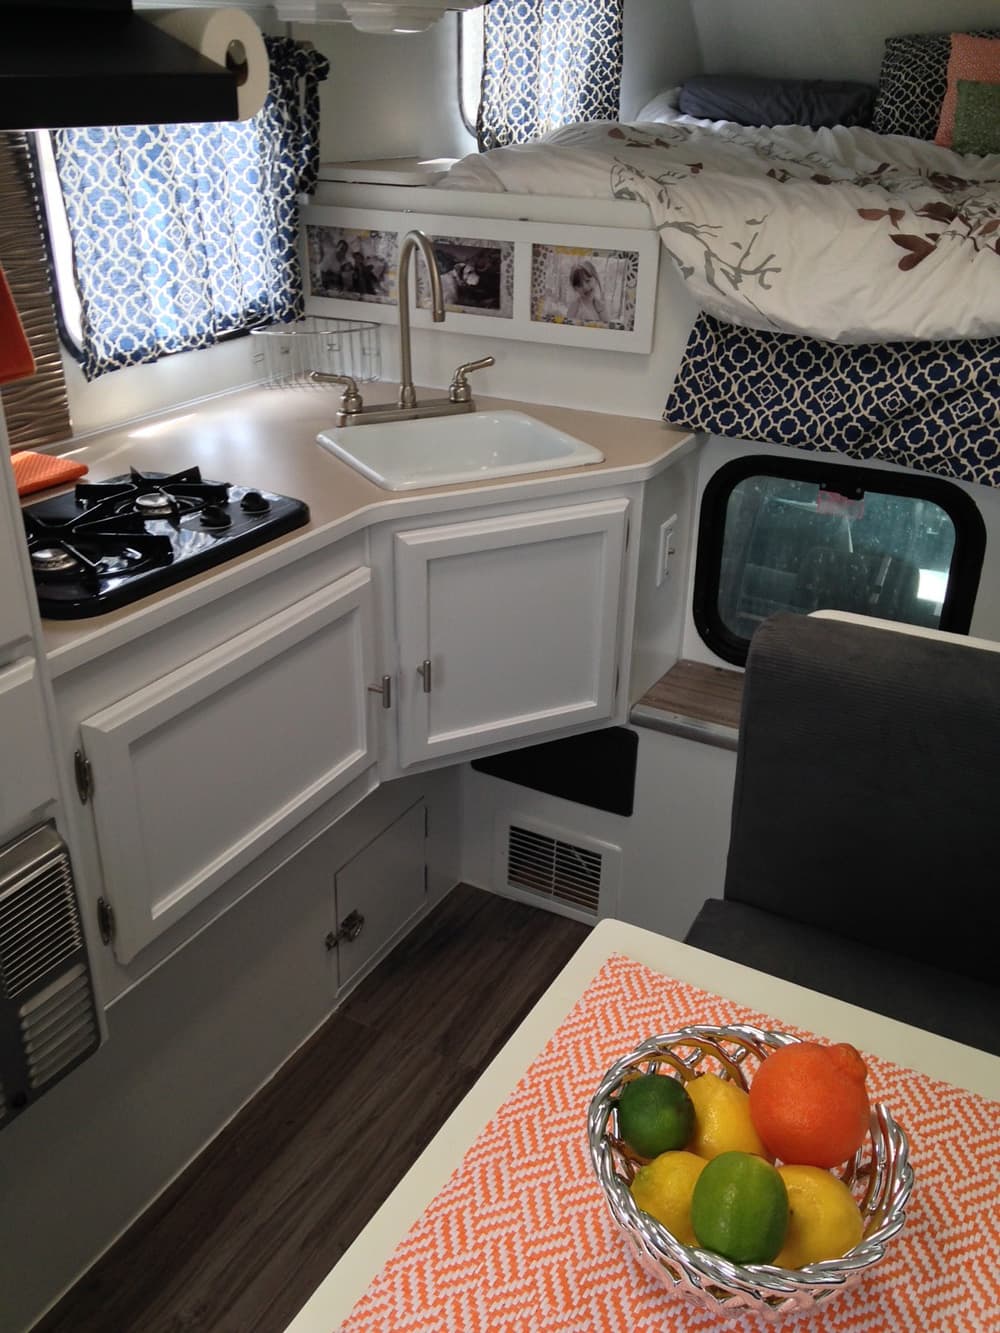
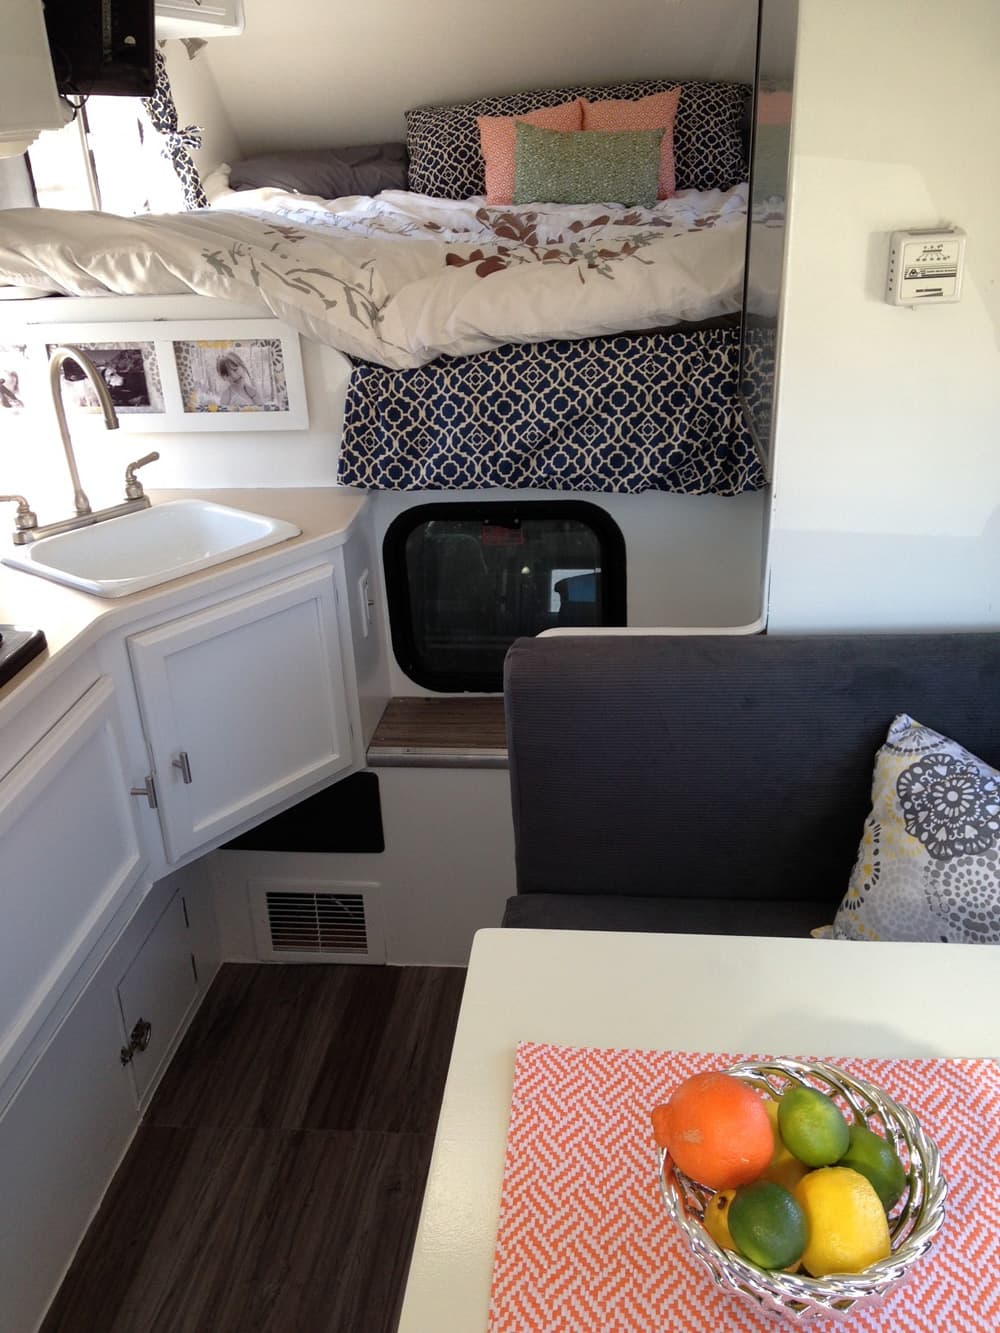
Above: David and Kathy remodeled their Lance 815 by painting the cabinets – click to enlarge
My wife and I recently remodeled our 2005 Lance Lite 815. We were hoping for a new fresh look and were aiming to create the illusion of more space. The remodel took a few months of dedication to complete.

Above: David and Kathy remodeled their Lance 815 with a new kitchen table, new slip covers, new flooring, etc. – click to enlarge
I primed and painted the cabinets and walls two different whites and added two light gray accent walls. I made a new kitchen table. We ordered dark grey suede zippered slip covers for the couch cushions. I installed grey maple vinyl plank flooring, chrome molding, caulk, curtain rods, paper towel holder, cabinet pulls, kitchen backsplash, stainless steel refrigerator cover, and wire baskets.

Above: The walls were painted a light gray accent color

Above: Kathy making the accent pillows
My wife sewed the curtains and made the accent pillows. I made the picture frame and my wife decorated it with left over fabric and black and white family photos. I painted the heater vent and refrigerator with liquid stainless steel. I also added energy efficient LED replacement bulbs and a chrome faucet.

Above: A new backsplash behind the stove and high faucet were added
We did most of our shopping online. From Home Depot we got the vinyl plank flooring, backsplash, and faucet. From Lowes we got the curtain rods and curtains. We went to Ace Hardware to get the cabinet pulls, paint, and towel holder.
The fabric came from Walmart and the wire baskets from Crate & Barrel. The dish towels, pot holders, and table mat came from TJ Maxx. Online I bought the cushion covers from slipcovershop.com, the refrigerator cover from applianceart.com, the stainless steel paint from liquidstainless.com, and the LED bulbs from Camping World.
Above: Their finished camper – click to enlarge
We love it! The camper feels bigger and cleaner.
It took me a little more than twenty hours to complete and cost $1,100. In my opinion, the skill level of this mod is medium.
#2 – Charles Coushaine, Punta Gorda, Florida
2001 Ford F350
2012 Chalet DS116RB

Last year I entered a truck camper mod which involved using a laser system to align the truck camper and truck while backing up. Although this has worked great for me, and others, I received feedback that some truck camper folks were not comfortable using a laser, and that they would prefer something mechanical. They also wanted something that would help keep the loaded truck camper aligned during travel.
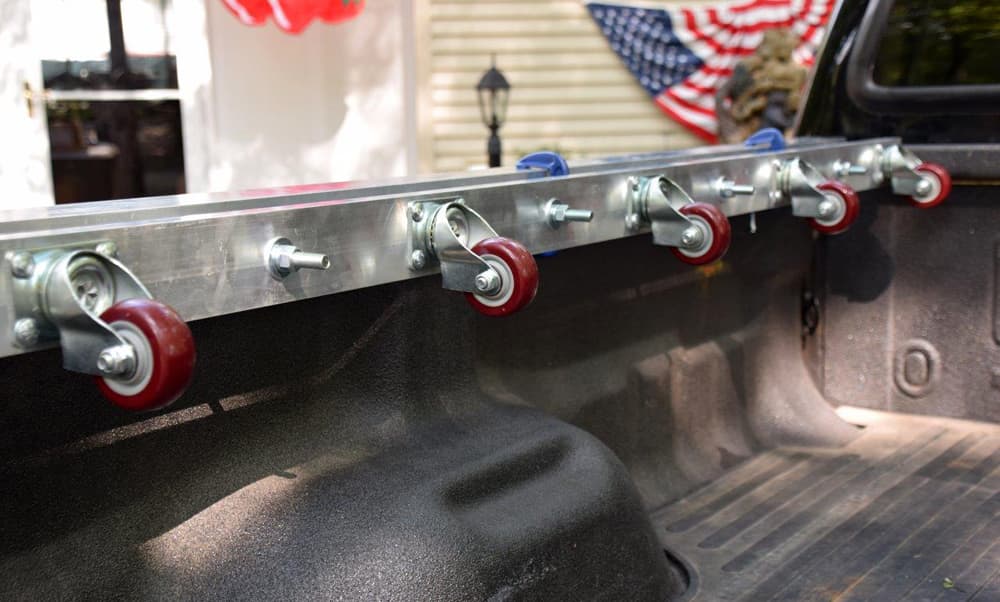
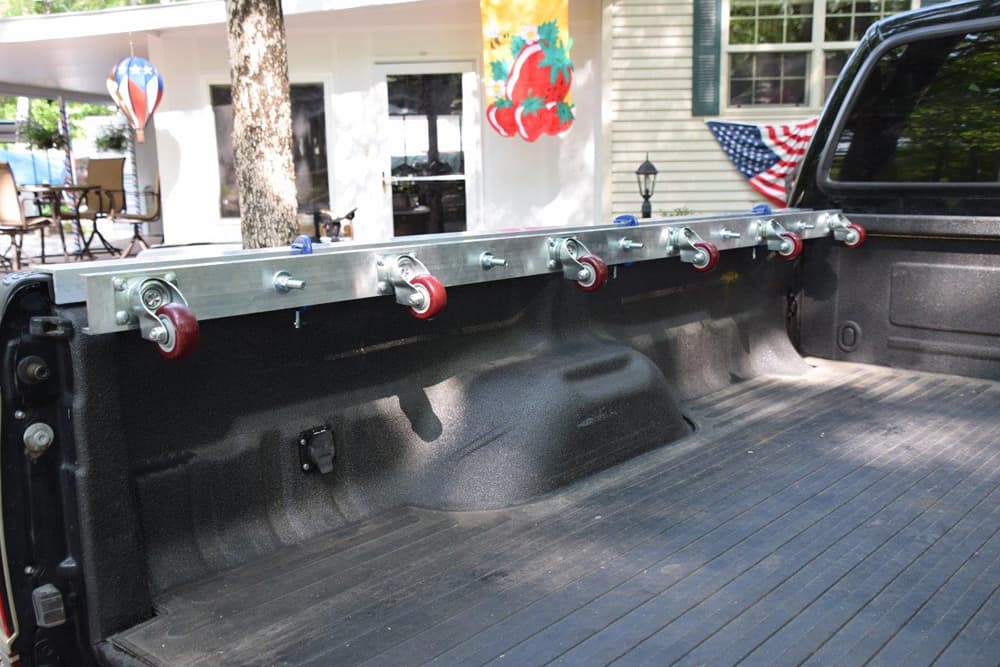
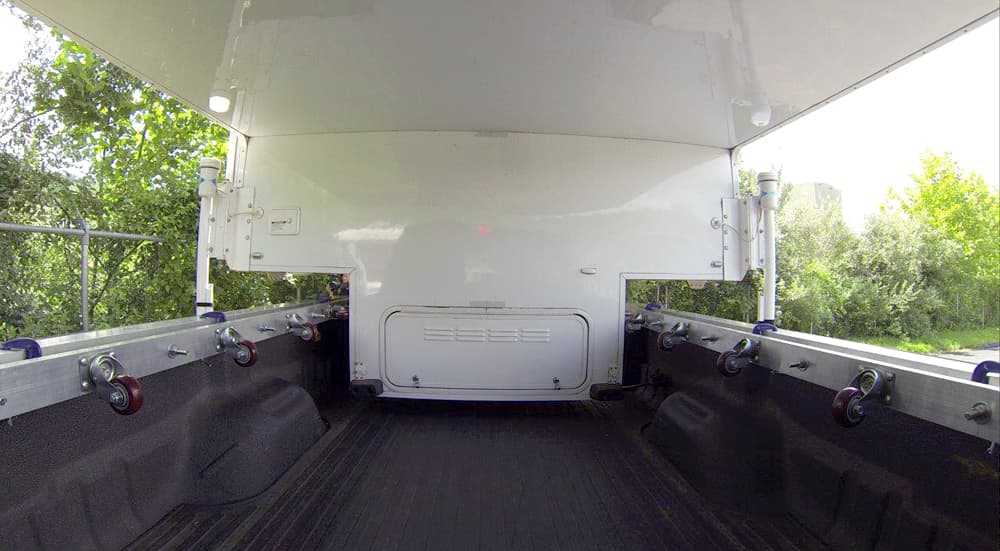
Above: Charlie’s roller alignment system. Click to enlarge the picture above.
Therefore, I submit this new roller alignment system that I have built and tested, and it works great.
Note: This system is designed to do the last half-inch to an inch of centering, nothing more. It requires your truck camper to slightly move on its legs during centering.
 |  |
Above: The materials needed for the roller alignment system – click to enlarge
Here is a general list of parts:
– two 3/16” thick x 3” x 3” x 8’ long aluminum angle
– two ¼” thick x 3” x 1” x 8’ long aluminum U-channel
– twelve 3” polyurethane swivel rollers, 220 pounds capability each
– ten ½-13 x 6” carriage bolts with nuts, lock washers and washers
– forty-eight 5/16-18 x ¾” carriage bolts with nuts and lock washers
– six 3” C-clamps
Keep in mind that this is general, and that each truck and camper combination may need slightly different list of bolt lengths.

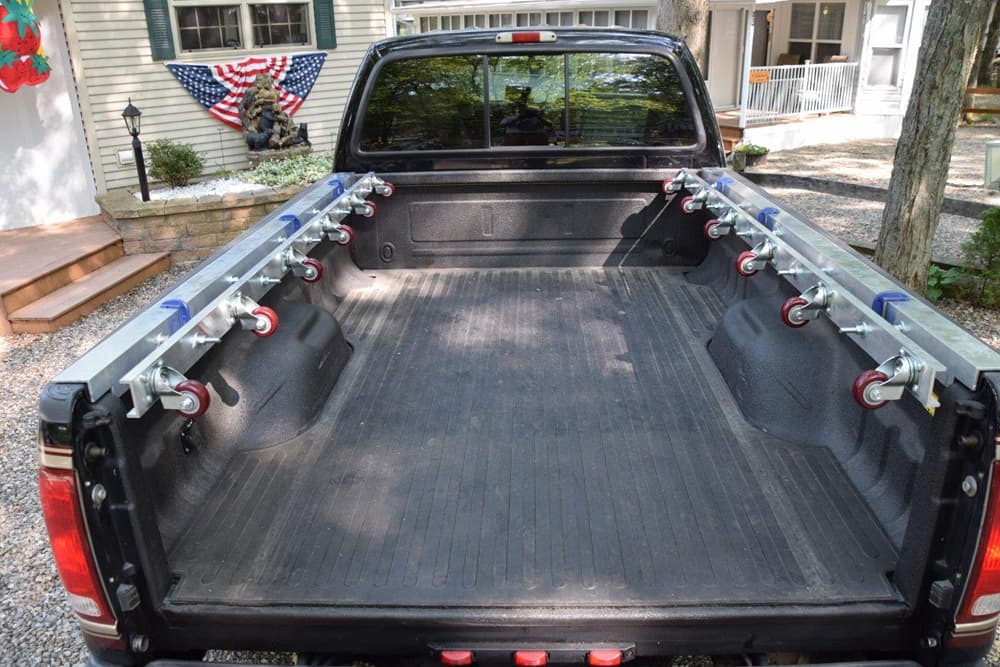
Above: Clamping the alignment system in place. Charlie demonstrates the set-up in his video below.
This roller alignment system involves adding a set of twelve polyurethane pivoting rollers to the bed rails of your truck. Using two 8-foot long pieces of aluminum, I added five half-inch by 6-inch long adjustment bolts. These bolts allow the finished system to be adjusted from side-to-side to allow for centering the pivoting rollers with the truck bed, and also allow for setting the gap that fits your truck camper.
 |  | 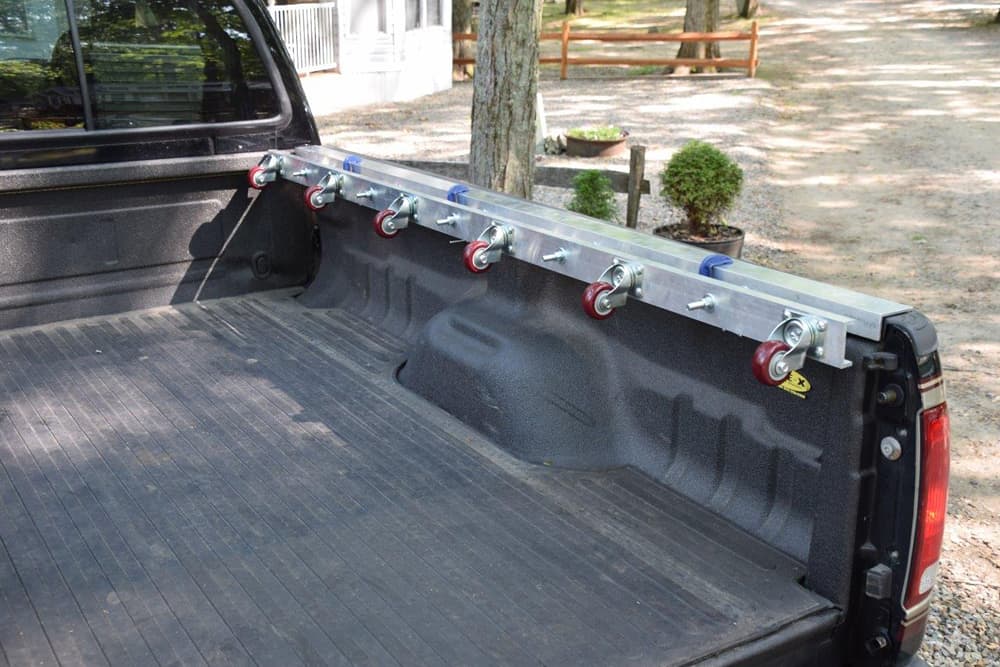 |
Above: The 8-foot long piece of aluminum with rollers attached – click to enlarge
Attached to these adjusting bolts is another 8-foot long piece of aluminum that has the rollers attached, six per side. These are polyurethane pivoting rollers, rated at 220 pounds each. I chose polyurethane because it is very durable and will not scratch the truck camper during alignment.
 | 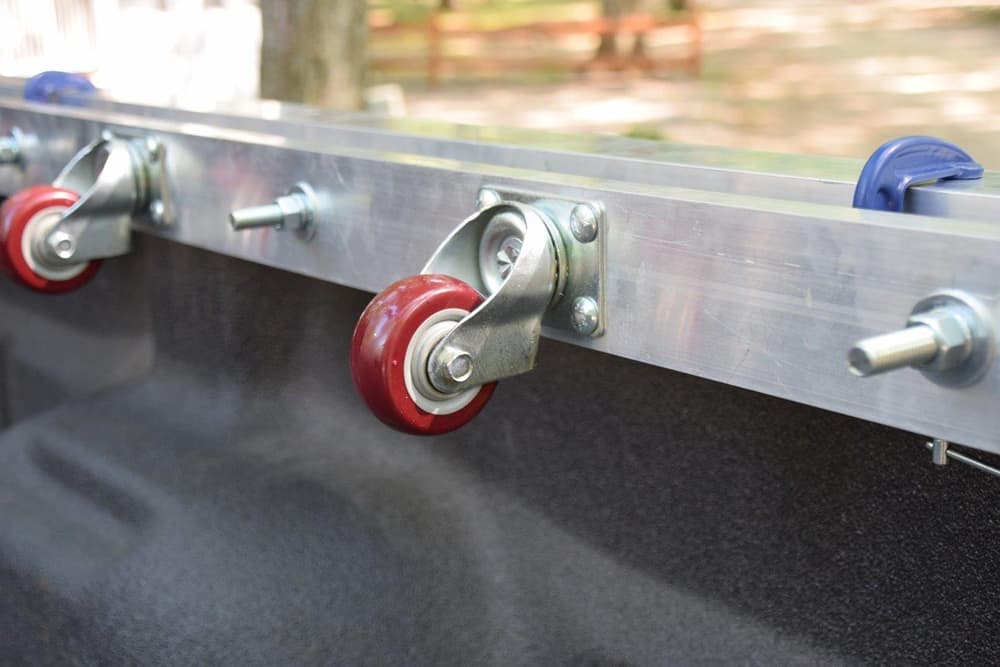 |
Above: The polyurethane rollers up close – click to enlarge
Here’s a video showing exactly how the roller alignment system was built, installed, and tested:
After installing this roller alignment system to my truck, I tested the system by hooking up my truck camper and, as you’ll see in the video, it worked great!
Above: The system of rollers does the last 1/2″ to 1″ of precise alignment – click to enlarge
As I noted, you still need to get closely aligned by eye, then this system of rollers does the last 1/2″ to 1″ of precise alignment which I have found to be the most difficult part. I was able to hook up my truck camper the very first try, and it was totally stress free. No more worries of hitting the wheel wells of my truck, or the camper legs with my dually fender flares. With this system, if you are inside the rollers, you are perfectly aligned.
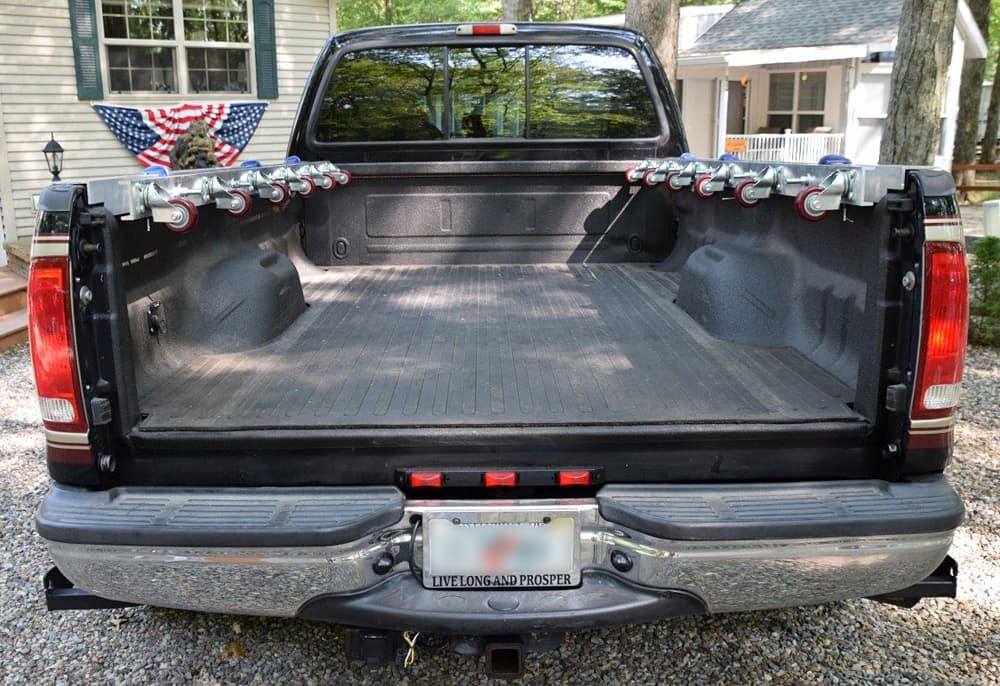
Above: Charlie’s roller alignment system on his truck and ready to go. Click to enlarge the picture above.
It took me sixteen hours to complete and cost about $400. In my opinion, the skill level of this mod is medium to hard.
#3 – David Donovan, Caldwell, Idaho
2007 Chevrolet K3500
2012 Chalet TS 116

Above: David put chairs in his triple-slide truck camper – click to enlarge
I own a Chalet TS116 camper. The rear slide contained a couch/sleeper in it. The couch was very uncomfortable to sit on and, since there is just my wife and I, we didn’t need to use the sleeper. I decided to look into if I could modify the couch/sleeper into a two chair installation. This would improve our comfort.
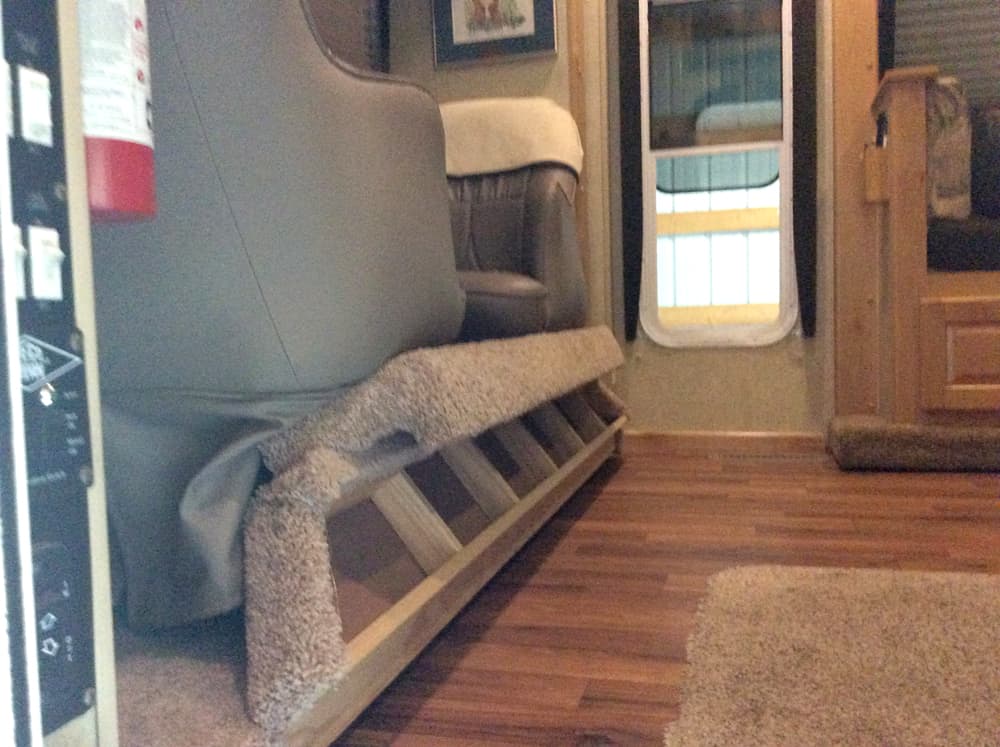
Above: The added floor has a hinge so that the slide can close – click to enlarge
I took the existing couch out. Since the rear slide in the Chalet camper is not very deep, some depth had to be added to the floor in order to make the chairs fit. This could not be a permanent floor. Otherwise the slide wouldn’t close. The added floor had to be made to hinge up and the chairs moved back when the slide was retracted.
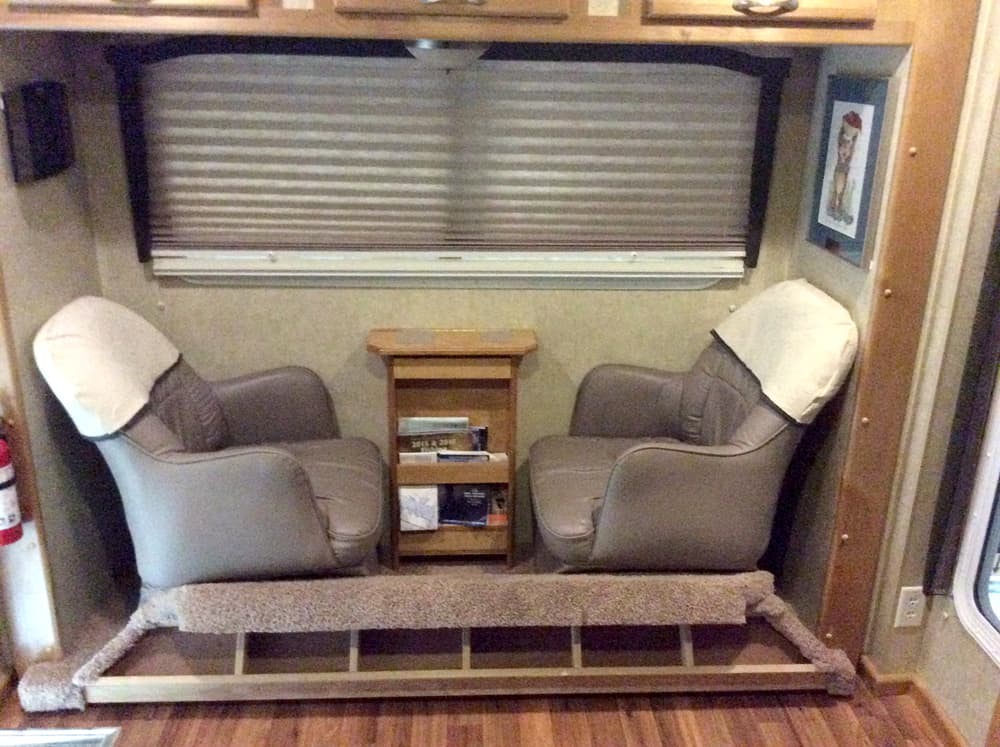
Above: The chairs turn to the side and the table is folded up in travel mode – click to enlarge
I also built a table between the chairs that could be folded up when traveling. The pictures explain what was done. All materials were purchased at Home Depot except for the chairs.
This modification has worked out great. We did lose the storage under the couch, but the convenience and comfort of the two chairs far out way the lost storage.
It took me four to six hours hours to complete and cost $850. In my opinion, the skill level of this mod is medium.
#4 – Lucien Langlois, Berlin, New Hampshire
2012 Ford F250
2004 Lance 1025
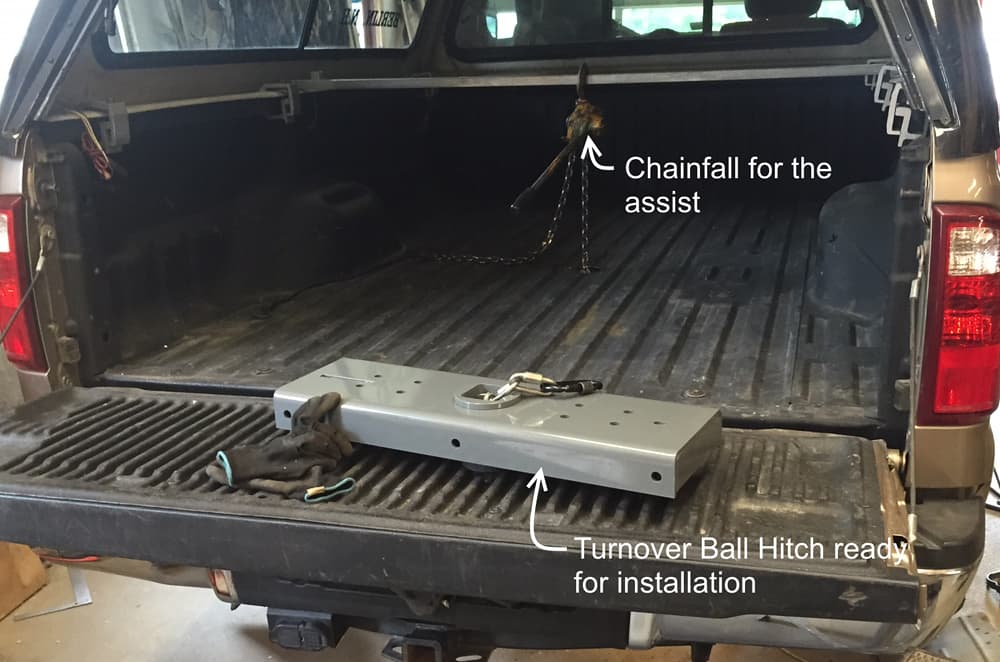
Most modifications come from an additional need or improvement to an existing situation that doesn’t meet your expectations. This mod came from a need. I needed a pickup truck with a clean flat unobstructed bed. This, of course, was mainly for the truck camper and other load carrying chores. This all changed when I purchased a fifth wheel camper for our extended winter stay in Key West, Florida and the occasional use of a gooseneck trailer.
This all led to the purchase and installation of a turnover ball hitch (giving me a clean flat bed) and a fifth wheel companion hitch. The following photos detail the installation of both.
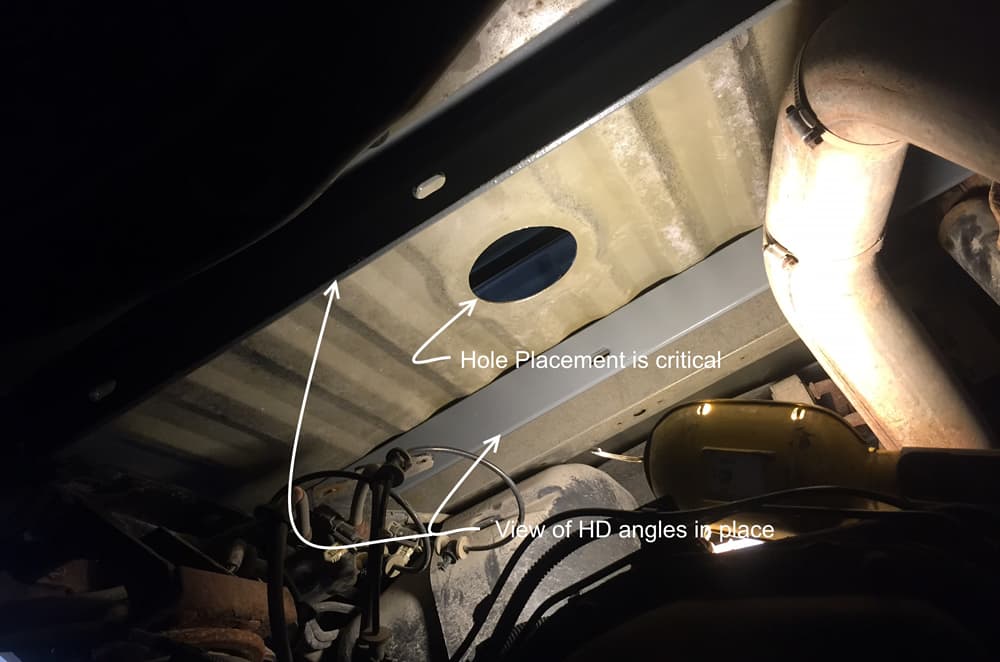 |  |
 |  |
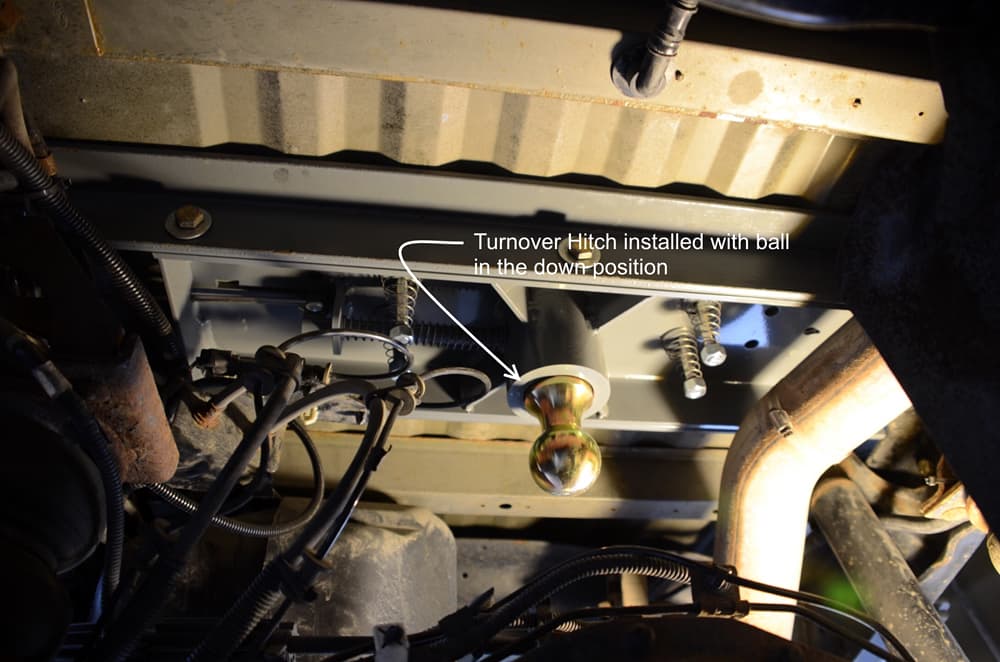 |  |
Above: Turnover ball installation. Photos are labeled with steps. Click to enlarge.
A note here about fifth wheel hitches. Most of these hitches have two perpendicular cross members above the bed that are fastened to the truck frame. At this point, some readers will say, “Just add plywood or foam insulation board around the cross members to make everything in the bed on the same plane.” I didn’t want to go that route.
I am a fabricator, but I didn’t want to fabricate the turnover ball hitch because of the very close and tight tolerances of the turnover ball itself and for safety reasons. I did a lot of research and decided to purchase B&W turnover ball and the companion hitches. They have excellent detail videos on installation for different vehicles. Their eighteen minute video on my 2012 Ford F-250 was right on, detailed, and accurate.
I spent an entire day installing the turnover ball hitch under the truck. This is probably because this 70 year old body doesn’t seem to bend into a pretzel shape like it once did. I did the installation and was happy with the clarity of the instructions.

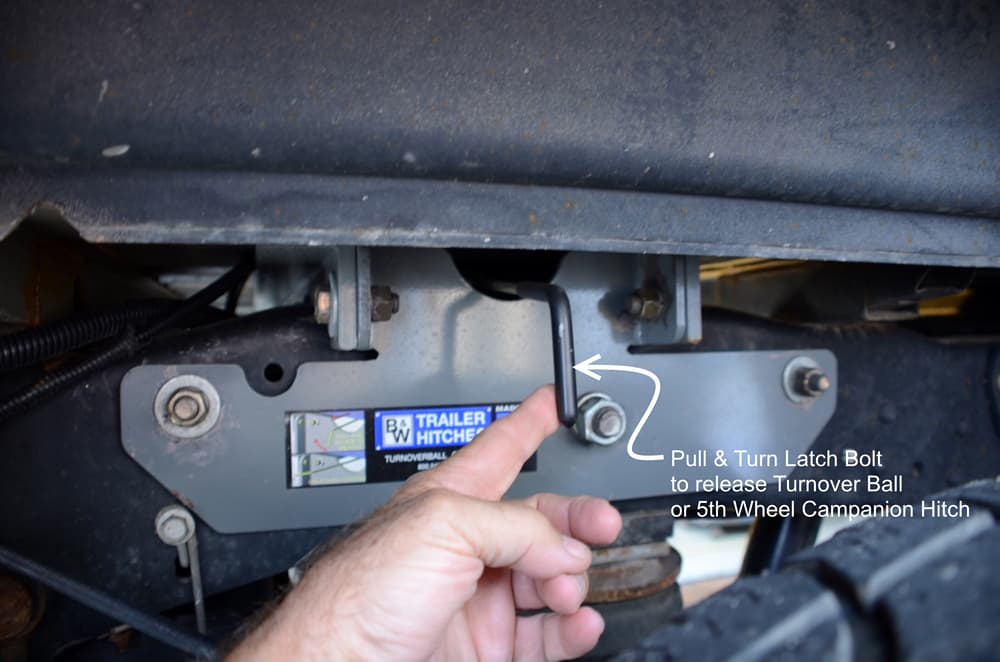
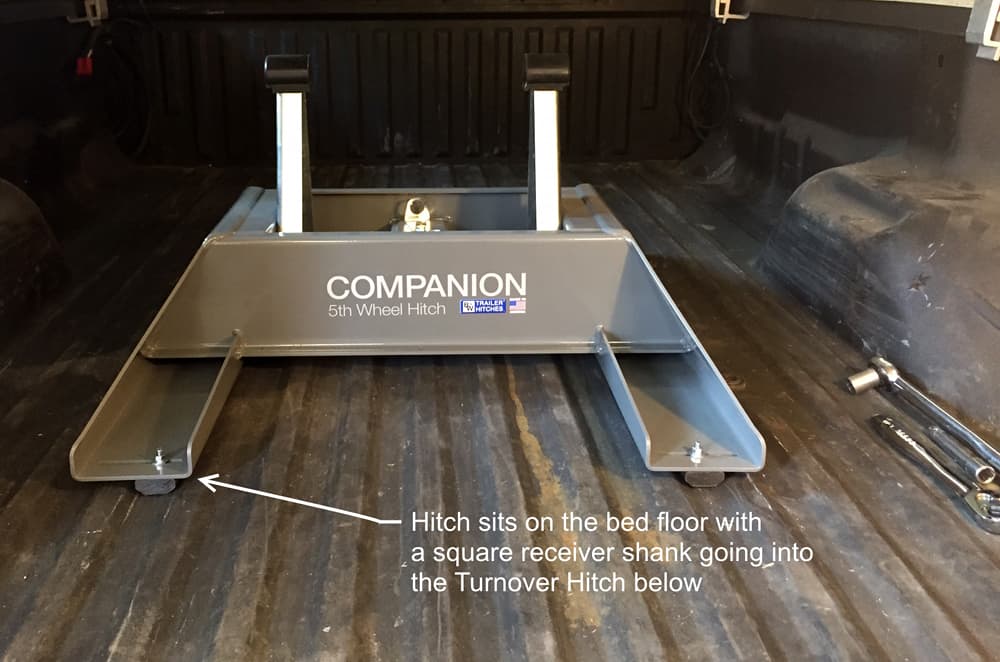
Above: The fifth wheel companion hitch assembly – click to enlarge

Above: The fifth wheel companion hitch assembly in bed of truck – click to enlarge
The fifth wheel companion hitch assembly was pretty straight forward. The beauty of this hitch is its fast install and removal once assembled. Pull one lock bolt lever, remove the turnover ball, slide the companion hitch into the turnover hitch receiving socket, engage the locking bolt and, finally, torque one double safety bolt to 60 foot pounds.
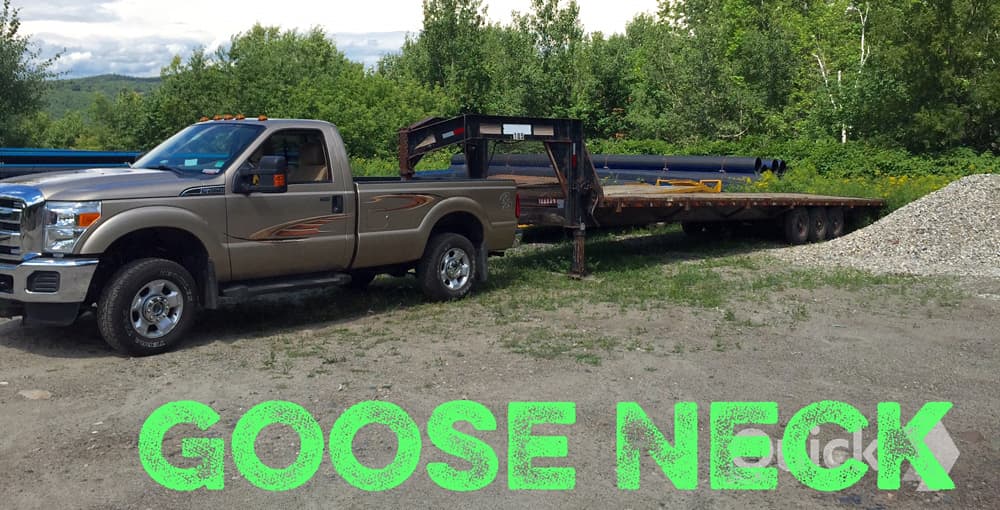
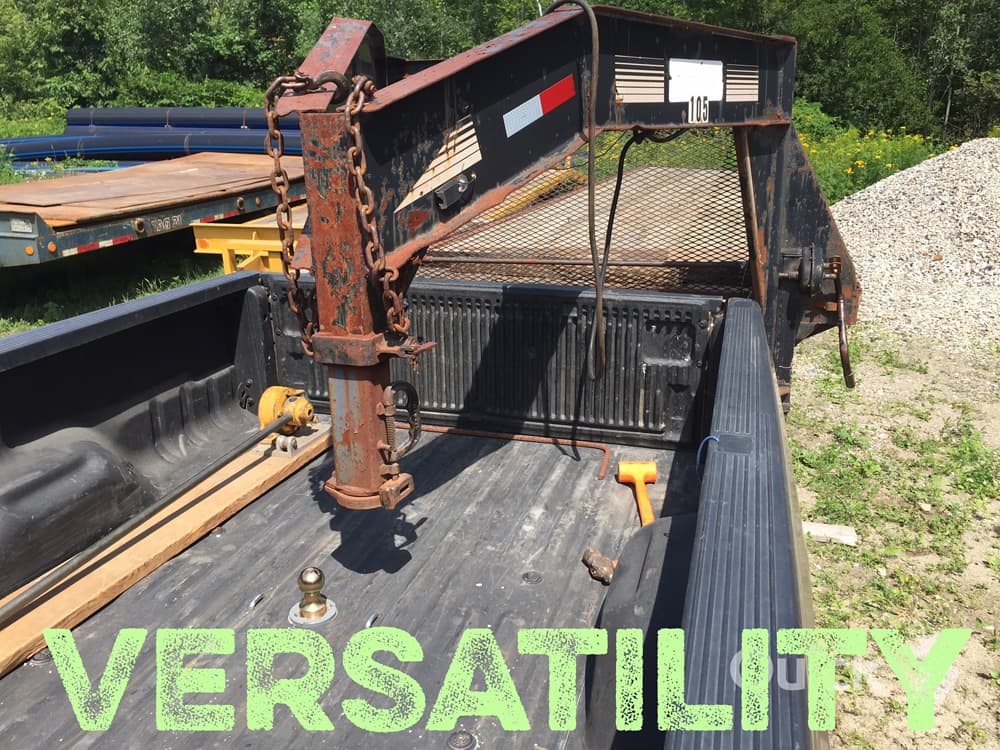
Above: Lucien’s modification can be used for different applications – click to enlarge
There we have it! It can be used on a fifth wheel camper, a gooseneck trailer, a tag along trailer and, best of all, a slide-in Lance truck camper.


The truck camper is our favorite for exploring “What’s on the other side of the hill”. Our next adventure will be along the West Coast up the Pacific Coast Highway in the summer of 2016.
The mod has met my needs and I’m very happy with the modification. What’’s the next mod? Most likely, it will be a rear extension hitch for towing an “Off Road Jeep” when the truck camper is on board.
It took me 16 hours to complete and cost $1,318. In my opinion, the skill level of this mod is hard.
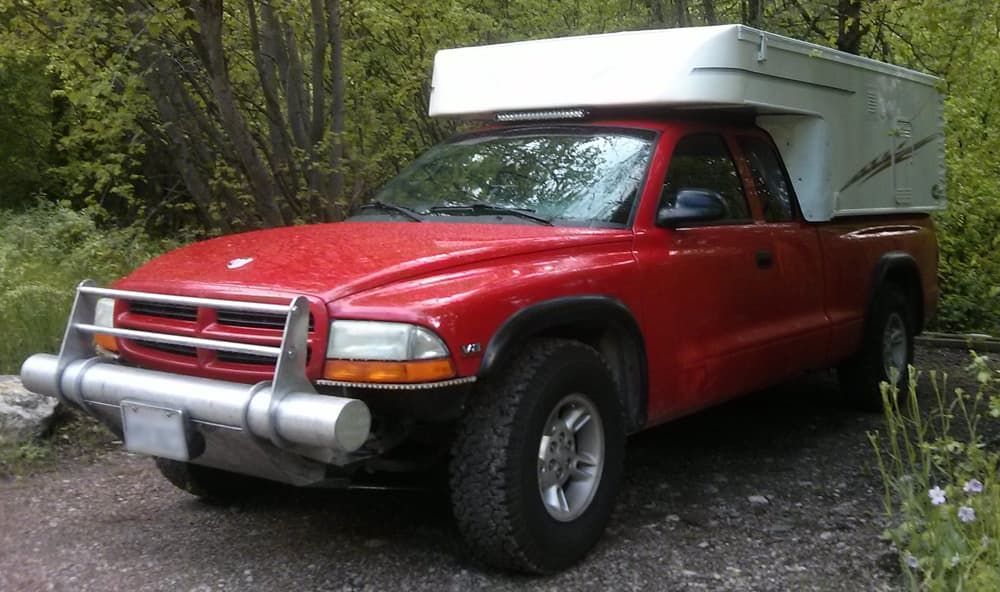
#5 – Tom Rives, San Diego, California
2000 Dodge Dakota
2013 Phoenix pop-up
I wanted to lighten up and better protect my truck and camper, but didn’t want to spend $5,000 on those beautiful Aluminess bumpers made here in San Diego for my fifteen year old truck. I also wanted to run the radiator protection pan back to protect the transmission.

Above: The round aluminum rear bumper that Tom designed – click to enlarge
I designed the rear bumper out of aluminum because it can be cut with a hack saw blade in a regular hand power tool and, of course, it’s light weight. The tubular style popular twenty years ago seemed to be both strong, light, and easiest to fabricate.
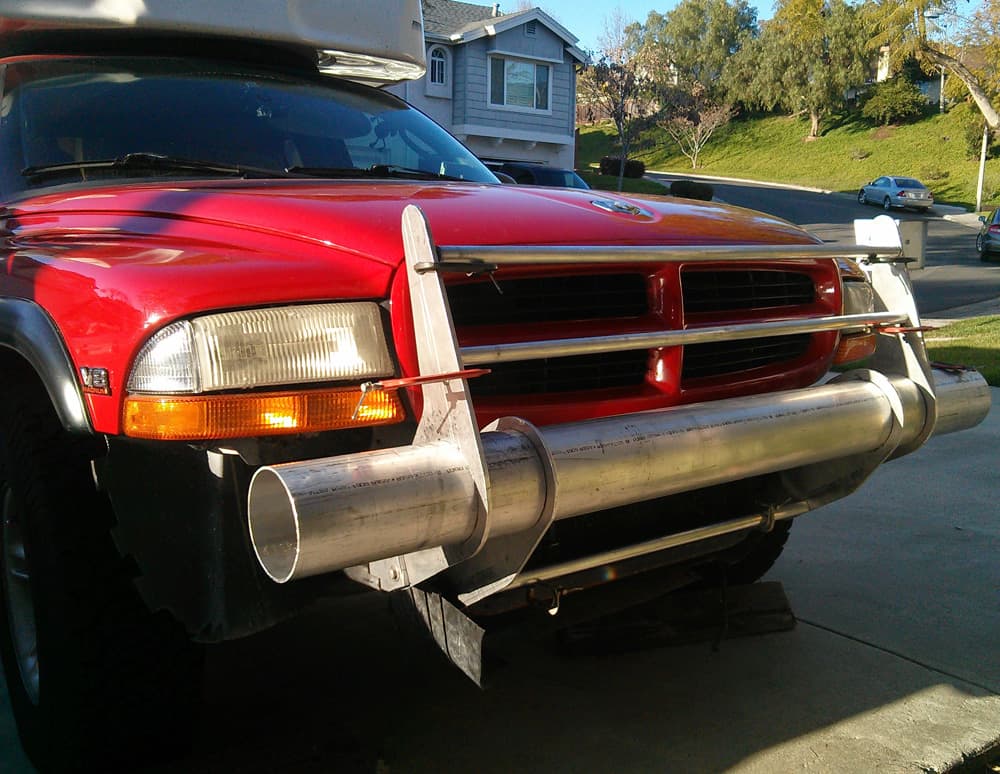
Above: The round aluminum front bumper – click to enlarge

Above: The round aluminum front bumper – click to enlarge
The rear bumper worked out so well that an aluminum front bumper, incorporating a radiator guard and skid pan, was next. It would be easy to use the main tubes for storage, but I stuck with light weight as my priority. It works great. I had both bumpers ready to go for this spring’s trip.

Above: The new bumpers on this year’s camping trip
It took me eight hours to fabricate the rear bumper and eighteen hours to complete the front bumper. The cost of the rear bumper was $80, and the front was $150. In my opinion, the skill level of this mod is medium.
#6 – Mark Siminoff, Mountain View, California
2005 Dodge Ram 3500
2004 Alpenlite Saratoga 935
I chose to upgrade my camper’s electrical storage system for three reasons.
1. I wanted to have more total capacity so that I could boondock for extended periods of time without the need to start the generator or truck engine. Also, I wanted to be off-the-grid during times of overcast skies or in a dense forest. Those are conditions in which the solar panels would be shaded.
2. I wanted a battery bank that could supply sufficient current and capacity to operate high current devices (via a 2000W sine-wave inverter), such as my convection oven/microwave, induction cooktop, or even the roof air conditioner.
3. I wanted the batteries to be in a better location than where they were originally installed. In my case, better means that the temperature is controlled so that the battery capacity and service life will be extended. I also wanted the batteries as low and as close to the front of the truck camper as possible to contribute to shifting the camper’s center of gravity down and forward.
The fact that I wanted the batteries to be in a climate controlled space meant that I needed to use absorbed glass matt (AGM) batteries. AGM batteries, when properly charged and discharged, do not vent hydrogen gas and, as a result, they are safe for installation in spaces with limited ventilation. Conveniently, this battery type can provide extremely high discharge rates (perfect for running the microwave) and also accepts very high charge current. I can charge at over 100A from either my alternator or my inverter/charger.
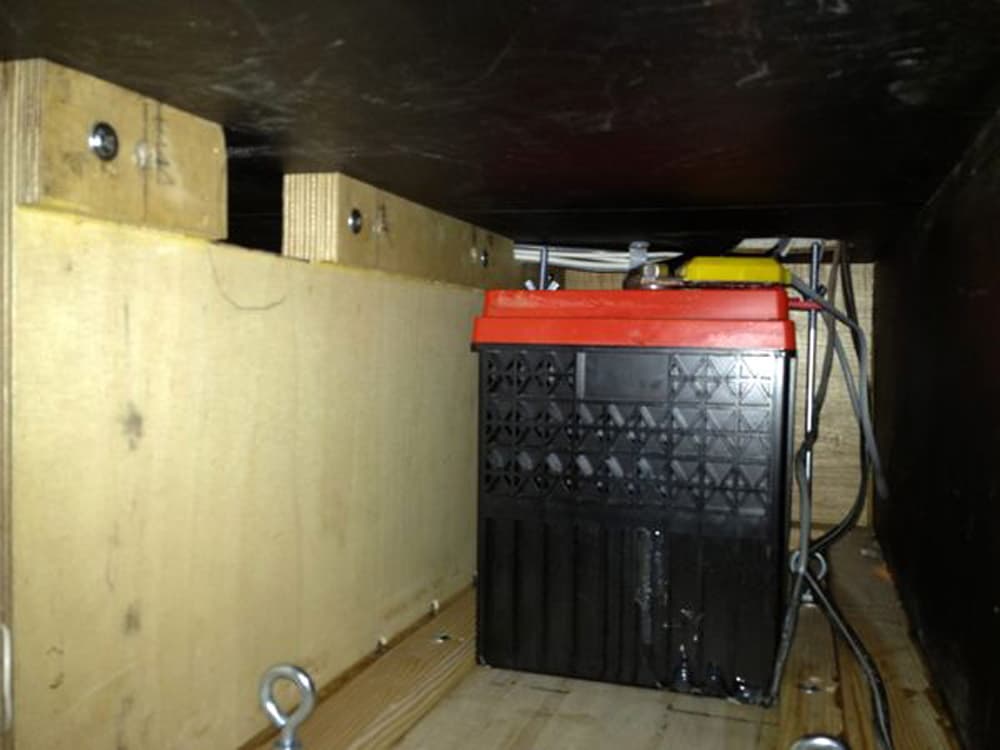
I selected to use three Odyssey PC2150 (Group 31) batteries for my installation. These were a size that would fit in my intended location in the basement, offered 100Ah of capacity each (at 20/hour rate), and have an unlimited charge current rate.
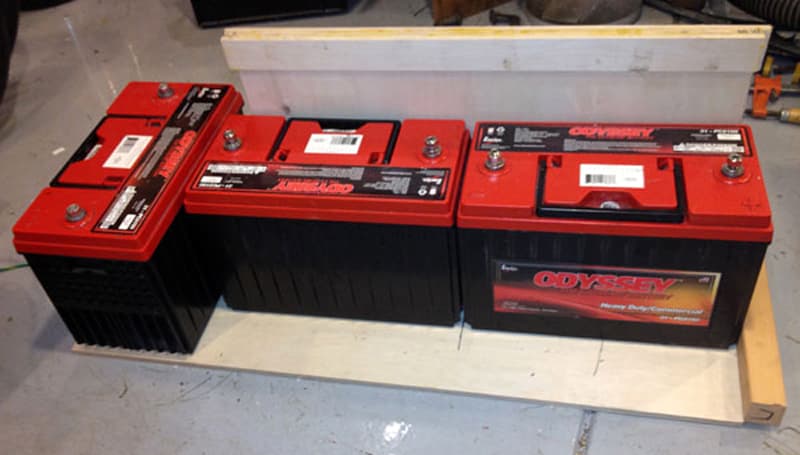
Above: The T-shaped configuration of the three Odyssey PC2150 (Group 31) batteries. Click to enlarge.
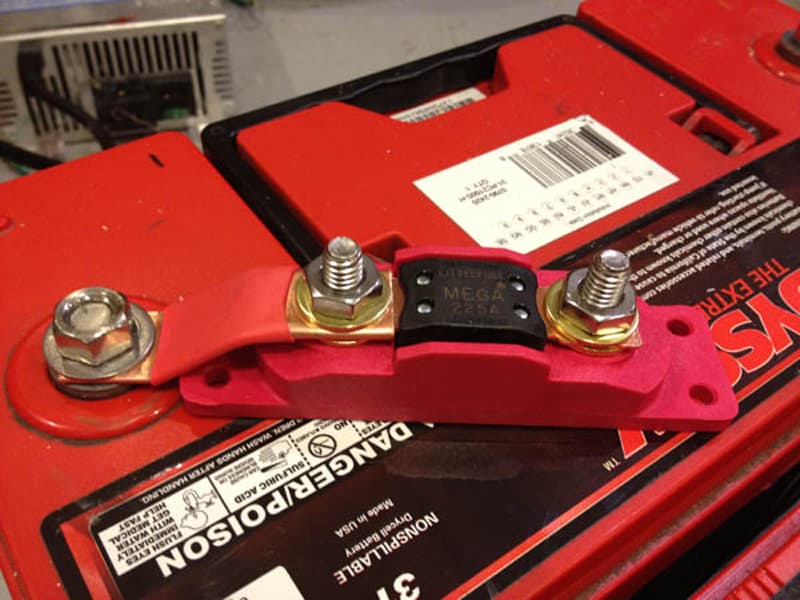
Above: The fuse and fuse holder. There is one of these on top of each of the three batteries. Click to enlarge.
In addition, Odyssey has a nationwide dealer network and their batteries carry a three year warranty.
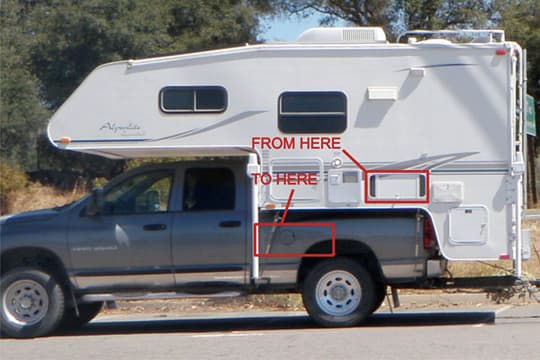
Above: The factory battery location and the where they have been relocated to in the basement
I moved the batteries from their original location in a battery box on the side wall of the camper into the basement up against the front wall of the camper. This move meant that I needed to do a significant reinforcement of the structure of the front of the camper and basement floor so that the 230 pounds of batteries could be safely supported.
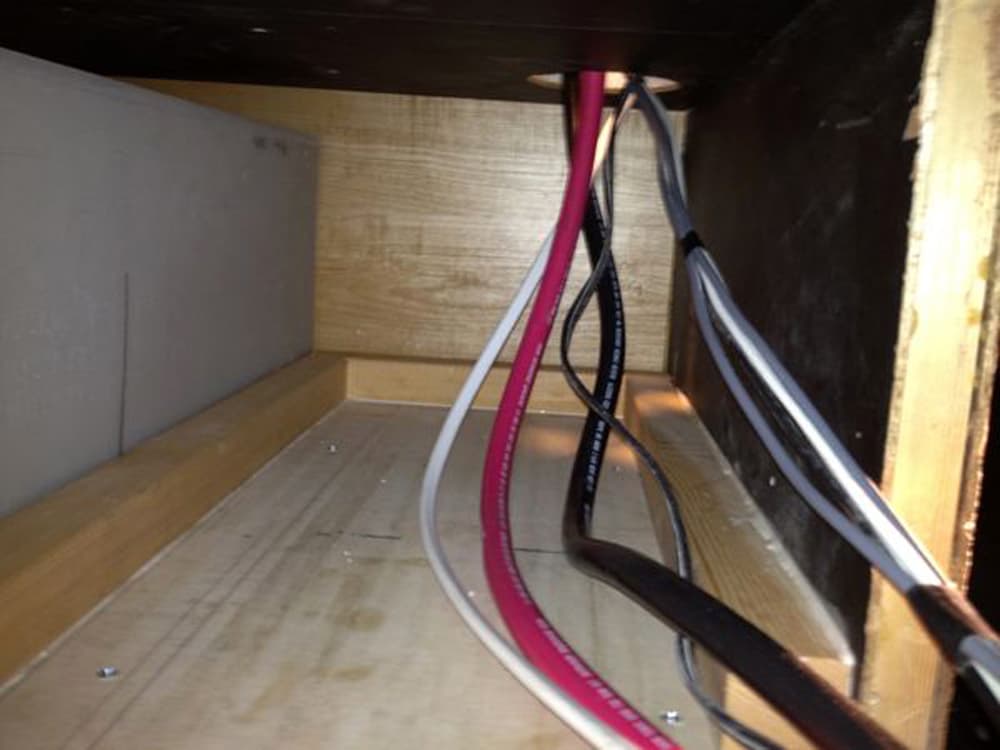 | 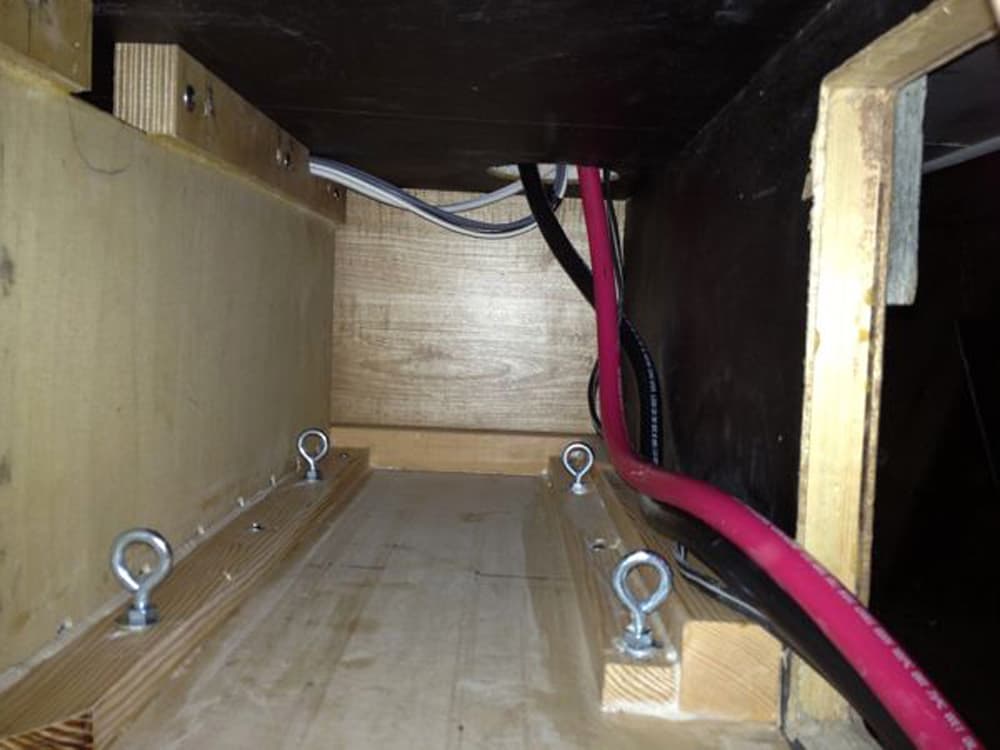 |  |
Above: These three photos show the assembly of the battery mounting components in the basement. The white box in the photo on the left is the camper’s fresh water tank. The eye-bolts are used to securely tie-down the batteries and they are screwed into T-nuts which have been installed into the plywood base plate. In the photo on the right you can see the temperature probes for the inverter/charger and solar charge controllers. Click to enlarge the above photos.
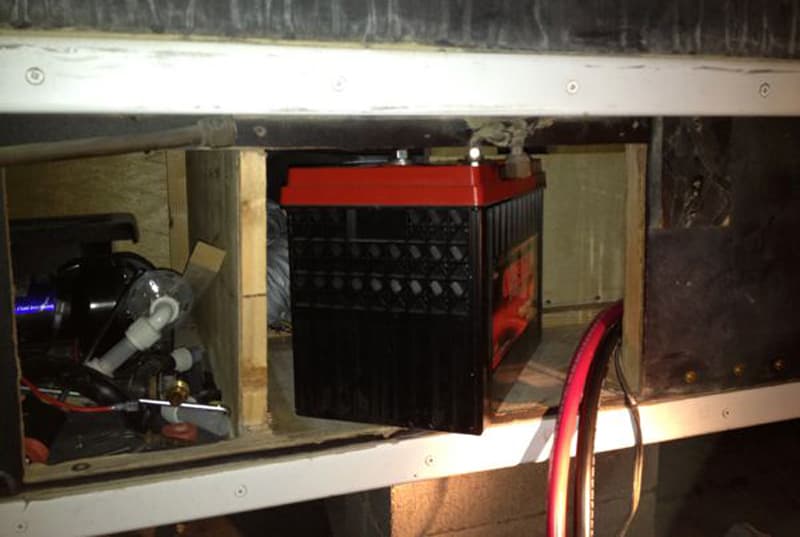
Above: The batteries are installed into the compartment through an access panel in the side of the basement.
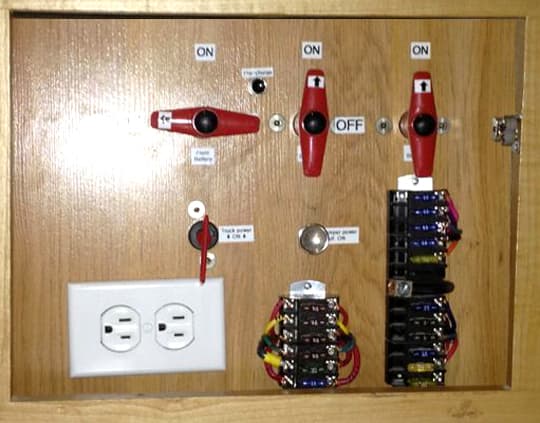
Above: The three battery disconnect switches (the red t-handles). The positive bus-bar is mounted directly to the contacts of these switches. The black pushbutton (between the left and middle t-handles) is for a pre-charge circuit which allows the capacitors in the inverter to charge slowly which prevents arcing and pitting of the contacts in the battery switches. The red handle above the Edison outlet is the electrical disconnect between the camper and truck. The silver pull-knob is the camper’s interior DC power switch.
In addition, I built a new switch panel that has a dedicated high-current switch for each battery. The switches are connected to a common solid copper bus bar. Of course I also created a negative bus bar. There are three equal length runs (36” of both positive and negative) of 2/0 gauge cable running from the switches to the batteries. This balanced wiring approach ensures equal load on each battery during both charge and discharge cycles.
The cable from the bus bars to the inverter/charger is 4/0 gauge and only one foot long. There is a fan in the truck camper just above the batteries which provides ventilation and climate controlled air to the basement.
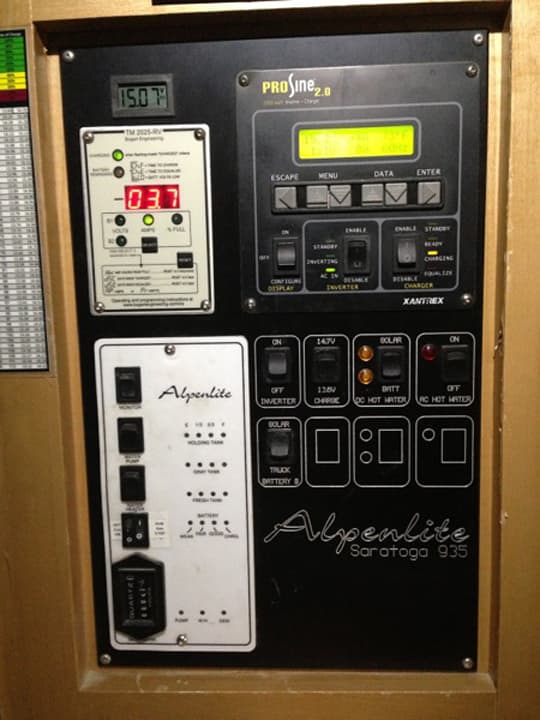
Above: The power monitoring panel I made which includes the Trimetric, Digital Voltmeter, and Inverter/Charger control panel.
To allow for simple tracking of battery capacity and performance, I also installed a precision digital voltmeter and TriMetric battery monitor and a 500A shunt.
It is very convenient to have 300A (~150A of which is useable) of battery capacity. It means that our family of four can live in the camper with the same electrical conveniences that we have at home. We use the lights, radio, television, water pump, computers, and cooking appliances without ever thinking twice about having enough available battery capacity.
Even with no solar charging, no starting of the truck engine, and no generator running, this is sufficient battery capacity for more than six days of dry camping. I can easily operate the roof air conditioner for up to four hours or the convection/microwave for an hour. This is convenient for times when the generator cannot be run, like in a campground at night.
It took me 30 hours to complete this mod and cost $1,350. In my opinion, the skill level of this mod is hard.
CLICK HERE TO SEE WHO WON THIS MONTH’S CONTEST.
Disclaimer: The modifications above are submitted by Truck Camper Magazine readers. It is your responsibility to make sure that any do-it-yourself modification project you undertake is safe, effective, and legal for your situation.