The 2017 Mod Super Cup Mod Contest begins with ten fantastic Medium Mods including a counter mod, dinette mod, platform mod, secret vault mod, and more.

Welcome to the November 2016 Monthly Mod Contest. Please review the following ten Medium Mods and vote for your favorite mod. We will announce the November 2016 Mod Contest winner next week.
For more information about the Monthly Mod Super Cup Series Contest, including how to enter, click here.
1. Tracy and Steve Schuster, Superior, Colorado
2015 GMC 3500
2012 Lance 992
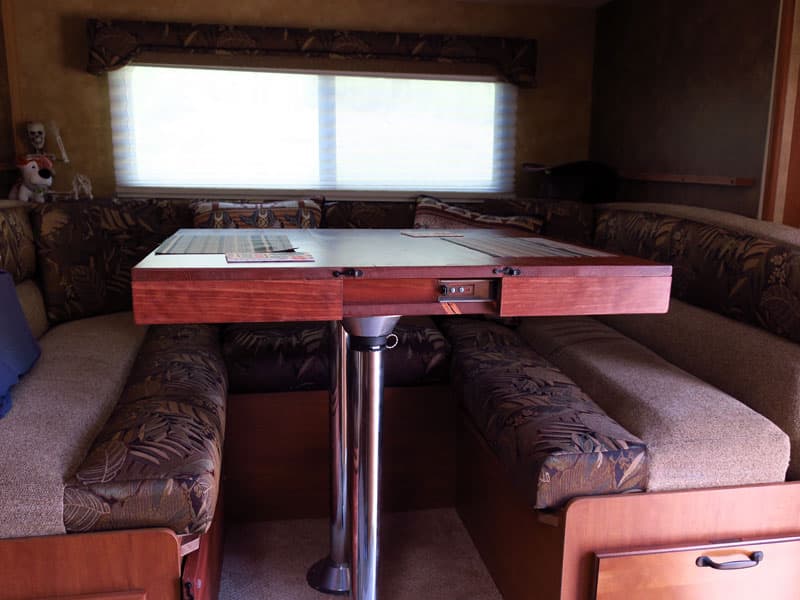
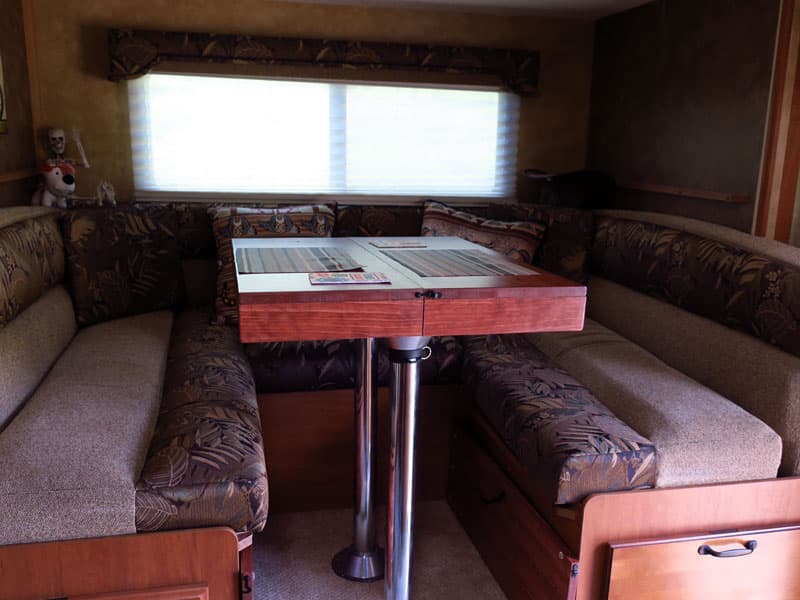
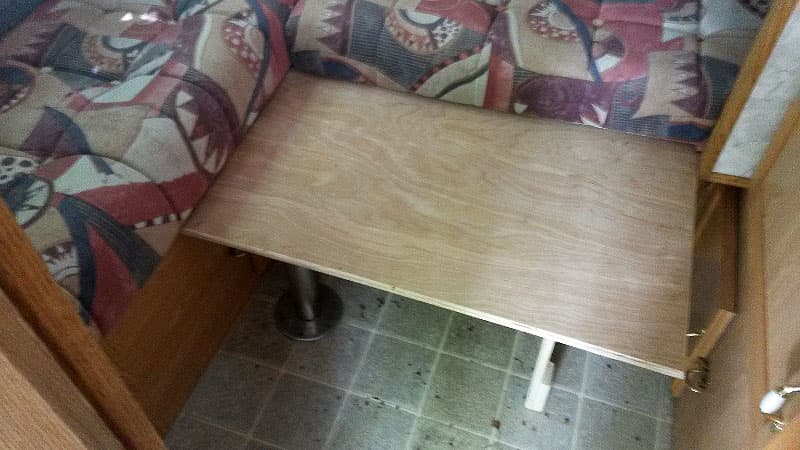
Our dining table was a bit too low, especially after adding memory foam to the seat cushions. The table edge was also too far away from me to work or eat comfortably.
I needed a solution that would not only raise the table, but also make it closer when I needed it to be without making it impossible to get in to and out of the dinette seat.
We created a box for the base of the table that is about 1 ¾ inches deep, and the approximate size of the original table (24-inches by 30-inches).
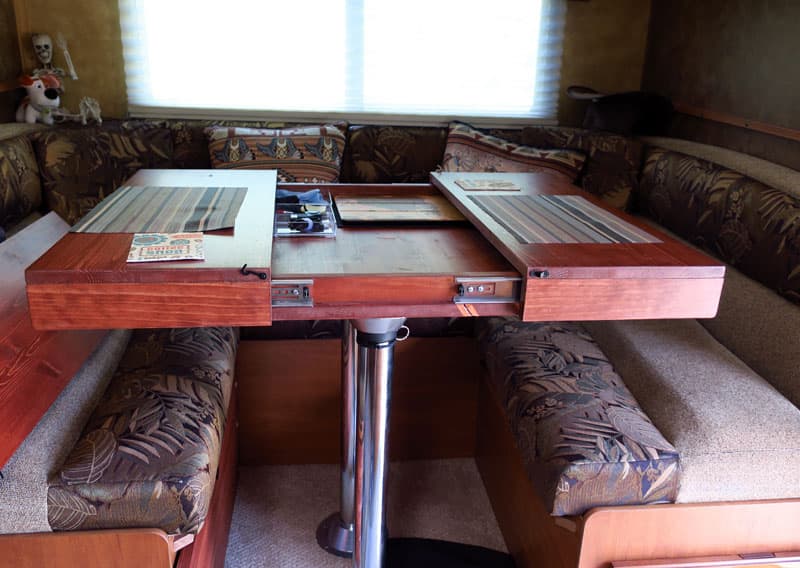
We then ordered two sets of 8-inch long drawer slides and attached them to the sides of the table base box. For the top, we used two 30-inch by 12-inch boards and attached side skirts that serve as attachments for the outer half of the drawer slides.
Finally, we cut a 10-inch and a 12-inch leaf. We have found we don’t use the 12-inch leaf as much. To the leafs we installed rubber bumpers to make them the exact same height as the table top when placed over the box top. To hold the table and leaf in place when in use and traveling, we put latches on all of the edges.

This modification turned out better than we expected! I can put the table as close to me as I need, and my husband is still comfortable on his side. We have much more table space, and the storage created under the table top in the box is perfect for phones, tablets, chargers, placements, and other items.
When we want to watch a movie on the iPad on the table, we just take out the leaf and have tons of room to sit and put our legs up on the benches of the U-shaped dinette.
Each leaf stores nicely under the dinette. You’d really never know they are there.
It took me at least twenty hours (including problem solving and actual construction) to complete this modification and cost me $125. In my opinion, the skill level of this modification is medium.
2. Clay and Caitlin Neumeier, Davis, California
2003 Toyota Tundra
2010 Four Wheel Camper Eagle Shell Model
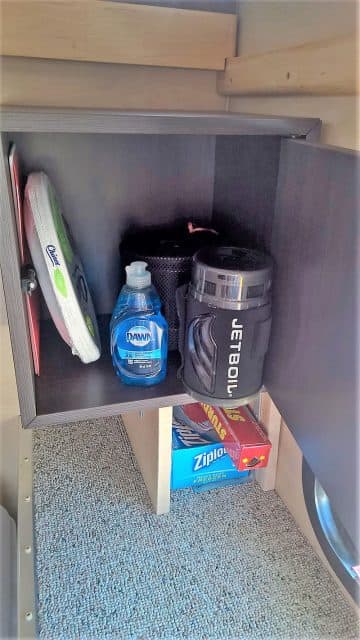
We just bought our 2010 Four Wheel Camper Eagle shell model and wanted to start making organizational modifications.
A major source of clutter was all of our kitchen items; flatware, dishes, pots and pans, and those sorts of things. Previously, we kept them in a plastic tub, but it got annoying always moving it around and strapping it down for transit. I wanted all kitchen items self-contained in a cabinet that would be easily accessible, out of the way, and stay in the same place.
Our goal was to install a cabinet in the far corner near the bed, over the bench. The bench itself was the strongest support to attach the cabinet to (as opposed to the wall of the camper), but we did not want to block any of the bench storage.
 |  |
So first, we built a platform for the cabinet, attached brackets to the platform to hold the cabinet, and then attached the cabinet to the brackets. The platform allows the bench storage space to be opened completely without hindrance.
We found a cabinet from IKEA that was the perfect size for our space, and it had a spring-loaded door opening mechanism that would keep the door closed for transit. It was an affordable and easy option.
The mod is great! The cabinet is completely out of the way, no storage space was lost, and the creation of the platform to raise the cabinet created another nook where I’ve been storing flatware and cooking utensils.
 |  |
We were initially concerned about IKEA’s quality and the cabinet not holding up well, but it’s been great so far and the door stays closed when in transit. We are very happy with how this turned out.
It took me two hours to complete this modification and cost $70. In my opinion, the skill level of this modification is easy to medium.
3. Stephen O’Neal, Miami, Florida
2013 Chevy 3500 HD
2011 11-Foot Alaskan
Since my travel plans included haul roads, I needed to carry a second mounted spare, but where?
I had a 4-foot by 8-foot flat bed deck extension that carried the entry stairs on the driver’s side, and storage for one spare underneath. The spare was accessible from the driver’s side. The only location left was on top on the deck, but that was my access to the camper and the Thetford cassette.
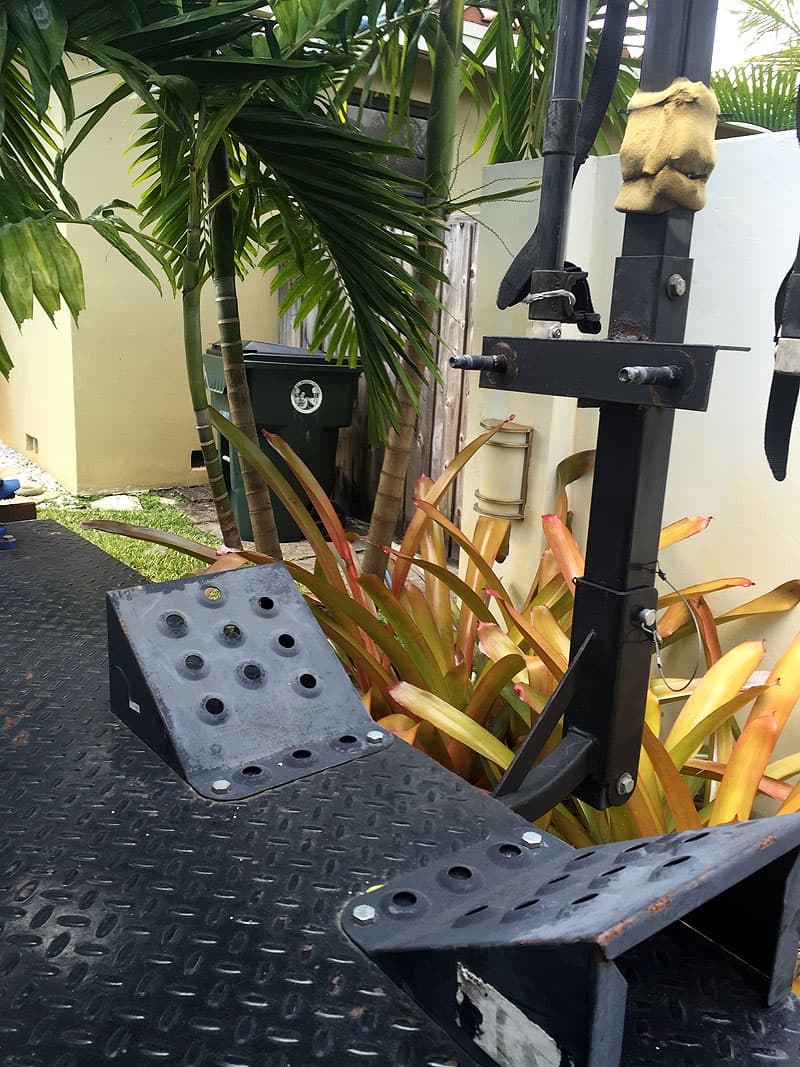
Since I already had a bicycle rack, the best option was to have my welder attach a 1-foot section of angle iron with two-wheel studs and lock nuts.
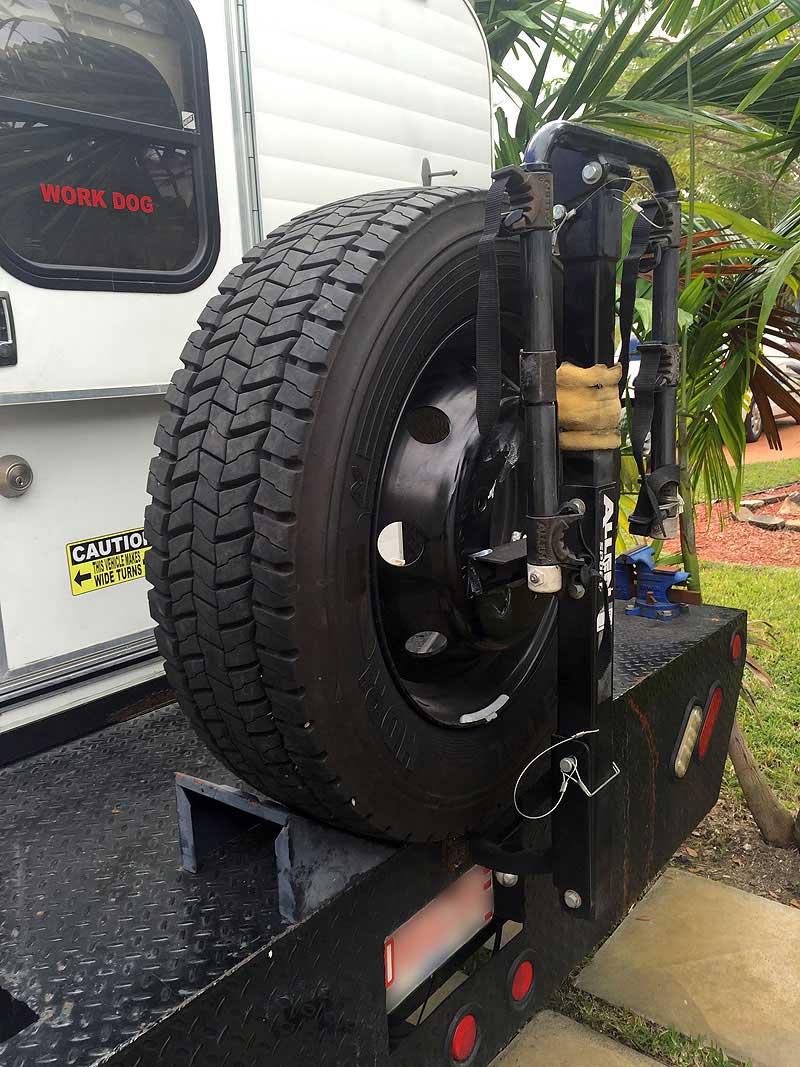
I mounted the tire and snugged up two inexpensive metal chocks on the deck, traced their outline, removed the tire, and mounted the chocks with two bolts each.
The rack holds the tire vertical and the deck holds its weight. The chocks stabilize the tire and stop any movement.
My two spares are rotated to the front along with an alignment every 4,500 miles. All tires, including the duallies, are rebalanced at that time. 15,000 miles later, the new spare tire mount is holding up well.
It took me 1.5 hours to complete and cost $25. In my opinion, the skill level of this mod is moderate to hard depending on whether you do the welding part yourself.
4. Mark Siminoff, Mountain View, California
2005 Dodge Ram 3500
2004 Alpenlite Saratoga 935
On many occasions, while connecting my truck camper to 120-volt shore power, I have encountered electrical outlets that have been incorrectly wired. Most typically the issue has been reversed hot and neutral leads. As a result, I had gotten into the habit of carrying a receptacle tester with me to check the wiring of the outlet before plugging in and I have even re-wired the plug on my camper’s shore power cord to correct for errors in the receptacle.
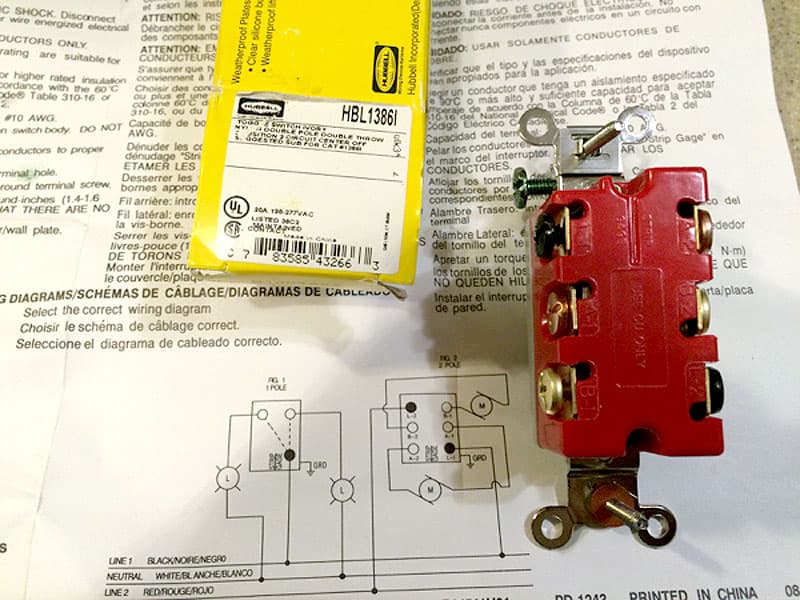
After getting fed up with wasting my precious camping time to fix somebody else’s sloppy wiring, I decided to fix the issue in a way that was easiest for me.
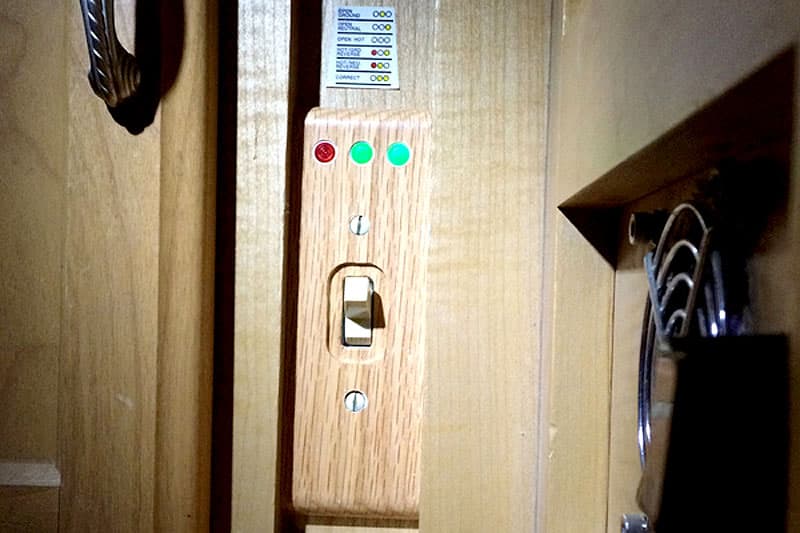
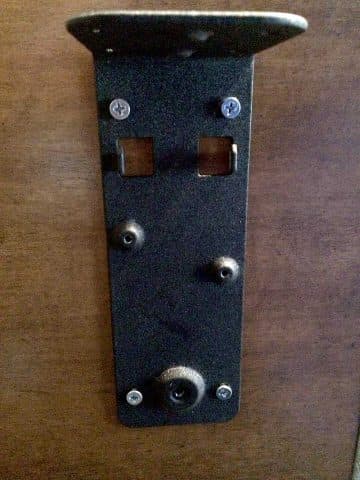
I installed a 20-amp, double-pole double-throw switch (in place of my previous single-pole-single throw switch) so that I can now correct polarity issues from inside the truck camper.
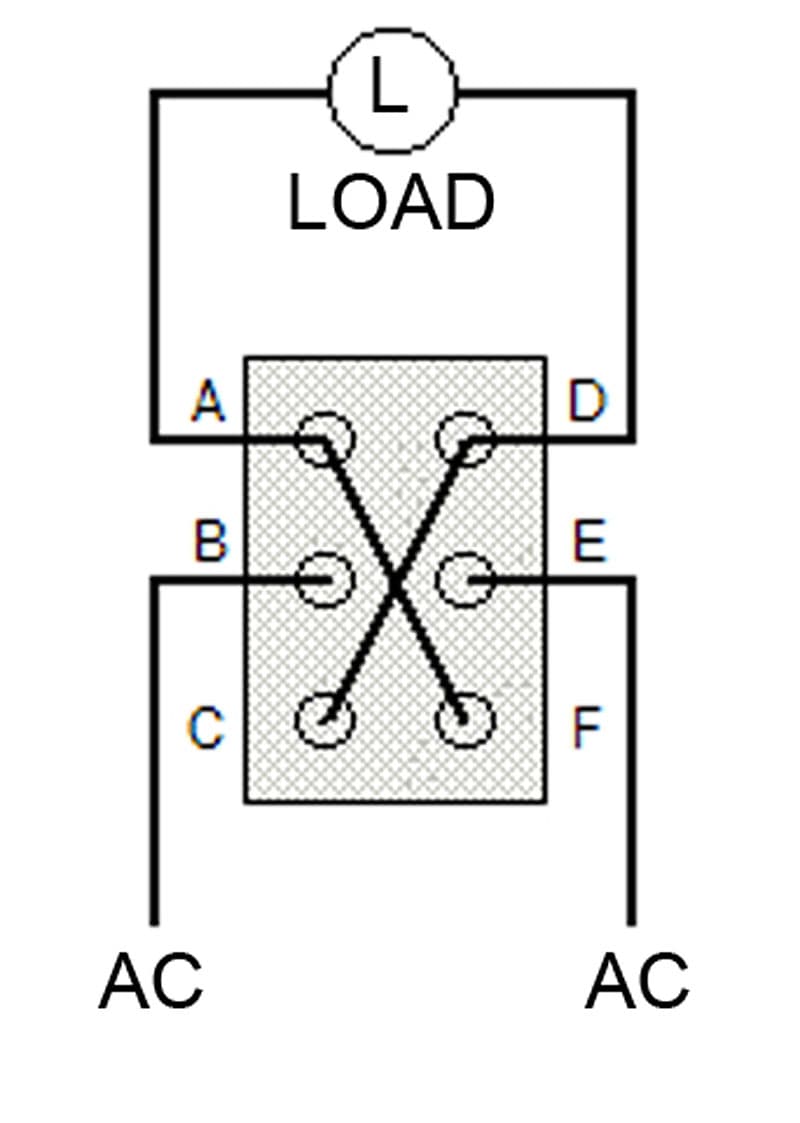 In addition, I installed an AC polarity tester at the switch location so that I can verify polarity before closing the switch.
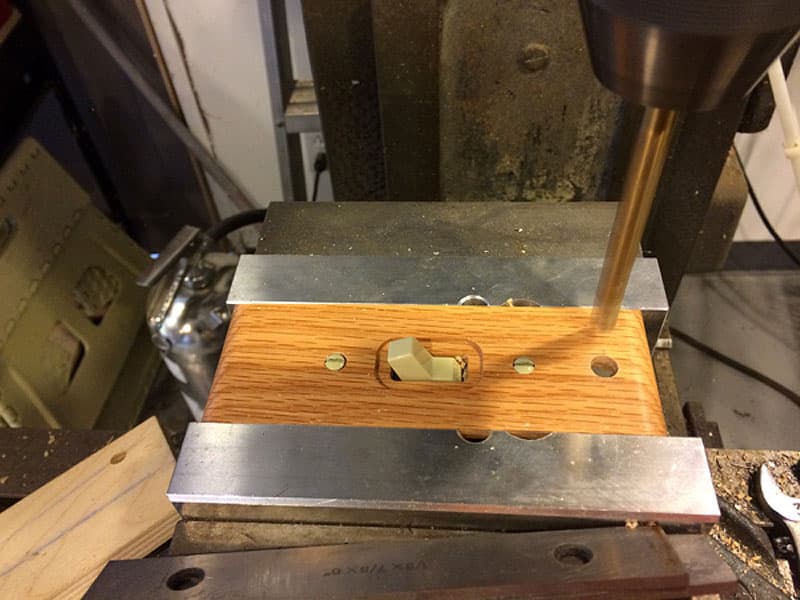
I installed a 20-amp Hubbel HBL1386I double-pole double-throw (center off) switch in place of my truck camper’s shore-power disconnect switch. This switch is wired as a reversing circuit, which allows me to quickly and easily remedy a reversed hot/neutral wiring condition.
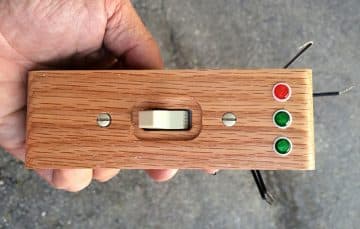 | 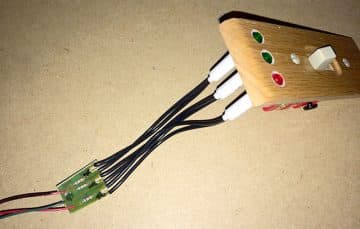 |
In addition, I installed a built in AC receptacle tester into the switch’s mounting plate. The indicator lamps on the tester inform me of a wiring problem before I close the switch and connect the mains power to the camper.
Since installing the switch and testing the circuit, I have encountered a reversed hot/neutral condition at two places. The first was at a rustic site at Lake Santa Margarita Park near San Luis Obispo, California. The second was a private camp near Guernville, California. In both instances a simple flip of the switch (down instead of up) was all it took to correct the problem.
It took three hours to complete and cost about $75. This modification is easy if you have basic electrical wiring skills.
5. Charles Coushaine, Punta Gorda, Florida
2001 Ford F350
2012 Chalet DS116RB
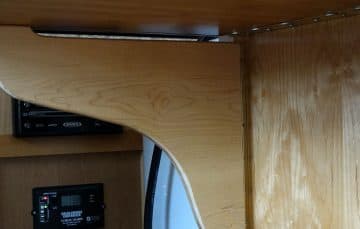
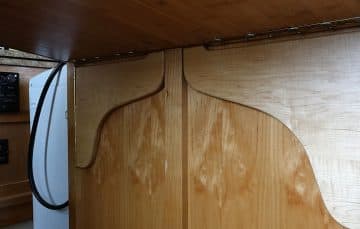
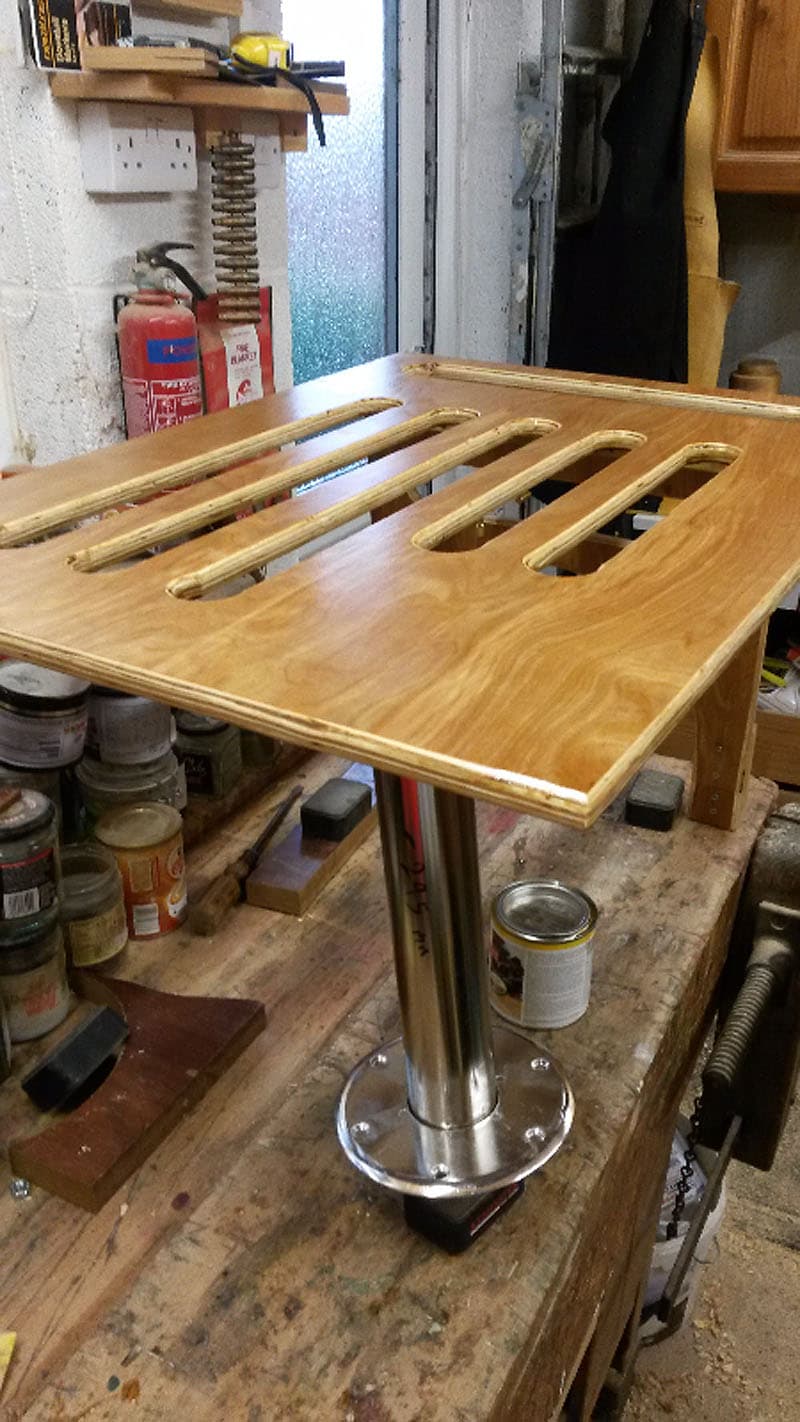
My wife and I saw a need for increased counter space in our Chalet DS116RB. This new counter space would need to do double duty, acting as increased counter space as well as additional table seating area when we have guests.
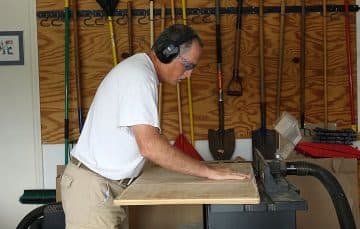 |  |
After considering all our options, we decided to build a flip-up table off the center island. This needed to be as big as possible, but be no longer than the island itself, and narrow enough to allow walking around it when up.
 | 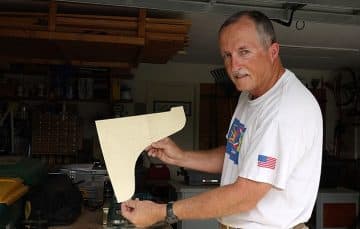 |
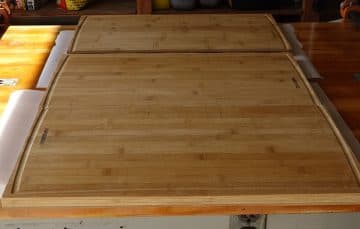
When complete, it was made out of beautiful bamboo, with a size of 20-inches by 35-inches, and folds away neatly when not needed.
 |  |
This should greatly enhance our entertaining needs.
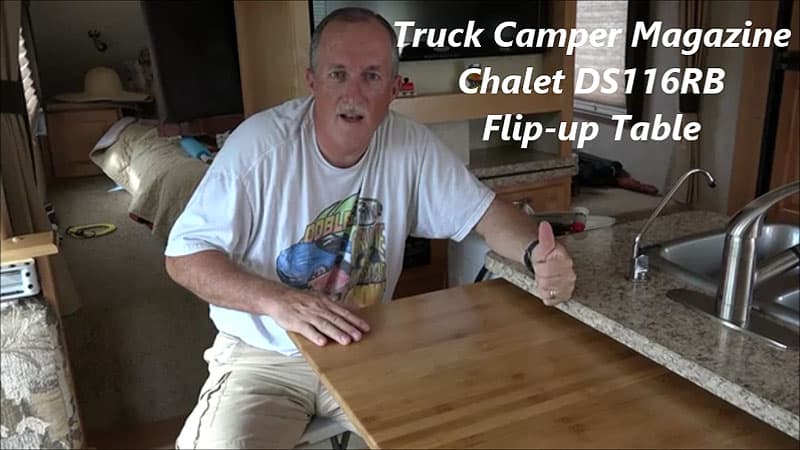
The cost was $60 for the three bamboo cutting boards (extremely rigid and well made), $10 for the 4-foot hinge, and $16 for the polyurethane.
6. Robert and June Morrissey, Savannah, Georgia
2011 Ford F-350
2012 Lance 850
We built this modification to be able to carry stuff, like muddy boots, that we did not want to carry inside the camper for various reasons.
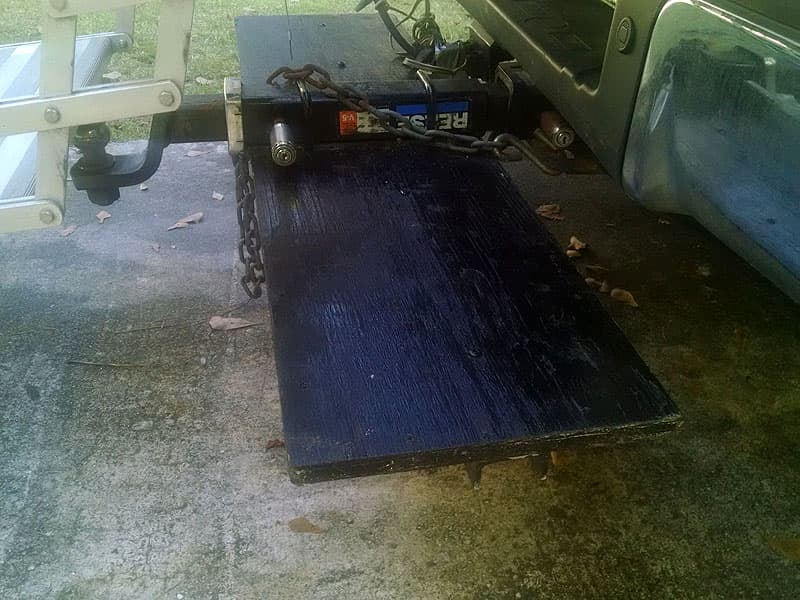
Our truck camper is 8-feet 11-inches which means it extends 11-inches beyond the bed and therefore requires a 24-inch receiver extension in order to pull our boat.
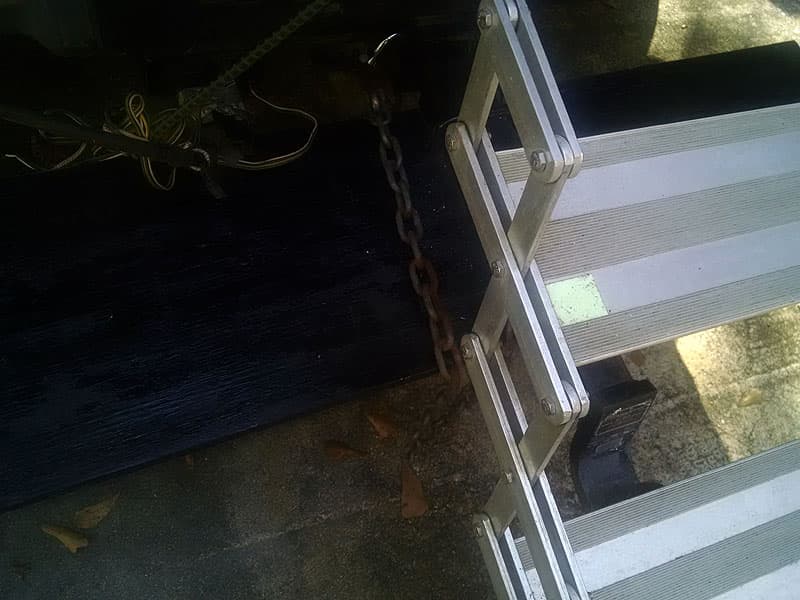
I U-bolted a piece of ¾-inch plywood to the receiver extension. Underneath, I bolted a piece of channel aluminum to give the platform support on the ends. This is perfect for carrying the gas can that we do not want inside of the camper, muddy boots, or anything we want to keep outside. Milk crates have been bolted on to the platform to carry smaller items.
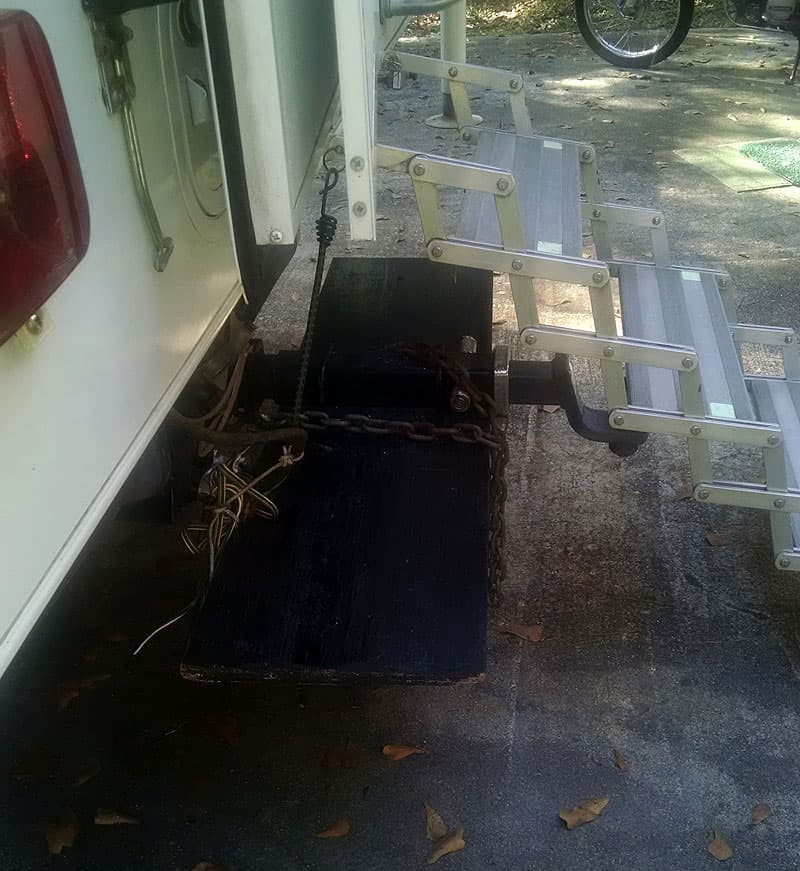
The finished mod does not interfere with the scissor steps and eliminates the connecting wire designed to hold the steps up.
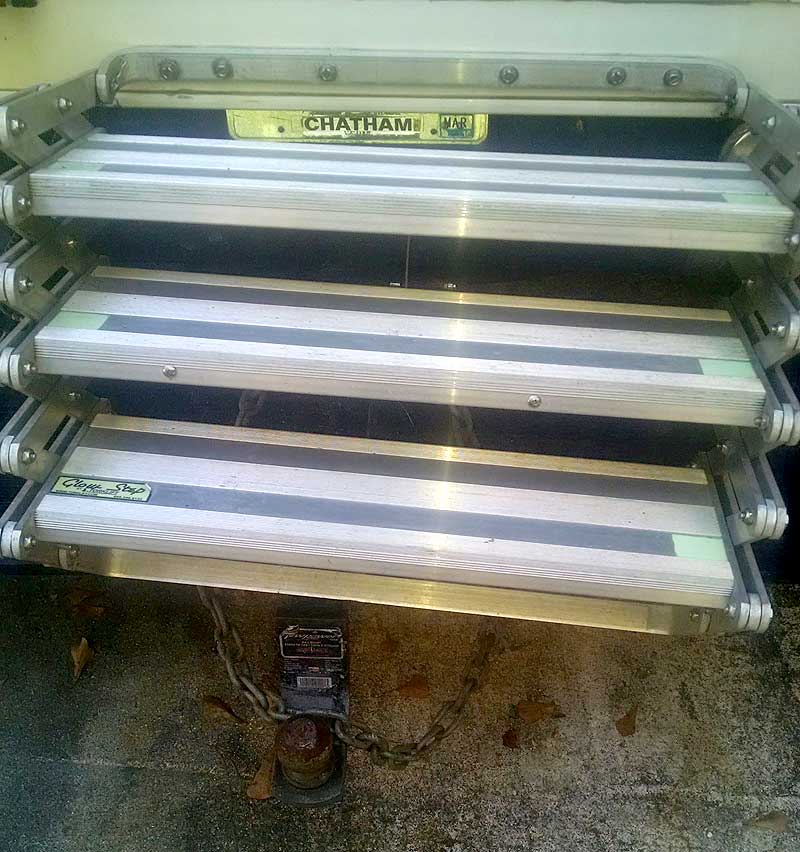
It took me two hours to complete and cost $20. In my opinion, the skill level of this mod is easy.
7. William Cooke, St, Anderson, South Carolina
2002 Dodge 2500
1966 Avion C-10
My 1966 Avion C-10 truck camper did not come with a grey water holding tank. It only came with a black tank. Also, I did not have any compartments or space for an onboard generator.
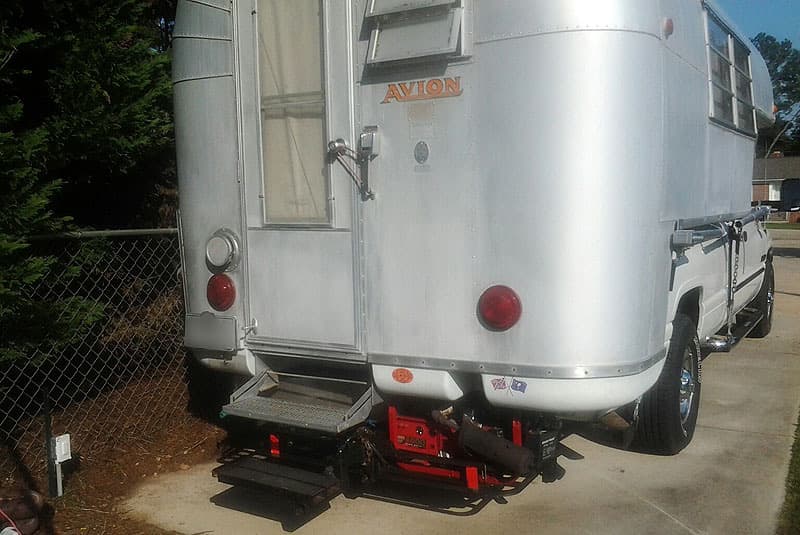
I added a 24-inch hitch extension to tow a VW or a small trailer. I modified a 20-inch by 48-inch tray to fit under the receiver extension. It is dropped down 3-inches lower than the tube. I modified a 4,000 XP-series Generac generator by removing the top mounted fuel tank and shortening the frame to 13-inches tall to fit under camper’s rear overhang.
I also added a universal fuel pump. The generator is located on right side of carrier. The fuel tank can be located on the left side of carrier or set on the ground when parked.
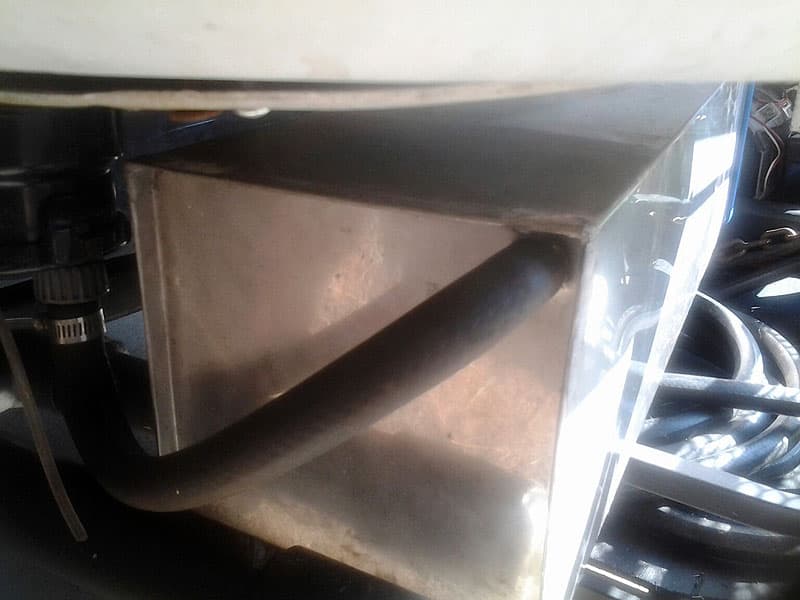
For grey water, I added a stainless tank that’s 7.5-inches by 7.5-inches by 36-inches that’s calculated to hold nine gallons of water.
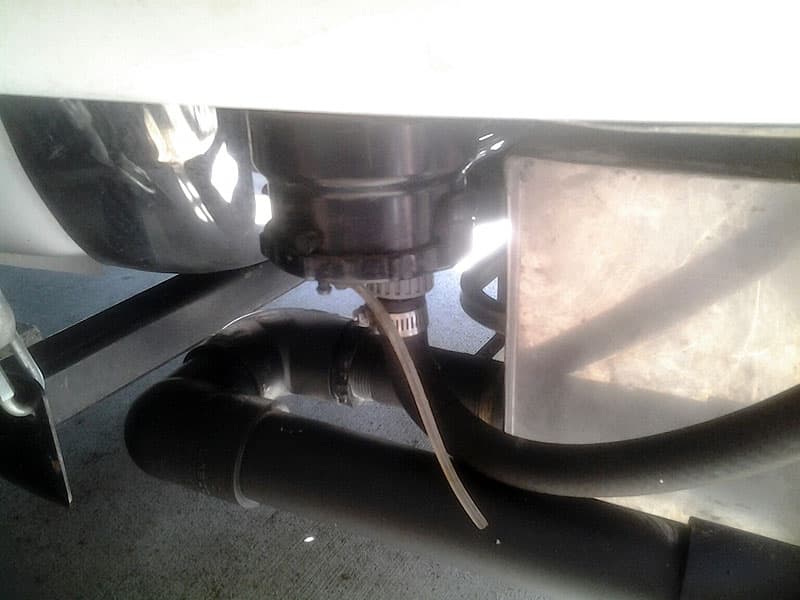
The tank fill and drain are located adjacent to the factory’s black drain outlet. Now, the grey water can go into the tank.
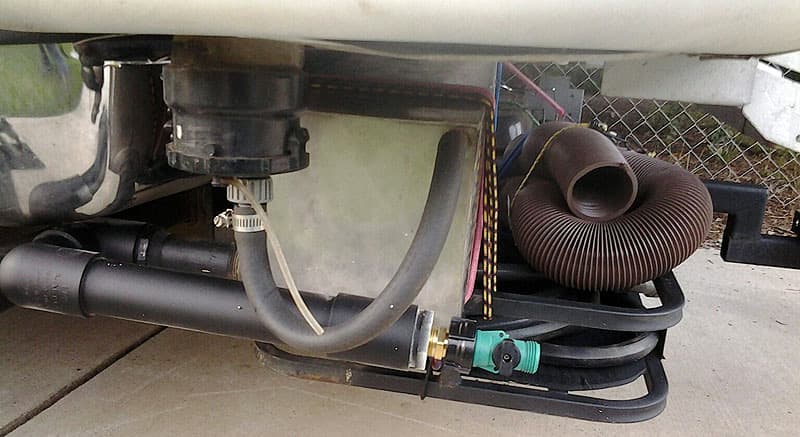
The room left under the left side of the carrier can be used for a sewer hose or longer water hoses. It all works great while traveling or for stops at Walmart. The ground clearance under the carrier is 8 to 9-inches. Should the ground clearance be close, the very bottom tube will just slide over the dirt.

It works well, but you must plan trips to use a 4,000-watt generator. When parked for longer times I carry two 2,000-watt Honda generators with six gallons of fuel. My supply in the boat type tank is two gallons in the generators. It lasts all weekend.
It took me 6 to 8 construction and welding hours to complete. The cost of the carrier was $60 and the stainless water tank was from an old Airstream trailer I had on hand. In my opinion, the skill level of this mod is hard because the generator and carrier tray require welding.
8. A.K., Pennsylvania
2013 Chevy 2500
2015 Lance 855S
I wanted a secure place in my camper to store a handgun or other valuables (cash or jewelry). I strongly believe that firearms should always be stored locked. My disclaimer is to know your local and state laws on carrying a handgun in the United States. You cannot bring a handgun into Canada.
This presented a challenge in that truck campers do not have a lot of extra space and areas to secure a safe.
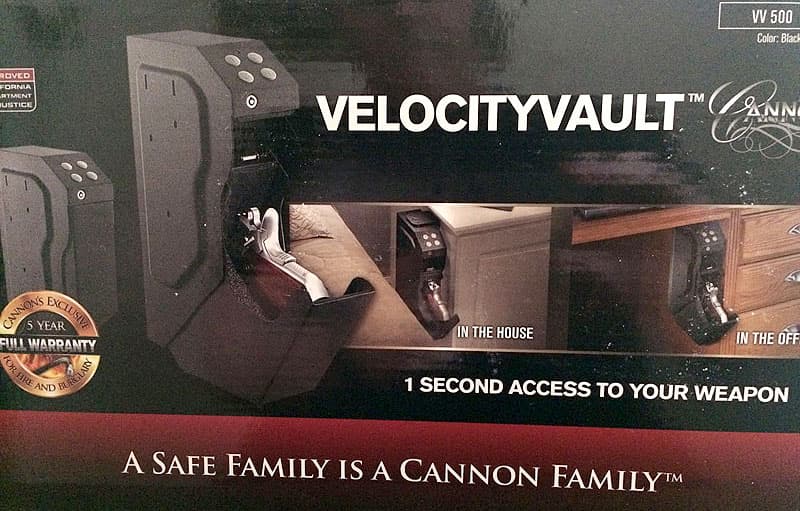
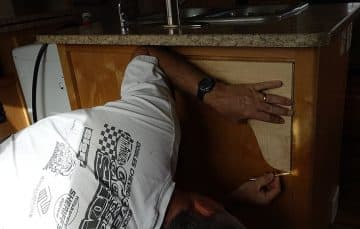
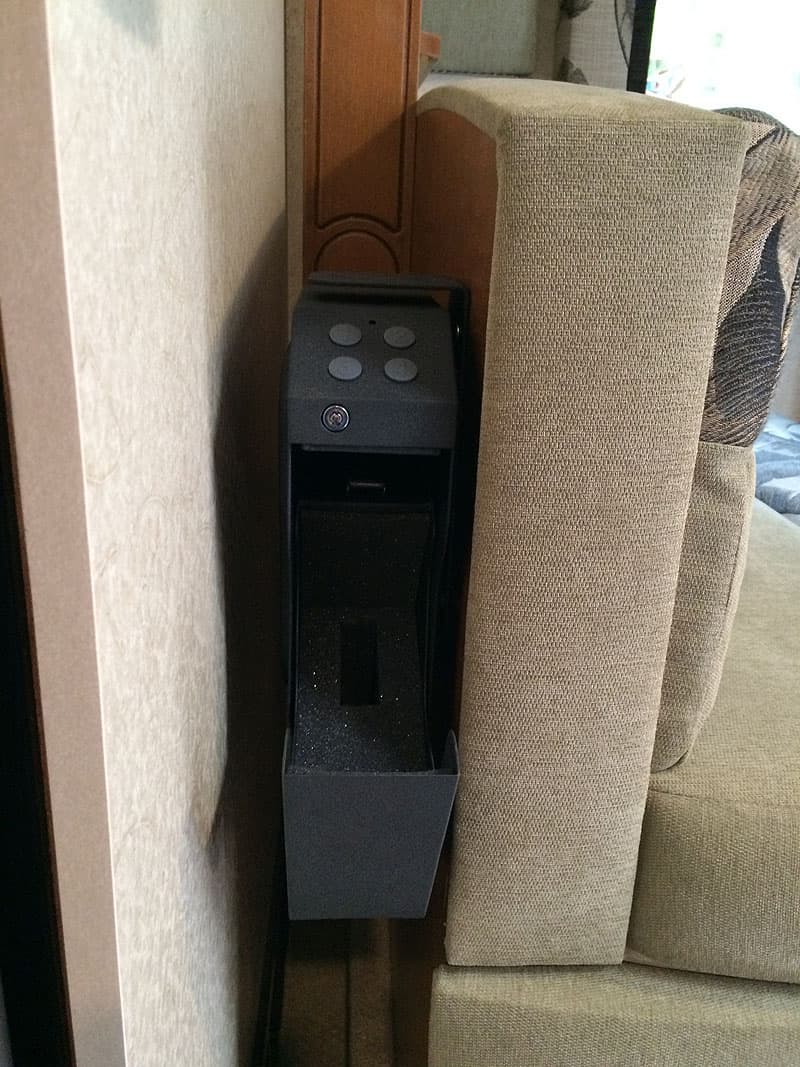
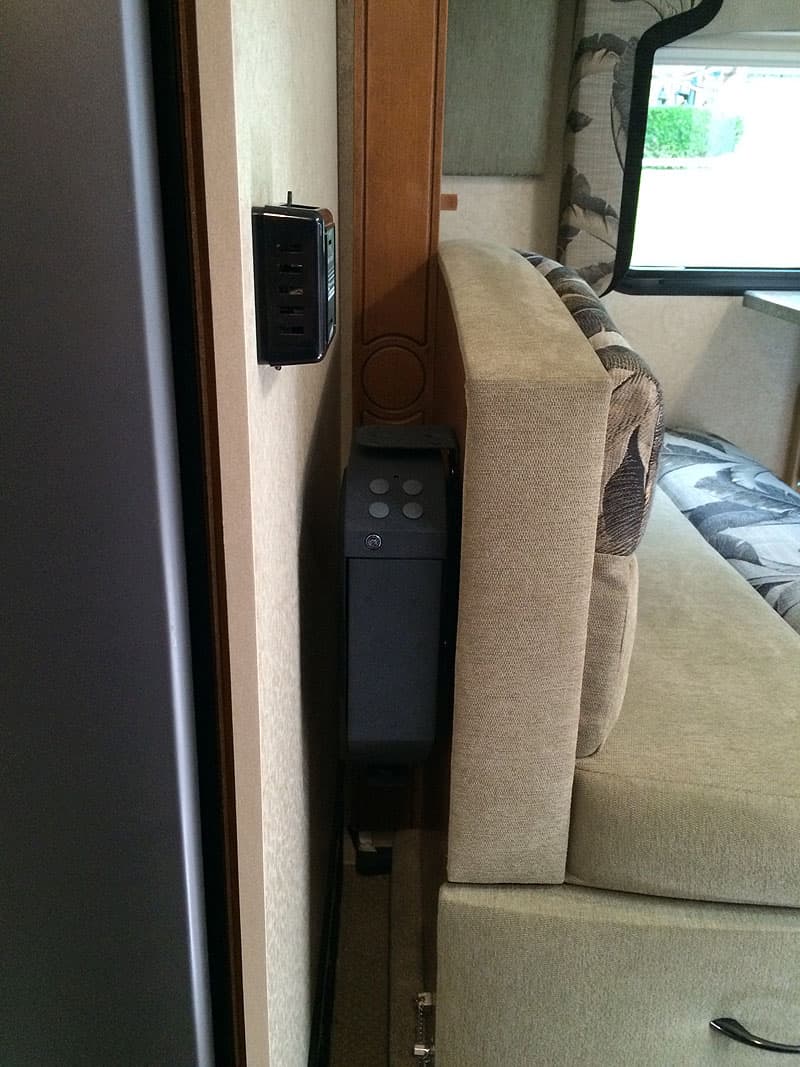
The Velocity Vault by Cannon Handgun Safe is $99.99 at Costco.com. Finding this safe made this modification as easy as it is. The safe is 3.5-inches wide including the mounting bracket. I mounted this behind my dinette seat on my Lance 855S. It had adequate clearance for the slide.
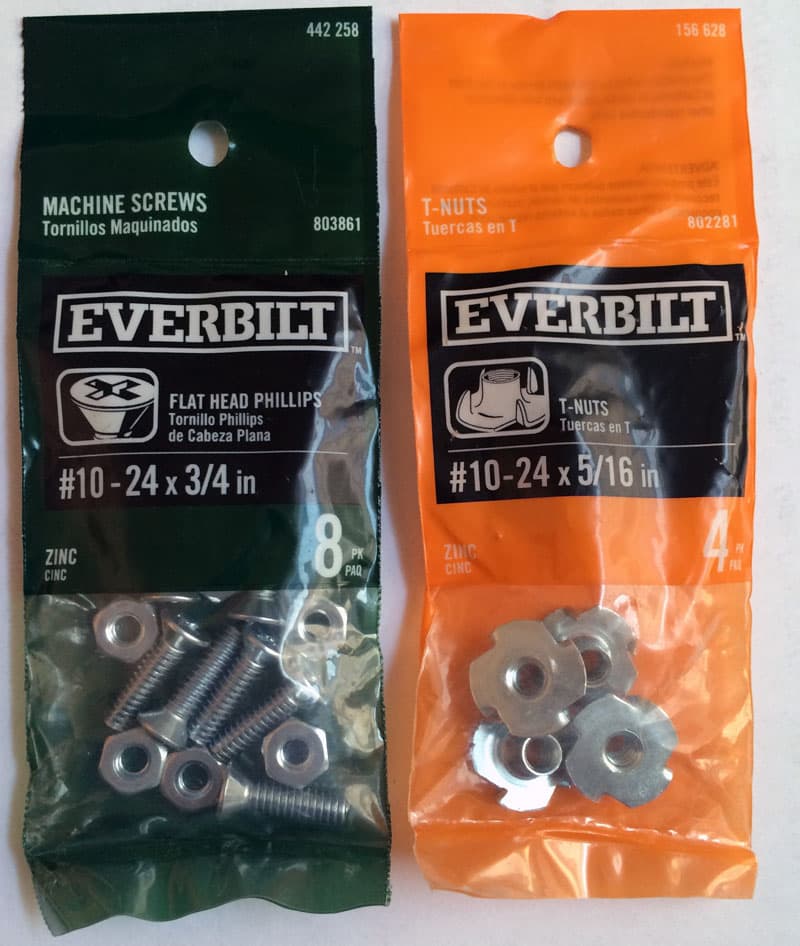
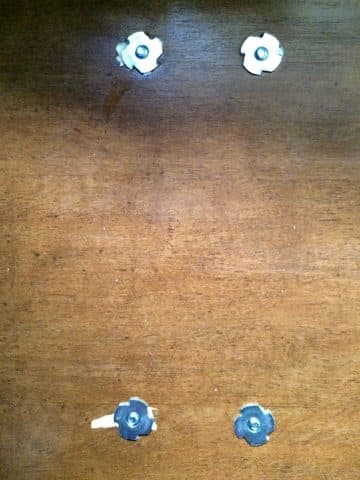
After positioning, I drilled four holes and mounted the bracket with #10-24 x ¾-inch flat head Phillips screw and #10-24 x ¾-inch T-nuts and secured these with Loctite.
 |  |
I then attached the safe to the bracket using the supplied safe screws and Loctite. I used my Dremel to grind down and smooth out the slightly protruding screws to avoid damaging the seat cushion. The safe is accessible, discrete and functional.
Note: I value my privacy and am retired law enforcement. I wanted to make folks aware that they could safely and securely store their firearms and valuables. That is why I am using only my initials and the location of Pennsylvania only.
It took me 30 minutes to complete this modification and cost me $99.99 for the safe, $2.50 for the hardware, and $5 for the Loctite. In my opinion, the skill level of this modification is easy to medium.
9. Ray and Brenda Fair, Hopkinton, Massachusetts
2013 Silverado 2500HD
2015 Eagle Cap 850
The Eagle Cap came with three clothes closets. Two are located on each side of the bed and the third above the radio/DVD. The closets are not convenient for storage of clothes that do not require to be hung like t-shirts, socks, and underwear.
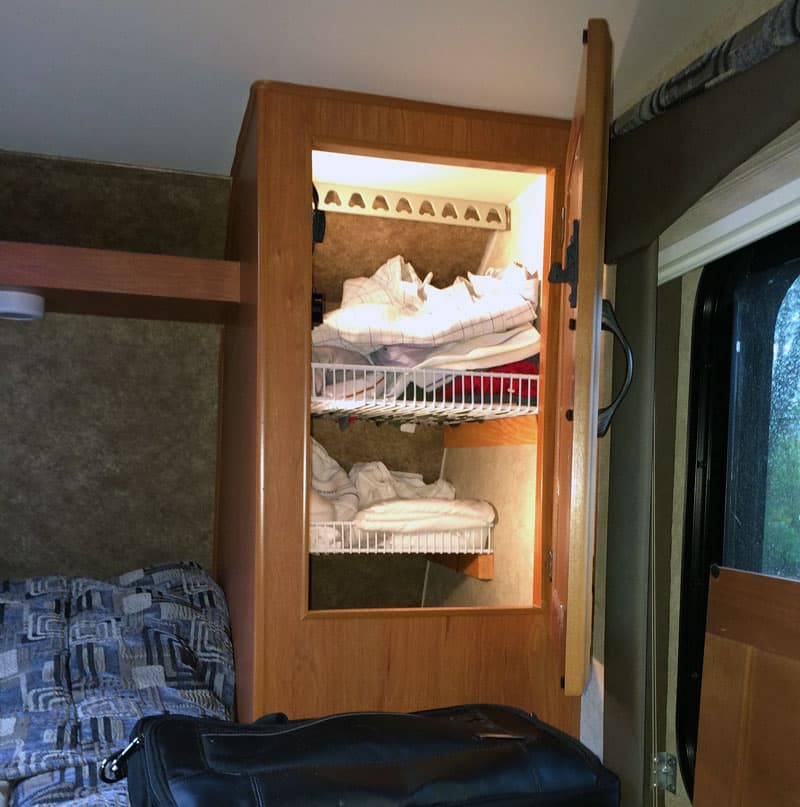
The closet heights are about three feet by two feet, thus shelves were needed. Measuring down twelve inches from the ceiling, I attached two pine boards (1x18x3/4) on the side walls and a pine board (1x12x3/4) on rear wall with industrial adhesive for the top shelf. Then I measured below that point attaching three more pine boards (1x12x3/4 on the side and 1x12x3/4 on the rear wall).
Varying the length of the shelves allowed access to the lower portion of the closet for shoes, sweatshirts, etc. At the local box store, I purchased a white wire rack (8 feet x 3 feet) that had a one-inch lip. The wire rack was cut to match each shelf and then installed with the lip pointing up. Hardware supplied with the wire rack was used to attach the rack to the wooden board. That prevented the rack from moving.
I purchased lighting system for each closet from American Lighting which contained three puck lights and an accompanying 120-volt transformer with an on/off switch. The first task was to remove and discard the transformer. Next, I mounted each puck with the hardware provided to the side wall of the cabinet above each shelf. Next, I soldered the on/off switch and mounted it to the top side of the cabinet’s door frame. The lights were wired to the 12-volt light over the bed.
It took me 1.5 hours to complete this modification and cost me about $35. In my opinion, the skill level of this modification is medium.
10. Tony Sutton, Kingswinford, England
2007 Ford Ranger
2005 Northstar 700DL
As our daughters had refused to sleep in our old VW T25 camper, which has now gone to the big campsite in the sky. We assumed that the same would apply to our new demountable.
However, the attractions of blown air heating, an inside toilet, and a roof that doesn’t leak sparked some interest. When we booked the Channel Tunnel to take us over to Normandy to watch a few stages of the Tour de France, Joanna was suddenly keen on coming along for a free holiday.
Unfortunately, we had gone for a two berth demountable and the L-shaped seating was about three inches too short for her to lie comfortably. The idea of topping and tailing between the two of us wasn’t attractive. She claimed she wouldn’t be able to sleep with me breaking wind and her snoring, or was it the other way around?
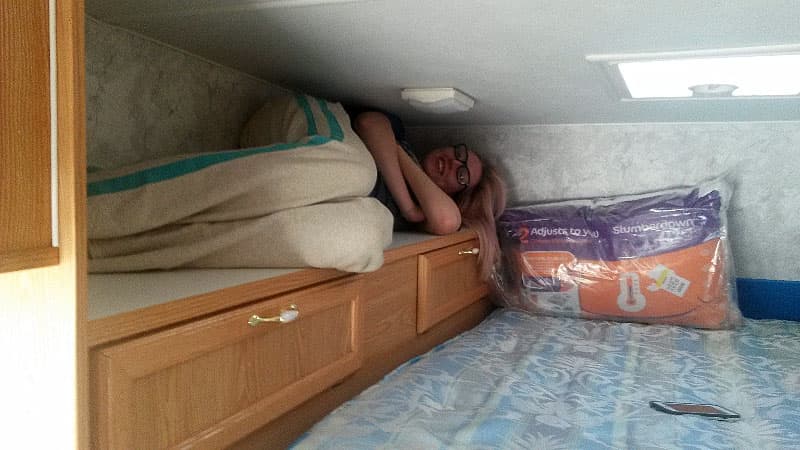
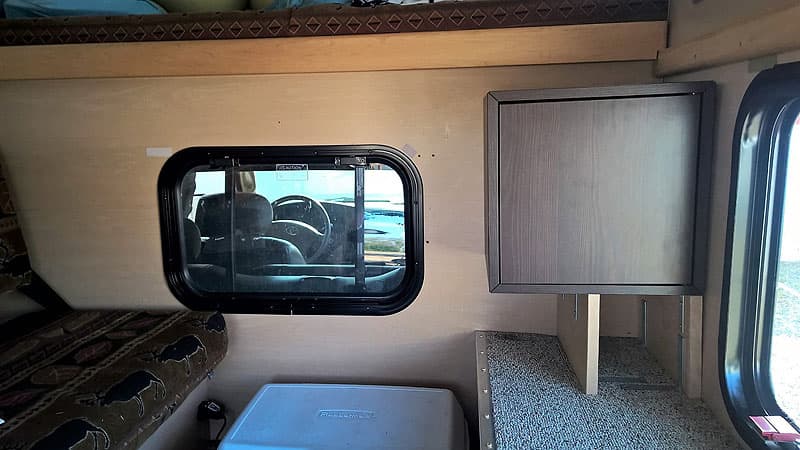
She even tested the raised cupboard next to the bed, but that was a little cramped.
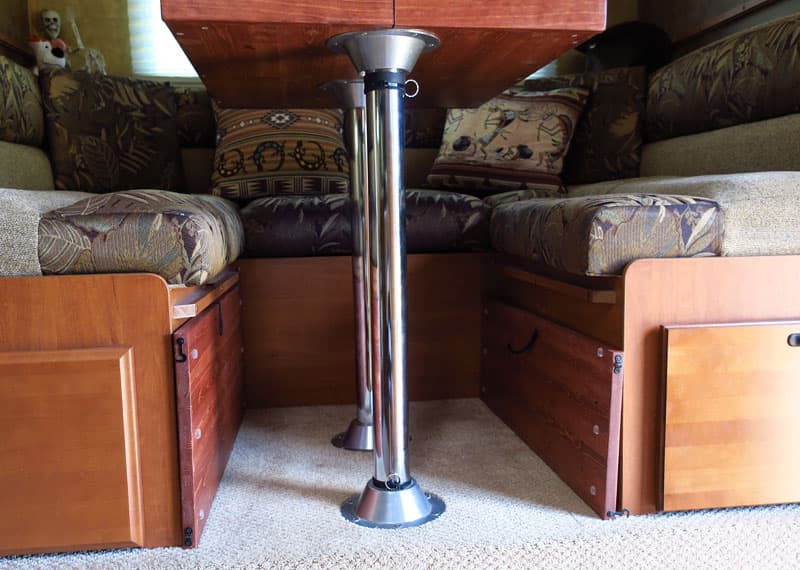
I thought if I could source another island leg for the table, I might be able to cut it to length, set the table at the same height as the seats, and rearrange the cushions to infill the corner so that she lie diagonally. I sketched it out and measured it.
It was apparent that the table is too small and I would need to make a custom bed base.
After quite a bit of searching I found exactly what I wanted online.
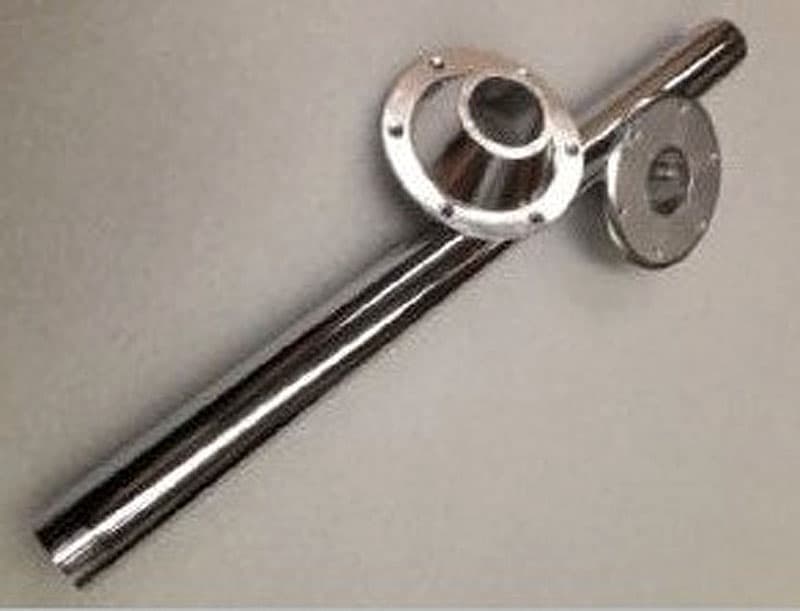
I spotted that it would cost the same to get the full set of table fitting, floor fitting, and leg as it would to get just the table fitting and leg I needed. So, I bought the set for £20 (about $26.50 USD) and would find a use for the floor fitting in the future.
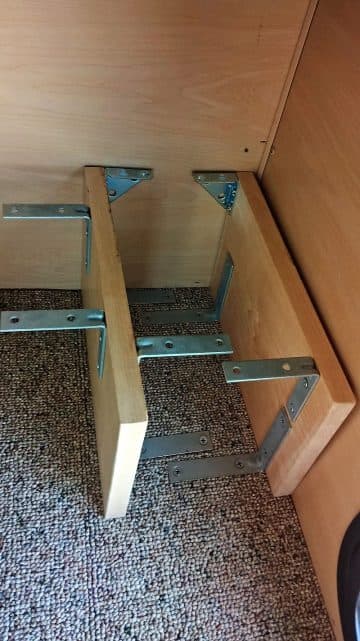
The next step was to pop into Wickes (think the UK equivalent of Home Depot) to get some plywood for the bed base. I picked up a ¼-sheet of 18mm for £12 (about $16 USD). I did think of using 15mm but they had none in stock and 12mm stuff was too flimsy.
I realized as I was carrying the plywood to the pickup truck that it would be quite a bit of weight to transport around in the camper and weighed it when I got home. It came in at 10 kilograms (about 22 pounds) which is the same as carrying 10 liters of water (2.2 gallons), so I needed to look at some way of reducing the weight.
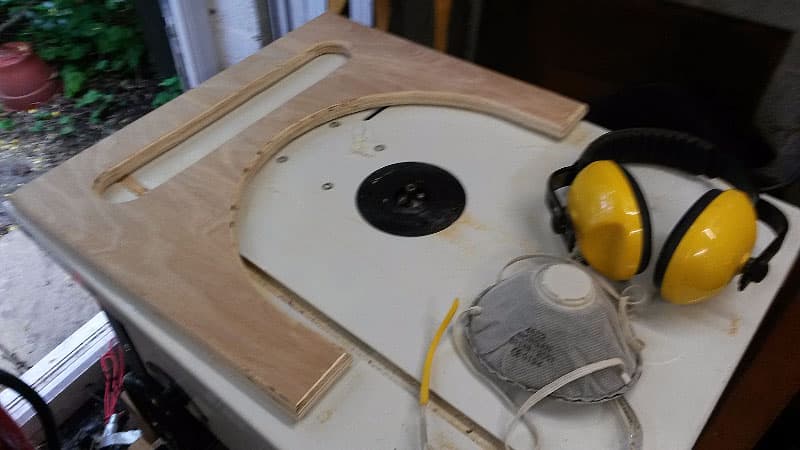
The first step was to cut the legs from the end of the sheet, which left the perfect length of plywood for the bed base. I cut an arch shape to the legs and also cut a 50mm wide rectangle from most of the width at the top to reduce the weight.
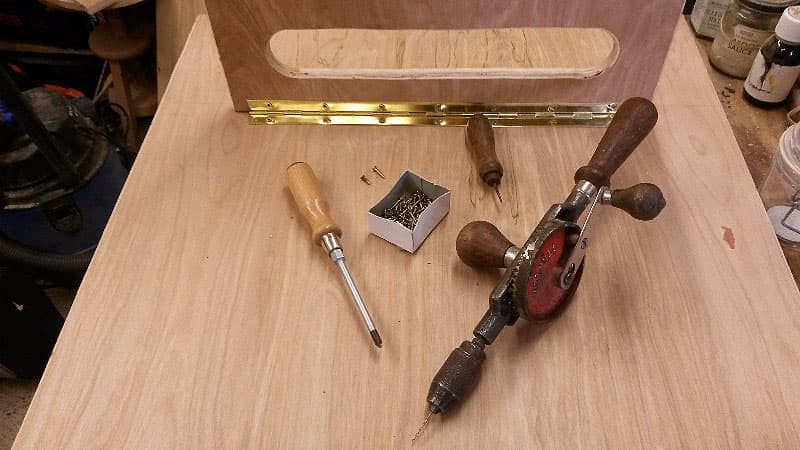
I then used a round-over bit in my router table to smooth the edges of the both the legs and bed base. I found a length of piano hinge left over from another project (a magician’s Zig-Zag Lady cabinet for cutting a girl into three parts) to attach the legs to the base.
Although I’ve got a shed full of power tools, I prefer to use hand tools for the detailed work of fitting the hinges. I have more control and things can go wrong quickly with fast power tools.
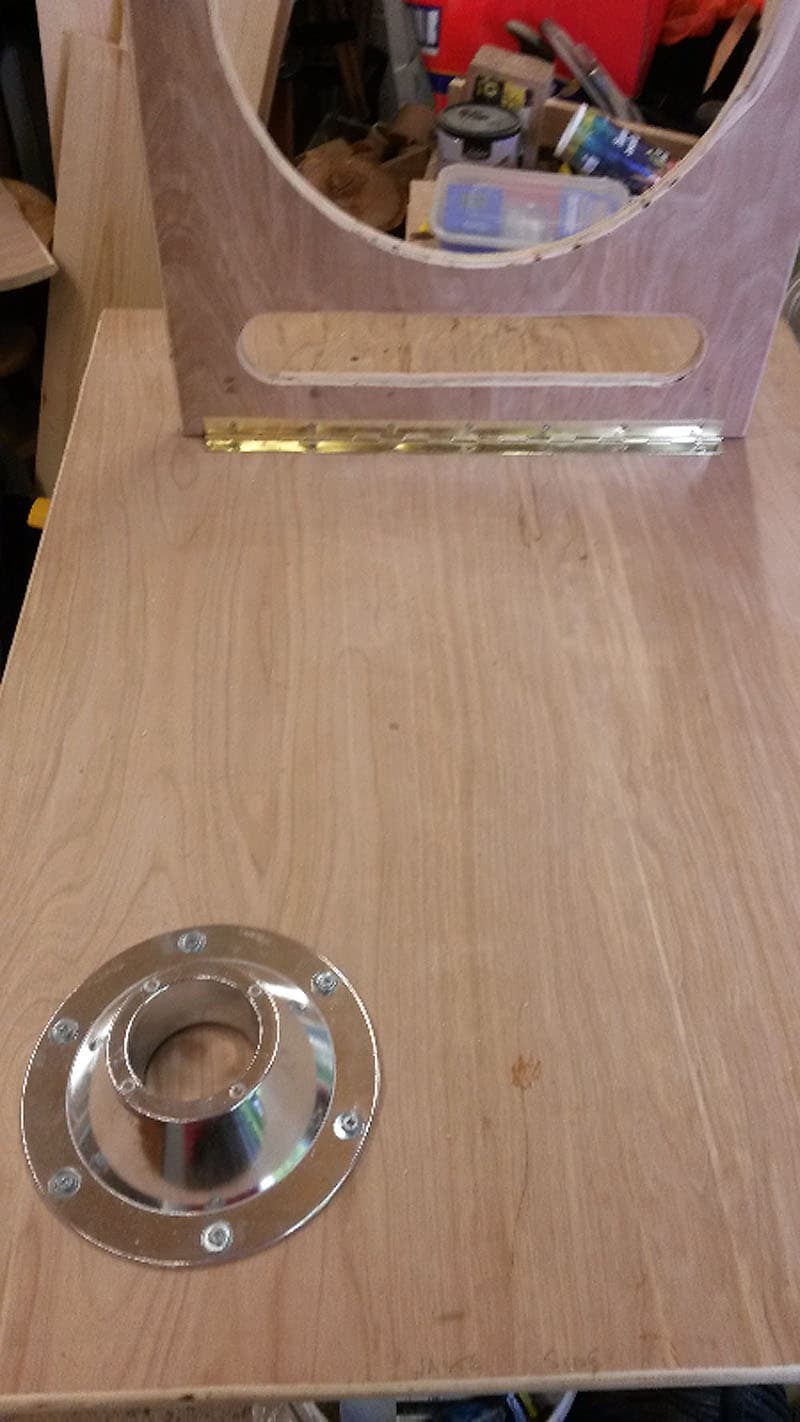
My newly retired engineer neighbor needed something to keep him occupied so I enlisted his help to cut the island leg neatly to the exact length. He also helped to mark out the position of the metal table fitting.
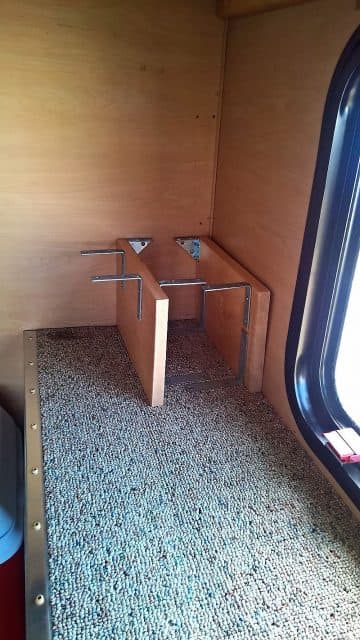
With the base unit put together, it was time to check the fit. This was just in time as it was Friday evening and we were going away for the weekend. It also gave us an opportunity for a test run.
The weekend proved that the idea worked, but I was still bothered by the weight. I used Forstner bits and a jigsaw to cut some rectangles out of the bed base.
This, together with the shaping of the legs, cut the weight down by 4 kilograms (about 8.8 pounds), stops the cushions slipping about, and reduces the chance of condensation.
A couple of coats of Osmo wood oil and the job was finished.
The new bed base works exactly as intended and Joanna can sleep soundly at night. The only negative was that Shep, our Border Collie, kept climbing over Joanna as he attempted to join us in the double bed. Sweep, our Collie-Whippet cross, also tries to get into Joanna’s sleeping bag. The dog problems have been solved by letting them sleep in the cab of the pickup truck instead of joining us in the camper.
It took me four hours to complete this modification and cost me £35 (about $46.50). In my opinion, the skill level of this modification is medium.
Disclaimer: The modifications above are submitted by Truck Camper Magazine readers. It is your responsibility to make sure that any do-it-yourself modification project you undertake is safe, effective, and legal for your situation.